User Guide
Page 2
... AC adapter/charger to use this camcorder. This symbol indicates important instructions accompanying the product. NO USER-SERVICEABLE PARTS ARE INSIDE. Keep your sales receipt for this product. Important. Product Registration Please fill out the product registration card and retum it immediately. Model No: SerialNo:_,, Purchase Date-_ _ Purchased From: CC6151 or CC6251 or...
... AC adapter/charger to use this camcorder. This symbol indicates important instructions accompanying the product. NO USER-SERVICEABLE PARTS ARE INSIDE. Keep your sales receipt for this product. Important. Product Registration Please fill out the product registration card and retum it immediately. Model No: SerialNo:_,, Purchase Date-_ _ Purchased From: CC6151 or CC6251 or...
User Guide
Page 3
...Switch to OFF to Turn Off the Camcorder ........ 9 • Close the Lens Cover 9 • Review Camcorder's Operating Controls 10-11 Power Your Camcorder • Use the Adapter/Charger to Power Your Camcorder 12 • Use the Battery to Power Your Camcorder 13-15 • Use the ...83) Accessories 800-338-0376 (pages 70-75) Safety Information i First Time Operation • Assistance 3 • Unpack the Camcorder and Accessories 3 • Attach the Adapter/Charger 4 • Adjust the Handstrap to Fit Your Hand 4 • Slide LENS COVER Control to Open Lens Cover 4 &#...
...Switch to OFF to Turn Off the Camcorder ........ 9 • Close the Lens Cover 9 • Review Camcorder's Operating Controls 10-11 Power Your Camcorder • Use the Adapter/Charger to Power Your Camcorder 12 • Use the Battery to Power Your Camcorder 13-15 • Use the ...83) Accessories 800-338-0376 (pages 70-75) Safety Information i First Time Operation • Assistance 3 • Unpack the Camcorder and Accessories 3 • Attach the Adapter/Charger 4 • Adjust the Handstrap to Fit Your Hand 4 • Slide LENS COVER Control to Open Lens Cover 4 &#...
User Guide
Page 5
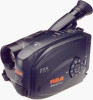
...immediately. ACS091 4+ "{1 AC Adapter/Charger and DC Cable C...a..s..s.e..t.t..e...A...d..a..p...t.e..r........C...a..s.s..e..t.t.e... Unpack the camcorder and accessories. • Save the packing materials and box in case you may appear slightly different than the one shown.) Rechargeable Battery Part No FB1260 or BB700 Shoulder... Strap Part No. such as CR2025 available from most local drug stores and camera shops. Model CC6151 or CC6251 or CC6271 Camcorder* (*Your camcorder may encounter. Use of...
...immediately. ACS091 4+ "{1 AC Adapter/Charger and DC Cable C...a..s..s.e..t.t..e...A...d..a..p...t.e..r........C...a..s.s..e..t.t.e... Unpack the camcorder and accessories. • Save the packing materials and box in case you may appear slightly different than the one shown.) Rechargeable Battery Part No FB1260 or BB700 Shoulder... Strap Part No. such as CR2025 available from most local drug stores and camera shops. Model CC6151 or CC6251 or CC6271 Camcorder* (*Your camcorder may encounter. Use of...
User Guide
Page 6
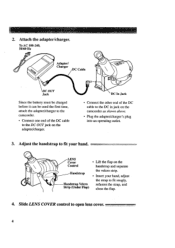
Handstrap strap Velcro trip (Under Flap) Insert your hand. ___ _d LENS Cover Lift the flap on the adapter/charger. _DC In Jack • Connect the other end of the DC cable to the DC OUT jack on the Control handstrap and separate the velcro ... fit your hand, adjust the strap to the DC in jack on the camcorder as shown above. • Plug the adapter/charger's plug into an operating outlet. 3. To AC 100-240, 50/60 Hz Adapter/ Charger Cable PUT Jack Since the battery must be charged before it can be used the first time, attach...
Handstrap strap Velcro trip (Under Flap) Insert your hand. ___ _d LENS Cover Lift the flap on the adapter/charger. _DC In Jack • Connect the other end of the DC cable to the DC OUT jack on the Control handstrap and separate the velcro ... fit your hand, adjust the strap to the DC in jack on the camcorder as shown above. • Plug the adapter/charger's plug into an operating outlet. 3. To AC 100-240, 50/60 Hz Adapter/ Charger Cable PUT Jack Since the battery must be charged before it can be used the first time, attach...
User Guide
Page 13
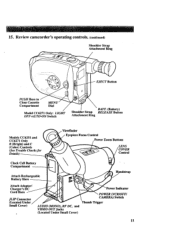
... _ .......... ..... 15. Review camcorder's operating controls. (continued) Shoulder Strap Attachment Ring EJECT Button PUSH Here to Close Cassette Compartment MENU Dial Model CC6271 Only: LIGHT OFF.A UTO.ON Switch Shoulder Strap Attachment Ring BATT. (Battery) RELEASE Button Models CC6251 and CC6271...) Controls (See Trouble Checks for Details) Focus Control Power Zoom Buttons LENS Control Clock Cell Battery Compartment Attach Rechargeable Battery Here Handstrap Attach Adapter/ Charger's DC Cord Here JLIP Connector (Located Under Small Cover) Indicator POWER (VCR/OFF/ CAMERA)...
... _ .......... ..... 15. Review camcorder's operating controls. (continued) Shoulder Strap Attachment Ring EJECT Button PUSH Here to Close Cassette Compartment MENU Dial Model CC6271 Only: LIGHT OFF.A UTO.ON Switch Shoulder Strap Attachment Ring BATT. (Battery) RELEASE Button Models CC6251 and CC6271...) Controls (See Trouble Checks for Details) Focus Control Power Zoom Buttons LENS Control Clock Cell Battery Compartment Attach Rechargeable Battery Here Handstrap Attach Adapter/ Charger's DC Cord Here JLIP Connector (Located Under Small Cover) Indicator POWER (VCR/OFF/ CAMERA)...
User Guide
Page 14
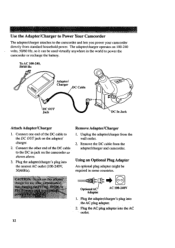
... the other end of the DC cable to power the camcorder or recharge the battery. Optional AC / Adapter AC 100-240V 1. Plug the adapter/charger's plug into the AC _ outlet. 12 Use the Adapter/Charger to Power Your Camcorder The adapter/charger attaches to the DC in some countries. Using an Optional Plug Adapter An optional...
... the other end of the DC cable to power the camcorder or recharge the battery. Optional AC / Adapter AC 100-240V 1. Plug the adapter/charger's plug into the AC _ outlet. 12 Use the Adapter/Charger to Power Your Camcorder The adapter/charger attaches to the DC in some countries. Using an Optional Plug Adapter An optional...
User Guide
Page 16
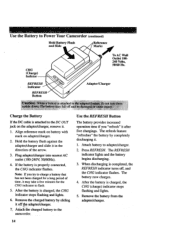
... it off , and the CHG indicator flashes. Align reference mark on battery with mark on the adapter/charger, remove it after five chargings. After the battery is properiy connected, the CHG indicator flashes. The battery now charges. 4. Use the Battery to Power Your Camcorder Hold Battery Flush and Slide (continued) Marks I CHG (Charge) Im REFRESH • Indicator...
... it off , and the CHG indicator flashes. Align reference mark on battery with mark on the adapter/charger, remove it after five chargings. After the battery is properiy connected, the CHG indicator flashes. The battery now charges. 4. Use the Battery to Power Your Camcorder Hold Battery Flush and Slide (continued) Marks I CHG (Charge) Im REFRESH • Indicator...
User Guide
Page 17
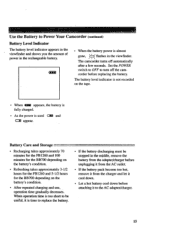
.... • When _ appears, the battery is fully charged. • As the power is almost gone, ,_,\:_" flashes in the middle, remove the battery from the charger and let it to Power Your Camcorder (continued) Battery Level Indicator The battery level indicator appears in the viewf'mder ...and shows you the amount of power in the rechargeable battery. Use the Battery to the AC adapter/charger. 15 mmml • When the battery power...
.... • When _ appears, the battery is fully charged. • As the power is almost gone, ,_,\:_" flashes in the middle, remove the battery from the charger and let it to Power Your Camcorder (continued) Battery Level Indicator The battery level indicator appears in the viewf'mder ...and shows you the amount of power in the rechargeable battery. Use the Battery to the AC adapter/charger. 15 mmml • When the battery power...
User Guide
Page 62
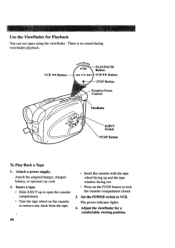
Attach the adapter/charger, charged battery, or optional car cord. 2. Use the Viewfinder for a comfortable viewing position. Set the POWER switch to lock the cassette compartment closed. 3. The power indicator lights. . ...
Attach the adapter/charger, charged battery, or optional car cord. 2. Use the Viewfinder for a comfortable viewing position. Set the POWER switch to lock the cassette compartment closed. 3. The power indicator lights. . ...
User Guide
Page 73
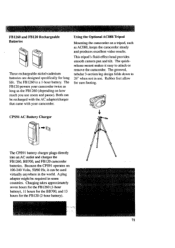
... tripod's fluid-effect head provides smooth camera pan and tilt. CPS91 AC Battery Charger The CPS91 battery chargerplugs directly into an AC outlet and charges the FB 1260, BB700, and FB 120 camcorder batteries. Charging takes approximately seven hours for the FB 1260 (1-hour battery), 11 hours for the BB700, and 13 hours for the FB...
... tripod's fluid-effect head provides smooth camera pan and tilt. CPS91 AC Battery Charger The CPS91 battery chargerplugs directly into an AC outlet and charges the FB 1260, BB700, and FB 120 camcorder batteries. Charging takes approximately seven hours for the FB 1260 (1-hour battery), 11 hours for the BB700, and 13 hours for the FB...
User Guide
Page 75
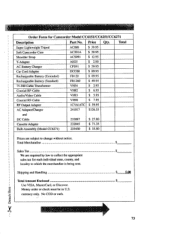
..., and locality to which the merchandise is being sent. Price Qty. Super Lightweight Tripod Soft Camcorder Case Shoulder Strap Y-Adapter AC Battery Charger Car Cord Adapter Rechargeable Battery (Extended) Rechargeable Battery (Standard) 75-300 Cable Transformer Coaxial RF-Cable AC088 AC201A ACS091 AH25 CPS91 DCC08 FB 120...Adapter]Charger and VH90 1CVA147C 241017 $ 7.95 $ 59.95 $126.55 DC Cable 233087 $ 27.80 Cassette Adapter Bulb Assembly (Model CC627i) 232845 233430 $ 71.35 $ 33.80 Total Prices are required by law to collect the appropriate sales tax for Camcorder Model CC6151/...
..., and locality to which the merchandise is being sent. Price Qty. Super Lightweight Tripod Soft Camcorder Case Shoulder Strap Y-Adapter AC Battery Charger Car Cord Adapter Rechargeable Battery (Extended) Rechargeable Battery (Standard) 75-300 Cable Transformer Coaxial RF-Cable AC088 AC201A ACS091 AH25 CPS91 DCC08 FB 120...Adapter]Charger and VH90 1CVA147C 241017 $ 7.95 $ 59.95 $126.55 DC Cable 233087 $ 27.80 Cassette Adapter Bulb Assembly (Model CC627i) 232845 233430 $ 71.35 $ 33.80 Total Prices are required by law to collect the appropriate sales tax for Camcorder Model CC6151/...
User Guide
Page 78
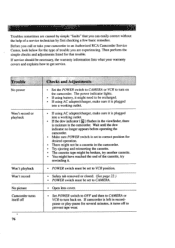
...to turn on . If service should be necessary, the warranty information lists what your camcorder to an Authorized RCA Camcorder Service Center, look below for desired operation. • There might not be a cassette in the camcorder. • Try ejecting and reinserting the cassette. • The cassette tape might... be recharged. • If using AC adapter/charger, make sure it is left in the camcorder. The power indicator lights. • If using AC adapter/charger, make sure it is plugged into a working outlet. • If using battery, it might have reached the end of trouble ...
...to turn on . If service should be necessary, the warranty information lists what your camcorder to an Authorized RCA Camcorder Service Center, look below for desired operation. • There might not be a cassette in the camcorder. • Try ejecting and reinserting the cassette. • The cassette tape might... be recharged. • If using AC adapter/charger, make sure it is left in the camcorder. The power indicator lights. • If using AC adapter/charger, make sure it is plugged into a working outlet. • If using battery, it might have reached the end of trouble ...
User Guide
Page 83
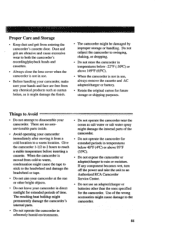
... not expose the camcorder or adapter/charger to rain or moisture. When the camcorder is not in use an adapter/charger or batteries other bright objects. • Do not leave your camcorder immediately after moving ... • Do not aim your camcorder. Avoid operating your camcorder in use. Use of time. Dust and grit are no user- Do not subject the camcorder to reach a stable temperature before inserting...cause damage to disassemble your camcorder at the sun or other than the ones specified for future storage or shipping purposes. When the camcorder is not in direct sunlight ...
... not expose the camcorder or adapter/charger to rain or moisture. When the camcorder is not in use an adapter/charger or batteries other bright objects. • Do not leave your camcorder immediately after moving ... • Do not aim your camcorder. Avoid operating your camcorder in use. Use of time. Dust and grit are no user- Do not subject the camcorder to reach a stable temperature before inserting...cause damage to disassemble your camcorder at the sun or other than the ones specified for future storage or shipping purposes. When the camcorder is not in direct sunlight ...
User Guide
Page 88
1 S 1/1000 indicator 28, 43 A Accessories included 3 optional 70 order form 73 Accessory order form 73 Adapter/charger charging battery 14 using 4, 12 AE dial 7, 8, 10, 18, 20, 21, 24, 32, 34, 35, 36, 38, 40, 43, 44, 46, 47, 48, 50, 52, 54, 55...29 Cassettes inserting and removing 23 Cassette's tape wheel 5, 23 Cautions i CHARACTER menu 47 Checks and adjustments 76 Clean the camcorder 80 Clean the camcorder's lens 80 Clean the camcorder's viewfinder 80 Clock cell battery compartment Clock cell indicator 17, 31 Color enhancement light (modelCC6271) 10, 58 Contents 1 11, 17 Copy tapes 67 ...
1 S 1/1000 indicator 28, 43 A Accessories included 3 optional 70 order form 73 Accessory order form 73 Adapter/charger charging battery 14 using 4, 12 AE dial 7, 8, 10, 18, 20, 21, 24, 32, 34, 35, 36, 38, 40, 43, 44, 46, 47, 48, 50, 52, 54, 55...29 Cassettes inserting and removing 23 Cassette's tape wheel 5, 23 Cautions i CHARACTER menu 47 Checks and adjustments 76 Clean the camcorder 80 Clean the camcorder's lens 80 Clean the camcorder's viewfinder 80 Clock cell battery compartment Clock cell indicator 17, 31 Color enhancement light (modelCC6271) 10, 58 Contents 1 11, 17 Copy tapes 67 ...
User Guide
Page 90
... 5, 9, 11, 13, 15, 16, 18, 20, 24, 29, 32, 33, 35, 36, 38, 40, 42, 58, 60, 62, 63, 67, 69 Powering your camcorder using adapter/charger 12 using battery 13 using optional car cord adapter 16 Preset title, recording 46 Problem solving 76 .Product registration i PUSH button 5, 11, 23, 60 Q QUICK REC...
... 5, 9, 11, 13, 15, 16, 18, 20, 24, 29, 32, 33, 35, 36, 38, 40, 42, 58, 60, 62, 63, 67, 69 Powering your camcorder using adapter/charger 12 using battery 13 using optional car cord adapter 16 Preset title, recording 46 Problem solving 76 .Product registration i PUSH button 5, 11, 23, 60 Q QUICK REC...

