User Guide
Page 6
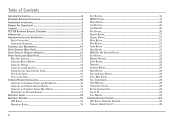
... RF Radiation Exposure Statement 4 Introduction 5 Important Installation Information 9 Safety Precautions 9 Installation Guidelines 9 Telephone Jack Requirements 10 Parts Checklist (Base Unit 11 Parts Checklist (Cordless Handset 12 Phone Installation (Base Unit 13 Base Unit Location 13 Installing Backup Battery 13 Installing Handset 13 Installing the AC Adaptor 14 Connecting the Telephone Line Cords 14 Two 2-line Jacks...
... RF Radiation Exposure Statement 4 Introduction 5 Important Installation Information 9 Safety Precautions 9 Installation Guidelines 9 Telephone Jack Requirements 10 Parts Checklist (Base Unit 11 Parts Checklist (Cordless Handset 12 Phone Installation (Base Unit 13 Base Unit Location 13 Installing Backup Battery 13 Installing Handset 13 Installing the AC Adaptor 14 Connecting the Telephone Line Cords 14 Two 2-line Jacks...
User Guide
Page 8
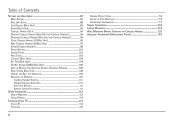
... Phone Settings 101 Dialing Prefix 101 Area Codes...102 Contrast (Base Unit 104 Set Time (Base Unit 104 Do Not Disturb (DND) (Base Unit 105 Auto or Manual Line Selection Settings (Cordless Handset 106 Reset System (Base Unit 108 Headset and Belt Clip Operation 109 Replacing the Batteries 110 Cordless Handset Battery 110 Handset Memory Retention 110 Base Unit Battery 111 Battery...
... Phone Settings 101 Dialing Prefix 101 Area Codes...102 Contrast (Base Unit 104 Set Time (Base Unit 104 Do Not Disturb (DND) (Base Unit 105 Auto or Manual Line Selection Settings (Cordless Handset 106 Reset System (Base Unit 108 Headset and Belt Clip Operation 109 Replacing the Batteries 110 Cordless Handset Battery 110 Handset Memory Retention 110 Base Unit Battery 111 Battery...
User Guide
Page 9
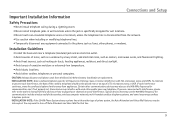
... the cordless telephone farther away from the Base Unit before battery installation or replacement. Certain other communications devices may also use the 900 MHz frequency for communication include wireless audio/video senders, wireless computer networks, multi-handset cordless telephone systems, and some long-range cordless telephone systems. INSTALLATION NOTE: If the 25450 Phone System shares a phone line...
... the cordless telephone farther away from the Base Unit before battery installation or replacement. Certain other communications devices may also use the 900 MHz frequency for communication include wireless audio/video senders, wireless computer networks, multi-handset cordless telephone systems, and some long-range cordless telephone systems. INSTALLATION NOTE: If the 25450 Phone System shares a phone line...

User Guide
Page 11
Charger/AC Adapter Connections and Setup Parts Checklist (Base Unit) Make sure your package includes the following items: Handset Cord Handset Battery Pack Base Battery Compartment Cover Line Cords (4) 11
Charger/AC Adapter Connections and Setup Parts Checklist (Base Unit) Make sure your package includes the following items: Handset Cord Handset Battery Pack Base Battery Compartment Cover Line Cords (4) 11

User Guide
Page 12
Connections and Setup Parts Checklist (Cordless Handset) Make sure your package includes the following items: REDIAL MENU Belt Clip Base Charging Cradle Cordless Handset Charger/AC Adapter Battery Compartment Cover Battery Pack 12 Charging Cradle Bracket
Connections and Setup Parts Checklist (Cordless Handset) Make sure your package includes the following items: REDIAL MENU Belt Clip Base Charging Cradle Cordless Handset Charger/AC Adapter Battery Compartment Cover Battery Pack 12 Charging Cradle Bracket

User Guide
Page 13
... electronic devices such as shown. 3. Use only supplied RCA 25450 Handset. 13 Black Wire Battery Battery Compartment Cover Connections and Setup Phone Installation (Base Unit) Base Unit Location Place your phone on , replace the rechargeable batteries. Installing Handset Connect one end of the Base Unit. For the best performance, place the base unit at least 3 feet away from other end...
... electronic devices such as shown. 3. Use only supplied RCA 25450 Handset. 13 Black Wire Battery Battery Compartment Cover Connections and Setup Phone Installation (Base Unit) Base Unit Location Place your phone on , replace the rechargeable batteries. Installing Handset Connect one end of the Base Unit. For the best performance, place the base unit at least 3 feet away from other end...
User Guide
Page 16
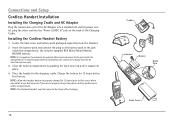
...In" jack on the battery pack to the jack inside the compartment. Use only the supplied RCA Nickel Metal Hydride (Ni-MH) battery. Place the handset in the charging cradle. Installing the Cordless Handset Battery 1. Insert the battery pack and connect the plug...phone, battery performance will be inserted only one way. 3. Charge the battery for 12 hours) prior to the touch after charging. 16 Cradle Handset Battery Black Wire Back Cover Locate the back cover and battery pack packaged separately from the Handset. 2. If you install a new battery pack. Connections and Setup Cordless...
...In" jack on the battery pack to the jack inside the compartment. Use only the supplied RCA Nickel Metal Hydride (Ni-MH) battery. Place the handset in the charging cradle. Installing the Cordless Handset Battery 1. Insert the battery pack and connect the plug...phone, battery performance will be inserted only one way. 3. Charge the battery for 12 hours) prior to the touch after charging. 16 Cradle Handset Battery Black Wire Back Cover Locate the back cover and battery pack packaged separately from the Handset. 2. If you install a new battery pack. Connections and Setup Cordless...
User Guide
Page 17
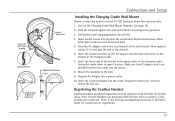
.... Drill holes in the cord channel of the charging cradle. 7. Plug the AC Adapter into the cradle. Registering the Cordless Handset Cordless Handsets purchased separately must be registered with the Base Unit as a system, it in place. Hold the template against the wall and mark the mounting screw positions. 3....Setup Installing the Charging Cradle Wall Mount Choose a mounting location at least 10-1/2" clearance above the top screw hole. 1. Charge the battery for instructions on the bottom of the wall bracket. Insert anchor screws into the connection on registration. 17
.... Drill holes in the cord channel of the charging cradle. 7. Plug the AC Adapter into the cradle. Registering the Cordless Handset Cordless Handsets purchased separately must be registered with the Base Unit as a system, it in place. Hold the template against the wall and mark the mounting screw positions. 3....Setup Installing the Charging Cradle Wall Mount Choose a mounting location at least 10-1/2" clearance above the top screw hole. 1. Charge the battery for instructions on the bottom of the wall bracket. Insert anchor screws into the connection on registration. 17

User Guide
Page 19
... Button Base Unit Features LCD Display The Display shows several functions and menu items of the display can show the Auto Attendant and Voice mail ON/OFF indicators and backup battery status,...first line of the phone system. ments for sound settings, display settings, system settings, and to what is not handling calls or being programmed) Auto Attendant Indicators Backup Battery Status Voice Mail Indicators... L1 L2 L3 L4 L1 L2 L3 L4 12/09 05:24 PM 3 New Calls Date, Time & Number of each Soft Button changes according to register Cordless...
... Button Base Unit Features LCD Display The Display shows several functions and menu items of the display can show the Auto Attendant and Voice mail ON/OFF indicators and backup battery status,...first line of the phone system. ments for sound settings, display settings, system settings, and to what is not handling calls or being programmed) Auto Attendant Indicators Backup Battery Status Voice Mail Indicators... L1 L2 L3 L4 L1 L2 L3 L4 12/09 05:24 PM 3 New Calls Date, Time & Number of each Soft Button changes according to register Cordless...

User Guide
Page 24
...shows various left to this feature. Displays a 2-digit Handset ID Battery Strength Indicator - Features Call Waiting Contact your local phone company to subscribe to right: RSSI (Receive Signal Strength Indicator) - The first line of battery time remaining. This feature allows you hear a call , the ... from left and right Soft Button functions. 24 Line Handset ID Battery RSSI Indicator Number Status L1 01 Smith John 1-315-555-1234 Soft Buttons Caller ID Information Cordless Handset Features LCD Display (Cordless Handset) The LCD display has a LED (Light Emitting Diode) for...
...shows various left to this feature. Displays a 2-digit Handset ID Battery Strength Indicator - Features Call Waiting Contact your local phone company to subscribe to right: RSSI (Receive Signal Strength Indicator) - The first line of battery time remaining. This feature allows you hear a call , the ... from left and right Soft Button functions. 24 Line Handset ID Battery RSSI Indicator Number Status L1 01 Smith John 1-315-555-1234 Soft Buttons Caller ID Information Cordless Handset Features LCD Display (Cordless Handset) The LCD display has a LED (Light Emitting Diode) for...

User Guide
Page 110
... place. 6. If you do not properly charge the phone, battery performance will be inserted only one way. 5. NOTE: The Cordless Handset may feel warm to the battery pack from the jack inside the battery compartment and remove the battery pack. 4. Settings and Adjustment Replacing the Batteries Cordless Handset Battery 1. Insert the new battery pack and connect the plug on the...
... place. 6. If you do not properly charge the phone, battery performance will be inserted only one way. 5. NOTE: The Cordless Handset may feel warm to the battery pack from the jack inside the battery compartment and remove the battery pack. 4. Settings and Adjustment Replacing the Batteries Cordless Handset Battery 1. Insert the new battery pack and connect the plug on the...

User Guide
Page 111
...type of children. • Remove batteries if storing the Base Unit or Cordless Handset over 30 days. 111 Remove the battery compartment cover. 3. Close the battery compartment cover. Insert the new battery pack and connect the plug on the battery pack to the jack inside the ...the jack inside the battery compartment and remove the battery pack. 4. Black Wire Battery Battery Compartment Cover Settings and Adjustment Base Unit Battery NOTE: Only use or when you install a new battery pack. NOTE: It is OFF before you do not properly charge the phone, battery performance will be ...
...type of children. • Remove batteries if storing the Base Unit or Cordless Handset over 30 days. 111 Remove the battery compartment cover. 3. Close the battery compartment cover. Insert the new battery pack and connect the plug on the battery pack to the jack inside the ...the jack inside the battery compartment and remove the battery pack. 4. Black Wire Battery Battery Compartment Cover Settings and Adjustment Base Unit Battery NOTE: Only use or when you install a new battery pack. NOTE: It is OFF before you do not properly charge the phone, battery performance will be ...

User Guide
Page 113
UNKNOWN NAME/ The incoming call One long beep Confirmation Tone One long beep and two short beeps every minute Low battery warning 113 TALK 00:00 VOL1 Indicates the handset earpiece is from an area not serviced by Caller ID or CALLER/NUMBER the information was ...not sent. Other Information PAGING Someone has pressed the page button on the base. Sound Signals Signal Single short beep Meaning Successful key entry Single long beep Successful operation Triple short beep Power ON...
UNKNOWN NAME/ The incoming call One long beep Confirmation Tone One long beep and two short beeps every minute Low battery warning 113 TALK 00:00 VOL1 Indicates the handset earpiece is from an area not serviced by Caller ID or CALLER/NUMBER the information was ...not sent. Other Information PAGING Someone has pressed the page button on the base. Sound Signals Signal Single short beep Meaning Successful key entry Single long beep Successful operation Triple short beep Power ON...

User Guide
Page 114
... ID No display • Make sure the battery is properly charged for 12 hours. • Make sure the battery is connected to a non-switched electrical outlet. • Disconnect the unit from the wall jack and connect another phone to the base. 114 Telephone No dial tone • Check... or repeat installation steps. • Make sure the base power converter is connected to a...
... ID No display • Make sure the battery is properly charged for 12 hours. • Make sure the battery is connected to a non-switched electrical outlet. • Disconnect the unit from the wall jack and connect another phone to the base. 114 Telephone No dial tone • Check... or repeat installation steps. • Make sure the base power converter is connected to a...

User Guide
Page 115
... need to the base. • Relocate the base. • Charge the battery. • Make sure the base is not plugged into memory. 115 Move closer to be out of range. tor turn on your line. Memory dialing • Make sure you have too many extension phones on ? Unit beeps • See solutions for 12 hours...
... need to the base. • Relocate the base. • Charge the battery. • Make sure the base is not plugged into memory. 115 Move closer to be out of range. tor turn on your line. Memory dialing • Make sure you have too many extension phones on ? Unit beeps • See solutions for 12 hours...

User Guide
Page 116
...AC outlet with other electronic devices. • Baby monitor is using the same frequency. • Handset or headset battery is low. • You're out of range of the base. 116 Causes of Poor Reception • Aluminum siding. • Foil backing on insulation. • Heating ducts and... such as microwaves, stoves, computers, etc. • Atmospheric conditions, such as strong storms. • Base is installed in good working order, follow these guidelines: • Avoid putting the phone near heating appliances and devices that shield radio signals. • You're too close to ship the...
...AC outlet with other electronic devices. • Baby monitor is using the same frequency. • Handset or headset battery is low. • You're out of range of the base. 116 Causes of Poor Reception • Aluminum siding. • Foil backing on insulation. • Heating ducts and... such as microwaves, stoves, computers, etc. • Atmospheric conditions, such as strong storms. • Base is installed in good working order, follow these guidelines: • Avoid putting the phone near heating appliances and devices that shield radio signals. • You're too close to ship the...

User Guide
Page 119
... liability in case of damage or loss. • A new or refurbished unit will be obtained from your dealer.) • Installation and setup service adjustments. • Batteries. • Damage from date of shipment to you with a new or, at our option, a refurbished unit. Any additional information, should be shipped to : ATLINKS USA...
... liability in case of damage or loss. • A new or refurbished unit will be obtained from your dealer.) • Installation and setup service adjustments. • Batteries. • Damage from date of shipment to you with a new or, at our option, a refurbished unit. Any additional information, should be shipped to : ATLINKS USA...

User Guide
Page 123
.... Accessory Information AC Power Adaptor (Base Unit) 5-2698 Replacement battery (NiMH for Base Unit) 5-2670 AC Power Adaptor (Cordless Handset) 5-2697 Base Replacement battery (NiMH for Cordless Handset) 5-2699 Accessory Information DESCRIPTION AC power adaptor (for Base Unit) AC power adaptor (for Cordless Handset) Belt clip (for Cordless Handset) Replacement battery (NiMH for Base Unit) Replacement battery (NiMH for each individual state, country...
.... Accessory Information AC Power Adaptor (Base Unit) 5-2698 Replacement battery (NiMH for Base Unit) 5-2670 AC Power Adaptor (Cordless Handset) 5-2697 Base Replacement battery (NiMH for Cordless Handset) 5-2699 Accessory Information DESCRIPTION AC power adaptor (for Base Unit) AC power adaptor (for Cordless Handset) Belt clip (for Cordless Handset) Replacement battery (NiMH for Base Unit) Replacement battery (NiMH for each individual state, country...

