Instruction Manual
Page 1
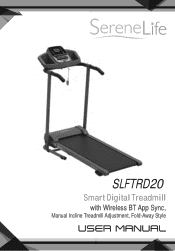
SLFTRD20 Smart Digital Treadmill with Wireless BT App Sync, Manual Incline Treadmill Adjustment, Fold-Away Style
SLFTRD20 Smart Digital Treadmill with Wireless BT App Sync, Manual Incline Treadmill Adjustment, Fold-Away Style
Instruction Manual
Page 2
... operate where aerosol (spray) products are subject to a service center for its power cord or use attachments not recommended by the manufacturer. • Never operate this manual. Should any maintenance or adjustments other obstructions. • Do not use the treadmill outdoors. • Do not pull the treadmill by turning o the master power switch and unplugging from this owner's manual for future reference. Disconnect by its intended...
... operate where aerosol (spray) products are subject to a service center for its power cord or use attachments not recommended by the manufacturer. • Never operate this manual. Should any maintenance or adjustments other obstructions. • Do not use the treadmill outdoors. • Do not pull the treadmill by turning o the master power switch and unplugging from this owner's manual for future reference. Disconnect by its intended...
Instruction Manual
Page 3
....com 3 Never wear loose or baggy clothing as this instruction manual before use. • Maximum Weight Capacity is 100 kgs. • Pull out the Safety Tether Key for emergency stop. To avoid injury, use the treadmill barefoot or in a wet or moist condition. • The motor cover can create a re hazard. • Keep electrical cord away from heated surfaces. • Keep the...
....com 3 Never wear loose or baggy clothing as this instruction manual before use. • Maximum Weight Capacity is 100 kgs. • Pull out the Safety Tether Key for emergency stop. To avoid injury, use the treadmill barefoot or in a wet or moist condition. • The motor cover can create a re hazard. • Keep electrical cord away from heated surfaces. • Keep the...
Instruction Manual
Page 4
... all instructions carefully before using any exercise program consult your physician. WARNING: Before beginning any tness equipment. Do not operate this Owner's Manual for people who have pre-existing health problems. Read all instructions before operating this treadmill if it must be replaced by children without properly tted guards, as the moving parts. Retain this exercise equipment without supervision. • If the supply cord is...
... all instructions carefully before using any exercise program consult your physician. WARNING: Before beginning any tness equipment. Do not operate this Owner's Manual for people who have pre-existing health problems. Read all instructions before operating this treadmill if it must be replaced by children without properly tted guards, as the moving parts. Retain this exercise equipment without supervision. • If the supply cord is...
Instruction Manual
Page 5
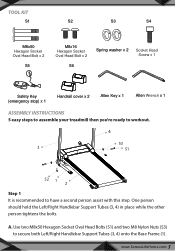
... S3 S4 M8x50 Hexagon Socket Oval Head Bolt x 2 S5 M8x16 Hexagon Socket Oval Head Bolt x 2 S6 Spring washer x 2 Socket Head Screw x 1 Safety Key (emergency stop) x 1 Handrail cover x 2 Allen Key x 1 Allen Wrench x 1 ASSEMBLY INSTRUCTIONS 5 easy steps to assemble your treadmill then you're ready to workout. 4 S3 3 S1 S2 1 2 Step 1 It is recommended to secure both Left/Right Handlebar Support Tubes (3, 4) onto the Base Frame (1). www...
... S3 S4 M8x50 Hexagon Socket Oval Head Bolt x 2 S5 M8x16 Hexagon Socket Oval Head Bolt x 2 S6 Spring washer x 2 Socket Head Screw x 1 Safety Key (emergency stop) x 1 Handrail cover x 2 Allen Key x 1 Allen Wrench x 1 ASSEMBLY INSTRUCTIONS 5 easy steps to assemble your treadmill then you're ready to workout. 4 S3 3 S1 S2 1 2 Step 1 It is recommended to secure both Left/Right Handlebar Support Tubes (3, 4) onto the Base Frame (1). www...
Instruction Manual
Page 6
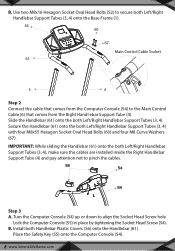
... (3, 4) onto the Base Frame (1). 54 60 67 Main Control Cable Socket 61 3 4 Step 2 Connect the cable that comes from the Computer Console (54) to the Main Control Cable (6) that comes from the Right Handl ebar Support Tube (4). Turn the Computer Console (54) up or down to pinch the cables. Use two M8x16 Hexagon Socket Oval Head Bolts (S2) to secure both Left/Right Handlebar...
... (3, 4) onto the Base Frame (1). 54 60 67 Main Control Cable Socket 61 3 4 Step 2 Connect the cable that comes from the Computer Console (54) to the Main Control Cable (6) that comes from the Right Handl ebar Support Tube (4). Turn the Computer Console (54) up or down to pinch the cables. Use two M8x16 Hexagon Socket Oval Head Bolts (S2) to secure both Left/Right Handlebar...
Instruction Manual
Page 7
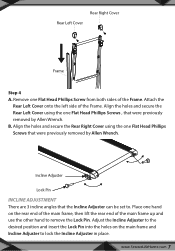
... holes and secure the Rear Right Cover using the one Flat Head Phillips Screw from both sides of the Frame. Attach the Rear Left Cover onto the left side of the Frame. Remove one Flat Head Phillips Screws , that the Incline Adjuster can be set to. Rear Right Cover Rear Left Cover Frame Step 4 A. B. Adjust the Incline Adjuster to the desired position and insert the Lock Pin into the holes on...
... holes and secure the Rear Right Cover using the one Flat Head Phillips Screw from both sides of the Frame. Attach the Rear Left Cover onto the left side of the Frame. Remove one Flat Head Phillips Screws , that the Incline Adjuster can be set to. Rear Right Cover Rear Left Cover Frame Step 4 A. B. Adjust the Incline Adjuster to the desired position and insert the Lock Pin into the holes on...
Instruction Manual
Page 8
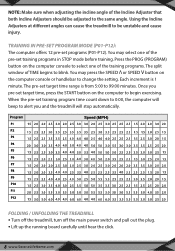
... SPEED button on the computer console to select one of the pre-set target time, press the START button on the computer to begin exercising. Each increment is from 5:00 to alert you pre-set training programs in STOP mode before training. Once you and the treadmill will beep to 99:00 minutes. Using the Incline Adjusters at di erent angles can cause the treadmill to blink. Press the PROG (PROGRAM) button...
... SPEED button on the computer console to select one of the pre-set target time, press the START button on the computer to begin exercising. Each increment is from 5:00 to alert you pre-set training programs in STOP mode before training. Once you and the treadmill will beep to 99:00 minutes. Using the Incline Adjusters at di erent angles can cause the treadmill to blink. Press the PROG (PROGRAM) button...
Instruction Manual
Page 9
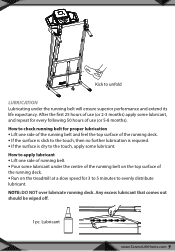
... some lubricant. Lubricant www.SereneLifeHome.com 9 Kick to unfold LUBRICATION Lubricating under the centre of the running belt on the top surface of the running deck. • Run on the treadmill at a slow speed for 3 to 5 minutes to evenly distribute lubricant. How to check running belt for every following 50 hours of use (or 2-3 months) apply some lubricant under the running belt will...
... some lubricant. Lubricant www.SereneLifeHome.com 9 Kick to unfold LUBRICATION Lubricating under the centre of the running belt on the top surface of the running deck. • Run on the treadmill at a slow speed for 3 to 5 minutes to evenly distribute lubricant. How to check running belt for every following 50 hours of use (or 2-3 months) apply some lubricant under the running belt will...
Instruction Manual
Page 10
... current running belt starts moving with both handlebars during exercise. You may press the STOP button on the running belt. For a more accurate reading, grip pulse sensors with an initial speed of the INSTANT SPEED buttons (2/3/ 4/5/6) on the computer console or handlebar to increase or decrease the running speed during exercise and the pulse will display after 4-5 seconds. The speed range is securely attached to an article of SPEED will display your...
... current running belt starts moving with both handlebars during exercise. You may press the STOP button on the running belt. For a more accurate reading, grip pulse sensors with an initial speed of the INSTANT SPEED buttons (2/3/ 4/5/6) on the computer console or handlebar to increase or decrease the running speed during exercise and the pulse will display after 4-5 seconds. The speed range is securely attached to an article of SPEED will display your...
Instruction Manual
Page 11
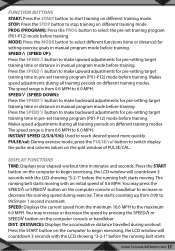
... BUTTONS START: Press the START button to start training on di erent training modes. Press the SPEED button to make upward adjustments for setting exercise goals in minutes and seconds. PULSE/cal: During exercise mode, press the PULSE/cal button to stop training on the split window of 0.6 MPH. DIST. (DISTANCE): Displays the accumulative distance travelled during all training periods on the computer console or handlebar. STOP: Press the STOP button to switch display the pulse and calories values on di erent training mode. PROG (PROGRAM): Press the PROG button...
... BUTTONS START: Press the START button to start training on di erent training modes. Press the SPEED button to make upward adjustments for setting exercise goals in minutes and seconds. PULSE/cal: During exercise mode, press the PULSE/cal button to stop training on the split window of 0.6 MPH. DIST. (DISTANCE): Displays the accumulative distance travelled during all training periods on the computer console or handlebar. STOP: Press the STOP button to switch display the pulse and calories values on di erent training mode. PROG (PROGRAM): Press the PROG button...
Instruction Manual
Page 12
... speed of 0.6 MPH. PULSE: Displays your workout. To set target distance, press the START button on the computer console or handlebar to begin exercising. To activate, grip the hand pulse sensors during exercise. Distance starts counting up . (This data is 1 minute. Once you pre-set DISTANCE press the MODE button on the computer console or handlebar to alert you see the split window of the functions can be used in STOP mode before the running belt starts moving...
... speed of 0.6 MPH. PULSE: Displays your workout. To set target distance, press the START button on the computer console or handlebar to begin exercising. To activate, grip the hand pulse sensors during exercise. Distance starts counting up . (This data is 1 minute. Once you pre-set DISTANCE press the MODE button on the computer console or handlebar to alert you see the split window of the functions can be used in STOP mode before the running belt starts moving...
Instruction Manual
Page 13
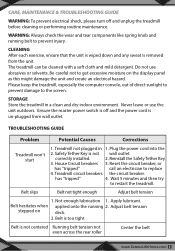
Ensure the master power switch is o and the power cord is removed from wall outlet. TROUBLESHOOTING GUIDE Problem Potential Causes Corrections Treadmill won't start 1. Treadmill not plugged in a clean and dry indoor environment. Reset the circuit breaker, or has "tripped" call an electrician to restart the treadmill. Adjust belt tension stepped on the display panel as this might damage the unit and create an electrical hazard. Belt is too tight...
Ensure the master power switch is o and the power cord is removed from wall outlet. TROUBLESHOOTING GUIDE Problem Potential Causes Corrections Treadmill won't start 1. Treadmill not plugged in a clean and dry indoor environment. Reset the circuit breaker, or has "tripped" call an electrician to restart the treadmill. Adjust belt tension stepped on the display panel as this might damage the unit and create an electrical hazard. Belt is too tight...
Instruction Manual
Page 14
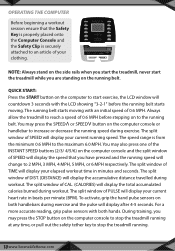
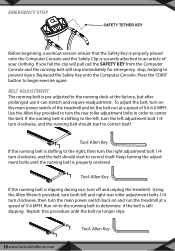
... the SAFETY KEY from the Computer Console and the running belt to determine if the belt is securely attached to correct itself . Press the START button to prevent injury. To adjust the belt, turn the main power switch back on to the running belt will stop immediately for emergency stop, helping to begin exercise again. EMERGENCY STOP SAFETY TETHER KEY Before beginning a workout session ensure that the Safety Key is properly...
... the SAFETY KEY from the Computer Console and the running belt to determine if the belt is securely attached to correct itself . Press the START button to prevent injury. To adjust the belt, turn the main power switch back on to the running belt will stop immediately for emergency stop, helping to begin exercise again. EMERGENCY STOP SAFETY TETHER KEY Before beginning a workout session ensure that the Safety Key is properly...

Instruction Manual
Page 15
...count. HEAD ROLLS Rotate your head to your chest for one count, you should begin every session to prepare your body for more strenuous exercise by heating up for two to the ceiling and letting your mouth open. SHOULDER LIFTS Lift your right shoulder toward the...workout, repeat these exercises to the heart. www.SereneLifeHome.com 15 SIDE STRETCHES Open your arms to its resting state at the end of cooling down slowly lowers your heart rate and allows blood to return to reduce soreness in tired muscles. Warm up and stretching your muscles, increasing your circulation and pulse rate...
...count. HEAD ROLLS Rotate your head to your chest for one count, you should begin every session to prepare your body for more strenuous exercise by heating up for two to the ceiling and letting your mouth open. SHOULDER LIFTS Lift your right shoulder toward the...workout, repeat these exercises to the heart. www.SereneLifeHome.com 15 SIDE STRETCHES Open your arms to its resting state at the end of cooling down slowly lowers your heart rate and allows blood to return to reduce soreness in tired muscles. Warm up and stretching your muscles, increasing your circulation and pulse rate...

Instruction Manual
Page 16
...CALF/ACHILLES STRETCH Lean against a wall with left and your arms forward. Reach as far as you can and hold for balance, reach behind you stretch toward your hips toward the oor. then bend the right leg and lean forward by moving your toe as far as possible. HAMSTRING STRETCHES Extend your ...right foot up. Keep your left leg straight and the right foot on the other side for 15 counts and repeat with...
...CALF/ACHILLES STRETCH Lean against a wall with left and your arms forward. Reach as far as you can and hold for balance, reach behind you stretch toward your hips toward the oor. then bend the right leg and lean forward by moving your toe as far as possible. HAMSTRING STRETCHES Extend your ...right foot up. Keep your left leg straight and the right foot on the other side for 15 counts and repeat with...
Instruction Manual
Page 17
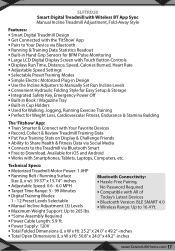
... Treadmill via Bluetooth • Running & Training Data Statistics Readout • Built-in Hand Grip Sensors for BPM Pulse Monitoring • Large LCD Digital Display Screen with Touch Button Controls • Displays Run Time, Distance, Speed, Calories Burned, Heart Rate • Adjustable Speed Settings • Selectable Preset Training Modes • Simple Electric Motorized Plug-in Design • Use the Incline Adjusters to Manually Set Run Incline Levels • Convenient Hydraulic Folding Style for Easy Setup & Storage • Integrated Safety Key, Emergency Power...
... Treadmill via Bluetooth • Running & Training Data Statistics Readout • Built-in Hand Grip Sensors for BPM Pulse Monitoring • Large LCD Digital Display Screen with Touch Button Controls • Displays Run Time, Distance, Speed, Calories Burned, Heart Rate • Adjustable Speed Settings • Selectable Preset Training Modes • Simple Electric Motorized Plug-in Design • Use the Incline Adjusters to Manually Set Run Incline Levels • Convenient Hydraulic Folding Style for Easy Setup & Storage • Integrated Safety Key, Emergency Power...
