Instruction Manual
Page 2
... treadmill on or taking o parts. • Use this appliance only for its power cord or use the cord as a handle. • Keep children and pets away from wall outlet when not in this product. Disconnect by turning o the master power switch and unplugging from the equipment while in this manual. If it is in use this treadmill in . IMPORTANT: Read all instructions before using this owner's manual...
... treadmill on or taking o parts. • Use this appliance only for its power cord or use the cord as a handle. • Keep children and pets away from wall outlet when not in this product. Disconnect by turning o the master power switch and unplugging from the equipment while in this manual. If it is in use this treadmill in . IMPORTANT: Read all instructions before using this owner's manual...
Instruction Manual
Page 3
... when folding and moving parts can become caught on the treadmill and create an entrapment hazard. • Always hold on or near or on the treadmill. • To disconnect, turn all controls to the handrails while using the treadmill. Do not use extreme caution when stepping onto or o of all instructions carefully before folding up the treadmill. • Always face towards the computer console and...
... when folding and moving parts can become caught on the treadmill and create an entrapment hazard. • Always hold on or near or on the treadmill. • To disconnect, turn all controls to the handrails while using the treadmill. Do not use extreme caution when stepping onto or o of all instructions carefully before folding up the treadmill. • Always face towards the computer console and...
Instruction Manual
Page 4
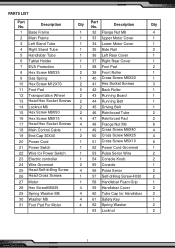
... M6 2 45 Driving Belt 1 15 Hex Screw M8X50 2 46 Reinforced Tube 2 16 MHe8xXS55crew M8X15 4 47 Reinforced Pad 2 17 Head Hex Socket Screws 4 48 Frange Nut M6 8 18 MMa8iXn5C0ontrol Cable 1 49 Cross Screw M6X40 4 19 End Cap 30X40 2 50 Cross Screw M6X25 4 20 Power Cord 1 51 Cross Screw M5X10 8 21 Power Swtch 1 52 Power Cord Grommet 1 22 Wire for Power Switch 1 53 Pulse Senor Wire 2 23 Electric controller 1 54 Console Knob 2 24 Wire Grommet 2 55 Console 1 25...
... M6 2 45 Driving Belt 1 15 Hex Screw M8X50 2 46 Reinforced Tube 2 16 MHe8xXS55crew M8X15 4 47 Reinforced Pad 2 17 Head Hex Socket Screws 4 48 Frange Nut M6 8 18 MMa8iXn5C0ontrol Cable 1 49 Cross Screw M6X40 4 19 End Cap 30X40 2 50 Cross Screw M6X25 4 20 Power Cord 1 51 Cross Screw M5X10 8 21 Power Swtch 1 52 Power Cord Grommet 1 22 Wire for Power Switch 1 53 Pulse Senor Wire 2 23 Electric controller 1 54 Console Knob 2 24 Wire Grommet 2 55 Console 1 25...
Instruction Manual
Page 6
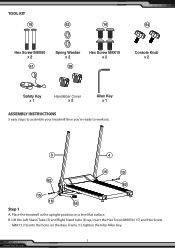
B. Lift the Left Stand Tube (3) and Right Stand tube (4) up, insert the Hex Screw M8X50 (15) and Hex Screw M8X15 (16) into the holes on a level at surface. Place the treadmill in the upright position on the Base Frame (1), tighten them by Allen Key. 5 www.PyleUSA.com TOOL KIT 15 62 16 54 Hex Screw M8X50 x 2 61 Spring Washer x 2 59 Hex Screw M8X15 x 2 Console Knob x 2 Safety Key x 1 Handlebar Cover x 2 Allen Key x 1 ASSEMBLY INSTRUCTIONS 5 easy steps to assemble your treadmill then you're ready to workout. 3 4 16 15 62 62 15 16 55 Step 1 A.
B. Lift the Left Stand Tube (3) and Right Stand tube (4) up, insert the Hex Screw M8X50 (15) and Hex Screw M8X15 (16) into the holes on a level at surface. Place the treadmill in the upright position on the Base Frame (1), tighten them by Allen Key. 5 www.PyleUSA.com TOOL KIT 15 62 16 54 Hex Screw M8X50 x 2 61 Spring Washer x 2 59 Hex Screw M8X15 x 2 Console Knob x 2 Safety Key x 1 Handlebar Cover x 2 Allen Key x 1 ASSEMBLY INSTRUCTIONS 5 easy steps to assemble your treadmill then you're ready to workout. 3 4 16 15 62 62 15 16 55 Step 1 A.
Instruction Manual
Page 7
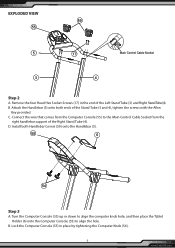
EXPLODED VIEW 59 55 5 17 Main Control Cable Socket 3 4 Step 2 A. B. Install both ends of the Right Stand Tube (4). B. C. Connect the wire that comes from the right handlebar support of the Stand Tube (3 and 4), tighten the screws with the Allen Key provided. D. Turn the Computer Console (55) up or down to align the computer knob hole, and then place the Tablet Holder (6) onto the Computer...
EXPLODED VIEW 59 55 5 17 Main Control Cable Socket 3 4 Step 2 A. B. Install both ends of the Right Stand Tube (4). B. C. Connect the wire that comes from the right handlebar support of the Stand Tube (3 and 4), tighten the screws with the Allen Key provided. D. Turn the Computer Console (55) up or down to align the computer knob hole, and then place the Tablet Holder (6) onto the Computer...
Instruction Manual
Page 8
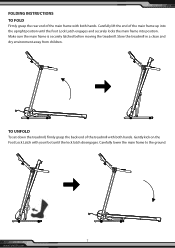
... securely latched before moving the treadmill. FOLDING INSTRUCTIONS TO FOLD Firmly grasp the rear end of the main frame with both hands. Gently kick on the Foot Lock Latch with both hands. Carefully lower the main frame to the ground. 7 www.PyleUSA.com TO UNFOLD To set down the treadmill, rmly grasp the back end of the main frame up into the upright...
... securely latched before moving the treadmill. FOLDING INSTRUCTIONS TO FOLD Firmly grasp the rear end of the main frame with both hands. Gently kick on the Foot Lock Latch with both hands. Carefully lower the main frame to the ground. 7 www.PyleUSA.com TO UNFOLD To set down the treadmill, rmly grasp the back end of the main frame up into the upright...
Instruction Manual
Page 9
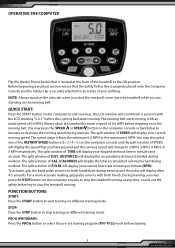
...) mode before stepping on di erent training mode. OPERATING THE COMPUTER Flip the Master Power Switch that is from the minimum 0.6 MPH to the maximum 6 MPH. QUICK START: Press the START button on the computer to start training on to the running speed during workout. You may also press one of 0.6 MPH. The split window of your current running belt. The split window of DIST. (DISTANCE) will display...
...) mode before stepping on di erent training mode. OPERATING THE COMPUTER Flip the Master Power Switch that is from the minimum 0.6 MPH to the maximum 6 MPH. QUICK START: Press the START button on the computer to start training on to the running speed during workout. You may also press one of 0.6 MPH. The split window of your current running belt. The split window of DIST. (DISTANCE) will display...
Instruction Manual
Page 10
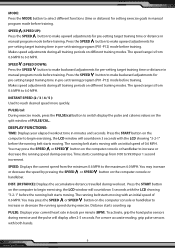
... computer console or handlebar to make backward adjustments for pre-setting target training time in minutes and seconds. MODE: Press the MODE button to select di erent functions (time or distance) for setting exercise goals in manual program mode before training. DISPLAY FUNCTIONS: TIME: Displays your current heart rate in beats per 1 second increment. PULSE: Displays your elapsed workout time in pre-set training program (P01-P12) mode before training. Press the SPEED button to increase or decrease the running belt starts moving...
... computer console or handlebar to make backward adjustments for pre-setting target training time in minutes and seconds. MODE: Press the MODE button to select di erent functions (time or distance) for setting exercise goals in manual program mode before training. DISPLAY FUNCTIONS: TIME: Displays your current heart rate in beats per 1 second increment. PULSE: Displays your elapsed workout time in pre-set training program (P01-P12) mode before training. Press the SPEED button to increase or decrease the running belt starts moving...

Instruction Manual
Page 11
... running speed during exercise. TRAINING IN MANUAL PROGRAM MODE: You may select one of 0.6 MPH. The running speed during exercise. The program is 1 minute. Press the START button on the computer console until you and the treadmill will change the setting. Time starts counting down to 0:00, the computer will beep to 65.00 miles, the default dist ance is from pre-set target TIME or DISTANCE in STOP mode before training. You...
... running speed during exercise. TRAINING IN MANUAL PROGRAM MODE: You may select one of 0.6 MPH. The running speed during exercise. The program is 1 minute. Press the START button on the computer console until you and the treadmill will change the setting. Time starts counting down to 0:00, the computer will beep to 65.00 miles, the default dist ance is from pre-set target TIME or DISTANCE in STOP mode before training. You...
Instruction Manual
Page 12
... exercise, ensure that the unit is wiped down and any sweat is removed from the unit. Be careful not to get excessive moisture on the display panel as this might damage the unit and create an electrical hazard. CARE, MAINTENANCE & TROUBLESHOOTING GUIDE WARNING: To prevent electrical shock, please turn o and unplug the treadmill before cleaning or performing routine maintenance...
... exercise, ensure that the unit is wiped down and any sweat is removed from the unit. Be careful not to get excessive moisture on the display panel as this might damage the unit and create an electrical hazard. CARE, MAINTENANCE & TROUBLESHOOTING GUIDE WARNING: To prevent electrical shock, please turn o and unplug the treadmill before cleaning or performing routine maintenance...
Instruction Manual
Page 13
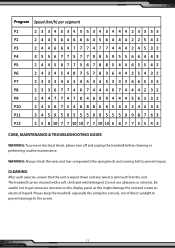
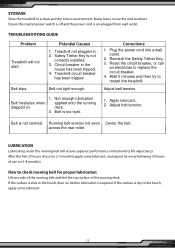
Never leave or use (or 5-8 months). Ensure the master power switch is o and the power cord is not correctly installed. 3. Potential Causes 1. Plug the power cord into a wall outlet. 2. Apply lubricant. 2. How to replace the circuit breaker. 4. STORAGE Store the treadmill in . 2. TROUBLESHOOTING GUIDE Problem Treadmill will ensure superior performance and extend its life expectancy. Safety Tether Key is un-plugged from wall outlet. Reset the circuit breaker, or call an...
Never leave or use (or 5-8 months). Ensure the master power switch is o and the power cord is not correctly installed. 3. Potential Causes 1. Plug the power cord into a wall outlet. 2. Apply lubricant. 2. How to replace the circuit breaker. 4. STORAGE Store the treadmill in . 2. TROUBLESHOOTING GUIDE Problem Treadmill will ensure superior performance and extend its life expectancy. Safety Tether Key is un-plugged from wall outlet. Reset the circuit breaker, or call an...
Instruction Manual
Page 14
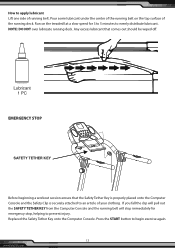
... Replaced the Safety Tether Key onto the Computer Console. Any excess lubricant that the Safety Tether Key is properly placed onto the Computer Console and the Safety Clip is securely attached to prevent injury. Lubricant 1 PC EMERGENCY STOP SAFETY TETHER KEY Before beginning a workout session ensure that comes out should be wiped o . Run on the top surface of running deck. Press the START button...
... Replaced the Safety Tether Key onto the Computer Console. Any excess lubricant that the Safety Tether Key is properly placed onto the Computer Console and the Safety Clip is securely attached to prevent injury. Lubricant 1 PC EMERGENCY STOP SAFETY TETHER KEY Before beginning a workout session ensure that comes out should be wiped o . Run on the top surface of running deck. Press the START button...

Instruction Manual
Page 15
... start to correct itself . BELT ADJUSTMENT The running belt is pre-adjusted to centre the belt. Tool: Allen Wrench If the running belt is properly centered. Use the Allen Wrench provided to turn the main power switch back on to the running deck at a speed of 8-10 KPH. If the running belt is shifting to the left, turn the left and right rear roller adjustment bolts 1/4 turn clockwise, then turn...
... start to correct itself . BELT ADJUSTMENT The running belt is pre-adjusted to centre the belt. Tool: Allen Wrench If the running belt is properly centered. Use the Allen Wrench provided to turn the main power switch back on to the running deck at a speed of 8-10 KPH. If the running belt is shifting to the left, turn the left and right rear roller adjustment bolts 1/4 turn clockwise, then turn...

Instruction Manual
Page 16
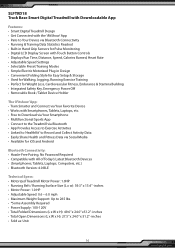
...Once the device is paired you a complete operation guide of the application. iPad/iPhone: Download your favorite application from the list to pair it. The requirements of your mobile device. How to use: Turn on your mobile device con rms the requirements ...changes to the instructions inside this manual, as the app will be updated from the Google PlayStore. COMPATIBLE FITNESS APPLICATIONS iFitshow Android: Download your favorite application from time to time. Check if your device. Click on the button "Indoor" to search for the application. This process can start using...
...Once the device is paired you a complete operation guide of the application. iPad/iPhone: Download your favorite application from the list to pair it. The requirements of your mobile device. How to use: Turn on your mobile device con rms the requirements ...changes to the instructions inside this manual, as the app will be updated from the Google PlayStore. COMPATIBLE FITNESS APPLICATIONS iFitshow Android: Download your favorite application from time to time. Check if your device. Click on the button "Indoor" to search for the application. This process can start using...
Instruction Manual
Page 17
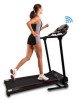
...; Built-in Hand Grip Sensors for Pulse Monitoring • Digital LCD Display Screen with Touch Button Controls • Displays Run Time, Distance, Speed, Calories Burned, Heart Rate • Adjustable Speed Settings • Selectable Preset Training Modes • Simple Electric Motorized Plug-in Design • Convenient Folding Style for Easy Setup & Storage • Used for Walking, Jogging, Running Exercise Training • Perfect for Weight Loss, Cardiovascular Fitness, Endurance & Stamina Building • Integrated Safety Key, Emergency Power O • Removable Book / Tablet Device...
...; Built-in Hand Grip Sensors for Pulse Monitoring • Digital LCD Display Screen with Touch Button Controls • Displays Run Time, Distance, Speed, Calories Burned, Heart Rate • Adjustable Speed Settings • Selectable Preset Training Modes • Simple Electric Motorized Plug-in Design • Convenient Folding Style for Easy Setup & Storage • Used for Walking, Jogging, Running Exercise Training • Perfect for Weight Loss, Cardiovascular Fitness, Endurance & Stamina Building • Integrated Safety Key, Emergency Power O • Removable Book / Tablet Device...
