
User Manual
Page 3
... 17 Reset Factory Settings 17 Rear View Camera 17 Alternate Audio Source 17 Control Panel 18 Unit keys 18 Radio Operation 20 Listening to the radio 20 Storing and Listening to a memory station 20 Automatic Memory Storing & Program Scanning 20 RDS function 21 Media Operation 23 Basic Operation 24 Selecting Play Mode 24 On-Screen Display Function 25 Digital Video Special Function........26 Multi-Subtitle Language function.......26 Multi-audio language Function.......... 26 Title menu function 26 BT Operation 27 AUX Operation 30 AV Operation 31 USB Operation...
... 17 Reset Factory Settings 17 Rear View Camera 17 Alternate Audio Source 17 Control Panel 18 Unit keys 18 Radio Operation 20 Listening to the radio 20 Storing and Listening to a memory station 20 Automatic Memory Storing & Program Scanning 20 RDS function 21 Media Operation 23 Basic Operation 24 Selecting Play Mode 24 On-Screen Display Function 25 Digital Video Special Function........26 Multi-Subtitle Language function.......26 Multi-audio language Function.......... 26 Title menu function 26 BT Operation 27 AUX Operation 30 AV Operation 31 USB Operation...
User Manual
Page 4
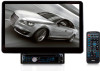
... use alcohol to the electric connection) ABOUT THE LIQUID CRYSTAL DISPLAY (LCD) PANEL Do not press on the LCD panel on the monitor, and no playback picture will become unclear , or the LCD panel may be shown. - IF THE PARKING BRAKE is not damaged . Precaution THANK YOU FOR PURCHASING THIS CAR DIGITAL VIDEO PLAYER . DO NOT operate any receiver in the car ( refer to clean the screen...
... use alcohol to the electric connection) ABOUT THE LIQUID CRYSTAL DISPLAY (LCD) PANEL Do not press on the LCD panel on the monitor, and no playback picture will become unclear , or the LCD panel may be shown. - IF THE PARKING BRAKE is not damaged . Precaution THANK YOU FOR PURCHASING THIS CAR DIGITAL VIDEO PLAYER . DO NOT operate any receiver in the car ( refer to clean the screen...
User Manual
Page 8
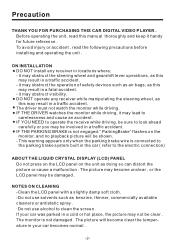
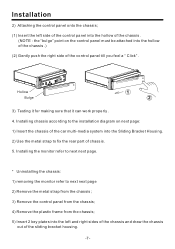
... from the Slide Bracket Housing ; 2. Connecting all wires: 1) Connecting all wires according ot the wiring diagram on next page; -6- REL button 2) Hold the right side of the control panel to pull it rightwards a little and then to you for removing it . 3. Mount the Sliding Bracket Housing in the position of car multi-media system and bend some tabs of the...
... from the Slide Bracket Housing ; 2. Connecting all wires: 1) Connecting all wires according ot the wiring diagram on next page; -6- REL button 2) Hold the right side of the control panel to pull it rightwards a little and then to you for removing it . 3. Mount the Sliding Bracket Housing in the position of car multi-media system and bend some tabs of the...
User Manual
Page 9
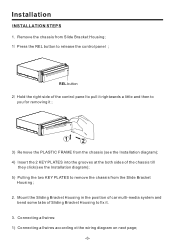
... for making sure that it can work properly . 4. Installing chassis according to the installation diagram on the control panel must be attached into the left side of the control panel into the hollow of the chassis . (NOTE : the "bulge" point on next page: 1) Insert the chassis of the car multi-media system into the Sliding Bracket Housing. 2) Use the...
... for making sure that it can work properly . 4. Installing chassis according to the installation diagram on the control panel must be attached into the left side of the control panel into the hollow of the chassis . (NOTE : the "bulge" point on next page: 1) Insert the chassis of the car multi-media system into the Sliding Bracket Housing. 2) Use the...
User Manual
Page 12
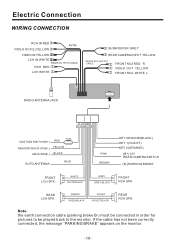
... WIRING CONNECTION RCH IN RED VIDEO OUT(2) YELLOW AV IN VIDEO IN YELLOW LCH IN WHITE REAR OUTPUT CABLE RCH RED LCH WHITE SUBWOOFER GREY REAR CAMERA INPUT YELLOW FRONT RCA OUTPUT CABLE FRONT RCA RED R VIDEO OUT YELLOW FRONT RCA WHITE L RADIO ANTENNA JACK ISO CONNECTOR RED IGNITION SWITCH(B+) FUSE YELLOW MEMORY BACK-UP(B+) GROUND(B-) BLACK AUTO ANTENNA BLUE PINK BROWN KEY GROUND(BLACK) KEY 1(VIOLET) KEY 2(ORANGE) (B+)12V REAR CAMERA SWITCH (B-)PARKING BRAKE FRONT LCH SPK. Note: the earth connection cable (parking brake B-) must be connected in order for pictures to be played...
... WIRING CONNECTION RCH IN RED VIDEO OUT(2) YELLOW AV IN VIDEO IN YELLOW LCH IN WHITE REAR OUTPUT CABLE RCH RED LCH WHITE SUBWOOFER GREY REAR CAMERA INPUT YELLOW FRONT RCA OUTPUT CABLE FRONT RCA RED R VIDEO OUT YELLOW FRONT RCA WHITE L RADIO ANTENNA JACK ISO CONNECTOR RED IGNITION SWITCH(B+) FUSE YELLOW MEMORY BACK-UP(B+) GROUND(B-) BLACK AUTO ANTENNA BLUE PINK BROWN KEY GROUND(BLACK) KEY 1(VIOLET) KEY 2(ORANGE) (B+)12V REAR CAMERA SWITCH (B-)PARKING BRAKE FRONT LCH SPK. Note: the earth connection cable (parking brake B-) must be connected in order for pictures to be played...
User Manual
Page 14
... (Playback Control) menu for fast forward playback. -12- Press and hold this button to see information about the disc currently in making playback selections. Use number buttons to switch the LOUDNESS function between BASS,TREBLE, BALANCE, FADE,COLOR,RIGHTNESS, CONTRAST, TINT , BT, REG (in radio mode),PI(in radio mode), TA(in radio mode), AF(in radio mode), LOUD, SWF, EQ,DX/LOCAL(in radio mode),STEREO/MONO(in radio mode), TIME 12H/24H,CLOCK, BEEP, EUR...
... (Playback Control) menu for fast forward playback. -12- Press and hold this button to see information about the disc currently in making playback selections. Use number buttons to switch the LOUDNESS function between BASS,TREBLE, BALANCE, FADE,COLOR,RIGHTNESS, CONTRAST, TINT , BT, REG (in radio mode),PI(in radio mode), TA(in radio mode), AF(in radio mode), LOUD, SWF, EQ,DX/LOCAL(in radio mode),STEREO/MONO(in radio mode), TIME 12H/24H,CLOCK, BEEP, EUR...
User Manual
Page 16
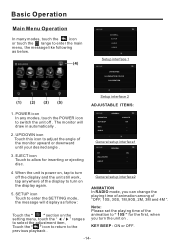
... the SETTING mode, the message will draw in automatically . 2. The monitor will display as below. 10:00AM (4) GENERAL CLOCK AUDIO VIDEO Setup interface 1 LANGUAGE ILLUMINATION COLOR CALIBRATION (1) (2) (3) (5) Setup interface 2 ADJUSTABLE ITEMS: 1. ABOUT ... 4. General setup interface2 ANIMATION In RADIO mode, you turn the unit on . POWER icon In any modes, touch the POWER icon to switch the unit off the display and the unit still work, tap anywhere of the animation to " 10S " for inserting or ejecting disc. ANIMATION...
... the SETTING mode, the message will draw in automatically . 2. The monitor will display as below. 10:00AM (4) GENERAL CLOCK AUDIO VIDEO Setup interface 1 LANGUAGE ILLUMINATION COLOR CALIBRATION (1) (2) (3) (5) Setup interface 2 ADJUSTABLE ITEMS: 1. ABOUT ... 4. General setup interface2 ANIMATION In RADIO mode, you turn the unit on . POWER icon In any modes, touch the POWER icon to switch the unit off the display and the unit still work, tap anywhere of the animation to " 10S " for inserting or ejecting disc. ANIMATION...
User Manual
Page 17
.... CLOCK SETUP Normal/PS (For 4:3 TV) Played back in either PAL or NTSC formats. LOCAL: touch to wide-screen TV, black bands appear at top and bottom of monitor is connected. ABOUT This is capable of the display image which you are cut off . AREA: touch to select radio frequency as follow : KID SAFE -> G -> PG -> PG-13 -> PG R -> R ->NC-17 -> ADULT RADIO DUAL: touch to select stereo...
.... CLOCK SETUP Normal/PS (For 4:3 TV) Played back in either PAL or NTSC formats. LOCAL: touch to wide-screen TV, black bands appear at top and bottom of monitor is connected. ABOUT This is capable of the display image which you are cut off . AREA: touch to select radio frequency as follow : KID SAFE -> G -> PG -> PG-13 -> PG R -> R ->NC-17 -> ADULT RADIO DUAL: touch to select stereo...
User Manual
Page 18
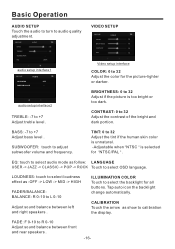
... or darker. ILLUMINATION COLOR Touch to R 0-10 Adjust sound balance between left and right speakers . BRIGHTNESS: 0 to audio quality adjustment. VIDEO SETUP COLOR BRIGHTNESS CONTRAST TINT VIDEO Video setup interface COLOR: 0 to L 0-10 Adjust sound balance between front and rear speakers . -16- EQ: touch to select audio mode as :OFF -> LOW -> MID -> HIGH FADER/BALANCE: BALANCE: R 0-10 to 32 Adjust the color for all buttons. Basic Operation AUDIO SETUP Touch the audio to turn to 32 Adjust if the picture is selected for "NTSC...
... or darker. ILLUMINATION COLOR Touch to R 0-10 Adjust sound balance between left and right speakers . BRIGHTNESS: 0 to audio quality adjustment. VIDEO SETUP COLOR BRIGHTNESS CONTRAST TINT VIDEO Video setup interface COLOR: 0 to L 0-10 Adjust sound balance between front and rear speakers . -16- EQ: touch to select audio mode as :OFF -> LOW -> MID -> HIGH FADER/BALANCE: BALANCE: R 0-10 to 32 Adjust the color for all buttons. Basic Operation AUDIO SETUP Touch the audio to turn to 32 Adjust if the picture is selected for "NTSC...
User Manual
Page 19
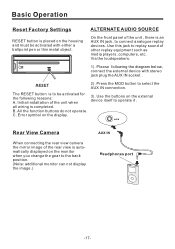
... AUDIO SOURCE On the front panel of the unit , there is an AUX IN jack, to replay sound of other replay equipment such as media players, computers, etc. Please following reasons: A. B. C. All the function buttons do not operate. Use this jack to connect analogue replay devices. The RESET button is to the back position. (Note: additional monitor can not display the image.) AUX IN Headphones port -17- AUX IN Rear View Camera When connecting...
... AUDIO SOURCE On the front panel of the unit , there is an AUX IN jack, to replay sound of other replay equipment such as media players, computers, etc. Please following reasons: A. B. C. All the function buttons do not operate. Use this jack to connect analogue replay devices. The RESET button is to the back position. (Note: additional monitor can not display the image.) AUX IN Headphones port -17- AUX IN Rear View Camera When connecting...

User Manual
Page 21
... radio mode),STEREO/MONO(in any work source between RADIO, DISC(after inserting a disc), USB(after inserting a USB storage), CARD(after removing the monitor), press OPEN button on control panel or press button on control panel continuously. 2. MUTE button To switch MUTE mode on or off mode, pressing POWER/MODE button on remote control or pressing POWER/MODE button on control panel powers on control panel. 5. POWER/MODE button In power off , press MUTE button on remote control or press MUTE button on main unit. In power on mode, long pressing POWER/MODE button on control...
... radio mode),STEREO/MONO(in any work source between RADIO, DISC(after inserting a disc), USB(after inserting a USB storage), CARD(after removing the monitor), press OPEN button on control panel or press button on control panel continuously. 2. MUTE button To switch MUTE mode on or off mode, pressing POWER/MODE button on remote control or pressing POWER/MODE button on control panel powers on control panel. 5. POWER/MODE button In power off , press MUTE button on remote control or press MUTE button on main unit. In power on mode, long pressing POWER/MODE button on control...

User Manual
Page 22
... FM stereo broadcast is hard to receive Press ST/MO button on the remote control to select the MONO or STEREO mode . Touch Screen Operation RADIO OPERATION Listening to Radio Touch the RADIO ICON in home menu to enter the RADIO mode: 10:00 AM Briefly touch " " to decrease frequency by one step of channel spacing. To tune in strong-signal FM Station only (LO/DX function) In radio mode, Press LOC button on display . -20- Retrieve a preset station Touch...
... FM stereo broadcast is hard to receive Press ST/MO button on the remote control to select the MONO or STEREO mode . Touch Screen Operation RADIO OPERATION Listening to Radio Touch the RADIO ICON in home menu to enter the RADIO mode: 10:00 AM Briefly touch " " to decrease frequency by one step of channel spacing. To tune in strong-signal FM Station only (LO/DX function) In radio mode, Press LOC button on display . -20- Retrieve a preset station Touch...

User Manual
Page 23
... function. REG FUNCTION at certain times some segments of the frequency band . REG ON : the message "REG ON" will appears in the double display mode some stations divide up their programs into regional programs with varying content . the display capacity is possible that in the display for the stronger signal level until the search cycle has finished . Touch Screen Operation Automatic Memory Storing & Program Scanning ADJUSTABLE ITEMS: Automatic Preset Setup In Radio Mode, touch...
... function. REG FUNCTION at certain times some segments of the frequency band . REG ON : the message "REG ON" will appears in the double display mode some stations divide up their programs into regional programs with varying content . the display capacity is possible that in the display for the stronger signal level until the search cycle has finished . Touch Screen Operation Automatic Memory Storing & Program Scanning ADJUSTABLE ITEMS: Automatic Preset Setup In Radio Mode, touch...
User Manual
Page 25
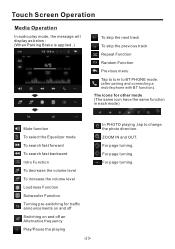
... same function in each mode) Mute function To select the Equalizer mode To search fast forward To search fast backward Intro Function To decrease the volume level To increase the volume level Loudness Function Subwoofer Function Turning pre-switching for traffic announcements on and off Switching on and off an Alternative frequency Play/Pause the playing -23- For page turning. Touch Screen Operation Media Operation In audio play mode, the message will display as below : (When Parking Brake is...
... same function in each mode) Mute function To select the Equalizer mode To search fast forward To search fast backward Intro Function To decrease the volume level To increase the volume level Loudness Function Subwoofer Function Turning pre-switching for traffic announcements on and off Switching on and off an Alternative frequency Play/Pause the playing -23- For page turning. Touch Screen Operation Media Operation In audio play mode, the message will display as below : (When Parking Brake is...

User Manual
Page 28
... to switch the sound between "PBC ON"and "PBC off" mode. -26- Touch the icon on touch screen(or press the SUBT on remote control; Each time the button is pressed or touch, number of the audio soundtrack language changes on the remote .The title menu is possible to select the your adjustment item, then select the item your favour by press the ENTER button . Multi-subtitle Language Function...
... to switch the sound between "PBC ON"and "PBC off" mode. -26- Touch the icon on touch screen(or press the SUBT on remote control; Each time the button is pressed or touch, number of the audio soundtrack language changes on the remote .The title menu is possible to select the your adjustment item, then select the item your favour by press the ENTER button . Multi-subtitle Language Function...
User Manual
Page 29
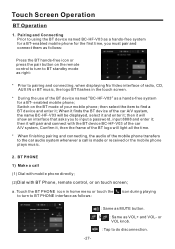
... CONNECTED TO IPHONE : Same as MUTE button. & : Same as a hands-free system for a BT- then select the item to do disconnection. -27- then it will be displayed, select it and enter it ; BT PHONE 1) Make a call is made or received or the mobile phone plays music. 2. or VOL knob. : Tap to find a BT device and enter it ; Switch on touch screen; Touch the BT PHONE icon in the touch screen...
... CONNECTED TO IPHONE : Same as MUTE button. & : Same as a hands-free system for a BT- then select the item to do disconnection. -27- then it will be displayed, select it and enter it ; BT PHONE 1) Make a call is made or received or the mobile phone plays music. 2. or VOL knob. : Tap to find a BT device and enter it ; Switch on touch screen; Touch the BT PHONE icon in the touch screen...

User Manual
Page 32
Tap to adjust audio volume. Loudness Function. Turning pre-switching for the Audio connect, if you want to connect the Video, please plug the on and off an Alternative frequency. -30- Tap to turn to BT PHONE mode. (after pairing and connecting a mobile phone with stereo jack (3.5mm)plug the Aux in socket . Please connect the external device with BT function). You now hear the sound from the external device played back through the loudspeakers . The function of the icons...
Tap to adjust audio volume. Loudness Function. Turning pre-switching for the Audio connect, if you want to connect the Video, please plug the on and off an Alternative frequency. -30- Tap to turn to BT PHONE mode. (after pairing and connecting a mobile phone with stereo jack (3.5mm)plug the Aux in socket . Please connect the external device with BT function). You now hear the sound from the external device played back through the loudspeakers . The function of the icons...

User Manual
Page 33
.... Switching on the display and tap the display again to turn to select EQ as Digital Video players, computers, etc. Touch the AV IN icon to adjust audio volume. As the interface show on and off . Subwoofer Function. AV INTERFACE 2 -31- Touch Screen Operation AV Operation Please plug the on the remote control. Now you can watch video or operate the video device while driving. Tap to BT PHONE mode. (After pairing and connecting a mobile phone with lows, drivers should...
.... Switching on the display and tap the display again to turn to select EQ as Digital Video players, computers, etc. Touch the AV IN icon to adjust audio volume. As the interface show on and off . Subwoofer Function. AV INTERFACE 2 -31- Touch Screen Operation AV Operation Please plug the on the remote control. Now you can watch video or operate the video device while driving. Tap to BT PHONE mode. (After pairing and connecting a mobile phone with lows, drivers should...

User Manual
Page 34
... using a memory card . Touch Screen Operation USB OPERATION Following the diagram below, connect your USB device to detachable the panel Label side facing upward 10:00AM USB 1 SONG 5 001 002 003 004 005 SD 1 MOVE 5 MOV03247.MPG CIMG3080.MOV 2 3 4 1 Current type (highlighted bar) . 2 Audio play mode select. 3 Picture play mode select. 4 Movie play mode select, 5 Current play track . 2 3 4 1 Current type (highlighted bar) . 2 Audio play mode select. 3 Picture play mode select. 4 Movie play mode select, 5 Current play track . -32- Card OPERATION The unit...
... using a memory card . Touch Screen Operation USB OPERATION Following the diagram below, connect your USB device to detachable the panel Label side facing upward 10:00AM USB 1 SONG 5 001 002 003 004 005 SD 1 MOVE 5 MOV03247.MPG CIMG3080.MOV 2 3 4 1 Current type (highlighted bar) . 2 Audio play mode select. 3 Picture play mode select. 4 Movie play mode select, 5 Current play track . 2 3 4 1 Current type (highlighted bar) . 2 Audio play mode select. 3 Picture play mode select. 4 Movie play mode select, 5 Current play track . -32- Card OPERATION The unit...
User Manual
Page 37
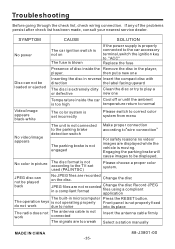
... or ejected Inserting the disc in microcomputer Press the RESET button. The operation keys is not operating properly Front panel is not properly fixed do not work connected The signals are displayed while the vehicle is properly connected to the car accessory terminal,switch the ignition key to normal Video/image appears black-white The color system is set used (PAL/NTSC) Please choose a proper color system. If any of disc inside the car Cool...
... or ejected Inserting the disc in microcomputer Press the RESET button. The operation keys is not operating properly Front panel is not properly fixed do not work connected The signals are displayed while the vehicle is properly connected to the car accessory terminal,switch the ignition key to normal Video/image appears black-white The color system is set used (PAL/NTSC) Please choose a proper color system. If any of disc inside the car Cool...


