
Owners Manual
Page 1
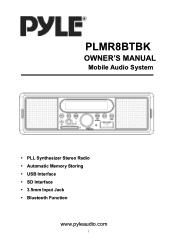
PLMR8BTBK OWNER'S MANUAL Mobile Audio System PLL Synthesizer Stereo Radio Automatic Memory Storing USB Interface SD Interface 3.5mm Input Jack Bluetooth Function www.pyleaudio.com 1
PLMR8BTBK OWNER'S MANUAL Mobile Audio System PLL Synthesizer Stereo Radio Automatic Memory Storing USB Interface SD Interface 3.5mm Input Jack Bluetooth Function www.pyleaudio.com 1
Owners Manual
Page 2
... 3 Installing the unit 3 Removing the unit 4 Wiring Connection 5 Operation 6 Location of keys 6 Switching the unit on/off 7 Sound adjustment 7 Display time 7 Liquid crystal display 7 Auxiliary input 7 Reset function 7 Radio operation 7 Switching to radio mode 7 Selecting the frequency band 7 Selecting station 8 Storing& Program scanning 8 Reset stations selecting 8 Station storing 8 USB play operation 8 Selecting tracks in single step 8 Pausing 8 Selecting songs by SCH button......... 9 SD operation 9 BT operation 9 Remote control 10 Specification 11 Trouble shooting...
... 3 Installing the unit 3 Removing the unit 4 Wiring Connection 5 Operation 6 Location of keys 6 Switching the unit on/off 7 Sound adjustment 7 Display time 7 Liquid crystal display 7 Auxiliary input 7 Reset function 7 Radio operation 7 Switching to radio mode 7 Selecting the frequency band 7 Selecting station 8 Storing& Program scanning 8 Reset stations selecting 8 Station storing 8 USB play operation 8 Selecting tracks in single step 8 Pausing 8 Selecting songs by SCH button......... 9 SD operation 9 BT operation 9 Remote control 10 Specification 11 Trouble shooting...
Owners Manual
Page 3
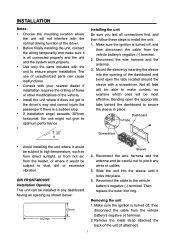
... use of the vehicle. Install the unit where it does not get in place. Dashboard Tabs Screwdriver Avoid installing the unit where it would be careful not to the vehicle battery's negative (-) terminal. Make sure the ignition is turned off , then disconnect the cable from the vehicle battery's negative (-) terminal. 2. Disconnect the wire harness and the antenna. 3. Bending open the tabs located around...
... use of the vehicle. Install the unit where it does not get in place. Dashboard Tabs Screwdriver Avoid installing the unit where it would be careful not to the vehicle battery's negative (-) terminal. Make sure the ignition is turned off , then disconnect the cable from the vehicle battery's negative (-) terminal. 2. Disconnect the wire harness and the antenna. 3. Bending open the tabs located around...
Owners Manual
Page 4
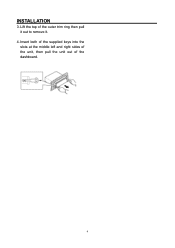
Insert both of the supplied keys into the slots at the middle left and right sides of the unit, then pull the unit out of the outer trim ring then pull it out to remove it. 4. Lift the top of the dashboard. 4 INSTALLATION 3.
Insert both of the supplied keys into the slots at the middle left and right sides of the unit, then pull the unit out of the outer trim ring then pull it out to remove it. 4. Lift the top of the dashboard. 4 INSTALLATION 3.

Owners Manual
Page 5
WIRING CONNECTION ISO CONNECTION 5
WIRING CONNECTION ISO CONNECTION 5

Owners Manual
Page 6
CLK 7. / SAVE 8. Reset button 10. VOL/SEL/PWR 11. Skip backwards 2. IR 6 LCD 5. (hang up )/ MOD 4. USB interface 9. SD interface 13. Skip forward 3. (pick up )/ BND/AS/SCH 6. AUX IN 12. OPERATION LOCATION OF KEYS 1.
CLK 7. / SAVE 8. Reset button 10. VOL/SEL/PWR 11. Skip backwards 2. IR 6 LCD 5. (hang up )/ MOD 4. USB interface 9. SD interface 13. Skip forward 3. (pick up )/ BND/AS/SCH 6. AUX IN 12. OPERATION LOCATION OF KEYS 1.
Owners Manual
Page 7
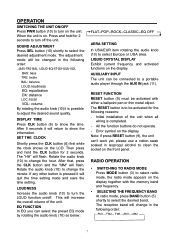
... will change in the following reasons: - AUXILIARY INPUT The unit can be changed in isopropyl alcohol to turn on the display together with either a ballpoint pen or thin metal object. All the function buttons do not operate. - The adjustment mode will quit the time setting mode and save the time setting. After 5 seconds it will be connected to change the minute. Rotate the audio knob (10) to a portable audio player through the AUX IN...
... will change in the following reasons: - AUXILIARY INPUT The unit can be changed in isopropyl alcohol to turn on the display together with either a ballpoint pen or thin metal object. All the function buttons do not operate. - The adjustment mode will quit the time setting mode and save the time setting. After 5 seconds it will be connected to change the minute. Rotate the audio knob (10) to a portable audio player through the AUX IN...
Owners Manual
Page 8
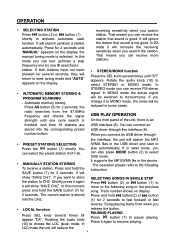
... is USB PLAY OPERATION On the front panel of the unit, there is selected. Automatic memory storing Press AS button (5) for 2 seconds to seek tuning mode and "AUTO" appears on the display. AUTOMATIC MEMORY STORING & PROGRAM SCANNING - radio searches from when you connect an USB driver through this moment press and hold the SAVE button (7) for 2 seconds. And then 18 stations are USB interface (8). number button. You can receive the station that sound is...
... is USB PLAY OPERATION On the front panel of the unit, there is selected. Automatic memory storing Press AS button (5) for 2 seconds to seek tuning mode and "AUTO" appears on the display. AUTOMATIC MEMORY STORING & PROGRAM SCANNING - radio searches from when you connect an USB driver through this moment press and hold the SAVE button (7) for 2 seconds. And then 18 stations are USB interface (8). number button. You can receive the station that sound is...
Owners Manual
Page 9
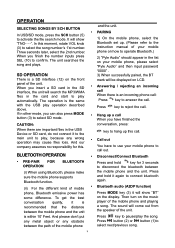
... unit will search the MP3/WMA files in the USB Device or SD card, do not connect it will be displayed on the music player of mobile phone, Bluetooth emissive power has some difference. BLUETOOTH OPERATION PRE-PAIR FOR BLUETOOTH OPERATION (i) When using Bluetooth, please make sure the mobile phone supports Bluetooth function. (ii) For the different kind of the mobile phone and playing a song. Press key to use your mobile phone, please select "Pyle Audio...
... unit will search the MP3/WMA files in the USB Device or SD card, do not connect it will be displayed on the music player of mobile phone, Bluetooth emissive power has some difference. BLUETOOTH OPERATION PRE-PAIR FOR BLUETOOTH OPERATION (i) When using Bluetooth, please make sure the mobile phone supports Bluetooth function. (ii) For the different kind of the mobile phone and playing a song. Press key to use your mobile phone, please select "Pyle Audio...

Owners Manual
Page 10
... 9. 6/+10/DIR+: 10. 5/-10/DIR-: 11. 3/RPT 12. 2/INT 13. DISP 14. MP3 mode: skip to recover the Sound. REMOTE CONTROL FUNCTION KEY & CONTROL 1. 2. MP3 mode: press for previous directory. Press it to change the source. 10 Radio mode: Preset number 1. MP3 mode: Turn on /off the INTRO function. Volume down station. press and hold for +10 songs function). Radio mode: Preset number 2. AMS 17. 18. Radio mode: seek/turn down button. MP3 mode: Pause/playing file. Press to mute the sound.
... 9. 6/+10/DIR+: 10. 5/-10/DIR-: 11. 3/RPT 12. 2/INT 13. DISP 14. MP3 mode: skip to recover the Sound. REMOTE CONTROL FUNCTION KEY & CONTROL 1. 2. MP3 mode: press for previous directory. Press it to change the source. 10 Radio mode: Preset number 1. MP3 mode: Turn on /off the INTRO function. Volume down station. press and hold for +10 songs function). Radio mode: Preset number 2. AMS 17. 18. Radio mode: seek/turn down button. MP3 mode: Pause/playing file. Press to mute the sound.
Owners Manual
Page 11
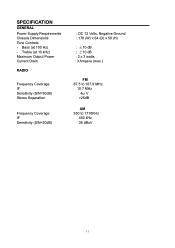
SPECIFICATION GENERAL Power Supply Requirements Chassis Dimensions Tone Controls - Bass (at 10 kHz) Maximum Output Power Current Drain RADIO Frequency Coverage IF Sensitivity (S/N=30dB) Stereo Separation Frequency Coverage IF Sensitivity (S/N=20dB) : DC 12 Volts, Negative Ground : 178 (W) x 64 (D) x 50 (H) : ±10 dB : ±10 dB : 2 x 3 watts : 3 Ampere (max.) FM 87.5 to 107.9 MHz. 10.7 MHz 4μ V >25dB AM 530 to 1710KHz 450 kHz 36 dBuV 11 Treble (at 100 Hz) -
SPECIFICATION GENERAL Power Supply Requirements Chassis Dimensions Tone Controls - Bass (at 10 kHz) Maximum Output Power Current Drain RADIO Frequency Coverage IF Sensitivity (S/N=30dB) Stereo Separation Frequency Coverage IF Sensitivity (S/N=20dB) : DC 12 Volts, Negative Ground : 178 (W) x 64 (D) x 50 (H) : ±10 dB : ±10 dB : 2 x 3 watts : 3 Ampere (max.) FM 87.5 to 107.9 MHz. 10.7 MHz 4μ V >25dB AM 530 to 1710KHz 450 kHz 36 dBuV 11 Treble (at 100 Hz) -
Owners Manual
Page 12
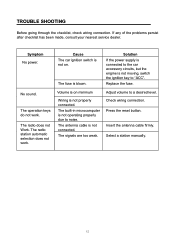
... work . The signals are too weak. Symptom No power. Select a station manually. 12 The antenna cable is not operating properly due to a desired level. Press the reset button. Replace the fuse. Adjust volume to noise. Insert the antenna cable firmly. Cause The car ignition switch is not on minimum Wiring is on . The built-in microcomputer is not connected. TROUBLE SHOOTING Before going through the checklist, check wiring connection. If any of the problems...
... work . The signals are too weak. Symptom No power. Select a station manually. 12 The antenna cable is not operating properly due to a desired level. Press the reset button. Replace the fuse. Adjust volume to noise. Insert the antenna cable firmly. Cause The car ignition switch is not on minimum Wiring is on . The built-in microcomputer is not connected. TROUBLE SHOOTING Before going through the checklist, check wiring connection. If any of the problems...

