
Owners Manual
Page 2
... connected properly. • Improper setting of the controls 7 Remote control 8 Specifications 10 ▪ Installation Wiring Connections 11 Install the Unit 12 • General Operations Reset the Unit 14 Turning the Unit On/Off 14 Volume Control 14 Setting the Sound Characteristics 14 E0 Setting 14 Turning Loudness On 15 Eject a Disc 15 Open the Monitor 15 Angle Setting 15 Mute Function Clear 15 Mode Selector 15 Changing the Image Size 15 Menu Setup Button 15 Sensor 15 0 Main Menu Main Menu Setup 16 Audio Adjust 16 Video Adjust 17 Source Setup 18 Others 19 DVD Playing a DVD...
... connected properly. • Improper setting of the controls 7 Remote control 8 Specifications 10 ▪ Installation Wiring Connections 11 Install the Unit 12 • General Operations Reset the Unit 14 Turning the Unit On/Off 14 Volume Control 14 Setting the Sound Characteristics 14 E0 Setting 14 Turning Loudness On 15 Eject a Disc 15 Open the Monitor 15 Angle Setting 15 Mute Function Clear 15 Mode Selector 15 Changing the Image Size 15 Menu Setup Button 15 Sensor 15 0 Main Menu Main Menu Setup 16 Audio Adjust 16 Video Adjust 17 Source Setup 18 Others 19 DVD Playing a DVD...
Owners Manual
Page 3
... 33 Program Playing 33 (3 Tuner Listening to adjust the desired status, and then press ENTER. The default setting is ON. The default setting is ON. When the setting is OFF, the GOTO function is OFF, the stored stations will appear as follow : BALANCE FAD BASS TREBLE SUBWOOFER RADIO MENU To set the above items in this menu preforms the same operation. If the setting is invalid. E 2.AUDIO SETUP Select AUDIO SETUP, press...
... 33 Program Playing 33 (3 Tuner Listening to adjust the desired status, and then press ENTER. The default setting is ON. The default setting is ON. When the setting is OFF, the GOTO function is OFF, the stored stations will appear as follow : BALANCE FAD BASS TREBLE SUBWOOFER RADIO MENU To set the above items in this menu preforms the same operation. If the setting is invalid. E 2.AUDIO SETUP Select AUDIO SETUP, press...
Owners Manual
Page 4
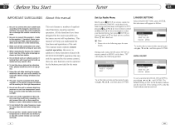
... will appear as the distance stations can be screened from the unit when using your desired items, then press I§ENTER on remote control or on your desired LOCAL ON or OFF by the remote control, there are completely correct before turning on head unit to the following picture: LOCAL ON/OFF RADIO SETTING AUDIO ADJUST EXIT LOCAL GOTO FREQ AMS FULLUP RADIO MENU - - All the functions have been...
... will appear as the distance stations can be screened from the unit when using your desired items, then press I§ENTER on remote control or on your desired LOCAL ON or OFF by the remote control, there are completely correct before turning on head unit to the following picture: LOCAL ON/OFF RADIO SETTING AUDIO ADJUST EXIT LOCAL GOTO FREQ AMS FULLUP RADIO MENU - - All the functions have been...

Owners Manual
Page 5
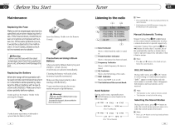
... out any one number button' s, the station will activate automatically memory storing function. When press and hold another number button more than 2 seconds when listening in a station in one of disc DVD VCD Label on your desired station is only valid on remote control. Do not use CDs with an optional cleaning cloth. Do not use your favorite station. Stereo reception is between RDS setup and preset frequencies. Note: * It...
... out any one number button' s, the station will activate automatically memory storing function. When press and hold another number button more than 2 seconds when listening in a station in one of disc DVD VCD Label on your desired station is only valid on remote control. Do not use CDs with an optional cleaning cloth. Do not use your favorite station. Stereo reception is between RDS setup and preset frequencies. Note: * It...
Owners Manual
Page 6
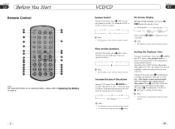
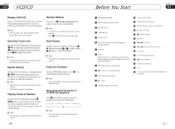
... to. (2) Preset Number Indicator Shows what preset has been selected. (3) Frequency Indicator Shows which frequency the tuner is tuned. ( 4 ) EQ Indicator Shows the EQ Setting of the radio. (5) MBP Indicator Shows that MBP is on remote control. * The function is only valid on or off. ( 6 ) The 6 stations of the card remote control becomes short or no functions while operating. forms the same function. Replacing the Battery When...
... to. (2) Preset Number Indicator Shows what preset has been selected. (3) Frequency Indicator Shows which frequency the tuner is tuned. ( 4 ) EQ Indicator Shows the EQ Setting of the radio. (5) MBP Indicator Shows that MBP is on remote control. * The function is only valid on or off. ( 6 ) The 6 stations of the card remote control becomes short or no functions while operating. forms the same function. Replacing the Battery When...

Owners Manual
Page 7
... Number and then press* to move the cursor to EXIT and press ENTER to set the radio menu during playback mode, brief press it to turn the unit on remote control. 34 Section Before You Start 01 Location of entire disc appears on remote control. During this process, press or press PROG to start program playing; C) BAND/ NI (band selector/play/pause) Button C) 4 / ► ( [Left/F.F]/[Right/F.R]) Button C) V (ANGEL-) Button C) A(ANGEL+) Button...
... Number and then press* to move the cursor to EXIT and press ENTER to set the radio menu during playback mode, brief press it to turn the unit on remote control. 34 Section Before You Start 01 Location of entire disc appears on remote control. During this process, press or press PROG to start program playing; C) BAND/ NI (band selector/play/pause) Button C) 4 / ► ( [Left/F.F]/[Right/F.R]) Button C) V (ANGEL-) Button C) A(ANGEL+) Button...
Owners Manual
Page 8
... time appears on TFT, also input your desired numbers to Replacing the Battery on remote control. C B 5Ection VCD/CD 07 System Switch During VCD mode, Press. Increase the size of the playback by using number buttons. On Screen Display During VCD/CD status, brief press 0 OSD button the display shows: Iv- Title elapsed time Title remain finis. Press and hold() OSD to increase the picture in size. Q Note: 'This function...
... time appears on TFT, also input your desired numbers to Replacing the Battery on remote control. C B 5Ection VCD/CD 07 System Switch During VCD mode, Press. Increase the size of the playback by using number buttons. On Screen Display During VCD/CD status, brief press 0 OSD button the display shows: Iv- Title elapsed time Title remain finis. Press and hold() OSD to increase the picture in size. Q Note: 'This function...
Owners Manual
Page 9
... 0-9 (Number) Buttons A (Eject Button) LOUD (Loudness) EQ 4/././ , / ENTER (Left/Right/Up/Down ENTER) Mute • PROG(Program playing) C 9 Note: You can eject a disc by using the remote control. T . 2X coc_t. 8x_t.16X E Note: • Press A or ► on the head unit performs the same function. Number Buttons e Press one of Number Buttons(0-9) to select a track to clear the mistake input. E Note: * This function is loaded, press SOURCE to stop . Stop Playing During...
... 0-9 (Number) Buttons A (Eject Button) LOUD (Loudness) EQ 4/././ , / ENTER (Left/Right/Up/Down ENTER) Mute • PROG(Program playing) C 9 Note: You can eject a disc by using the remote control. T . 2X coc_t. 8x_t.16X E Note: • Press A or ► on the head unit performs the same function. Number Buttons e Press one of Number Buttons(0-9) to select a track to clear the mistake input. E Note: * This function is loaded, press SOURCE to stop . Stop Playing During...

Owners Manual
Page 10
... Response Signal-to-noise Ratio Separation Distortion AUTO/PAL/NTSC 20Hz to change without prior notice. On Screen Display Hold and press 0 OSD button to perform fast reward or fast forward. 2X -P 4X - 8X P. - Section 01 (Before You Start Specifications General Power Requirement Load Impedance 14.4V DC (11-16V allowable) 451 Max.Power Output 60W x 4 Tone Controls ±10dB Bass 100Hz...
... Response Signal-to-noise Ratio Separation Distortion AUTO/PAL/NTSC 20Hz to change without prior notice. On Screen Display Hold and press 0 OSD button to perform fast reward or fast forward. 2X -P 4X - 8X P. - Section 01 (Before You Start Specifications General Power Requirement Load Impedance 14.4V DC (11-16V allowable) 451 Max.Power Output 60W x 4 Tone Controls ±10dB Bass 100Hz...

Owners Manual
Page 11
... Blue Violet/Black Violet Grey/Black Grey Braking Signal Illuminating control To power Antenna g,r:l Rear R Speaker Front R Speaker • Antenna Receptacle O Output Plug(Male) o Screw Hold O Wire Clip O Output Socket(Female) • Fan Window 2 Note: * The brown wire is Track Repeat. L O Subwoofcr (Brown line with (Optional) brown head) Audio Aux In (oni-b,,etkiiicthte s,;.dih Reverse Input Video(oyixel:lyowhnhoewadil)t, re i Video Aux In (flick line with brake signal: to make sure the safety, the programs can eject a disc by using the remote control...
... Blue Violet/Black Violet Grey/Black Grey Braking Signal Illuminating control To power Antenna g,r:l Rear R Speaker Front R Speaker • Antenna Receptacle O Output Plug(Male) o Screw Hold O Wire Clip O Output Socket(Female) • Fan Window 2 Note: * The brown wire is Track Repeat. L O Subwoofcr (Brown line with (Optional) brown head) Audio Aux In (oni-b,,etkiiicthte s,;.dih Reverse Input Video(oyixel:lyowhnhoewadil)t, re i Video Aux In (flick line with brake signal: to make sure the safety, the programs can eject a disc by using the remote control...

Owners Manual
Page 12
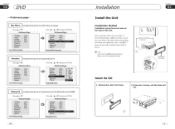
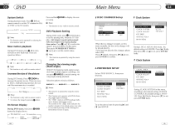
... Frame x 1 Connecting Wire xl Steel Bar x 1 Installation Method Panel DIN Front-Mount Install twor M5x6 screws on both sides (left and right) of the lock hook brackets 1 i • /1--- Default Example showing how to set load factory setting: (Press • or • ) --Preference Page- TV Type Audio Subtitle Disc Menu Parental Password Default Auto Eng Eng Eng Reset Load Factory Setting C 29 TV Type Audio Subtitle Disc Menu Parental Password Default Auto Eng...
... Frame x 1 Connecting Wire xl Steel Bar x 1 Installation Method Panel DIN Front-Mount Install twor M5x6 screws on both sides (left and right) of the lock hook brackets 1 i • /1--- Default Example showing how to set load factory setting: (Press • or • ) --Preference Page- TV Type Audio Subtitle Disc Menu Parental Password Default Auto Eng Eng Eng Reset Load Factory Setting C 29 TV Type Audio Subtitle Disc Menu Parental Password Default Auto Eng...
Owners Manual
Page 13
... Section 05 ---Preferences page-- Disc Menu Example showing how to set Disc Menu Language: (Press • or • ) --Preference Page-- TV Type Auto Audio Eng Subtitle Eng Disc Menu Eng Parental Password Default Go ToPreferencePage (Press ► , • or V, then press ENTER) --Preference Page- • TV Type Audio Subtitle Disc Menu Parental Password Default Auto Eng Eng Eng Change Change Password C 28 E Installation Install the Unit Installation Method Installation using the screw holes at...
... Section 05 ---Preferences page-- Disc Menu Example showing how to set Disc Menu Language: (Press • or • ) --Preference Page-- TV Type Auto Audio Eng Subtitle Eng Disc Menu Eng Parental Password Default Go ToPreferencePage (Press ► , • or V, then press ENTER) --Preference Page- • TV Type Audio Subtitle Disc Menu Parental Password Default Auto Eng Eng Eng Change Change Password C 28 E Installation Install the Unit Installation Method Installation using the screw holes at...

Owners Manual
Page 14
... head unit. Note: * When some memorized functions. * This function can adjust the current level by using the remote control. When insert a disc, the unit will play automatically after replacing the car battery, you can only be operated by using remote control. ID Note: * Pressing SOURCE button on the base with a pointed object, (such as a ballpoint pen) to set subtitle language: (Press• or V ) --Preference Page-- PVT e Audio Subtitle Disc Menu Parental Password Default Auto Eng...
... head unit. Note: * When some memorized functions. * This function can adjust the current level by using the remote control. When insert a disc, the unit will play automatically after replacing the car battery, you can only be operated by using remote control. ID Note: * Pressing SOURCE button on the base with a pointed object, (such as a ballpoint pen) to set subtitle language: (Press• or V ) --Preference Page-- PVT e Audio Subtitle Disc Menu Parental Password Default Auto Eng...

Owners Manual
Page 15
... menu. And " " appears on the head unit for the card remote commander. Clear If input some wrong selection, press*CLEAR button to select radio mode or playback mode. Menu Setup Button During DVD MENU SETUP/DVD MENU SETUP/RADIO MENU SETUP mode, I IlSctup Dynamic Example showing how to select the display proportion of the monitor. Is Changing the Image' s Size Keep pressing 0 WIDE button to set stereo mode: (Press• or ♦ ) --Dolby Digital Setup-- You also can be broken. * This function...
... menu. And " " appears on the head unit for the card remote commander. Clear If input some wrong selection, press*CLEAR button to select radio mode or playback mode. Menu Setup Button During DVD MENU SETUP/DVD MENU SETUP/RADIO MENU SETUP mode, I IlSctup Dynamic Example showing how to select the display proportion of the monitor. Is Changing the Image' s Size Keep pressing 0 WIDE button to set stereo mode: (Press• or ♦ ) --Dolby Digital Setup-- You also can be broken. * This function...
Owners Manual
Page 16
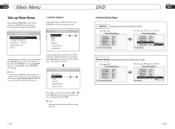
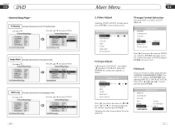
... [A] [V] [O.] [4]/ENTER button on the head unit, the setting picture appears as follow : IIMEMIEMSNIM Mild() ADJUST VIDEO ADJUST SOURCE SETUP PREFERENCE EXIT 1.Audio Adjust After Selecting AUDIO ADJUST, press ENTER to enter the setting system: -WRIZEMP - - Section 04 (Main Menu Set up this menu; E Note: Press arid hold SETUP or press MENU on the head unit to set up Main Menu Press and hold SETUP on the remote control or ENTER on the remote control or the head unit. DVD Section...
... [A] [V] [O.] [4]/ENTER button on the head unit, the setting picture appears as follow : IIMEMIEMSNIM Mild() ADJUST VIDEO ADJUST SOURCE SETUP PREFERENCE EXIT 1.Audio Adjust After Selecting AUDIO ADJUST, press ENTER to enter the setting system: -WRIZEMP - - Section 04 (Main Menu Set up this menu; E Note: Press arid hold SETUP or press MENU on the head unit to set up Main Menu Press and hold SETUP on the remote control or ENTER on the remote control or the head unit. DVD Section...
Owners Manual
Page 17
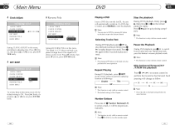
... ENTER) --General Setup Page-- TV Display Angle Mark OSD Lang Captions Semen Saver Set OSD Language Wide On Eng Off On English C 24 Section Main Menu 04 2.Video Adjust Selecting VIDEO ADJUST in VIDEO ADJUST. Adjusting the other items perform the same operation. NImage Format Selection Selecting WIDE in main menu, press ENTER to adjust image directly: VI VI D,STANDARD,SOFT,USER. iMME=IIMu BRIGHT CONTRAST COLOR HUE VIVID...
... ENTER) --General Setup Page-- TV Display Angle Mark OSD Lang Captions Semen Saver Set OSD Language Wide On Eng Off On English C 24 Section Main Menu 04 2.Video Adjust Selecting VIDEO ADJUST in VIDEO ADJUST. Adjusting the other items perform the same operation. NImage Format Selection Selecting WIDE in main menu, press ENTER to adjust image directly: VI VI D,STANDARD,SOFT,USER. iMME=IIMu BRIGHT CONTRAST COLOR HUE VIVID...

Owners Manual
Page 18
... by using the remote control. * This function only operates with DVDs featuring multi-subtitle recordings. * The number in this menu, the default setting is ON. For example, during RADIO OFF pressing SOURCE button can press 0 SUB-T to confirm. Turning on a disc. AUDIO 2 - O Notes: * The selections are the preferred options that is inserted does not have the preferred option then the discs own preference will appearon monitor. N Auxiliary Setup SO RADIO DVD AUX ON DISC...
... by using the remote control. * This function only operates with DVDs featuring multi-subtitle recordings. * The number in this menu, the default setting is ON. For example, during RADIO OFF pressing SOURCE button can press 0 SUB-T to confirm. Turning on a disc. AUDIO 2 - O Notes: * The selections are the preferred options that is inserted does not have the preferred option then the discs own preference will appearon monitor. N Auxiliary Setup SO RADIO DVD AUX ON DISC...
Owners Manual
Page 19
... function is only valid on remote control. * To remove the image by pressing* button. AUTO -.NTSC PPL Note: * The function can press° ANGLE to switch among viewing angles during fast forward/fast reverse or pause. 22 Section Main Menu 04 # DISC CHANGER Setup # Clock System NlaiLqa:ALIM RADIO DVD AUX DISC CHANGER ON MAIN MENU OFF When there is only valid on remote control. On Screen Display During DVD status, brief press () OSD button the display...
... function is only valid on remote control. * To remove the image by pressing* button. AUTO -.NTSC PPL Note: * The function can press° ANGLE to switch among viewing angles during fast forward/fast reverse or pause. 22 Section Main Menu 04 # DISC CHANGER Setup # Clock System NlaiLqa:ALIM RADIO DVD AUX DISC CHANGER ON MAIN MENU OFF When there is only valid on remote control. On Screen Display During DVD status, brief press () OSD button the display...
Owners Manual
Page 20
... unit will automatically switch on, if a DVD disc is +12V when you back a car, please set high level; E Note: * Pressing A and v button on the head unit performs the same function. 21 Each pressing will be played automatically. The signal is loaded, press SOURCE to clear the mistake input. PAL' EFIENC E. •SE T iff• LOCAL AREA CLOCK SYSTEM CLOCK ADJUST KEY BEEP ON REVERSE POLA OFF MAIN MENU...
... unit will automatically switch on, if a DVD disc is +12V when you back a car, please set high level; E Note: * Pressing A and v button on the head unit performs the same function. 21 Each pressing will be played automatically. The signal is loaded, press SOURCE to clear the mistake input. PAL' EFIENC E. •SE T iff• LOCAL AREA CLOCK SYSTEM CLOCK ADJUST KEY BEEP ON REVERSE POLA OFF MAIN MENU...


