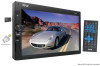
PLDN79U Manual 1
Page 2
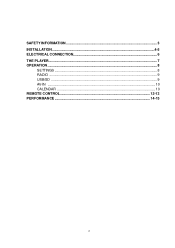
SAFETY INFORMATION ...3 INSTALLATION ...4-5 ELECTRICAL CONNECTION 6 THE PLAYER...7 OPERATION ...8 SETTINGS ...8 RADIO ...9 USB/SD ...9 AV-IN ...10 CALENDAR ...10 REMOTE CONTROL...12-13 PERFORMANCE ...14-15 2
SAFETY INFORMATION ...3 INSTALLATION ...4-5 ELECTRICAL CONNECTION 6 THE PLAYER...7 OPERATION ...8 SETTINGS ...8 RADIO ...9 USB/SD ...9 AV-IN ...10 CALENDAR ...10 REMOTE CONTROL...12-13 PERFORMANCE ...14-15 2

PLDN79U Manual 1
Page 3
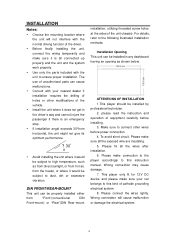
... operate with this unit protect you if you observe the following procedures for service assistance. For Installation The unit should be installed in electric shock or fire hazard. Use the Proper Power Supply This product is designed to disassemble or adjust this precision product. The safeguards incorporated in direct sunlight can produce very high temperatures inside your vehicle. When Parked Parking...
... operate with this unit protect you if you observe the following procedures for service assistance. For Installation The unit should be installed in electric shock or fire hazard. Use the Proper Power Supply This product is designed to disassemble or adjust this precision product. The safeguards incorporated in direct sunlight can produce very high temperatures inside your vehicle. When Parked Parking...
PLDN79U Manual 1
Page 4
... wiring temporarily and make sure all the wires after installation. 6. please read the instruction and operation of the unit chassis). Please connect the wires rightly. The use of unauthorized parts can be installed in the driver's way and cannot injure the passenger if there is all connected up properly and the unit and the system work properly. Use only the parts included with your car belongs to this instruction manual...
... wiring temporarily and make sure all the wires after installation. 6. please read the instruction and operation of the unit chassis). Please connect the wires rightly. The use of unauthorized parts can be installed in the driver's way and cannot injure the passenger if there is all connected up properly and the unit and the system work properly. Use only the parts included with your car belongs to this instruction manual...
PLDN79U Manual 1
Page 6
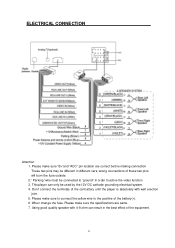
Please make sure to connect the yellow wire to active the video function 3. Please make sure "B+"and "ACC" pin location are same. 7. Using good quality speaker with well erection joint. 5. When change the fuse. This player can result in the best effect of the battery(+). 6. Please make sure the specifications are correct before making connection These two pins may be connected to "ground" in different cars, wrong connections of the car battery until the player is absolutely with...
Please make sure to connect the yellow wire to active the video function 3. Please make sure "B+"and "ACC" pin location are same. 7. Using good quality speaker with well erection joint. 5. When change the fuse. This player can result in the best effect of the battery(+). 6. Please make sure the specifications are correct before making connection These two pins may be connected to "ground" in different cars, wrong connections of the car battery until the player is absolutely with...

PLDN79U Manual 1
Page 7
AV IN1 jack. 4. VOL /Power on/off /Mute button. 3. RESET 6. 7" TFT LCD display. 7. THE PLAYER . 1. Multi-media TF card slot 7 IR Sensor . 2. USB port. 5.
AV IN1 jack. 4. VOL /Power on/off /Mute button. 3. RESET 6. 7" TFT LCD display. 7. THE PLAYER . 1. Multi-media TF card slot 7 IR Sensor . 2. USB port. 5.
PLDN79U Manual 1
Page 8
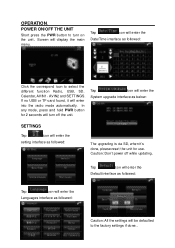
... to the factory settings if done.. 8 POWER ON/OFF THE UNIT Short press the PWR button to turn off while updating. Caution: Don't power off the unit. If no USB or TF-card found, it will enter the Date/Time interface as followed: The upgrading is via SD, when it's done, please reset the unit for 2 seconds will be defaulted to select the different function Radio, USB, SD...
... to the factory settings if done.. 8 POWER ON/OFF THE UNIT Short press the PWR button to turn off while updating. Caution: Don't power off the unit. If no USB or TF-card found, it will enter the Date/Time interface as followed: The upgrading is via SD, when it's done, please reset the unit for 2 seconds will be defaulted to select the different function Radio, USB, SD...
PLDN79U Manual 1
Page 9
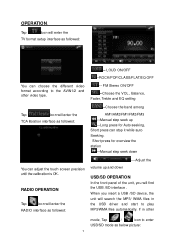
... the TV format setup interface as followed: volume up ---Long press for overview the station ---Manual step seek down ----Adjust the USB/SD OPERATION In the front panel of the unit, you insert a USB /SD device, the unit will enter the RADIO interface as followed: --- FM Stereo ON/OFF ---Choose the VOL , Balance, Fader, Treble and EQ setting Tap Icon will find the USB /SD interface...
... the TV format setup interface as followed: volume up ---Long press for overview the station ---Manual step seek down ----Adjust the USB/SD OPERATION In the front panel of the unit, you insert a USB /SD device, the unit will enter the RADIO interface as followed: --- FM Stereo ON/OFF ---Choose the VOL , Balance, Fader, Treble and EQ setting Tap Icon will find the USB /SD interface...
PLDN79U Manual 1
Page 10
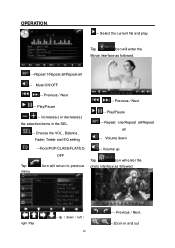
... , Balance, Fader, Treble and EQ setting / --- Select the current file and play Tap Icon will enter the Movie interface as followed. / / / ---Up / down Tap menu. ---Rock/POP/CLASS/FLAT/EQ OFF Icon will enter the photo interface as followed. ----Repeat 1/Repeat all/Repeat all --- Previous / Next / --- Mute ON/OFF / --- OPERATION. --- Volume up Tap Icon will return to...
... , Balance, Fader, Treble and EQ setting / --- Select the current file and play Tap Icon will enter the Movie interface as followed. / / / ---Up / down Tap menu. ---Rock/POP/CLASS/FLAT/EQ OFF Icon will enter the photo interface as followed. ----Repeat 1/Repeat all/Repeat all --- Previous / Next / --- Mute ON/OFF / --- OPERATION. --- Volume up Tap Icon will return to...
PLDN79U Manual 1
Page 11
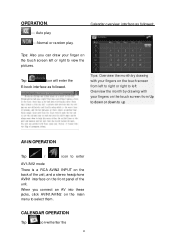
... panel of the unit. Auto play ----Normal or random play. CALENDAR OPERATION Tap Icon will enter the E-book interface as followed: Tips: Also you connect an AV into these jacks, click AVIN1/AVIN2 on the main menu to enter AV1/AV2 mode There is a RCA AVIN2 INPUT on the back of the unit, and a stereo headphone AVIN1 interface on the touch screen from Up...
... panel of the unit. Auto play ----Normal or random play. CALENDAR OPERATION Tap Icon will enter the E-book interface as followed: Tips: Also you connect an AV into these jacks, click AVIN1/AVIN2 on the main menu to enter AV1/AV2 mode There is a RCA AVIN2 INPUT on the back of the unit, and a stereo headphone AVIN1 interface on the touch screen from Up...
PLDN79U Manual 1
Page 13
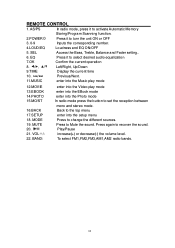
... to activate Automatic Memory Storing/Program Scanning function. 2.POWER Press it to set the reception between mono and stereo mode. Press to turn the unit ON or OFF 3. 0-9 Inputs the corresponding number. 4.LOUD/EQ Loudness and EQ ON/OFF 5. Press again to change the different sources. To select FM1,FM2,FM3,AM1,AM2 radio bands. 13 Play/Pause increase(+) or decrease(-) the volume level. MODE 19. MUTE 20. 21. REMOTE CONTROL...
... to activate Automatic Memory Storing/Program Scanning function. 2.POWER Press it to set the reception between mono and stereo mode. Press to turn the unit ON or OFF 3. 0-9 Inputs the corresponding number. 4.LOUD/EQ Loudness and EQ ON/OFF 5. Press again to change the different sources. To select FM1,FM2,FM3,AM1,AM2 radio bands. 13 Play/Pause increase(+) or decrease(-) the volume level. MODE 19. MUTE 20. 21. REMOTE CONTROL...
PLDN79U Manual 1
Page 15
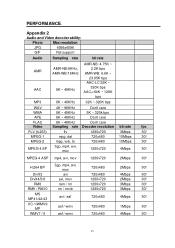
Appendix 2 Audio and Video decoder ability: Photo Max resolution JPG 4096x4096 GIF Not support Audio Sampling rate bit rate AMR AAC AMR-NB :8KHz, AMR-WB:16KHz 8K ~ 48KHz AMR-NB: 4.75K ~ 2.2K bps AMR-WB: 6.6K ~ 23.85K bps ... ~ 48KHz 32K ~ 320K bps WAV 4K ~ 96KHz Don't care WMA 8K ~ 48KHz 5K ~ 320k bps APE 8K ~ 48KHz Don't care FLAC 8K ~ 48KHz Don't care Video Sampling rate Decoder resolution bit rate fps FLV (h.263) flv 1280x720 3Mbps 30f MPEG-1 mpg, dat 720x480 10Mbps 30f MPEG-2 mpg, vob, ts 720x480 10Mbps...
Appendix 2 Audio and Video decoder ability: Photo Max resolution JPG 4096x4096 GIF Not support Audio Sampling rate bit rate AMR AAC AMR-NB :8KHz, AMR-WB:16KHz 8K ~ 48KHz AMR-NB: 4.75K ~ 2.2K bps AMR-WB: 6.6K ~ 23.85K bps ... ~ 48KHz 32K ~ 320K bps WAV 4K ~ 96KHz Don't care WMA 8K ~ 48KHz 5K ~ 320k bps APE 8K ~ 48KHz Don't care FLAC 8K ~ 48KHz Don't care Video Sampling rate Decoder resolution bit rate fps FLV (h.263) flv 1280x720 3Mbps 30f MPEG-1 mpg, dat 720x480 10Mbps 30f MPEG-2 mpg, vob, ts 720x480 10Mbps...

