PLD71MU Manual 1
Page 2
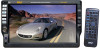
...Electric Connection 9 Remote Control 10 Control Panel 13 Touch Panel 13 Unit Keys 14 Basic Operations 16 TFT Monitor Adjustment 17 Rear View Camera 17 Audio Quality Adjustments 17 Setting Audio Mode 18 Reset Factory Settings 18 Alternate Audio/Video Source ..........18 Radio Operations 19 Listening...AUX Operation 25 On-Screen Disc Operations 26 DISC Special Functions 27 Selecting audio languages 27 Selecting Subtitles 27 Selecting multi-angle views 27 Title menu function 27 Setup 28 General Setup 28 Speaker Setup 30 Dolby Digital Setup 30 Preferences Setup 31 Defaults ...
...Electric Connection 9 Remote Control 10 Control Panel 13 Touch Panel 13 Unit Keys 14 Basic Operations 16 TFT Monitor Adjustment 17 Rear View Camera 17 Audio Quality Adjustments 17 Setting Audio Mode 18 Reset Factory Settings 18 Alternate Audio/Video Source ..........18 Radio Operations 19 Listening...AUX Operation 25 On-Screen Disc Operations 26 DISC Special Functions 27 Selecting audio languages 27 Selecting Subtitles 27 Selecting multi-angle views 27 Title menu function 27 Setup 28 General Setup 28 Speaker Setup 30 Dolby Digital Setup 30 Preferences Setup 31 Defaults ...
PLD71MU Manual 1
Page 4
... HAZARDOUS RADIATION EXPOSURE.DO NOT OPEN COVERS AND DO NOT REPAIR YOURSELF. REGION MANAGEMENT INFORMATION: This DVD Player is intended for home and other limited viewing uses only unless otherwise authorized by method claims of this DVD Player, this DVD Player cannot play this disc. -3- If the Region number described on...
... HAZARDOUS RADIATION EXPOSURE.DO NOT OPEN COVERS AND DO NOT REPAIR YOURSELF. REGION MANAGEMENT INFORMATION: This DVD Player is intended for home and other limited viewing uses only unless otherwise authorized by method claims of this DVD Player, this DVD Player cannot play this disc. -3- If the Region number described on...
PLD71MU Manual 1
Page 9
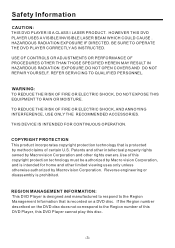
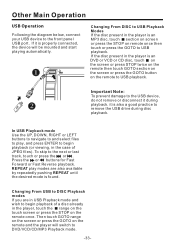
Panel Angle Adjustment CHANGING THE CONTROL PANEL ANGLE When you want to change the viewing angle of the operating unit to play, you can touch the section on touch screen (or press the button on the front panel) repeatedly to select the desired angle as follows: ANGLE 1 - ANGEL 4 - ANGLE 1 ANGLE 2 ANGLE 4 ANGLE 3 Caution: Do not insert your finger behind the control panel. -8- ANGLE 2 - ANGLE 3 - ANGLE 1 .
Panel Angle Adjustment CHANGING THE CONTROL PANEL ANGLE When you want to change the viewing angle of the operating unit to play, you can touch the section on touch screen (or press the button on the front panel) repeatedly to select the desired angle as follows: ANGLE 1 - ANGEL 4 - ANGLE 1 ANGLE 2 ANGLE 4 ANGLE 3 Caution: Do not insert your finger behind the control panel. -8- ANGLE 2 - ANGLE 3 - ANGLE 1 .

PLD71MU Manual 1
Page 11
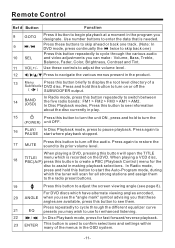
... INT 1 2 3 VOL RDM 4 5 6 AF SEL 7 8 9 TA SETUP GOTO +10 0 16 3 5 20 1 21 23 9 12 26 25 24 Ref # Button Function 1 CLOCK Press it briefly to view the clock time , Press again to return to cycle through the various modes: RADIO > DISC > AUX IN. Press longer to set the time . 2 MODE Press...
... INT 1 2 3 VOL RDM 4 5 6 AF SEL 7 8 9 TA SETUP GOTO +10 0 16 3 5 20 1 21 23 9 12 26 25 24 Ref # Button Function 1 CLOCK Press it briefly to view the clock time , Press again to return to cycle through the various modes: RADIO > DISC > AUX IN. Press longer to set the time . 2 MODE Press...
PLD71MU Manual 1
Page 12
... navigate the various menus present in play. 15 Press this button to turn the unit ON , press and hold this button to adjust the screen viewing angle (see them. In Disc Playback modes, Press this button to turn on the DVD. When playing a DVD, pressing this button will open the TITLE... Auto-Program mode, during which is recorded on or off the audio. Press again to its prior volume level. For DVD discs which have alternate viewing angles encoded, 20 ANGLE when you designate.
... navigate the various menus present in play. 15 Press this button to turn the unit ON , press and hold this button to adjust the screen viewing angle (see them. In Disc Playback modes, Press this button to turn on the DVD. When playing a DVD, pressing this button will open the TITLE... Auto-Program mode, during which is recorded on or off the audio. Press again to its prior volume level. For DVD discs which have alternate viewing angles encoded, 20 ANGLE when you designate.
PLD71MU Manual 1
Page 14
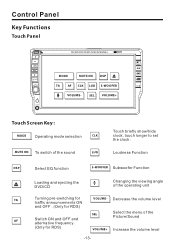
... AF Switch ON and OFF and alternative frequency . Loudness Function DSP Select EQ function S-WOOFER Subwoofer Function Loading and ejecting the DVD/CD Changing the viewing angle of the sound LUD Touch briefly show/hide clock, touch longer to set the clock . SEL VOLUME+ IR AUX IN Touch Screen Key : MODE...
... AF Switch ON and OFF and alternative frequency . Loudness Function DSP Select EQ function S-WOOFER Subwoofer Function Loading and ejecting the DVD/CD Changing the viewing angle of the sound LUD Touch briefly show/hide clock, touch longer to set the clock . SEL VOLUME+ IR AUX IN Touch Screen Key : MODE...

PLD71MU Manual 1
Page 18
... dark. SEL VOLUME+ touch to select touch to 32 Adjust the contrast of the rear view through the rear view camera is selected for the picture-lighter or darker. CONTRAST: 0 to adjust Rear View Camera When connecting the rear view camera. TINT: 0 to +14 Adjust bass level by using VOL + / - . Bass: -14 to 32...
... dark. SEL VOLUME+ touch to select touch to 32 Adjust the contrast of the rear view through the rear view camera is selected for the picture-lighter or darker. CONTRAST: 0 to adjust Rear View Camera When connecting the rear view camera. TINT: 0 to +14 Adjust bass level by using VOL + / - . Bass: -14 to 32...
PLD71MU Manual 1
Page 34
..., DOWN, RIGHT or LEFT buttons to navigate to and select files to play modes are in USB Playback mode and wish to begin playback (or viewing, in the case of a disc already in the player is also a good practice to DVD/VCD/CD/MP3 Playback mode. -33- Press the or buttons...
..., DOWN, RIGHT or LEFT buttons to navigate to and select files to play modes are in USB Playback mode and wish to begin playback (or viewing, in the case of a disc already in the player is also a good practice to DVD/VCD/CD/MP3 Playback mode. -33- Press the or buttons...


