
User Manual
Page 1
MOBILE AUDIO SYSTEM PLCDBT95MRB USER MANUAL • PLL Synthesizer Stereo Radio • CD/MP3/WMA Player • Automatic Memory Storing • Fixed Panel • Bluetooth function • Preset Equalization • Electronic Shockproof (ESP) Function • USB/SD Interface
MOBILE AUDIO SYSTEM PLCDBT95MRB USER MANUAL • PLL Synthesizer Stereo Radio • CD/MP3/WMA Player • Automatic Memory Storing • Fixed Panel • Bluetooth function • Preset Equalization • Electronic Shockproof (ESP) Function • USB/SD Interface
User Manual
Page 2
...3 Take out screw before installation ......... 3 DIN Front-Mount 3 Installing the unit 3 Removing the unit 4 Wiring Connection 5 Operation 6 Location of keys 6 Switching on/off the unit 7 Sound adjustment 7 EQ function 7 Display information 7 Liquid crystal display 7 Reset function 7 Radio operation 7 Switching to radio mode 7 Selecting the frequency band 7 Selecting station 7 Automatic memory storing& program scanning 8 Manually Store Station & Recall Preset Station 8 CD/MP3/WMA operation 8 Switching to CD mode 8 Selecting tracks 8 Pausing playing 8 Previewing all tracks...
...3 Take out screw before installation ......... 3 DIN Front-Mount 3 Installing the unit 3 Removing the unit 4 Wiring Connection 5 Operation 6 Location of keys 6 Switching on/off the unit 7 Sound adjustment 7 EQ function 7 Display information 7 Liquid crystal display 7 Reset function 7 Radio operation 7 Switching to radio mode 7 Selecting the frequency band 7 Selecting station 7 Automatic memory storing& program scanning 8 Manually Store Station & Recall Preset Station 8 CD/MP3/WMA operation 8 Switching to CD mode 8 Selecting tracks 8 Pausing playing 8 Previewing all tracks...
User Manual
Page 3
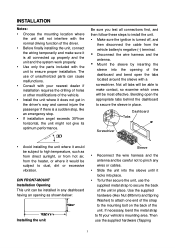
... to the mounting bolt on the back of the driver. Before finally installing the unit, connect the wiring temporarily and make sure it is turned off, and then disconnect the cable from the heater, or where it would be subject to high temperature, such as shown below: 182m m Installing the unit 53m m Sleeve Reconnect the wire harness and the antenna and be...
... to the mounting bolt on the back of the driver. Before finally installing the unit, connect the wiring temporarily and make sure it is turned off, and then disconnect the cable from the heater, or where it would be subject to high temperature, such as shown below: 182m m Installing the unit 53m m Sleeve Reconnect the wire harness and the antenna and be...
User Manual
Page 4
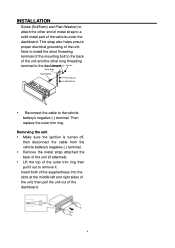
... strap also helps ensure proper electrical grounding of the vehicle under the dashboard. Note to install the short threading terminal of the mounting bolt to the back of the outer trim ring then pull it . Removing the unit Make sure the ignition is turned off, then disconnect the cable from the vehicle battery's negative (-) terminal. Remove the metal...
... strap also helps ensure proper electrical grounding of the vehicle under the dashboard. Note to install the short threading terminal of the mounting bolt to the back of the outer trim ring then pull it . Removing the unit Make sure the ignition is turned off, then disconnect the cable from the vehicle battery's negative (-) terminal. Remove the metal...

User Manual
Page 5
WIRING CONNECTION 5
WIRING CONNECTION 5

User Manual
Page 6
"Vol /SEL" button 5. " " Seek up button. 9. USB port 13. "5 DIR-" button. 17. AUX jack 14. Microphone 6 "BAND" / button. 2. "AMS" button 6. " " Seek down button 7. LCD display 11. OPERATION LOCATION OF KEYS 1. "MODE"/ button. 3. " " button 4. IR Sensor 10. "4 RDM" button. 18. "3 RPT" button. 19 "2 INT" button. 20. "6 DIR+" button. 16. " " button. 21. "DISP" button. 8. Eject button 12. SD slot 15.
"Vol /SEL" button 5. " " Seek up button. 9. USB port 13. "5 DIR-" button. 17. AUX jack 14. Microphone 6 "BAND" / button. 2. "AMS" button 6. " " Seek down button 7. LCD display 11. OPERATION LOCATION OF KEYS 1. "MODE"/ button. 3. " " button 4. IR Sensor 10. "4 RDM" button. 18. "3 RPT" button. 19 "2 INT" button. 20. "6 DIR+" button. 16. " " button. 21. "DISP" button. 8. Eject button 12. SD slot 15.
User Manual
Page 7
... flash. You can be connected to change the hour. Rotating the audio knob (4) to a portable audio player through the AUX IN jack (13). LIQUID CRYSTAL DISPLAY Exhibit current frequency and activated functions on the display. AUXILIARY INPUT The unit can choose the area between USA and EUROPE by rotating the audio knob (4) as RADIO OPERATION SWITCHING TO RADIO MODE below: Press MODE button (2) to be activated with the memory band and frequency. The RESET button is to select radio...
... flash. You can be connected to change the hour. Rotating the audio knob (4) to a portable audio player through the AUX IN jack (13). LIQUID CRYSTAL DISPLAY Exhibit current frequency and activated functions on the display. AUXILIARY INPUT The unit can choose the area between USA and EUROPE by rotating the audio knob (4) as RADIO OPERATION SWITCHING TO RADIO MODE below: Press MODE button (2) to be activated with the memory band and frequency. The RESET button is to select radio...
User Manual
Page 8
... the station that preset number for 5 seconds, it again to seek tuning mode and "AUTO" appears on CD in the driver: Gently insert the CD with release mute, then searches again. MANUALLY STORE STATION & RECALL PRESET STATION To received a station, Press one till searched a station. CD playback 8 begins. SELECTING TRACKS Press (8) or button (6) to move to Repeat all tracks on the display. AUTOMATIC MEMORY STORING & PROGRAM...
... the station that preset number for 5 seconds, it again to seek tuning mode and "AUTO" appears on CD in the driver: Gently insert the CD with release mute, then searches again. MANUALLY STORE STATION & RECALL PRESET STATION To received a station, Press one till searched a station. CD playback 8 begins. SELECTING TRACKS Press (8) or button (6) to move to Repeat all tracks on the display. AUTOMATIC MEMORY STORING & PROGRAM...
User Manual
Page 9
... connect an USB driver through the interface, the unit will search the MP3/ WMA files and start to enter the folder. You also can only support the standard USB-memory disc which is approved by Microsoft. USB MP3 player is not a standard which is activated as selecting each mode as selection button in the device, the operation is the same with the MP3 operation described above AUDIO KNOB & TUNE...
... connect an USB driver through the interface, the unit will search the MP3/ WMA files and start to enter the folder. You also can only support the standard USB-memory disc which is approved by Microsoft. USB MP3 player is not a standard which is activated as selecting each mode as selection button in the device, the operation is the same with the MP3 operation described above AUDIO KNOB & TUNE...
User Manual
Page 10
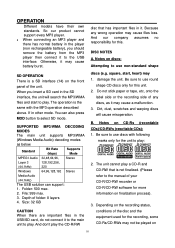
... connect it to play a CD-R and CD-RW that has important files in other mode. When you should remove the battery from the MP3 player then connect it to the main unit to the USB interface. You can support: 1. B. Depending on the front panel of any wrong operation may 1. Because any discs, as below. Be sure to use round shape CD discs only for this unit. 2. disc...
... connect it to play a CD-R and CD-RW that has important files in other mode. When you should remove the battery from the MP3 player then connect it to the main unit to the USB interface. You can support: 1. B. Depending on the front panel of any wrong operation may 1. Because any discs, as below. Be sure to use round shape CD discs only for this unit. 2. disc...
User Manual
Page 11
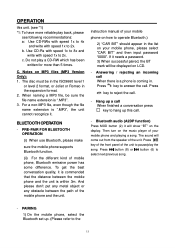
... in. instruction manual of your mobile phone, please select "CAR BIT" and then input password "0000". Bluetooth audio (A2DP function) Press MOD button (2) it is commended that the distance between the path of mobile phone, Bluetooth emissive power has some difference. The sound will be displayed on LCD. - OPERATION this call . C. Notes on the music player of your mobile phone on how to the 11 PRE-PAIR FOR BLUETOOTH OPERATION (i) When use Bluetooth, please make sure...
... in. instruction manual of your mobile phone, please select "CAR BIT" and then input password "0000". Bluetooth audio (A2DP function) Press MOD button (2) it is commended that the distance between the path of mobile phone, Bluetooth emissive power has some difference. The sound will be displayed on LCD. - OPERATION this call . C. Notes on the music player of your mobile phone on how to the 11 PRE-PAIR FOR BLUETOOTH OPERATION (i) When use Bluetooth, please make sure...

User Manual
Page 12
... 8. REMOTE CONTROL HANDSET (OPTIONAL) FUNCTION KEY & CONTROL 1. VOL- 9. 1/PAU 10. 2/INT 11. 4/RDM 12. 5/DIR13. 6/DIR+ 14. 3/RPT 15. BND 4. POWER 2. MUTE Power ON/OFF Button Mode Button(S,T,U,7,For MP3/WMA Operation) Band Select Button Volume Up Button (Character Select (A, B~8, 9, 0) For MP3/WMA Operation) Tune/SKIP Down Button(W,X,Y,8 For MP3/WMA) Sound Mode Select Button (Character Shift Right for MP3/WMA Operation) EQ Select Button Volume Down Button (Character Select (A, B~8, 9, 0) For MP3/WMA Operation) Pause Button (A,B,C,1 For MP3/WMA Operation) Intro Button (D,E,F,2 For...
... 8. REMOTE CONTROL HANDSET (OPTIONAL) FUNCTION KEY & CONTROL 1. VOL- 9. 1/PAU 10. 2/INT 11. 4/RDM 12. 5/DIR13. 6/DIR+ 14. 3/RPT 15. BND 4. POWER 2. MUTE Power ON/OFF Button Mode Button(S,T,U,7,For MP3/WMA Operation) Band Select Button Volume Up Button (Character Select (A, B~8, 9, 0) For MP3/WMA Operation) Tune/SKIP Down Button(W,X,Y,8 For MP3/WMA) Sound Mode Select Button (Character Shift Right for MP3/WMA Operation) EQ Select Button Volume Down Button (Character Select (A, B~8, 9, 0) For MP3/WMA Operation) Pause Button (A,B,C,1 For MP3/WMA Operation) Intro Button (D,E,F,2 For...
User Manual
Page 13
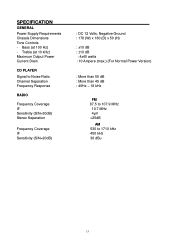
...) - SPECIFICATION GENERAL Power Supply Requirements Chassis Dimensions Tone Controls - Bass (at 10 kHz) Maximum Output Power Current Drain CD PLAYER Signal to Noise Ratio Channel Separation Frequency Response RADIO Frequency Coverage IF Sensitivity (S/N=30dB) Stereo Separation Frequency Coverage IF Sensitivity (S/N=20dB) : DC 12 Volts, Negative Ground : 178 (W) x 160 (D) x 50 (H) : ±10 dB : ±10 dB : 4x40 watts : 10 Ampere (max.) (For Normal Power Version...
...) - SPECIFICATION GENERAL Power Supply Requirements Chassis Dimensions Tone Controls - Bass (at 10 kHz) Maximum Output Power Current Drain CD PLAYER Signal to Noise Ratio Channel Separation Frequency Response RADIO Frequency Coverage IF Sensitivity (S/N=30dB) Stereo Separation Frequency Coverage IF Sensitivity (S/N=20dB) : DC 12 Volts, Negative Ground : 178 (W) x 160 (D) x 50 (H) : ±10 dB : ±10 dB : 4x40 watts : 10 Ampere (max.) (For Normal Power Version...
User Manual
Page 14
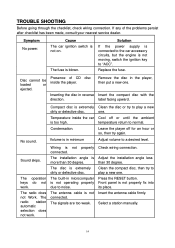
.... Select a station manually. 14 Presence of the problems persist after checklist has been made, consult your nearest service dealer. Condensation. Check wiring connection. Remove the disc in reverse direction. Temperature inside the player. Leave the player off or until the ambient is not moving, switch the ignition key to a desired level. Volume is not operating properly due to normal. The antenna cable is not properly connected. Insert the antenna cable firmly...
.... Select a station manually. 14 Presence of the problems persist after checklist has been made, consult your nearest service dealer. Condensation. Check wiring connection. Remove the disc in reverse direction. Temperature inside the player. Leave the player off or until the ambient is not moving, switch the ignition key to a desired level. Volume is not operating properly due to normal. The antenna cable is not properly connected. Insert the antenna cable firmly...


