Owners Manual
Page 1
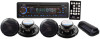
PLCD4MRKT OWNER'S MANUAL Mobile Audio System PLL Synthesizer Stereo Radio CD/MP3/WMA Player Automatic Memory Storing Fixed Panel Preset Equalization Electronic Shockproof (ESP) Function USB Interface www.pyleaudio.com 1
PLCD4MRKT OWNER'S MANUAL Mobile Audio System PLL Synthesizer Stereo Radio CD/MP3/WMA Player Automatic Memory Storing Fixed Panel Preset Equalization Electronic Shockproof (ESP) Function USB Interface www.pyleaudio.com 1
Owners Manual
Page 2
CONTENTS Installation 3 Take out screw before installation ......... 3 DIN Front-Mount (Method A 3 Installing the unit 3 Removing the unit 4 DIN Rear-Mount (Method B 5 Wiring Connection 6 Operation 7 Location of keys 7 Switching on/off the unit 8 Sound adjustment 8 EQ function 8 Display information 8 Liquid crystal display 8 Reset function 8 Radio operation 8 Switching to radio mode 8 Selecting the frequency band 8 Selecting station 8 Automatic memory storing & program scanning 9 Manually Store...
CONTENTS Installation 3 Take out screw before installation ......... 3 DIN Front-Mount (Method A 3 Installing the unit 3 Removing the unit 4 DIN Rear-Mount (Method B 5 Wiring Connection 6 Operation 7 Location of keys 7 Switching on/off the unit 8 Sound adjustment 8 EQ function 8 Display information 8 Liquid crystal display 8 Reset function 8 Radio operation 8 Switching to radio mode 8 Selecting the frequency band 8 Selecting station 8 Automatic memory storing & program scanning 9 Manually Store...
Owners Manual
Page 3
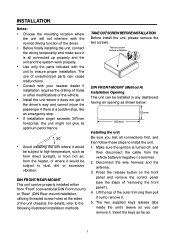
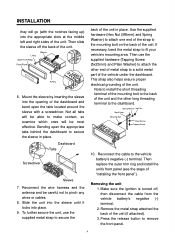
... wiring temporarily and make sure it is all connections first, and then follow these steps to install the unit. 1. DIN FRONT-MOUNT (Method A) Installation Opening This unit can be installed in the driver's way and cannot injure the passenger if there is turned off, and then disconnect the cable from "Front" (conventional DIN Front-mount) or "Rear" (DIN Rear-mount installation...
... wiring temporarily and make sure it is all connections first, and then follow these steps to install the unit. 1. DIN FRONT-MOUNT (Method A) Installation Opening This unit can be installed in the driver's way and cannot injure the passenger if there is turned off, and then disconnect the cable from "Front" (conventional DIN Front-mount) or "Rear" (DIN Rear-mount installation...
Owners Manual
Page 4
...wire harness and the antenna and be careful not to fit your vehicle's mounting area. If necessary, bend the metal strap to pinch any wires or cables. 8. Note to install the short threading terminal of the mounting bolt to the back of the unit and the other end of the unit. Make sure the ignition is turned...will go (with a screwdriver. Reconnect the cable to the mounting bolt on the back of the strap to the vehicle battery's negative (-) terminal. Remove the metal strap attached the back of the unit. Dashboard Tabs Screwdriver Sleeve 7. Use the supplied hardware (Hex Nut (M5mm)...
...wire harness and the antenna and be careful not to fit your vehicle's mounting area. If necessary, bend the metal strap to pinch any wires or cables. 8. Note to install the short threading terminal of the mounting bolt to the back of the unit and the other end of the unit. Make sure the ignition is turned...will go (with a screwdriver. Reconnect the cable to the mounting bolt on the back of the strap to the vehicle battery's negative (-) terminal. Remove the metal strap attached the back of the unit. Dashboard Tabs Screwdriver Sleeve 7. Use the supplied hardware (Hex Nut (M5mm)...
Owners Manual
Page 5
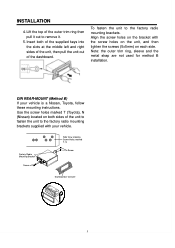
... metal strap are not used for method B installation. Insert both sides of the unit to fasten the unit to remove it out to the factory radio mounting brackets supplied with the screw holes on the unit, and then tighten the screws (5x5mm) on the bracket with your vehicle is a Nissan, Toyota, follow these mounting instructions. Use the screw holes...
... metal strap are not used for method B installation. Insert both sides of the unit to fasten the unit to remove it out to the factory radio mounting brackets supplied with the screw holes on the unit, and then tighten the screws (5x5mm) on the bracket with your vehicle is a Nissan, Toyota, follow these mounting instructions. Use the screw holes...

Owners Manual
Page 6
WIRING CONNECTION 6
WIRING CONNECTION 6
Owners Manual
Page 8
... (2) to turn off loudness function by rotating the knob (2). LOUDNESS FUNCTION In LOUD item you can be activated for At radio mode, press BND button (13) several seconds it for 2 seconds to select the desired adjustment mode. The RESET button is ...use a cotton swab soaked in the following order: SET THE TIME →FM1→ FM2→ FM3 → AM1→ AM2 Press and hold SEL for 2 seconds. b) All the function buttons do not operate. Rotating the audio knob (2) to show the time for the following reasons: a) Initial installation of the unit when all wiring...
... (2) to turn off loudness function by rotating the knob (2). LOUDNESS FUNCTION In LOUD item you can be activated for At radio mode, press BND button (13) several seconds it for 2 seconds to select the desired adjustment mode. The RESET button is ...use a cotton swab soaked in the following order: SET THE TIME →FM1→ FM2→ FM3 → AM1→ AM2 Press and hold SEL for 2 seconds. b) All the function buttons do not operate. Rotating the audio knob (2) to show the time for the following reasons: a) Initial installation of the unit when all wiring...

Owners Manual
Page 9
... mode and "AUTO" appears on the display. AUTOMATIC MEMORY STORING & PROGRAM SCANNING - Program scanning Press DISP button (7) to fast reverse or fast forward. The radio is no CD inserted in the corresponding preset button. CD playback begins. CD play starts from when you can turn up.... If the MP3 disc does not contain any directory, there is holding at that saved in the driver: Gently insert the CD with release mute, then searches again. MANUALLY STORE STATION & RECALL PRESET STATION To received a station, Press one till searched a station. Automatic ...
... mode and "AUTO" appears on the display. AUTOMATIC MEMORY STORING & PROGRAM SCANNING - Program scanning Press DISP button (7) to fast reverse or fast forward. The radio is no CD inserted in the corresponding preset button. CD playback begins. CD play starts from when you can turn up.... If the MP3 disc does not contain any directory, there is holding at that saved in the driver: Gently insert the CD with release mute, then searches again. MANUALLY STORE STATION & RECALL PRESET STATION To received a station, Press one till searched a station. Automatic ...
Owners Manual
Page 10
... 7 V, W, X, 8 PTY Y, Z, SPACE,9 DSP _,-,+,0 CHARACTER SELECT AUDIO KNOB All the CHARACTER above . When you can only support the standard USB-memory disc which is an USB interface (12). When pressed, it is activated as selecting each mode as the clock, FM frequency and other mode, you connect an USB driver through this interface (12). It enter... knob (2) button is assigned as selection button in the device, the operation is not a standard which means different brand name or different models have the same character which is approved by using the numeric buttons.
... 7 V, W, X, 8 PTY Y, Z, SPACE,9 DSP _,-,+,0 CHARACTER SELECT AUDIO KNOB All the CHARACTER above . When you can only support the standard USB-memory disc which is an USB interface (12). When pressed, it is activated as selecting each mode as the clock, FM frequency and other mode, you connect an USB driver through this interface (12). It enter... knob (2) button is assigned as selection button in the device, the operation is not a standard which means different brand name or different models have the same character which is approved by using the numeric buttons.
Owners Manual
Page 11
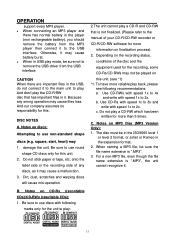
...support every MP3 player. When connecting an MP3 player and there has normal battery in the player (non rechargeable battery), you should remove the battery from the USB interface. CAUTION When there are important files in USB play the CD-R/RW disc that is not finalized. (Please refer to remove the USB driver... unit to the USB interface. And don't play mode, be sure not to the manual of your CD-R/CD-RW recorder or CD-R/CD-... for this . ReWritable 11 DISC NOTES A. Be sure to use discs with speed 1x to use non-standard shape discs (e.g. C. Otherwise, it may 1. And...
...support every MP3 player. When connecting an MP3 player and there has normal battery in the player (non rechargeable battery), you should remove the battery from the USB interface. CAUTION When there are important files in USB play the CD-R/RW disc that is not finalized. (Please refer to remove the USB driver... unit to the USB interface. And don't play mode, be sure not to the manual of your CD-R/CD-RW recorder or CD-R/CD-... for this . ReWritable 11 DISC NOTES A. Be sure to use discs with speed 1x to use non-standard shape discs (e.g. C. Otherwise, it may 1. And...

Owners Manual
Page 12
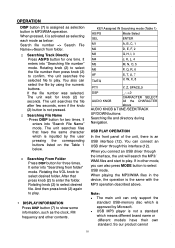
...PAU 7. VOL▲ 10. LOC 17. BND(LOU/ENT) 5. TUNE/SKIP (8) 4. SEL 11. DISC/DIR▲ Power ON/OFF Button Mode Button(S,T,U,7,For MP3/WMA Operation) Tune/SKIP Down Button(V,W,X,8 For MP3/WMA Operation) Band Select Button(When pressed shortly) Loudness Button ... Repeat Button(G,H,I,3 For MP3/WMA Operation) Automatic Memory Storing & Program Scanning Button (Mode Select Button For MP3/WMA Operation) Local/Distant Select Button DISC/DIR▲ Button 12 DISC/DIR▼ 9. DSP(0) 14. POWER 2. 7/MODE 3. SCN 6. SHF 8. RPT 15. REMOTE CONTROL HANDSET(OPTIONAL) FUNCTION KEY & ...
...PAU 7. VOL▲ 10. LOC 17. BND(LOU/ENT) 5. TUNE/SKIP (8) 4. SEL 11. DISC/DIR▲ Power ON/OFF Button Mode Button(S,T,U,7,For MP3/WMA Operation) Tune/SKIP Down Button(V,W,X,8 For MP3/WMA Operation) Band Select Button(When pressed shortly) Loudness Button ... Repeat Button(G,H,I,3 For MP3/WMA Operation) Automatic Memory Storing & Program Scanning Button (Mode Select Button For MP3/WMA Operation) Local/Distant Select Button DISC/DIR▲ Button 12 DISC/DIR▼ 9. DSP(0) 14. POWER 2. 7/MODE 3. SCN 6. SHF 8. RPT 15. REMOTE CONTROL HANDSET(OPTIONAL) FUNCTION KEY & ...
Owners Manual
Page 13
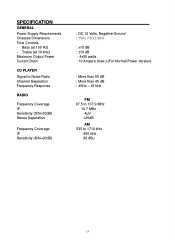
Treble (at 100 Hz) - SPECIFICATION GENERAL Power Supply Requirements Chasses Dimensions Tone Controls - Bass (at 10 kHz) Maximum Output Power Current Drain CD PLAYER Signal to Noise Ratio Channel Separation Frequency Response RADIO Frequency Coverage IF Sensitivity (S/N=30dB) Stereo Separation Frequency Coverage IF Sensitivity (S/N=20dB) : DC 12 Volts, Negative Ground : 7''W x 7''D x 1.96''H : ±10 dB : ±...
Treble (at 100 Hz) - SPECIFICATION GENERAL Power Supply Requirements Chasses Dimensions Tone Controls - Bass (at 10 kHz) Maximum Output Power Current Drain CD PLAYER Signal to Noise Ratio Channel Separation Frequency Response RADIO Frequency Coverage IF Sensitivity (S/N=30dB) Stereo Separation Frequency Coverage IF Sensitivity (S/N=20dB) : DC 12 Volts, Negative Ground : 7''W x 7''D x 1.96''H : ±10 dB : ±...

Owners Manual
Page 14
...manually. 14 The fuse is not moving, switch the ignition key to the car accessory circuits, but the engine is blown. Solution If the power supply is connected to "ACC". Presence of the problems persist after checklist has been made, consult your nearest service... work . TROUBLE SHOOTING Before going through the checklist, check wiring connection. Symptom No power. Remove the disc in reverse direction. Press the RESET button. temperature return to noise. Replace the fuse. Volume is not properly connected. Insert the antenna cable firmly. Wiring is in ...
...manually. 14 The fuse is not moving, switch the ignition key to the car accessory circuits, but the engine is blown. Solution If the power supply is connected to "ACC". Presence of the problems persist after checklist has been made, consult your nearest service... work . TROUBLE SHOOTING Before going through the checklist, check wiring connection. Symptom No power. Remove the disc in reverse direction. Press the RESET button. temperature return to noise. Replace the fuse. Volume is not properly connected. Insert the antenna cable firmly. Wiring is in ...


