Pyle PLCD36MRW Support and Manuals
Get Help and Manuals for this Pyle item
View All Support Options Below
Free Pyle PLCD36MRW manuals!
Problems with Pyle PLCD36MRW?
Ask a Question
Free Pyle PLCD36MRW manuals!
Problems with Pyle PLCD36MRW?
Ask a Question
Popular Pyle PLCD36MRW Manual Pages
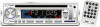
Owners Manual - Page 1

PLCD34MRW-PLCD36MRW
OWNER'S MANUAL
Marine Audio System
• In-Dash Marine CD/MP3 Player
• Auto Power Loading
• PLL Synthesizer Stereo Radio
• Auxiliary Input Function
• AM/...
Owners Manual - Page 2
... 3 Take out screw before installation .......3 DIN Front-Mount (Method A 3
Installing the unit 3 Removing the unit 4 DIN Rear-Mount (Method B 5 Wiring Connection 6 Operation 7 Location of keys 7 Switching on/off ...Display information 12 WMA operation 12 Mixed-CD operation 12 USB play operation 12 Supported MP3/WMA decoding modes 13 Disc notes 13 Specification 14 Trouble shooting 15
2
Owners Manual - Page 3
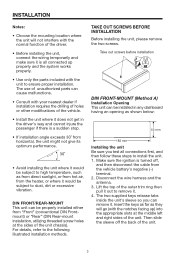
... screw holes at the middle left and right sides of the unit. The use of unauthorized parts can remove it . 4. Take out screws before installation
DIN FRONT-MOUNT (Method A) Installation Opening This unit can be installed in the driver's way and cannot injure the passenger if there is turned off the back of the unit...
Owners Manual - Page 4
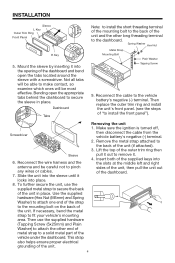
... helps ensure proper electrical grounding of "to a solid metal part of the unit in place. Dashboard
Tabs
Note: to install the short threading terminal of the mounting bolt to the back... end of metal strap to install the front panel"). Then replace the outer trim ring and install the unit's front panel. (see the steps of the unit. Removing the unit 1. INSTALLATION
Sleeve L Key Outer Trim ...
Owners Manual - Page 5
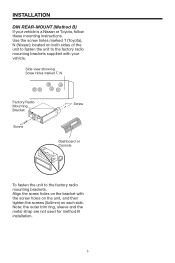
... the unit to the factory radio mounting brackets supplied with your vehicle is a Nissan or Toyota, follow these mounting instructions. Align the screw holes on the bracket with the screw holes on the unit, and then tighten the screws (5x5mm...: the outer trim ring, sleeve and the metal strap are not used for method B installation.
5
INSTALLATION
DIN REAR-MOUNT (Method B) If your vehicle.
Owners Manual - Page 8
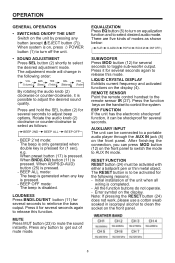
... IN mode.
The RESET button is possible to adjust the desired sound quality. Initial installation of modes as follows:
BEEP 2ND BEEP ALL BEEP OFF
-
LIQUID CRYSTAL DISPLAY Exhibits... FUNCTION RESET button (24) must be activated for several seconds again to release this function. Error symbol on the display (4). LOUDNESS Press BND/LOU/ENT button (11) for several seconds to...
Owners Manual - Page 9
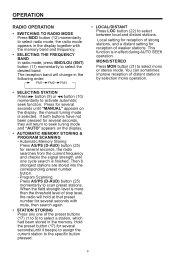
...until it beeps) to assign the current station to the specific button pressed.
• LOCAL/DISTANT Press LOC button (22... from the current frequency and checks the signal strength until "MANUAL" appears on the display.
• AUTOMATIC MEMORY STORING &...more than the threshold level of strong stations, and a distant setting for several seconds with the memory band and frequency. •...
Owners Manual - Page 10

...10) or button(9) to move to select directory downward or upward. If a CD is already inserted in the driver: Keep pressing MOD button (12) momentarily until the CD (MP3) mode display appears.
• EJECTING A...the previous track or the following track. If a MP3 disc is already inserted in the driver: Keep pressing MOD button (12) momentarily until you feel some resistance. If the MP3...
Owners Manual - Page 12
...SEEK/
When you connect an USB driver through this way, you can switch between playing CD audio tracks or MP3 songs repeatedly. product cannot support all MP3 players. then connect it... jumps to the end (i.e.
And the operation is not a standard which
means different brand name or different
Searching file and directory during
models...
Owners Manual - Page 13

...or level 2 format, or Joliet or Romeo
in the USB interface, you can support: 1. Size: 8 GB
B. And our company assumes no USB driver in the expansion format.
2. If in the card and start to SD/MMC directly...2x. Attempting to use discs with following recommendations: a.Use CD-RWs with speed 1x to the manual of your CD-R/CD-RW recorder or CD-R/ CD-RW software for this.
(Please refer to...
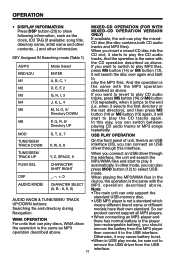
Owners Manual - Page 14
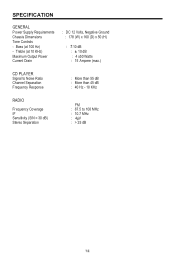
... : 40 Hz - 18 KHz
RADIO
Fr equency Coverage IF Sensitivity (S/N = 30 dB) Stereo Separation
FM : 87.5 to 108 MHz : 10.7 MHz
: 4μV : > 25 dB
15 SPECIFICATION
GENERAL P ower Supply Requirements Chassis Dimensions Tone Controls -
Owners Manual - Page 15
... the installation angle less than 30 degrees.
The...manually.
16 If the power supply is connected to the car accessory circuits, but the engine is more than 30 degrees.
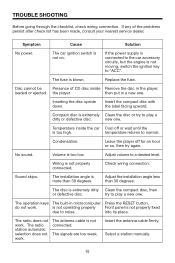
Disc cannot be
Presence of the problems persist after check list has been made, consult your nearest service...place. TROUBLE SHOOTING
Before going through the checklist, check wiring connection.
Replace the fuse...
Pyle PLCD36MRW Reviews
We have not received any reviews for Pyle yet.