
Owners Manual
Page 1
PLCD34MRW-PLCD36MRW OWNER'S MANUAL Marine Audio System • In-Dash Marine CD/MP3 Player • Auto Power Loading • PLL Synthesizer Stereo Radio • Auxiliary Input Function • AM/FM MPX Electronic Tuning Receiver • USB/SD/MMC Function • Program CD Tracks • Minute, Second Track ...Tracking • Loudness Mute Button • 8x Oversampling • Full Illumination Carrying Case • Anti-Skip Mechanism • 4 x 50 Watts Maximum Total Output • Marine Coating • Chassis Dimensions: 7''W x 7''D x 1.96''H www.pyleaudio.com
PLCD34MRW-PLCD36MRW OWNER'S MANUAL Marine Audio System • In-Dash Marine CD/MP3 Player • Auto Power Loading • PLL Synthesizer Stereo Radio • Auxiliary Input Function • AM/FM MPX Electronic Tuning Receiver • USB/SD/MMC Function • Program CD Tracks • Minute, Second Track ...Tracking • Loudness Mute Button • 8x Oversampling • Full Illumination Carrying Case • Anti-Skip Mechanism • 4 x 50 Watts Maximum Total Output • Marine Coating • Chassis Dimensions: 7''W x 7''D x 1.96''H www.pyleaudio.com
Owners Manual
Page 2
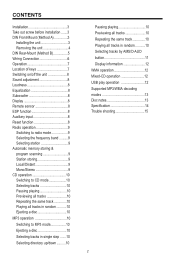
...out screw before installation .......3 DIN Front-Mount (Method A 3 Installing the unit 3 Removing the unit 4 DIN Rear-Mount (Method B 5 Wiring Connection 6 Operation 7 Location of keys 7 Switching on/off the unit 8 Sound adjustment 8 Loudness 8 Equalization 8 Subwoofer 8 Display 8 Remote sensor 8 ESP function 8 Auxiliary input 8 Reset function 8 Radio operation 9 Switching to radio mode 9 Selecting ... information 12 WMA operation 12 Mixed-CD operation 12 USB play operation 12 Supported MP3/WMA decoding modes 13 Disc notes 13 Specification 14 Trouble shooting 15 2
...out screw before installation .......3 DIN Front-Mount (Method A 3 Installing the unit 3 Removing the unit 4 DIN Rear-Mount (Method B 5 Wiring Connection 6 Operation 7 Location of keys 7 Switching on/off the unit 8 Sound adjustment 8 Loudness 8 Equalization 8 Subwoofer 8 Display 8 Remote sensor 8 ESP function 8 Auxiliary input 8 Reset function 8 Radio operation 9 Switching to radio mode 9 Selecting ... information 12 WMA operation 12 Mixed-CD operation 12 USB play operation 12 Supported MP3/WMA decoding modes 13 Disc notes 13 Specification 14 Trouble shooting 15 2
Owners Manual
Page 3
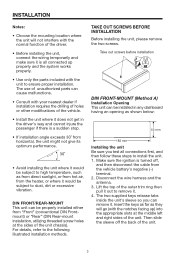
...• Avoid installing the unit where it . 4. Disconnect the wire harness and the antenna. 3. TAKE OUT SCREWS BEFORE INSTALLATION Before installing the unit, please remove the two screws. DIN FRONT/REAR-MOUNT This unit can be properly installed either from the heater, or where it . The use of unauthorized parts can remove it... dashboard having an opening as they will not interfere with the normal function of the driver. • Before installing the unit, connect the wiring temporarily and make sure it is turned off the back of the outer trim ring then pull it out to remove it...
...• Avoid installing the unit where it . 4. Disconnect the wire harness and the antenna. 3. TAKE OUT SCREWS BEFORE INSTALLATION Before installing the unit, please remove the two screws. DIN FRONT/REAR-MOUNT This unit can be properly installed either from the heater, or where it . The use of unauthorized parts can remove it... dashboard having an opening as they will not interfere with the normal function of the driver. • Before installing the unit, connect the wiring temporarily and make sure it is turned off the back of the outer trim ring then pull it out to remove it...
Owners Manual
Page 4
... the dashboard to the dashboard. Dashboard Tabs Note: to install the short threading terminal of the mounting bolt to install the front panel"). Slide the unit into the opening of the unit in place. Use the supplied hardware (Hex Nut (M5mm) and Spring Washer...sure the ignition is turned off, then disconnect the cable from the vehicle battery's negative (-) terminal. 2. If necessary, bend the metal strap to the vehicle battery's negative (-) terminal. Reconnect the wire harness and the antenna and be most effective. Spring Washer Hex Nut Metal Strap Mounting Bolt Plain Washer ...
... the dashboard to the dashboard. Dashboard Tabs Note: to install the short threading terminal of the mounting bolt to install the front panel"). Slide the unit into the opening of the unit in place. Use the supplied hardware (Hex Nut (M5mm) and Spring Washer...sure the ignition is turned off, then disconnect the cable from the vehicle battery's negative (-) terminal. 2. If necessary, bend the metal strap to the vehicle battery's negative (-) terminal. Reconnect the wire harness and the antenna and be most effective. Spring Washer Hex Nut Metal Strap Mounting Bolt Plain Washer ...
Owners Manual
Page 5
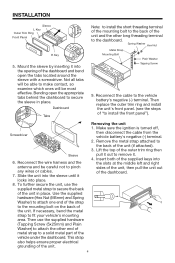
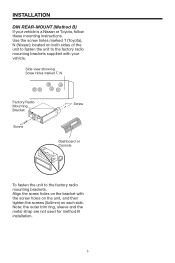
.... Side view showing Screw Holes marked T, N Factory Radio Mounting Bracket Screw Screw Dashboard or Console To fasten the unit to the factory radio mounting brackets supplied with the screw holes on the unit, and then tighten the screws (5x5mm) on the bracket with your vehicle is a Nissan or Toyota, follow these mounting instructions. INSTALLATION DIN REAR-MOUNT (Method B) If your vehicle.
.... Side view showing Screw Holes marked T, N Factory Radio Mounting Bracket Screw Screw Dashboard or Console To fasten the unit to the factory radio mounting brackets supplied with the screw holes on the unit, and then tighten the screws (5x5mm) on the bracket with your vehicle is a Nissan or Toyota, follow these mounting instructions. INSTALLATION DIN REAR-MOUNT (Method B) If your vehicle.

Owners Manual
Page 6
WIRING CONNECTION MAIN UNIT ANTENNA CONNECTOR IGNITION RED SWITCH (ACC+) MEMORY BACK-UP (B+) GROUND (B-) YELLOW BLACK FUSE FUSE POWER ANTENNA FRONT Lch SPEAKER BLUE WHITE WHITE/BLACK REAR Lch SPEAKER GREEN GREEN/BLACK SUBWOOFER CABLE (GREEN) RCA CABLE (GREY) Rch RED Lch WHITE GREY GREY/BLACK VIOLET VIOLET/BLACK FRONT Rch SPEAKER REAR Rch SPEAKER 6
WIRING CONNECTION MAIN UNIT ANTENNA CONNECTOR IGNITION RED SWITCH (ACC+) MEMORY BACK-UP (B+) GROUND (B-) YELLOW BLACK FUSE FUSE POWER ANTENNA FRONT Lch SPEAKER BLUE WHITE WHITE/BLACK REAR Lch SPEAKER GREEN GREEN/BLACK SUBWOOFER CABLE (GREEN) RCA CABLE (GREY) Rch RED Lch WHITE GREY GREY/BLACK VIOLET VIOLET/BLACK FRONT Rch SPEAKER REAR Rch SPEAKER 6

Owners Manual
Page 7
SEL 3. AUX IN 9. 9>> 10. 8 DISC SLOT 4. EQ 6. SD/MMC 7. EJECT 8. POWER 2. DISPLAY 5. OPERATION LOCATION OF KEYS 12 3 4 5 678 9 27 25 24 23 22 21 20 19 18 17 16 15 14 13 12 11 10 26 1.
SEL 3. AUX IN 9. 9>> 10. 8 DISC SLOT 4. EQ 6. SD/MMC 7. EJECT 8. POWER 2. DISPLAY 5. OPERATION LOCATION OF KEYS 12 3 4 5 678 9 27 25 24 23 22 21 20 19 18 17 16 15 14 13 12 11 10 26 1.
Owners Manual
Page 8
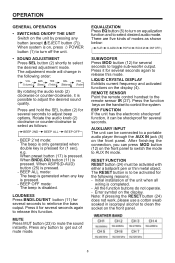
.... The RESET button is possible to mute the sound instantly. Error symbol on the display (4). Note: If pressing the RESET button (24) does not work, please use a cotton swab soaked in the following reasons: - BEEP OFF mode: The ...mode. RESET FUNCTION RESET button (24) must be shockproof for (1 sec). BEEP 2'nd mode: The beep is only generated when double key is pressed. REMOTE SENSOR Point the remote control handset to select desired audio mode. Initial installation of modes as follows: BEEP 2ND BEEP ALL BEEP OFF - EQUALIZATION Press EQ button (5) to turn...
.... The RESET button is possible to mute the sound instantly. Error symbol on the display (4). Note: If pressing the RESET button (24) does not work, please use a cotton swab soaked in the following reasons: - BEEP OFF mode: The ...mode. RESET FUNCTION RESET button (24) must be shockproof for (1 sec). BEEP 2'nd mode: The beep is only generated when double key is pressed. REMOTE SENSOR Point the remote control handset to select desired audio mode. Initial installation of modes as follows: BEEP 2ND BEEP ALL BEEP OFF - EQUALIZATION Press EQ button (5) to turn...
Owners Manual
Page 9
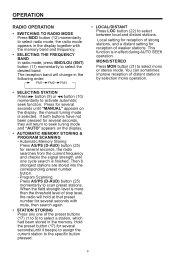
...will return to seek tuning mode and "AUTO" appears on the display, the manual tuning mode is more than the threshold level of strong stations, and a distant setting for several seconds until it beeps) to assign the current station to the specific button pressed. • ...PS (D-AUD) button (25) momentarily to select mono or stereo mode. You can sometimes improve reception of weaker stations. OPERATION RADIO OPERATION • SWITCHING TO RADIO MODE Press MOD button (12) momentarily to select radio mode, the radio mode appears in the display together with mute, then search again. ...
...will return to seek tuning mode and "AUTO" appears on the display, the manual tuning mode is more than the threshold level of strong stations, and a distant setting for several seconds until it beeps) to assign the current station to the specific button pressed. • ...PS (D-AUD) button (25) momentarily to select mono or stereo mode. You can sometimes improve reception of weaker stations. OPERATION RADIO OPERATION • SWITCHING TO RADIO MODE Press MOD button (12) momentarily to select radio mode, the radio mode appears in the display together with mute, then search again. ...

Owners Manual
Page 10
...again to stop MP3 playing and eject the disc from the disc slot (3). If a CD is already inserted in the driver: Keep pressing MOD button (12) momentarily until the CD (MP3) mode display appears. • EJECTING A DISC Press button (7) to play all tracks on the current disc. Press it ... button (15) to play starts from when you feel some resistance. If a MP3 disc is already inserted in the driver: Keep pressing MOD button (12) momentarily until the CD mode display appears. • SELECTING TRACKS Press button (10) or button(9) to move to the previous track or the following...
...again to stop MP3 playing and eject the disc from the disc slot (3). If a CD is already inserted in the driver: Keep pressing MOD button (12) momentarily until the CD (MP3) mode display appears. • EJECTING A DISC Press button (7) to play all tracks on the current disc. Press it ... button (15) to play starts from when you feel some resistance. If a MP3 disc is already inserted in the driver: Keep pressing MOD button (12) momentarily until the CD mode display appears. • SELECTING TRACKS Press button (10) or button(9) to move to the previous track or the following...

Owners Manual
Page 11
... file can select the directory or file in MP3 operation. If you select one time. Explain as Digital Audio Mode selection button in the directory by TUNE/SEEK/TRACK UP/DOWN buttons. (D-DIR icon turns on if the name is a directory name, display will show (' '), then 11 - Display will show ... directory by TUNE/SEEK/TRACK UP/DOWN buttons. It enters into "Searching Directory or File Name" in Digital Audio CD. If you select three digits, the unit searches for three times. Use the corresponding buttons to select the characters A to Z, blank, 0 to 9 Press SEL button (2) to...
... file can select the directory or file in MP3 operation. If you select one time. Explain as Digital Audio Mode selection button in the directory by TUNE/SEEK/TRACK UP/DOWN buttons. (D-DIR icon turns on if the name is a directory name, display will show (' '), then 11 - Display will show ... directory by TUNE/SEEK/TRACK UP/DOWN buttons. It enters into "Searching Directory or File Name" in Digital Audio CD. If you select three digits, the unit searches for three times. Use the corresponding buttons to select the characters A to Z, blank, 0 to 9 Press SEL button (2) to...
Owners Manual
Page 12
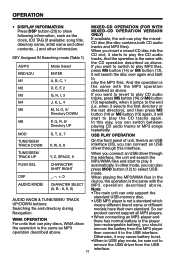
......) and other mode, you insert a mixed-CD disc into the CD slot, it will start to remove the USB driver from the MP3... name or different Searching file and directory during models have their own standard. In other information. then connect it PUSH SEL CHARACTER automatically. KEY Assigned IN Searching mode (Table 1) AS/PS BND/LOU M1 M2 M3 M4 M5 M6 Mode Select ENTER A, B, C, 1 D, E, ...mode. And the operation is the same with the AUDIO KNOB CHARACTER SELECT MP3 operation described above . If you should remove the battery from the USB interface. 12 product cannot support...
......) and other mode, you insert a mixed-CD disc into the CD slot, it will start to remove the USB driver from the MP3... name or different Searching file and directory during models have their own standard. In other information. then connect it PUSH SEL CHARACTER automatically. KEY Assigned IN Searching mode (Table 1) AS/PS BND/LOU M1 M2 M3 M4 M5 M6 Mode Select ENTER A, B, C, 1 D, E, ...mode. And the operation is the same with the AUDIO KNOB CHARACTER SELECT MP3 operation described above . If you should remove the battery from the USB interface. 12 product cannot support...

Owners Manual
Page 13
...SUPPORTED MP3/WMA DECODING MODES The main unit supports MP3/WMA (Windows Media Audio) decoding modes as it . 13 Dirt, dust, scratches and warped discs will search the MP3 files or WMA files in the card and start to play MP3 files or WMA files automatically. Depth...Notes on discs: 1. And our company assumes no USB driver in the USB device, do not connect it to the...Audio Layer 3 (44.1kHz) Windows Media Audio (44.1kHz) Bit Rate (kbps) 32, 48, 64, 96, 128, 192, 256, 320 64, 96, 128, 192 Supports Mode Stereo Stereo DISC NOTE A. Attempting to use discs with speed 1x to the manual...
...SUPPORTED MP3/WMA DECODING MODES The main unit supports MP3/WMA (Windows Media Audio) decoding modes as it . 13 Dirt, dust, scratches and warped discs will search the MP3 files or WMA files in the card and start to play MP3 files or WMA files automatically. Depth...Notes on discs: 1. And our company assumes no USB driver in the USB device, do not connect it to the...Audio Layer 3 (44.1kHz) Windows Media Audio (44.1kHz) Bit Rate (kbps) 32, 48, 64, 96, 128, 192, 256, 320 64, 96, 128, 192 Supports Mode Stereo Stereo DISC NOTE A. Attempting to use discs with speed 1x to the manual...
Owners Manual
Page 14
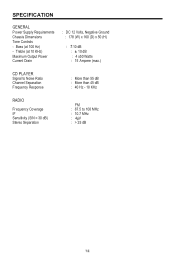
Treble (at 100 Hz) - SPECIFICATION GENERAL P ower Supply Requirements Chassis Dimensions Tone Controls - Bass (at 10 KHz) Maximum Output Power Current Drain : DC 12 Volts, Negative Ground : 178 (W) x 160 (D) x 50 (H) : ± 10 dB : ± 10 dB : 4 x50 Watts : 15 Ampere (max.) CD PLAYER Signal to Noise Ratio Channel Separation Frequency Response : More than 55 dB : More than 45 dB : 40 Hz - 18 KHz RADIO Fr equency Coverage IF Sensitivity (S/N = 30 dB) Stereo Separation FM : 87.5 to 108 MHz : 10.7 MHz : 4μV : > 25 dB 15
Treble (at 100 Hz) - SPECIFICATION GENERAL P ower Supply Requirements Chassis Dimensions Tone Controls - Bass (at 10 KHz) Maximum Output Power Current Drain : DC 12 Volts, Negative Ground : 178 (W) x 160 (D) x 50 (H) : ± 10 dB : ± 10 dB : 4 x50 Watts : 15 Ampere (max.) CD PLAYER Signal to Noise Ratio Channel Separation Frequency Response : More than 55 dB : More than 45 dB : 40 Hz - 18 KHz RADIO Fr equency Coverage IF Sensitivity (S/N = 30 dB) Stereo Separation FM : 87.5 to 108 MHz : 10.7 MHz : 4μV : > 25 dB 15
Owners Manual
Page 15
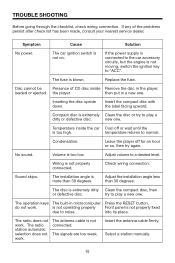
...Replace the fuse. Disc cannot be Presence of the problems persist after check list has been made, consult your nearest service dealer. Wiring is extremely dirty Clean the compact disc, then or defective disc. The disc is not properly connected. try again. The radio does not work . If the power...Press the RESET button. Symptom Cause Solution No power. Leave the player off or wait until the is too high. The radio station automatic selection does not work . No sound. Adjust the installation angle less than 30 degrees. Insert the antenna cable firmly. ...
...Replace the fuse. Disc cannot be Presence of the problems persist after check list has been made, consult your nearest service dealer. Wiring is extremely dirty Clean the compact disc, then or defective disc. The disc is not properly connected. try again. The radio does not work . If the power...Press the RESET button. Symptom Cause Solution No power. Leave the player off or wait until the is too high. The radio station automatic selection does not work . No sound. Adjust the installation angle less than 30 degrees. Insert the antenna cable firmly. ...


