Pyle PLCD13MR Support and Manuals
Get Help and Manuals for this Pyle item
View All Support Options Below
Free Pyle PLCD13MR manuals!
Problems with Pyle PLCD13MR?
Ask a Question
Free Pyle PLCD13MR manuals!
Problems with Pyle PLCD13MR?
Ask a Question
Popular Pyle PLCD13MR Manual Pages
PLCD13MR Manual 1 - Page 1
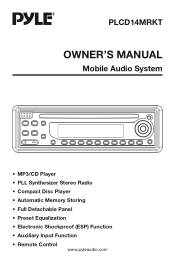
PLCD14MRKT
OWNER'S MANUAL
Mobile Audio System
• MP3/CD Player
• PLL Synthesizer Stereo Radio
• Compact Disc Player
• Automatic Memory Storing
• Full Detachable Panel
• Preset Equalization
• Electronic Shockproof (ESP) Function
• Auxiliary Input Function
• Remote Control
www.pyleaudio.com
PLCD13MR Manual 1 - Page 2
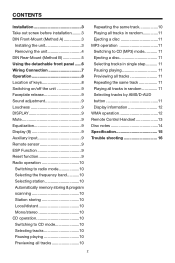
... 3 Take out screw before installation.........3 DIN Front-Mount (Method A 3
Installing the unit 3 Removing the unit 4 DIN Rear-Mount (Method B 5 Using the detachable front panel ......6 Wiring Connection 7 Operation 8 Location of keys 8...tracks by AMS/D-AUD button 11 Display information 12 WMA operation 12 Remote Control Handset 13 Disc notes 14 Specification 15 Trouble shooting 16
2
PLCD13MR Manual 1 - Page 3
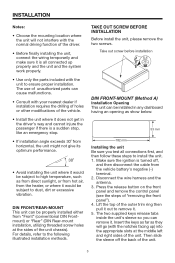
... as they will not interfere with the normal driving function of the driver.
• Before finally installing the unit, connect the wiring temporarily and make sure it is all connections first...and the unit and the system work properly.
• Use only the parts included with the unit to the following illustrated installation methods. The use of the unit chassis). The two supplied keys release tabs...
PLCD13MR Manual 1 - Page 4

... the dashboard and bend open the appropriate tabs behind the dashboard to secure the back of "installing the front panel"). Reconnect the cable to a solid metal part of the unit. Then replace the outer trim ring and install the unit's front panel. (see the steps of the unit in place.
Make sure the ignition...
PLCD13MR Manual 1 - Page 5
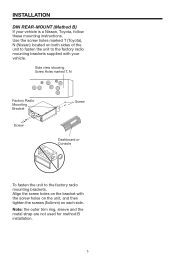
Note: the outer trim ring, sleeve and the metal strap are not used for method B installation.
5 Align the screw holes on the bracket with your vehicle is a Nissan, Toyota, follow these mounting instructions. Side view showing Screw Holes marked T, N
Factory Radio Mounting Bracket
Screw
Screw
Dashboard or Console
To fasten the unit to...
PLCD13MR Manual 1 - Page 6
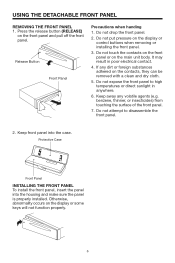
...away any dirt or foreign substances adhered on the display or control buttons when removing or installing the front panel.
3. Do not attempt to high temperatures or direct sunlight in poor electrical...clean and dry cloth.
5. If any volatile agents (e.g. Protective Case
Front Panel
INSTALLING THE FRONT PANEL To install the front panel, insert the panel into the case. Press the release button ...
PLCD13MR Manual 1 - Page 9
...press RESET button (24), the
output. The RESET button is
shown on the display. Initial installation of seconds.
Press the DISP button (15), the clock is to be shockproof about
When...detach the
again to enter into the selection for several seconds). Press and hold down sound.
Error symbol on the front panel. Then hold the SEL button (10) for several seconds to release...
PLCD13MR Manual 1 - Page 10

... track on the display, the manual tuning mode is holding at that preset number for
Press SCN button (21) to select the desired
station, and a distant setting for reception of strong
•...operation. band.
• MONO/STEREO
The reception band will return to select
appears in the driver: Keep pressing MODE button (6) shortly until
to stop
• STATION STORING
intro and listen ...
PLCD13MR Manual 1 - Page 11
...CD.
If selected one time. It enters into "Searching Directory or File Name" in the driver: Gently insert the MP3 disc with the printed side uppermost into the disc slot (5) until ...• Searching Directory or File Name Press AMS (D-AUD) button for seconds. It enters into the driver automatically. Press again to cancel the function.
• EJECTING A DISC Press button (4) to stop...
PLCD13MR Manual 1 - Page 14
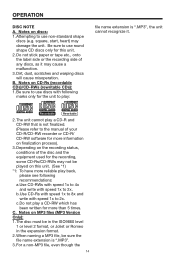
... write with following recommendations:
a.Use CD-RWs with speed 1x to 4x and write with speed 1x to use discs with speed 1x to the manual of the disc and the equipment used for more information on this unit. 2. The disc must be sure the file name extension is not finalized...
PLCD13MR Manual 1 - Page 15
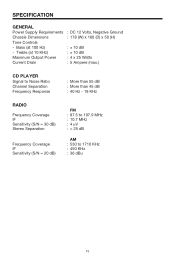
Treble (at 100 Hz) - SPECIFICATION
GENERAL Power Supply Requirements Chassis Dimensions Tone Controls - Bass (at 10 KHz) Maximum Output Power Current Drain
: DC 12 Volts, Negative Ground : 178 (W) x 160 (D) x 50 (H)
: &#...
PLCD13MR Manual 1 - Page 16
....
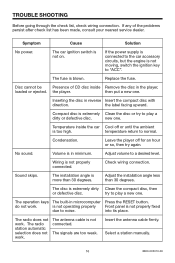
If the power supply is connected to "ACC".
Disc cannot be
Presence of the problems persist after check list has been made, consult your nearest service dealer. the player.
Volume is more than 30 degrees. Sound skips.
The installation angle is in the player,
loaded or ejected.
The operation keys The built-in...
Pyle PLCD13MR Reviews
We have not received any reviews for Pyle yet.