User Manual
Page 1
Car In-dash AM/FM MPX Receiver with CD, CD-R/RW, MP3 Playback & USB/SD/ AUX Inputs Receiver Models: PLCD43MRB/PLCD43BTM CLK USER'S MANUAL
Car In-dash AM/FM MPX Receiver with CD, CD-R/RW, MP3 Playback & USB/SD/ AUX Inputs Receiver Models: PLCD43MRB/PLCD43BTM CLK USER'S MANUAL
User Manual
Page 2
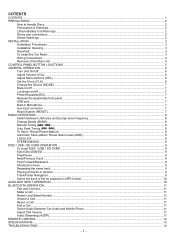
... CONTROL PANEL BUTTON LOACTIONS ...5 GENERAL OPERATION ...6 Turn Unit On/Off ...6 Adjust Volume (VOL)...6 Adjust Menu Options (SEL) ...6 Set the Clock (CLK)...6 Change the Source (MODE) ...7 Mute on/off ...7 Loudness on/off...7 Preset Equalizer(EQ) ...7 Release the detachable front panel ...7 USB port...7 Built-in Microphone...7 Aux input connector...7 Reset System (RESET)...7 RADIO OPERATION...8 Switch Between USA area and Europe area Frequency 8 Change Bands (BAND) ...8 Manual Tuning ( / ) ...8 Auto Seek Tuning ( / )...8 To Store / Recall Preset Stations ...8 Automatic Store station/ Preset...
... CONTROL PANEL BUTTON LOACTIONS ...5 GENERAL OPERATION ...6 Turn Unit On/Off ...6 Adjust Volume (VOL)...6 Adjust Menu Options (SEL) ...6 Set the Clock (CLK)...6 Change the Source (MODE) ...7 Mute on/off ...7 Loudness on/off...7 Preset Equalizer(EQ) ...7 Release the detachable front panel ...7 USB port...7 Built-in Microphone...7 Aux input connector...7 Reset System (RESET)...7 RADIO OPERATION...8 Switch Between USA area and Europe area Frequency 8 Change Bands (BAND) ...8 Manual Tuning ( / ) ...8 Auto Seek Tuning ( / )...8 To Store / Recall Preset Stations ...8 Automatic Store station/ Preset...
User Manual
Page 3
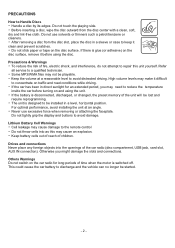
... files may cause an explosion. 噝 Keep battery cells out of reach of the car radio (disc compartment, USB jack, card slot, AUX IN connection). PRECAUTIONS How to avoid damage. Refer all service to reduce the temperature inside the car before using the unit. 噝 If the battery is disconnected, discharged, or changed, the preset memory of time when the motor is switched off. Others Warnings Do not switch...
... files may cause an explosion. 噝 Keep battery cells out of reach of the car radio (disc compartment, USB jack, card slot, AUX IN connection). PRECAUTIONS How to avoid damage. Refer all service to reduce the temperature inside the car before using the unit. 噝 If the battery is disconnected, discharged, or changed, the preset memory of time when the motor is switched off. Others Warnings Do not switch...
User Manual
Page 4
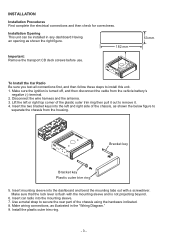
... deck screws before use. 53 mm To Install the Car Radio Be sure you test all connections first, and then follow these steps to remove it. 4. Install the plastic outer trim ring. - 3 - INSTALLATION Installation Procedures First complete the electrical connections and then check for correctness. Make sure that the lock lever is flush with a screwdriver. Installation Opening This unit can be installed in the "Wiring Diagram." 9. Make sure the...
... deck screws before use. 53 mm To Install the Car Radio Be sure you test all connections first, and then follow these steps to remove it. 4. Install the plastic outer trim ring. - 3 - INSTALLATION Installation Procedures First complete the electrical connections and then check for correctness. Make sure that the lock lever is flush with a screwdriver. Installation Opening This unit can be installed in the "Wiring Diagram." 9. Make sure the...
User Manual
Page 5
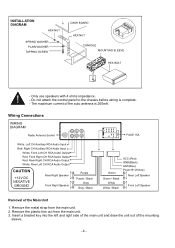
... sleeve. - 4 - Wiring Connections WIRING DIAGRAM Radio Antenna Socket White: Left CH Auxiliary RCA Audio Input Red: Right CH Auxiliary RCA Audio Input White: Front Left CH RCA Audio Output Red: Front Right CH RCA Audio Output Red: Rear Right CH RCA Audio Output White: Rear Left CH RCA Audio Output CAUTION +12V DC NEGATIVE GROUND Rear Right Speaker Front Right Speaker Purple Purple / Black Gray Gray / Black FUSE 15A Green Green / Black White White / Black ACC (Red) GND(Black) ANT(Blue) Power B+(Yellow) Rear Left Speaker Front Left Speaker Removal of the Main Unit 1. Remove the plastic...
... sleeve. - 4 - Wiring Connections WIRING DIAGRAM Radio Antenna Socket White: Left CH Auxiliary RCA Audio Input Red: Right CH Auxiliary RCA Audio Input White: Front Left CH RCA Audio Output Red: Front Right CH RCA Audio Output Red: Rear Right CH RCA Audio Output White: Rear Left CH RCA Audio Output CAUTION +12V DC NEGATIVE GROUND Rear Right Speaker Front Right Speaker Purple Purple / Black Gray Gray / Black FUSE 15A Green Green / Black White White / Black ACC (Red) GND(Black) ANT(Blue) Power B+(Yellow) Rear Left Speaker Front Left Speaker Removal of the Main Unit 1. Remove the plastic...
User Manual
Page 6
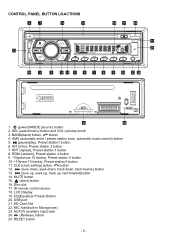
...select/menu) button and VOL (volume) knob 3. AMS (automatic store / preset station scan, automatic music search) button 5. (pause/play), Preset station1 button 6. IR remote control sensor 18. USB port 21. RPT (repeat), Preset station 3 button 8. RESET button - 5 - INT (intro), Preset station 2 button 7. AUX IN (auxiliary input) jack 24. (Release) button 25. MUTE button 15. (eject) button 16. SD Card Slot 22. CONTROL PANEL BUTTON LOACTIONS 4 1 14 16 18 15 22 17 20 12 CLK 19 3 2 11 13 5 6 7 8 9 10 23 24 RESET 21 25 1. (power)/MODE (source) button...
...select/menu) button and VOL (volume) knob 3. AMS (automatic store / preset station scan, automatic music search) button 5. (pause/play), Preset station1 button 6. IR remote control sensor 18. USB port 21. RPT (repeat), Preset station 3 button 8. RESET button - 5 - INT (intro), Preset station 2 button 7. AUX IN (auxiliary input) jack 24. (Release) button 25. MUTE button 15. (eject) button 16. SD Card Slot 22. CONTROL PANEL BUTTON LOACTIONS 4 1 14 16 18 15 22 17 20 12 CLK 19 3 2 11 13 5 6 7 8 9 10 23 24 RESET 21 25 1. (power)/MODE (source) button...
User Manual
Page 7
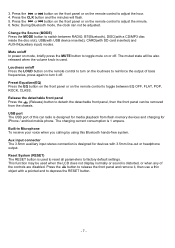
... remote Set the Clock (CLK) 1. Rotate the volume knob to choose 24 hours format or 12 hours format. - VOL LAST: In this mode, the unit power on at the actual volume it had when it again to ) button on the remote control to turn on the unit, and long press it was last switched off . Rotate the volume knob to switch between MONO and STEREO reception mode for radio frequencies. - Stereo/Mono: Switches...
... remote Set the Clock (CLK) 1. Rotate the volume knob to choose 24 hours format or 12 hours format. - VOL LAST: In this mode, the unit power on at the actual volume it had when it again to ) button on the remote control to turn on the unit, and long press it was last switched off . Rotate the volume knob to switch between MONO and STEREO reception mode for radio frequencies. - Stereo/Mono: Switches...
User Manual
Page 8
... USB port of this Bluetooth hands-free system. This function may be adjusted. Note: During Bluetooth mode, the clock can be also released when the volume knob is designed for devices with a pointed end to factory default settings. The charging current consumption is used to reset all parameters to depress the RESET button. - 7 - Aux input connector The 3.5mm auxiliary input stereo connection is used when the LCD does not display normally or sound is designed for iPhone / andriod mobile phone. Change...
... USB port of this Bluetooth hands-free system. This function may be adjusted. Note: During Bluetooth mode, the clock can be also released when the volume knob is designed for devices with a pointed end to factory default settings. The charging current consumption is used to reset all parameters to depress the RESET button. - 7 - Aux input connector The 3.5mm auxiliary input stereo connection is used when the LCD does not display normally or sound is designed for iPhone / andriod mobile phone. Change...
User Manual
Page 9
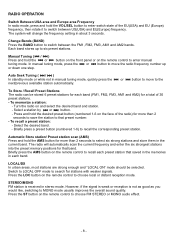
... Store station/ Preset station scan (AMS) Press and hold the AMS button for that preset number. - Switch to LOCAL OFF mode to recall the corresponding preset station. Press the ST button on the remote control to enter manual tuning mode. However, if the signal is weak or reception is received in manual tuning mode, quickly press the or button to move the radio frequency number up to six preset stations. The radio will change the frequency setting...
... Store station/ Preset station scan (AMS) Press and hold the AMS button for that preset number. - Switch to LOCAL OFF mode to recall the corresponding preset station. Press the ST button on the remote control to enter manual tuning mode. However, if the signal is weak or reception is received in manual tuning mode, quickly press the or button to move the radio frequency number up to six preset stations. The radio will change the frequency setting...
User Manual
Page 10
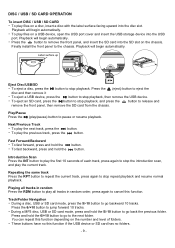
... remove the front panel, and insert the SD card into the SD slot on a disc, insert a disc with the label surface facing upward into the USB port. Label surface up Eject Disc/USB/SD 噝 To eject a disc, press the button to stop playback, and press the button to cancel this function depending on a USB device, open the USB port cover and insert the USB storage device into the disc slot. Play...
... remove the front panel, and insert the SD card into the SD slot on a disc, insert a disc with the label surface facing upward into the USB port. Label surface up Eject Disc/USB/SD 噝 To eject a disc, press the button to stop playback, and press the button to cancel this function depending on a USB device, open the USB port cover and insert the USB storage device into the disc slot. Play...
User Manual
Page 11
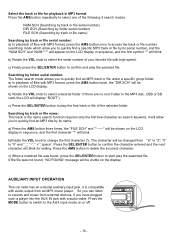
.... b)Rotate the VOL knob to the AUX input mode on the LCD display in sequence, and the first character "*" will appear on or off. - 10 - b) Rotate the VOL knob to start play the searched file. c) When a matched file was not found , press the SEL/ENTER button to select the serial number of files with a audio cable. AUXILIARY INPUT OPERATION This car radio has an external auxiliary input jack, it will allow you...
.... b)Rotate the VOL knob to the AUX input mode on the LCD display in sequence, and the first character "*" will appear on or off. - 10 - b) Rotate the VOL knob to start play the searched file. c) When a matched file was not found , press the SEL/ENTER button to select the serial number of files with a audio cable. AUXILIARY INPUT OPERATION This car radio has an external auxiliary input jack, it will allow you...

User Manual
Page 12
... a number has been incorrectly inputted, press the DEL button or button to using the Bluetooth device as a hands-free system for a Bluetooth-enabled mobile phone for the first time, you must pair and connect the two devices as follows: 1. Adjust Talk Volume 噝 During a call , press the button on the control panel. When a mobile device is made or received, or when the mobile phone plays music. To begin pairing, enable BT mode on the mobile phone. 4. Switch Audio Between Car Audio...
... a number has been incorrectly inputted, press the DEL button or button to using the Bluetooth device as a hands-free system for a Bluetooth-enabled mobile phone for the first time, you must pair and connect the two devices as follows: 1. Adjust Talk Volume 噝 During a call , press the button on the control panel. When a mobile device is made or received, or when the mobile phone plays music. To begin pairing, enable BT mode on the mobile phone. 4. Switch Audio Between Car Audio...
User Manual
Page 13
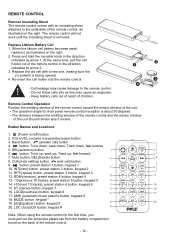
... window of the unit should remain less 5 meters. Mute button, DEL(Delete) button 8. RPT(repeat) button, preset station 3 button, keypad 3 12. LOUD(loudness) button, keypad 8 17. AMS (automatic music search) button, keypad 9 18. EQ(Equalizer) button, keypad 0 20. Do not throw cells into the remote control. - Button Names and Locations 1. (Power on the right. 2. REMOTE CONTROL Remove Insulating Sheet The remote control comes with a new one, making sure the (+) polarity is facing upward. 4. Replace the old...
... window of the unit should remain less 5 meters. Mute button, DEL(Delete) button 8. RPT(repeat) button, preset station 3 button, keypad 3 12. LOUD(loudness) button, keypad 8 17. AMS (automatic music search) button, keypad 9 18. EQ(Equalizer) button, keypad 0 20. Do not throw cells into the remote control. - Button Names and Locations 1. (Power on the right. 2. REMOTE CONTROL Remove Insulating Sheet The remote control comes with a new one, making sure the (+) polarity is facing upward. 4. Replace the old...
User Manual
Page 15
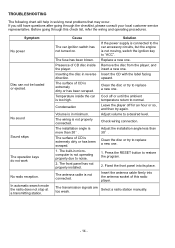
... the antenna cable firmly into its place. Temperature inside the player. Solution If the power supply is connected to the car accessory circuits, but the engine is too high. Replace a new one . 1. Check wiring connection. The transmission signals are too weak. No sound Sound skips The operation keys do not work No radio reception. The built-in solving most problems that may occur. Adjust volume to restore the program...
... the antenna cable firmly into its place. Temperature inside the player. Solution If the power supply is connected to the car accessory circuits, but the engine is too high. Replace a new one . 1. Check wiring connection. The transmission signals are too weak. No sound Sound skips The operation keys do not work No radio reception. The built-in solving most problems that may occur. Adjust volume to restore the program...

