PLCD16MRWB Manual 1
Page 3
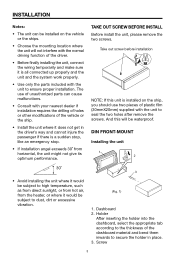
... holes after remove the screws. TAKE OUT SCREW BEFORE INSTALL Before install the unit, please remove the two screws. Dashboard 2. Screw 3 The use of unauthorized parts can be subject to ensure proper installation. DIN FRONT-MOUNT Installing the unit 1 2 182 30˚ 53 3 • Avoid installing the unit where it does..., connect the wiring temporarily and make sure it is all connected up properly and the unit and the system work properly. • Use only the parts included with the unit to dust, dirt or excessive vibration. (Fig. 1) 1.
... holes after remove the screws. TAKE OUT SCREW BEFORE INSTALL Before install the unit, please remove the two screws. Dashboard 2. Screw 3 The use of unauthorized parts can be subject to ensure proper installation. DIN FRONT-MOUNT Installing the unit 1 2 182 30˚ 53 3 • Avoid installing the unit where it does..., connect the wiring temporarily and make sure it is all connected up properly and the unit and the system work properly. • Use only the parts included with the unit to dust, dirt or excessive vibration. (Fig. 1) 1.