PLCD16MRWB Manual 1
Page 1
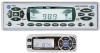
PLCD16MRWB OWNER'S MANUAL MARINE/WEATHER-BAND AUDIO SYSTEM • PLL Synthesizer Stereo Radio • Digital Compact Disc Player • Automatically Memory Storing • Slide Down Detachable Panel • Program CD Tracks • CD Changer Control • Auxiliary Input Function www.pyleaudio.com
PLCD16MRWB OWNER'S MANUAL MARINE/WEATHER-BAND AUDIO SYSTEM • PLL Synthesizer Stereo Radio • Digital Compact Disc Player • Automatically Memory Storing • Slide Down Detachable Panel • Program CD Tracks • CD Changer Control • Auxiliary Input Function www.pyleaudio.com
PLCD16MRWB Manual 1
Page 2
CONTENTS Installation ...3 DIN Front-Mount...3 Installing the unit 3 Removing the unit 4 Using the Detachable Front Panel 5 Wiring Connection 6 Operation ...7 General Operation 11 Radio Operation 13 CD Operation ...14 CD Changer Operation 15 Specification 16 Trouble Shooting 17 2
CONTENTS Installation ...3 DIN Front-Mount...3 Installing the unit 3 Removing the unit 4 Using the Detachable Front Panel 5 Wiring Connection 6 Operation ...7 General Operation 11 Radio Operation 13 CD Operation ...14 CD Changer Operation 15 Specification 16 Trouble Shooting 17 2
PLCD16MRWB Manual 1
Page 3
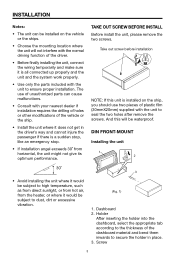
... to secure the holder in the driver's way and cannot injure the passenger if there is all connected up properly and the unit and the system work properly. • Use only the parts included with the unit to ensure proper installation. Holder After inserting the holder into... the dashboard, select the appropriate tab according to the thickness of the driver. • Before finally installing the unit, connect the wiring temporarily and make sure it is...
... to secure the holder in the driver's way and cannot injure the passenger if there is all connected up properly and the unit and the system work properly. • Use only the parts included with the unit to ensure proper installation. Holder After inserting the holder into... the dashboard, select the appropriate tab according to the thickness of the driver. • Before finally installing the unit, connect the wiring temporarily and make sure it is...

PLCD16MRWB Manual 1
Page 4
... strap can be bent by hand to slide down the front panel. 2. INSTALLATION 1 6 Removing the unit 2 3 5 7 4 (Fig. 2) 1 Front Panel OPEN button 1. Screw 6. Before removing the unit, press the OPEN button to the desired angle. 7. Nut (5mm) 3. Strap Be sure to use the strap to remove the unit from the dashboard. 4 Lever Insert...
... strap can be bent by hand to slide down the front panel. 2. INSTALLATION 1 6 Removing the unit 2 3 5 7 4 (Fig. 2) 1 Front Panel OPEN button 1. Screw 6. Before removing the unit, press the OPEN button to the desired angle. 7. Nut (5mm) 3. Strap Be sure to use the strap to remove the unit from the dashboard. 4 Lever Insert...
PLCD16MRWB Manual 1
Page 5
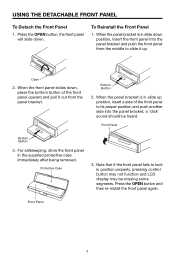
... and then re-install the front panel again. Bottom Button 2. Front Panel Bottom Button 3. Note that if the front panel fails to its proper position and push another side into the panel bracket and push the front panel from the panel bracket. Protective Case 3. When the front panel slides down . USING THE DETACHABLE FRONT...
... and then re-install the front panel again. Bottom Button 2. Front Panel Bottom Button 3. Note that if the front panel fails to its proper position and push another side into the panel bracket and push the front panel from the panel bracket. Protective Case 3. When the front panel slides down . USING THE DETACHABLE FRONT...

PLCD16MRWB Manual 1
Page 6
WIRING CONNECTION ANTENNA SOCKET IGNITION RED SWITCH (B+) FUSE MEMORY YELLOW BACK-UP BLACK GROUND (B-) POWER BLUE ANTENNA FRONT Lch SPEAKER WHITE WHITE/BLACK REAR Lch SPEAKER GREEN GREEN/BLACK MAIN UNIT AUX IN RCA CABLE GREY GREY/BLACK (BLACK) WIRING REMOTE CONNECTOR SOCKET (BLACK) CD CHANGER CONNECTOR SOCKET (YELLOW) Rch RED Lch WHITE (GREY) Rch RED Lch WHITE FRONT Rch SPEAKER VIOLET VIOLET/BLACK REAR Rch SPEAKER 6
WIRING CONNECTION ANTENNA SOCKET IGNITION RED SWITCH (B+) FUSE MEMORY YELLOW BACK-UP BLACK GROUND (B-) POWER BLUE ANTENNA FRONT Lch SPEAKER WHITE WHITE/BLACK REAR Lch SPEAKER GREEN GREEN/BLACK MAIN UNIT AUX IN RCA CABLE GREY GREY/BLACK (BLACK) WIRING REMOTE CONNECTOR SOCKET (BLACK) CD CHANGER CONNECTOR SOCKET (YELLOW) Rch RED Lch WHITE (GREY) Rch RED Lch WHITE FRONT Rch SPEAKER VIOLET VIOLET/BLACK REAR Rch SPEAKER 6
PLCD16MRWB Manual 1
Page 7
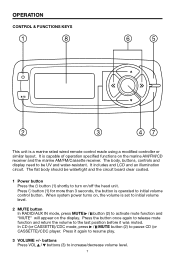
... last position before it again to turn on the marine AM/FM/CD receiver and the marine AM/FM/Cassette receiver. OPERATION CONTROL & FUNCTIONS KEYS 1 8 6 5 2 3 47 This unit is set to initial volume level. 2 MUTE button In RADIO/AUX IN mode, press MUTE / button (2) to...mode, press / MUTE button (2) to activate mute function and "MUTE" will appear on the display. It includes and LCD and an illumination circuit. Press it was muted. It is operated to increase/decrease volume level. 7 When system power turns on, the volume is a marine rated wired remote control made using...
... last position before it again to turn on the marine AM/FM/CD receiver and the marine AM/FM/Cassette receiver. OPERATION CONTROL & FUNCTIONS KEYS 1 8 6 5 2 3 47 This unit is set to initial volume level. 2 MUTE button In RADIO/AUX IN mode, press MUTE / button (2) to...mode, press / MUTE button (2) to activate mute function and "MUTE" will appear on the display. It includes and LCD and an illumination circuit. Press it was muted. It is operated to increase/decrease volume level. 7 When system power turns on, the volume is a marine rated wired remote control made using...
PLCD16MRWB Manual 1
Page 8
...and the current track, and other activated functions on the display (8). 8 Press for several seconds, they will appear on the display, the manual tuning mode is CH1~CH7 Channels. • CASSETTE REWIND/FORWARD (FOR CASSETTE OPERATION) Press / buttons (6) to activate the cassette fast forward or ... TRACKS (FOR CD OR CDC OPERATION) Press the / buttons (6) shortly to move to the following sources: e.g. At shift mode, press / buttons (6) to shift mode. Radio pauses for five seconds at each time the frequency is not any operation for more than 3 seconds until "MAN" appeared on...
...and the current track, and other activated functions on the display (8). 8 Press for several seconds, they will appear on the display, the manual tuning mode is CH1~CH7 Channels. • CASSETTE REWIND/FORWARD (FOR CASSETTE OPERATION) Press / buttons (6) to activate the cassette fast forward or ... TRACKS (FOR CD OR CDC OPERATION) Press the / buttons (6) shortly to move to the following sources: e.g. At shift mode, press / buttons (6) to shift mode. Radio pauses for five seconds at each time the frequency is not any operation for more than 3 seconds until "MAN" appeared on...
PLCD16MRWB Manual 1
Page 9
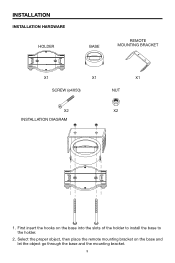
INSTALLATION INSTALLATION HARDWARE HOLDER BASE REMOTE MOUNTING BRACKET X1 X1 X1 SCREW (ø4X50) NUT X2 X2 INSTALLATION DIAGRAM 1. Select the proper object, then place the remote mounting bracket on the base into the slots of the holder to install the base to the holder. 2. First insert the hooks on the base and let the object go through the base and the mounting bracket. 9
INSTALLATION INSTALLATION HARDWARE HOLDER BASE REMOTE MOUNTING BRACKET X1 X1 X1 SCREW (ø4X50) NUT X2 X2 INSTALLATION DIAGRAM 1. Select the proper object, then place the remote mounting bracket on the base into the slots of the holder to install the base to the holder. 2. First insert the hooks on the base and let the object go through the base and the mounting bracket. 9
PLCD16MRWB Manual 1
Page 10
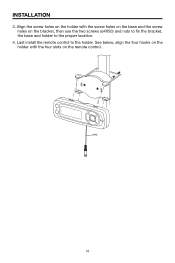
Last install the remote control to the proper location. 4. Align the screw holes on the holder with the four slots on the bracket, then use the two screws (ø4X50) and nuts to fix the bracket, the base and holder to the holder. WIRE 10 INSTALLATION 3. See below, align the four hooks on the holder with the screw holes on the base and the screw holes on the remote control.
Last install the remote control to the proper location. 4. Align the screw holes on the holder with the four slots on the bracket, then use the two screws (ø4X50) and nuts to fix the bracket, the base and holder to the holder. WIRE 10 INSTALLATION 3. See below, align the four hooks on the holder with the screw holes on the base and the screw holes on the remote control.
PLCD16MRWB Manual 1
Page 11
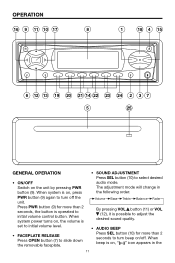
When system power turns on the unit by pressing PWR button (9). OPERATION 16 9 11 10 17 8 1 18 4 15 6 12 13 19 20 21 14 22 23 24 2 3 7 5 25 GENERAL OPERATION • ON/OFF Switch on , the volume is set to initial volume level. • FACEPLATE RELEASE Press OPEN button... (7) to slide down the removable faceplate. • SOUND ADJUSTMENT Press SEL button (10) to select desired audio mode. Press PWR button (9) for more than 2 seconds to turn off . When system is on ...
When system power turns on the unit by pressing PWR button (9). OPERATION 16 9 11 10 17 8 1 18 4 15 6 12 13 19 20 21 14 22 23 24 2 3 7 5 25 GENERAL OPERATION • ON/OFF Switch on , the volume is set to initial volume level. • FACEPLATE RELEASE Press OPEN button... (7) to slide down the removable faceplate. • SOUND ADJUSTMENT Press SEL button (10) to select desired audio mode. Press PWR button (9) for more than 2 seconds to turn off . When system is on ...

PLCD16MRWB Manual 1
Page 12
...Error symbol on the display and flashes. All the function buttons do not operate. - Pressing DISP button (1) while in Clock Priority will temporarily display selected station frequency (in RADIO mode) or track number (in CD/CDC mode) or state information (in isopropyl alcohol to adjust the brightness of the unit when all wiring is turned... 2 seconds until the clock is to select Clock Priority. Note: If press reset button (25), the unit can't work yet, please use a cotton swab soaked in AUX IN mode). • Frequency Priority Press and hold DISP button (1) while pressing button (...
...Error symbol on the display and flashes. All the function buttons do not operate. - Pressing DISP button (1) while in Clock Priority will temporarily display selected station frequency (in RADIO mode) or track number (in CD/CDC mode) or state information (in isopropyl alcohol to adjust the brightness of the unit when all wiring is turned... 2 seconds until the clock is to select Clock Priority. Note: If press reset button (25), the unit can't work yet, please use a cotton swab soaked in AUX IN mode). • Frequency Priority Press and hold DISP button (1) while pressing button (...
PLCD16MRWB Manual 1
Page 13
...) toggles between USA or European frequency spacing. - At each strong station. While in radio mode, pressing and holding BAND button (18) and then pressing button (16) selects European frequency spacing. * USA radio spacing is reached. • STATION STORING Press any one of selecting backward or forward is... 50k for FM and 9k for more than 2 seconds, the radio searches from the current frequency and checks the signal strength until "MAN" appeared on the display, the manual tuning mode is holding BAND button (18) and then pressing button (17) selects USA frequency...
...) toggles between USA or European frequency spacing. - At each strong station. While in radio mode, pressing and holding BAND button (18) and then pressing button (16) selects European frequency spacing. * USA radio spacing is reached. • STATION STORING Press any one of selecting backward or forward is... 50k for FM and 9k for more than 2 seconds, the radio searches from the current frequency and checks the signal strength until "MAN" appeared on the display, the manual tuning mode is holding BAND button (18) and then pressing button (17) selects USA frequency...
PLCD16MRWB Manual 1
Page 14
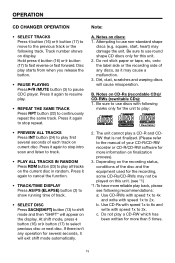
...choose track number. Press it again to eject the disc. - Thus, you release the button. • PAUSE PLAYING Press /MUTE button (3) to use Program. • EJECT When the front panel is played in programmed order. Track number shows on the display. 2. When the disc is playing in... • TRACK/TIME DISPLAY Press AS/PS (ELAPSE) button (2) to enter Program mode, then "PGM" stars flashing and "P-01" icon appear on display. How to cancel the function. When you to carry out program setting, then press PGM button (21), "NO-P" will appear on the display. - works...
...choose track number. Press it again to eject the disc. - Thus, you release the button. • PAUSE PLAYING Press /MUTE button (3) to use Program. • EJECT When the front panel is played in programmed order. Track number shows on the display. 2. When the disc is playing in... • TRACK/TIME DISPLAY Press AS/PS (ELAPSE) button (2) to enter Program mode, then "PGM" stars flashing and "P-01" icon appear on display. How to cancel the function. When you to carry out program setting, then press PGM button (21), "NO-P" will appear on the display. - works...
PLCD16MRWB Manual 1
Page 15
... Press RPT button (22) to continuously repeat the same track. Notes on finalization process). 3. c. At shift mode, press button (16) or button (17) to fast reverse or fast forward. Attempting to use discs with speed 1x to 2x. Disc play starts from when you release the button. • PAUSE PLAYING... Press /MUTE button (3) to pause CDC player. The unit cannot play a CD-R and CDRW that is not finalized. (Please refer to the manual of each track on ...
... Press RPT button (22) to continuously repeat the same track. Notes on finalization process). 3. c. At shift mode, press button (16) or button (17) to fast reverse or fast forward. Attempting to use discs with speed 1x to 2x. Disc play starts from when you release the button. • PAUSE PLAYING... Press /MUTE button (3) to pause CDC player. The unit cannot play a CD-R and CDRW that is not finalized. (Please refer to the manual of each track on ...
PLCD16MRWB Manual 1
Page 16
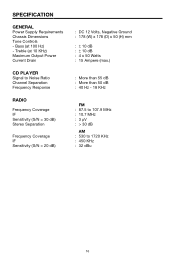
Treble (at 100 Hz) - SPECIFICATION GENERAL Power Supply Requirements Chassis Dimensions Tone Controls - Bass (at 10 KHz) Maximum Output Power Current Drain CD PLAYER Signal to Noise Ratio Channel Separation Frequency Response RADIO Frequency Coverage IF Sensitivity (S/N = 30 dB) Stereo Separation Frequency Coverage IF Sensitivity (S/N = 20 dB) : DC 12 Volts, Negative Ground : 178 (W) x 178 (D) x 50...
Treble (at 100 Hz) - SPECIFICATION GENERAL Power Supply Requirements Chassis Dimensions Tone Controls - Bass (at 10 KHz) Maximum Output Power Current Drain CD PLAYER Signal to Noise Ratio Channel Separation Frequency Response RADIO Frequency Coverage IF Sensitivity (S/N = 30 dB) Stereo Separation Frequency Coverage IF Sensitivity (S/N = 20 dB) : DC 12 Volts, Negative Ground : 178 (W) x 178 (D) x 50...
PLCD16MRWB Manual 1
Page 17
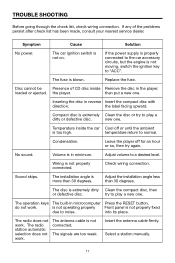
... the RESET button. Leave the player off or until the ambient is blown. The radio does not work . The fuse is too high. into its place. Temperature inside Remove the disc in minimum. Adjust volume to normal. Check wiring connection. try to play a new one . Insert the antenna cable firmly. the player. No sound. TROUBLE SHOOTING Before...
... the RESET button. Leave the player off or until the ambient is blown. The radio does not work . The fuse is too high. into its place. Temperature inside Remove the disc in minimum. Adjust volume to normal. Check wiring connection. try to play a new one . Insert the antenna cable firmly. the player. No sound. TROUBLE SHOOTING Before...


