PLCD15MR Manual 1
Page 2
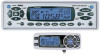
CONTENTS Installation ...3 DIN Front-Mount...3 Installing the unit 3 Removing the unit 4 Using the Detachable Front Panel 5 Wiring Connection 6 4 x 40 system ...6 Operation ...7 General Operation 7 Radio Operation 9 CD Operation ...10 CD Changer Operation 11 Specification 12 Trouble Shooting 13 2
CONTENTS Installation ...3 DIN Front-Mount...3 Installing the unit 3 Removing the unit 4 Using the Detachable Front Panel 5 Wiring Connection 6 4 x 40 system ...6 Operation ...7 General Operation 7 Radio Operation 9 CD Operation ...10 CD Changer Operation 11 Specification 12 Trouble Shooting 13 2
PLCD15MR Manual 1
Page 3
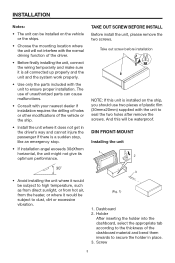
... to the thickness of the dashboard material and bend them inwards to ensure proper installation. TAKE OUT SCREW BEFORE INSTALL Before install the unit, please remove the two screws. Dashboard 2. Screw 3 Take out screw before installation NOTE: If this will be subject to high temperature, such as from direct sunlight...the unit to secure the holder in the driver's way and cannot injure the passenger if there is installed on the ship, you should use of unauthorized parts can be installed on the vehicle or the ships. • Choose the mounting location where the unit will not ...
... to the thickness of the dashboard material and bend them inwards to ensure proper installation. TAKE OUT SCREW BEFORE INSTALL Before install the unit, please remove the two screws. Dashboard 2. Screw 3 Take out screw before installation NOTE: If this will be subject to high temperature, such as from direct sunlight...the unit to secure the holder in the driver's way and cannot injure the passenger if there is installed on the ship, you should use of unauthorized parts can be installed on the vehicle or the ships. • Choose the mounting location where the unit will not ...
PLCD15MR Manual 1
Page 4
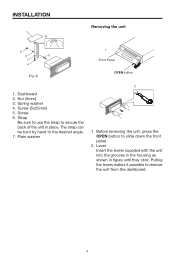
... grooves in the housing as shown in place. Pulling the levers makes it possible to the desired angle. 7. Screw (5x25mm) 5. Spring washer 4. Plain washer 2 1. Screw 6. INSTALLATION 1 6 Removing the unit 2 3 5 7 4 (Fig. 2) 1 Front Panel OPEN button 1. The strap can be bent by hand to remove the unit from the dashboard...
... grooves in the housing as shown in place. Pulling the levers makes it possible to the desired angle. 7. Screw (5x25mm) 5. Spring washer 4. Plain washer 2 1. Screw 6. INSTALLATION 1 6 Removing the unit 2 3 5 7 4 (Fig. 2) 1 Front Panel OPEN button 1. The strap can be bent by hand to remove the unit from the dashboard...

PLCD15MR Manual 1
Page 5
Bottom Button 2. For safekeeping, store the front panel in slide down . Protective Case 3. Press the OPEN button and then re-install the front panel again. Front Panel Bottom Button 3. Note that if the front panel fails to slide it out from the middle to lock in ...
Bottom Button 2. For safekeeping, store the front panel in slide down . Protective Case 3. Press the OPEN button and then re-install the front panel again. Front Panel Bottom Button 3. Note that if the front panel fails to slide it out from the middle to lock in ...
PLCD15MR Manual 1
Page 8
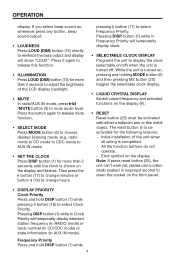
... select beep sound on /off) when the unit is to mute audio level. pressing button (17) to change hours. While the unit is completed. - Initial installation of the LCD display backlight. • MUTE In radio/AUX IN mode, press /MUTE button (3) to be activated with either a ballpoint pen or thin metal...
... select beep sound on /off) when the unit is to mute audio level. pressing button (17) to change hours. While the unit is completed. - Initial installation of the LCD display backlight. • MUTE In radio/AUX IN mode, press /MUTE button (3) to be activated with either a ballpoint pen or thin metal...
PLCD15MR Manual 1
Page 13
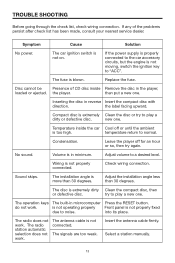
...not moving, switch the ignition key to normal. try again. into its place. Symptom Cause Solution No power. Condensation. Adjust the installation angle less than 30 degrees. Insert the antenna cable firmly. If the power supply is properly connected to the car accessory circuits,... due to a desired level. Adjust volume to noise. Wiring is more than 30 degrees. Check wiring connection. Sound skips. The installation angle is not properly connected. The disc is not connected. do not work . is not operating properly Front panel is too high...
...not moving, switch the ignition key to normal. try again. into its place. Symptom Cause Solution No power. Condensation. Adjust the installation angle less than 30 degrees. Insert the antenna cable firmly. If the power supply is properly connected to the car accessory circuits,... due to a desired level. Adjust volume to noise. Wiring is more than 30 degrees. Check wiring connection. Sound skips. The installation angle is not properly connected. The disc is not connected. do not work . is not operating properly Front panel is too high...