Pyle PFSHCMR1 Support and Manuals
Get Help and Manuals for this Pyle item
View All Support Options Below
Free Pyle PFSHCMR1 manuals!
Problems with Pyle PFSHCMR1?
Ask a Question
Free Pyle PFSHCMR1 manuals!
Problems with Pyle PFSHCMR1?
Ask a Question
Popular Pyle PFSHCMR1 Manual Pages
User Manual - Page 2
... for your product base on its life time, we strongly recommend you carefully read this user manual before use. The fishing line is featured by an excellent light compensation capability so that you ...two IR LEDs, the camera is made of a type of special soft material, available in a length of the line can capture dynamic movements of fish stocks in a more specific and direct manner.These ...
User Manual - Page 3
.... It is an ideal choice for fishing lovers as a complete package, and designed to the monitor.
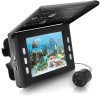
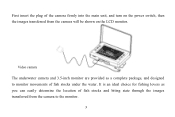
3 Video camera The underwater camera and 3.5-inch monitor are provided as you can easily determine the location of the camera firmly into the main unit, and turn on the power switch, then the images transferred from the...
User Manual - Page 5
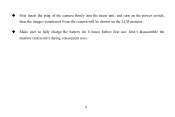
First insert the plug of the camera firmly into the main unit, and turn on the power switch, then the images transferred from the camera will be shown on the LCD monitor.
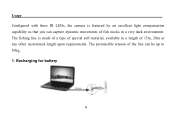
Make sure to fully charge the battery for 8 hours before first use. Don't disassemble the monitor (main unit) during consequent uses.
5
User Manual - Page 6
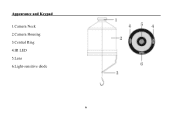
Appearance and Keypad 1.Camera Neck 2.Camera Housing 3.Central Ring 4.IR LED 5.Lens 6.Light-sensitive diode
6
User Manual - Page 8
Usage Configured with three IR LEDs, the camera is made of a type of special soft material, available in a very dark environment. The permissible tension of fish stocks in a length of 15m, 20m or ...
User Manual - Page 9
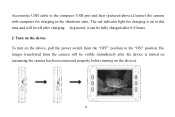
... after 8-9 hours. 2. Turn on the device To turn on the device).
9 Accessories USB cable to the computer USB port and host (pictured above),Connect the camera with computer for charging is on at this time and will be visible immediately after the device is turned on (assuming the...
User Manual - Page 10
3.
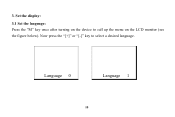
Now press the "[+]" or "[-]" key to call up the menu on the device to select a desired language. Language 0
Language 1
10 Set the display:
3.1 Set the language: Press the "M" key once after turning on the LCD monitor (see the figure below).
User Manual - Page 11
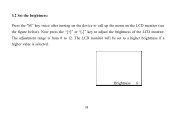
The adjustment range is from 0 to a higher brightness if a higher value is selected. Brightness 6
11 The LCD monitor will be set to 12. 3.2 Set the brightness: Press the "M" key twice after turning on the LCD monitor (see the figure below). Now press the "[+]" or "[-]" key to call up the menu on the device to adjust the brightness of the LCD monitor.
User Manual - Page 12
Contrast 6
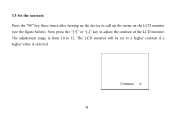
12 The LCD monitor will be set to 12. The adjustment range is from 10 to a higher contrast if a higher value is selected. 3.3 Set the contrast: Press the "M" key three times after turning on the LCD monitor (see the figure below). Now press the "[+]" or "[-]" key to call up the menu on the device to adjust the contrast of the LCD monitor.
User Manual - Page 13
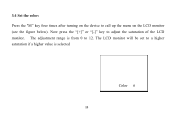
Now press the "[+]" or "[-]" key to call up the menu on the device to adjust the saturation of the LCD monitor. 3.4 Set the color: Press the "M" key four times after turning on the LCD monitor (see the figure below). The LCD monitor will be set to 12. The adjustment range is from 0 to a higher saturation if a higher value is selected
Color 6
13
User Manual - Page 15
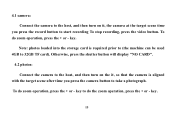
... target scene after time you press the record button to start recording To stop recording, press the video button. 4.1 camera: Connect the camera to the host, and then turn on it , so that the camera is required prior to (the machine can be used 4GB to do zoom operation, press the + or - To...
User Manual - Page 17
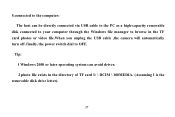
... of TF card I: \ DCIM \ 100MEDIA. (Assuming I is the
removable disk drive letter).
17 5.connected to the computer: The host can avoid driver. 2 photo file exists in the TF card photos or video file.When you unplug the USB cable ,the camera will automatically turn off .finally, the power switch dial to OFF.
User Manual - Page 18
Camera:
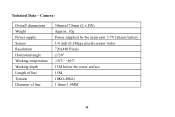
Overall dimensions Weight Power supply Sensor Resolution Horizontal angle Working temperature Working depth Length of line Tension Diameter of line
30mmx17.8mm (L x DN) Approx. 10g ...
User Manual - Page 20
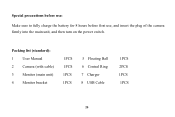
Packing list (standard): 1 User Manual 2 Camera (with cable) 3 Monitor (main unit) 4 Monitor bracket
1PCS 1PCS 1PCS 1PCS
5 Floating Ball 6 Central Ring 7 Charger 8 USB Cable
1PCS 2PCS 1PCS 1PCS
20 Special precautions before use:
Make sure to fully charge the battery for 8 hours before first use, and insert the plug of the camera firmly into the main unit, and then turn on the power switch.
Pyle PFSHCMR1 Reviews
We have not received any reviews for Pyle yet.