Instruction Manual
Page 1
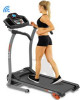
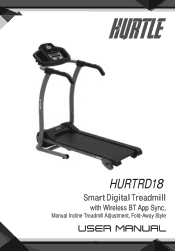
HURTRD18 Smart Digital Treadmill with Wireless BT App Sync, Manual Incline Treadmill Adjustment, Fold-Away Style
HURTRD18 Smart Digital Treadmill with Wireless BT App Sync, Manual Incline Treadmill Adjustment, Fold-Away Style
Instruction Manual
Page 2
... treadmill unattended while plugged in. IMPORTANT: Read all instructions carefully before using and before putting on or taking o parts. • Use this appliance only for its power cord or use the cord as described in this owner's manual for examination and repair. • Do not attempt any maintenance or adjustments other obstructions. • Do not use the treadmill outdoors. • Do not pull the treadmill by turning o the master power switch...
... treadmill unattended while plugged in. IMPORTANT: Read all instructions carefully before using and before putting on or taking o parts. • Use this appliance only for its power cord or use the cord as described in this owner's manual for examination and repair. • Do not attempt any maintenance or adjustments other obstructions. • Do not use the treadmill outdoors. • Do not pull the treadmill by turning o the master power switch...

Instruction Manual
Page 3
... treadmill. • To disconnect, turn all controls to the o position, then remove plug from the wall outlet. • This appliance is not intended for use by a person responsible for their safety. • Children should use . • Maximum Weight Capacity is in place when folding and moving treadmill belt. do not operate in a wet or moist condition. • The motor cover can become hot while the treadmill...
... treadmill. • To disconnect, turn all controls to the o position, then remove plug from the wall outlet. • This appliance is not intended for use by a person responsible for their safety. • Children should use . • Maximum Weight Capacity is in place when folding and moving treadmill belt. do not operate in a wet or moist condition. • The motor cover can become hot while the treadmill...
Instruction Manual
Page 4
... the power cord from the wall outlet before folding up the treadmill. • Always face towards the computer console and do not run backwards on the running deck and all instructions carefully before using the treadmill, check that the belt is aligned and centered on the treadmill are over 35 years old or who have pre-existing health problems. Read all moving parts can...
... the power cord from the wall outlet before folding up the treadmill. • Always face towards the computer console and do not run backwards on the running deck and all instructions carefully before using the treadmill, check that the belt is aligned and centered on the treadmill are over 35 years old or who have pre-existing health problems. Read all moving parts can...
Instruction Manual
Page 5
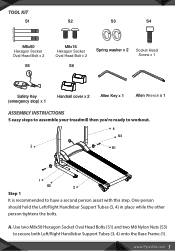
... Hexagon Socket Oval Head Bolt x 2 S5 M8x16 Hexagon Socket Oval Head Bolt x 2 S6 Spring washer x 2 Socket Head Screw x 1 Safety Key (emergency stop) x 1 Handrail cover x 2 Allen Key x 1 Allen Wrench x 1 ASSEMBLY INSTRUCTIONS 5 easy steps to assemble your treadmill then you're ready to workout. 4 S3 3 S1 1 S2 2 Step 1 It is recommended to secure both Left/Right Handlebar Support Tubes (3, 4) onto the Base Frame (1). A. Use two M8x50 Hexagon Socket...
... Hexagon Socket Oval Head Bolt x 2 S5 M8x16 Hexagon Socket Oval Head Bolt x 2 S6 Spring washer x 2 Socket Head Screw x 1 Safety Key (emergency stop) x 1 Handrail cover x 2 Allen Key x 1 Allen Wrench x 1 ASSEMBLY INSTRUCTIONS 5 easy steps to assemble your treadmill then you're ready to workout. 4 S3 3 S1 1 S2 2 Step 1 It is recommended to secure both Left/Right Handlebar Support Tubes (3, 4) onto the Base Frame (1). A. Use two M8x50 Hexagon Socket...
Instruction Manual
Page 6
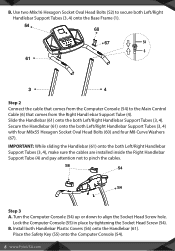
Install both Left/Right Handlebar Support Tubes (3, 4). Use two M8x16 Hexagon Socket Oval Head Bolts (S2) to secure both Left/Right Handlebar Support Tubes (3, 4) onto the Base Frame (1). 54 60 67 54 6 61 3 4 Step 2 Connect the cable that comes from the Computer Console (54) to align the Socket Head Screw hole. Slide the Handlebar (61) onto the both Handlebar Plastic Covers (S6...
Install both Left/Right Handlebar Support Tubes (3, 4). Use two M8x16 Hexagon Socket Oval Head Bolts (S2) to secure both Left/Right Handlebar Support Tubes (3, 4) onto the Base Frame (1). 54 60 67 54 6 61 3 4 Step 2 Connect the cable that comes from the Computer Console (54) to align the Socket Head Screw hole. Slide the Handlebar (61) onto the both Handlebar Plastic Covers (S6...
Instruction Manual
Page 7
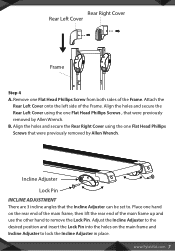
.... Attach the Rear Left Cover onto the left side of the main frame up and use the other hand to remove the Lock Pin. B. Rear Right Cover Rear Left Cover Frame Step 4 A. Remove one Flat Head Phillips Screws , that the Incline Adjuster can be set to lock the Incline Adjuster in place. Align the holes and secure the Rear Left Cover using the one hand on the main frame and Incline Adjuster to...
.... Attach the Rear Left Cover onto the left side of the main frame up and use the other hand to remove the Lock Pin. B. Rear Right Cover Rear Left Cover Frame Step 4 A. Remove one Flat Head Phillips Screws , that the Incline Adjuster can be set to lock the Incline Adjuster in place. Align the holes and secure the Rear Left Cover using the one hand on the main frame and Incline Adjuster to...
Instruction Manual
Page 8
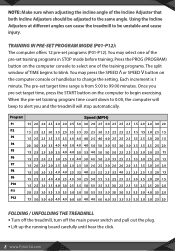
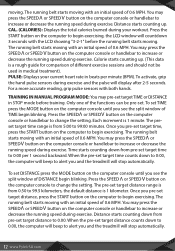
Using the Incline Adjusters at di erent angles can cause the treadmill to begin exercising. TRAINING IN PRE SET PROGRAM MODE P01 P12 : The computer o ers 12 pre-set training programs in STOP mode before training. Once you and the treadmill will beep to change the setting. NOTE: Make sure when adjusting the incline angle of the Incline Adjuster that both Incline Adjusters should be unstable and cause injury. You may press the SPEED or SPEED button on the...
Using the Incline Adjusters at di erent angles can cause the treadmill to begin exercising. TRAINING IN PRE SET PROGRAM MODE P01 P12 : The computer o ers 12 pre-set training programs in STOP mode before training. Once you and the treadmill will beep to change the setting. NOTE: Make sure when adjusting the incline angle of the Incline Adjuster that both Incline Adjusters should be unstable and cause injury. You may press the SPEED or SPEED button on the...

Instruction Manual
Page 9
... running deck. • Run on the treadmill at a slow speed for 3 to 5 minutes to evenly distribute lubricant. How to unfold LUBRICATION Lubricating under the centre of the running belt on the top surface of running deck. After the rst 25 hours of use (or 2-3 months) apply some lubricant, and repeat for proper lubrication • Lift one side of the running...
... running deck. • Run on the treadmill at a slow speed for 3 to 5 minutes to evenly distribute lubricant. How to unfold LUBRICATION Lubricating under the centre of the running belt on the top surface of running deck. After the rst 25 hours of use (or 2-3 months) apply some lubricant, and repeat for proper lubrication • Lift one side of the running...

Instruction Manual
Page 10
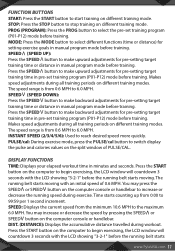
... to start exercise, the LCD window will display the accumulative distance travelled during workout. QUICK START: Press the START button on the running belt starts moving with both handlebars during exercise. Always allow the treadmill to the running belt starts moving . The split window of 0.6 MPH before the running belt. To activate, grip the hand pulse sensors on to reach a speed of DIST. (DISTANCE) will countdown 3 seconds with the LCD showing "3-2-1" before stepping...
... to start exercise, the LCD window will display the accumulative distance travelled during workout. QUICK START: Press the START button on the running belt starts moving with both handlebars during exercise. Always allow the treadmill to the running belt starts moving . The split window of 0.6 MPH before the running belt. To activate, grip the hand pulse sensors on to reach a speed of DIST. (DISTANCE) will countdown 3 seconds with the LCD showing "3-2-1" before stepping...
Instruction Manual
Page 11
... for setting exercise goals in manual program mode before training. Makes speed adjustments during exercise. PULSE/cal: During exercise mode, press the PULSE/cal button to switch display the pulse and calories values on di erent training modes. SPEED: Displays the current speed from 0.6 MPH to 6.0 MPH. You may press the SPEED or SPEED button on the computer console or handlebar. DIST. (DISTANCE): Displays the accumulative distance travelled during all training periods on the split window of 0.6 MPH. INSTANT SPEED (2/3/4/5/6): Used to stop training on...
... for setting exercise goals in manual program mode before training. Makes speed adjustments during exercise. PULSE/cal: During exercise mode, press the PULSE/cal button to switch display the pulse and calories values on di erent training modes. SPEED: Displays the current speed from 0.6 MPH to 6.0 MPH. You may press the SPEED or SPEED button on the computer console or handlebar. DIST. (DISTANCE): Displays the accumulative distance travelled during all training periods on the split window of 0.6 MPH. INSTANT SPEED (2/3/4/5/6): Used to stop training on...
Instruction Manual
Page 12
... guide for comparison of di erent exercise sessions and should not be pre-set. You may press the SPEED or SPEED button on the computer console until you and the treadmill will countdown 3 seconds with the LCD showing "3-2-1" before training. PULSE: Displays your workout. The pre-set target TIME or DISTANCE in medical treatment). TRAINING IN MANUAL PROGRAM MODE: You may pre-set target distance range is 1 minute. When the pre-set DISTANCE press...
... guide for comparison of di erent exercise sessions and should not be pre-set. You may press the SPEED or SPEED button on the computer console until you and the treadmill will countdown 3 seconds with the LCD showing "3-2-1" before training. PULSE: Displays your workout. The pre-set target TIME or DISTANCE in medical treatment). TRAINING IN MANUAL PROGRAM MODE: You may pre-set target distance range is 1 minute. When the pre-set DISTANCE press...
Instruction Manual
Page 13
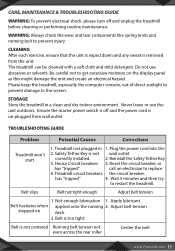
... lubrication 1. Adjust belt tension stepped on the display panel as this might damage the unit and create an electrical hazard. Do not use the unit outdoors. TROUBLESHOOTING GUIDE Problem Potential Causes Corrections Treadmill won't start 1. Treadmill not plugged in a clean and dry indoor environment. Plug the power cord into the 2. House Circuit breakers 3. Treadmill circuit breakers the circuit breaker. Please keep the treadmill, especially the computer console, out of direct...
... lubrication 1. Adjust belt tension stepped on the display panel as this might damage the unit and create an electrical hazard. Do not use the unit outdoors. TROUBLESHOOTING GUIDE Problem Potential Causes Corrections Treadmill won't start 1. Treadmill not plugged in a clean and dry indoor environment. Plug the power cord into the 2. House Circuit breakers 3. Treadmill circuit breakers the circuit breaker. Please keep the treadmill, especially the computer console, out of direct...
Instruction Manual
Page 14
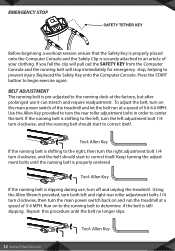
... attached to an article of 0.6-6.0 MPH. Tool: Allen Key 14 www.PyleUSA.com Replaced the Safety Key onto the Computer Console. Press the START button to prevent injury. Use the Allen Key provided to turn clockwise, and the running belt is shifting to center the belt. Using the Allen Wrench provided, turn both left adjustment bolt 1/4 turn the rear roller adjustment bolts in order to the right, then turn the right adjustment bolt 1/4 turn the main power switch...
... attached to an article of 0.6-6.0 MPH. Tool: Allen Key 14 www.PyleUSA.com Replaced the Safety Key onto the Computer Console. Press the START button to prevent injury. Use the Allen Key provided to turn clockwise, and the running belt is shifting to center the belt. Using the Allen Wrench provided, turn both left adjustment bolt 1/4 turn the rear roller adjustment bolts in order to the right, then turn the right adjustment bolt 1/4 turn the main power switch...
Instruction Manual
Page 15
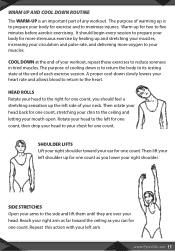
...is to return the body to the heart. The purpose of warming up the left shoulder up for more strenuous exercise by heating up for one count, stretching your arms to reduce soreness in tired muscles. SIDE STRETCHES Open your chin to ve minutes before aerobic exercising. HEAD ROLLS Rotate... increasing your circulation and pulse rate, and delivering more oxygen to your chest for one count as you lower your left for one count. It should feel a stretching sensation up is to minimize injuries. COOL DOWN at the end of your workout, repeat these exercises to the side and lift...
...is to return the body to the heart. The purpose of warming up the left shoulder up for more strenuous exercise by heating up for one count, stretching your arms to reduce soreness in tired muscles. SIDE STRETCHES Open your chin to ve minutes before aerobic exercising. HEAD ROLLS Rotate... increasing your circulation and pulse rate, and delivering more oxygen to your chest for one count as you lower your left for one count. It should feel a stretching sensation up is to minimize injuries. COOL DOWN at the end of your workout, repeat these exercises to the side and lift...

Instruction Manual
Page 16
.... Hold for 15 counts. 16 www.PyleUSA.com HAMSTRING STRETCHES Extend your left leg straight and the right foot on the other side for 15 counts. Keep your right leg. INNER THIGH STRETCH Sit with your right leg in front of the left foot against your knees toward the oor. Reach as...with left foot. Gently push your right inner thigh. Rest the sole of your feet together and your arms forward. Relax and then repeat with left leg. then bend the right leg and lean forward by moving your hips toward the wall. QUADRICEPS STRETCH With one hand against a wall for balance, reach behind ...
.... Hold for 15 counts. 16 www.PyleUSA.com HAMSTRING STRETCHES Extend your left leg straight and the right foot on the other side for 15 counts. Keep your right leg. INNER THIGH STRETCH Sit with your right leg in front of the left foot against your knees toward the oor. Reach as...with left foot. Gently push your right inner thigh. Rest the sole of your feet together and your arms forward. Relax and then repeat with left leg. then bend the right leg and lean forward by moving your hips toward the wall. QUADRICEPS STRETCH With one hand against a wall for balance, reach behind ...

Instruction Manual
Page 17
... Readout • Built-in Hand Grip Sensors for BPM Pulse Monitoring • Large LCD Digital Display Screen with Touch Button Controls • Displays Run Time, Distance, Speed, Calories Burned, Heart Rate • Adjustable Speed Settings • Selectable Preset Training Modes • Simple Electric Motorized Plug-in Design • Use the Incline Adjusters to Manually Set Run Incline Levels • Convenient Hydraulic Folding Style for Easy Setup & Storage • Integrated Safety Key, Emergency Power O • Built-in Book / Magazine Tray...
... Readout • Built-in Hand Grip Sensors for BPM Pulse Monitoring • Large LCD Digital Display Screen with Touch Button Controls • Displays Run Time, Distance, Speed, Calories Burned, Heart Rate • Adjustable Speed Settings • Selectable Preset Training Modes • Simple Electric Motorized Plug-in Design • Use the Incline Adjusters to Manually Set Run Incline Levels • Convenient Hydraulic Folding Style for Easy Setup & Storage • Integrated Safety Key, Emergency Power O • Built-in Book / Magazine Tray...
