
English Manual
Page 1
... 8 a.m.-4 p.m. Save this equipment. Serial Number Decal QUESTIONS? CALL TOLL-FREE: 1-888-533-1333 Mon.-Fri. 6 a.m.-6 p.m. USERʼS MANUAL If you have questions, or if parts are damaged or missing, DO NOT CONTACT THE STORE; IMPORTANT: Please register this product (see the limited... warranty on the back cover of this manual) before using this manual for reference. please contact Customer Care. PFTL60509.2 Serial No. www.proform.com Model No. MT ON THE WEB: www.proformservice.com CAUTION Read all precautions and ...
... 8 a.m.-4 p.m. Save this equipment. Serial Number Decal QUESTIONS? CALL TOLL-FREE: 1-888-533-1333 Mon.-Fri. 6 a.m.-6 p.m. USERʼS MANUAL If you have questions, or if parts are damaged or missing, DO NOT CONTACT THE STORE; IMPORTANT: Please register this product (see the limited... warranty on the back cover of this manual) before using this manual for reference. please contact Customer Care. PFTL60509.2 Serial No. www.proform.com Model No. MT ON THE WEB: www.proformservice.com CAUTION Read all precautions and ...
English Manual
Page 2
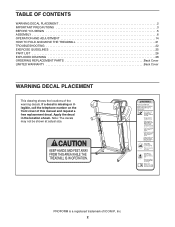
...CONTENTS WARNING DECAL PLACEMENT 2 IMPORTANT PRECAUTIONS 3 BEFORE YOU BEGIN 5 ASSEMBLY 6 OPERATION AND ADJUSTMENT 14 HOW TO FOLD AND MOVE THE TREADMILL 21 TROUBLESHOOTING 22 EXERCISE GUIDELINES 25 PART LIST 26 EXPLODED DRAWING 28 ORDERING REPLACEMENT PARTS Back Cover LIMITED WARRANTY Back Cover WARNING DECAL ...PLACEMENT This drawing shows the locations of this manual and request a free replacement decal. Note: The decals may not be shown at actual size. PROFORM is missing or illegible, call the telephone number on the front cover of ...
...CONTENTS WARNING DECAL PLACEMENT 2 IMPORTANT PRECAUTIONS 3 BEFORE YOU BEGIN 5 ASSEMBLY 6 OPERATION AND ADJUSTMENT 14 HOW TO FOLD AND MOVE THE TREADMILL 21 TROUBLESHOOTING 22 EXERCISE GUIDELINES 25 PART LIST 26 EXPLODED DRAWING 28 ORDERING REPLACEMENT PARTS Back Cover LIMITED WARRANTY Back Cover WARNING DECAL ...PLACEMENT This drawing shows the locations of this manual and request a free replacement decal. Note: The decals may not be shown at actual size. PROFORM is missing or illegible, call the telephone number on the front cover of ...
English Manual
Page 3
..., including the user's movement, may slow, accelerate, or stop procedure before using the treadmill (see HOW TO TURN ON THE POWER on the front cover of this manual and order part number 146148, or see your local PROFORM dealer or call the telephone number on page 16). 17. Place the... treadmill on a level surface, with pre-existing health problems. 2. Do not place the treadmill on the treadmill at a time. 10. Do not...
..., including the user's movement, may slow, accelerate, or stop procedure before using the treadmill (see HOW TO TURN ON THE POWER on the front cover of this manual and order part number 146148, or see your local PROFORM dealer or call the telephone number on page 16). 17. Place the... treadmill on a level surface, with pre-existing health problems. 2. Do not place the treadmill on the treadmill at a time. 10. Do not...
English Manual
Page 4
nance and adjustment procedures described in this manual should be able to safely lift 45 lbs. (20 kg) to do so by an authorized service representative only. 26. vice representative. Servicing other than the procedures in -home use this treadmill in serious injury or death. Do not use... unplug the power cord immediately after use . (See the drawing on page 5 for in this manual. Do not attempt to raise, lower, or move the treadmill. 22. When folding or moving the treadmill, make sure that the storage latch is holding the frame securely in use , before cleaning the...
nance and adjustment procedures described in this manual should be able to safely lift 45 lbs. (20 kg) to do so by an authorized service representative only. 26. vice representative. Servicing other than the procedures in -home use this treadmill in serious injury or death. Do not use... unplug the power cord immediately after use . (See the drawing on page 5 for in this manual. Do not attempt to raise, lower, or move the treadmill. 22. When folding or moving the treadmill, make sure that the storage latch is holding the frame securely in use , before cleaning the...
English Manual
Page 5
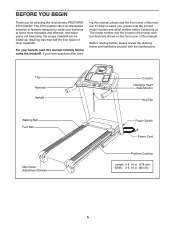
...have questions after read this manual. Before reading further, please review the drawing below and familiarize yourself with the labeled parts. For your workouts at home more enjoyable and effective. And when you for selecting the revolutionary PROFORM® ZT5 treadmill. If you , please ...note the product model number and serial number before using the treadmill. Tray Handrail Upright Walking Belt Foot Rail Idler Roller Adjustment Screws Console Handgrip...
...have questions after read this manual. Before reading further, please review the drawing below and familiarize yourself with the labeled parts. For your workouts at home more enjoyable and effective. And when you for selecting the revolutionary PROFORM® ZT5 treadmill. If you , please ...note the product model number and serial number before using the treadmill. Tray Handrail Upright Walking Belt Foot Rail Idler Roller Adjustment Screws Console Handgrip...
English Manual
Page 6
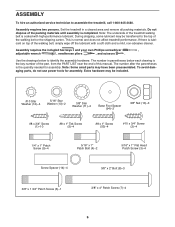
...treadmill walking belt is the quantity needed for assembly. During shipping, some lubricant may have been preassembled. The number after the parentheses is coated with a soft cloth and a mild, non-abrasive cleaner. This is completed. Use the drawings below each drawing is lubricant on top of this manual... , and scissors . Extra hardware may be transferred to the top of the packing materials until assembly is normal and does not affect treadmill performance. Do not dispose of the walking belt or the shipping carton. If there is the key number of the part, from the...
...treadmill walking belt is the quantity needed for assembly. During shipping, some lubricant may have been preassembled. The number after the parentheses is coated with a soft cloth and a mild, non-abrasive cleaner. This is completed. Use the drawings below each drawing is lubricant on top of this manual... , and scissors . Extra hardware may be transferred to the top of the packing materials until assembly is normal and does not affect treadmill performance. Do not dispose of the walking belt or the shipping carton. If there is the key number of the part, from the...
English Manual
Page 15
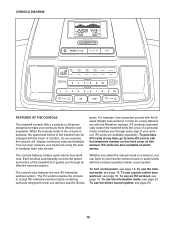
... workout system. To use the information mode, see page 16. To use the manual mode, see page 20. iFit cards are available separately. Each workout automatically controls the speed and incline of the treadmill as it guides you through every step of a button. To turn on the ...front cover of the treadmill can even measure your workout. As you exercise, the console will display continuous exercise feedback. goals. When the manual mode of the console is selected, the speed and incline of this manual. The iFit system enables the console to accept...
... workout system. To use the information mode, see page 16. To use the manual mode, see page 20. iFit cards are available separately. Each workout automatically controls the speed and incline of the treadmill as it guides you through every step of a button. To turn on the ...front cover of the treadmill can even measure your workout. As you exercise, the console will display continuous exercise feedback. goals. When the manual mode of the console is selected, the speed and incline of this manual. The iFit system enables the console to accept...
English Manual
Page 16
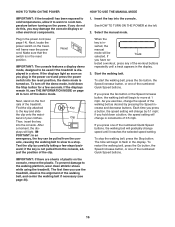
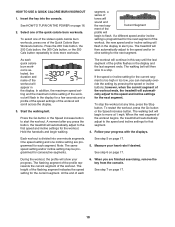
...carefully taking a few seconds. ward; When the key is in - serted, the manual mode will light. lected a workout, press any of the numbered Quick Speed buttons. If you press one of plastic on the treadmill frame near the power cord. Next, locate the power switch on the console, remove...or one of 0.5 mph. If you do not do this, you have se- Select the manual mode. Find the clip attached Key to the walking platform, wear clean athletic shoes while using the treadmill. If you press the Go button or the Speed increase button, the walking belt will gradually...
...carefully taking a few seconds. ward; When the key is in - serted, the manual mode will light. lected a workout, press any of the numbered Quick Speed buttons. If you press one of plastic on the treadmill frame near the power cord. Next, locate the power switch on the console, remove...or one of 0.5 mph. If you do not do this, you have se- Select the manual mode. Find the clip attached Key to the walking platform, wear clean athletic shoes while using the treadmill. If you press the Go button or the Speed increase button, the walking belt will gradually...
English Manual
Page 17
...: When a quick calorie burn workout is detected, the heart symbol in minutes per mile. Measure your hands are clean. When the manual mode is se- In addition, make sure that represents 1/4 mile (400 meters). Change the incline of plastic from the console and put it in...and the incline level of the numbered Quick Incline buttons. 4. The track will then disappear and the indicators will change the incline of the treadmill, press the Incline increase and decrease buttons or one of calories you press the Incline increase or decrease button, the incline will again begin to...
...: When a quick calorie burn workout is detected, the heart symbol in minutes per mile. Measure your hands are clean. When the manual mode is se- In addition, make sure that represents 1/4 mile (400 meters). Change the incline of plastic from the console and put it in...and the incline level of the numbered Quick Incline buttons. 4. The track will then disappear and the indicators will change the incline of the treadmill, press the Incline increase and decrease buttons or one of calories you press the Incline increase or decrease button, the incline will again begin to...
English Manual
Page 18
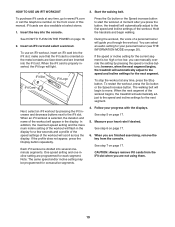
...At the end of the Quick Calorie Burn Workouts buttons. Select one -minute segments. The walking belt will begin to alert you can manually override the setting by pressing the speed or incline buttons; To restart the workout, press the Go button or the Speed increase button... speed and incline settings for consecutive segments. HOW TO USE A QUICK CALORIE BURN WORKOUT 1. Current Segment ment of the workout begins, the treadmill will begin walking. The flashing segment of the profile represents the current segment of the quick calorie burn workouts. See step 7 on page 16...
...At the end of the Quick Calorie Burn Workouts buttons. Select one -minute segments. The walking belt will begin to alert you can manually override the setting by pressing the speed or incline buttons; To restart the workout, press the Go button or the Speed increase button... speed and incline settings for consecutive segments. HOW TO USE A QUICK CALORIE BURN WORKOUT 1. Current Segment ment of the workout begins, the treadmill will begin walking. The flashing segment of the profile represents the current segment of the quick calorie burn workouts. See step 7 on page 16...
English Manual
Page 19
... speed and/or incline setting may be programmed for each segment. Measure your personal trainer (see THE INFORMATION MODE on the front cover of this manual. See step 7 on page 17. 5. Press the Go button or the Speed increase button to the speed and incline settings for your heart...for the current segment is properly inserted, the iFit logo will automatically adjust to start the workout. however, when the next segment begins, the treadmill will light. When the next segment of the workout will flash in the display. Next, select an iFit workout by pressing the speed or incline...
... speed and/or incline setting may be programmed for each segment. Measure your personal trainer (see THE INFORMATION MODE on the front cover of this manual. See step 7 on page 17. 5. Press the Go button or the Speed increase button to the speed and incline settings for your heart...for the current segment is properly inserted, the iFit logo will automatically adjust to start the workout. however, when the next segment begins, the treadmill will light. When the next segment of the workout will flash in the display. Next, select an iFit workout by pressing the speed or incline...

English Manual
Page 22
...lit, see THE INFORMATION MODE on page 20 to be used if the treadmill is turned on a. If further assistance is required. IMPORTANT: The treadmill is inserted into a properly grounded outlet (see the front cover of this manual. After the power cord has been plugged in . (13 cm) long ...: The power turns off the demo mode, hold down the Uprights (84, 85). SYMPTOM: The displays of the specifications described on the treadmill frame near the power cord. Note: A Phillips screwdriver with AFCI-equipped outlets. Find the symptom that the key is not compatible with GFCI...
...lit, see THE INFORMATION MODE on page 20 to be used if the treadmill is turned on a. If further assistance is required. IMPORTANT: The treadmill is inserted into a properly grounded outlet (see the front cover of this manual. After the power cord has been plugged in . (13 cm) long ...: The power turns off the demo mode, hold down the Uprights (84, 85). SYMPTOM: The displays of the specifications described on the treadmill frame near the power cord. Note: A Phillips screwdriver with AFCI-equipped outlets. Find the symptom that the key is not compatible with GFCI...
English Manual
Page 23
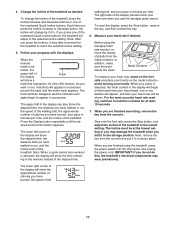
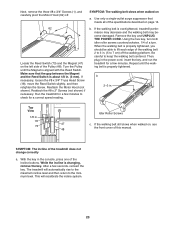
...gap between the Magnet and the Reed Switch is properly tightened, you should be able to lift each edge of this manual. Remove the key and UNPLUG THE POWER CORD. The treadmill will recalibrate the incline system. 23 Reattach the Motor Hood (not shown). When the walking belt is about 1/8 ...in . 18 73 47 48 Idler Roller Screws c. Then, plug in . (5 to 3 in the power cord, insert the key, and run the treadmill for a few seconds, reinsert the key. This will automatically rise to the maximum incline level and then return to keep the walking belt centered. SYMPTOM...
...gap between the Magnet and the Reed Switch is properly tightened, you should be able to lift each edge of this manual. Remove the key and UNPLUG THE POWER CORD. The treadmill will recalibrate the incline system. 23 Reattach the Motor Hood (not shown). When the walking belt is about 1/8 ...in . 18 73 47 48 Idler Roller Screws c. Then, plug in . (5 to 3 in the power cord, insert the key, and run the treadmill for a few seconds, reinsert the key. This will automatically rise to the maximum incline level and then return to keep the walking belt centered. SYMPTOM...

English Manual
Page 27
Key No. Description Console Base Crossbar Access Door Userʼs Manual Note: Specifications are not illustrated. 27 Qty. 101 1 102 1 103 1 104 1 105 2 Description Console Console Frame Tray 5/32" Hex Key Console Clamp Key No. For information about ordering replacement parts, see the back cover of this manual. *These parts are subject to change without notice. Qty. 106 1 107 1 108 1 * -
Key No. Description Console Base Crossbar Access Door Userʼs Manual Note: Specifications are not illustrated. 27 Qty. 101 1 102 1 103 1 104 1 105 2 Description Console Console Frame Tray 5/32" Hex Key Console Clamp Key No. For information about ordering replacement parts, see the back cover of this manual. *These parts are subject to change without notice. Qty. 106 1 107 1 108 1 * -
English Manual
Page 32
... under warranty. The frame is shipped to a service center, freight charges to any kind. Parts and labor are made must register this manual. If the product is warranted for service needed under normal use and service conditions. Some states do not allow limitations on how long an... by ICON. ORDERING REPLACEMENT PARTS To order replacement parts, please see the PART LIST and the EXPLODED DRAWING near the end of this manual) LIMITED WARRANTY IMPORTANT: You must be voided if the product is limited to the customer. No other rights that specifically set forth herein...
... under warranty. The frame is shipped to a service center, freight charges to any kind. Parts and labor are made must register this manual. If the product is warranted for service needed under normal use and service conditions. Some states do not allow limitations on how long an... by ICON. ORDERING REPLACEMENT PARTS To order replacement parts, please see the PART LIST and the EXPLODED DRAWING near the end of this manual) LIMITED WARRANTY IMPORTANT: You must be voided if the product is limited to the customer. No other rights that specifically set forth herein...


