
English Manual
Page 1
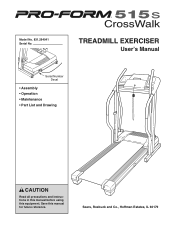
Model No. 831.294041 Serial No. Save this equipment. TREADMILL EXERCISER User's Manual Serial Number Decal • Assembly • Operation • Maintenance • Part List and Drawing CAUTION Read all precautions and instructions in this manual before using this manual for future reference. Sears, Roebuck and Co., Hoffman Estates, IL 60179
Model No. 831.294041 Serial No. Save this equipment. TREADMILL EXERCISER User's Manual Serial Number Decal • Assembly • Operation • Maintenance • Part List and Drawing CAUTION Read all precautions and instructions in this manual before using this manual for future reference. Sears, Roebuck and Co., Hoffman Estates, IL 60179
English Manual
Page 2
TABLE OF CONTENTS IMPORTANT PRECAUTIONS 3 BEFORE YOU BEGIN 5 ASSEMBLY 6 OPERATION AND ADJUSTMENT 10 HOW TO FOLD AND MOVE THE TREADMILL 21 TROUBLESHOOTING 23 CONDITIONING GUIDELINES 25 ORDERING REPLACEMENT PARTS Back Cover FULL 90 DAY WARRANTY Back Cover Note: An EXPLODED DRAWING and a PART LIST are attached in the center of this manual. 2
TABLE OF CONTENTS IMPORTANT PRECAUTIONS 3 BEFORE YOU BEGIN 5 ASSEMBLY 6 OPERATION AND ADJUSTMENT 10 HOW TO FOLD AND MOVE THE TREADMILL 21 TROUBLESHOOTING 23 CONDITIONING GUIDELINES 25 ORDERING REPLACEMENT PARTS Back Cover FULL 90 DAY WARRANTY Back Cover Note: An EXPLODED DRAWING and a PART LIST are attached in the center of this manual. 2
English Manual
Page 3
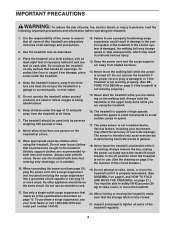
...a garage or covered patio, or near water. 12. Failure to ensure that the storage latch is fully closed. 21. Do not operate the treadmill where aerosol products are recommended for the location of the circuit breaker.) 10. Athletic support clothes are used only by persons weighing 250 pounds or... (not included) and plug the surge suppressor into a grounded circuit capable of carrying 15 or more than one person on page 5 if the treadmill is not in sandals. 15. Always remove the key, unplug the power cord and move the walking belt while the power is turned off position...
...a garage or covered patio, or near water. 12. Failure to ensure that the storage latch is fully closed. 21. Do not operate the treadmill where aerosol products are recommended for the location of the circuit breaker.) 10. Athletic support clothes are used only by persons weighing 250 pounds or... (not included) and plug the surge suppressor into a grounded circuit capable of carrying 15 or more than one person on page 5 if the treadmill is not in sandals. 15. Always remove the key, unplug the power cord and move the walking belt while the power is turned off position...
English Manual
Page 4
... for the "chirp" and be performed by pressing the speed buttons. 22. Always listen for persons over the age of the treadmill is heard, the speed will alert you are not shown at any time by an authorized ser- vice representative only. 27. If... before the personal trainer describes the change to order a free replacement decal. Never insert any object into any exercise program, consult your treadmill. scribed in the location shown. WARNING: Before beginning this manual. Sears assumes no responsibility for in a commercial, rental, or institutional ...
... for the "chirp" and be performed by pressing the speed buttons. 22. Always listen for persons over the age of the treadmill is heard, the speed will alert you are not shown at any time by an authorized ser- vice representative only. 27. If... before the personal trainer describes the change to order a free replacement decal. Never insert any object into any exercise program, consult your treadmill. scribed in the location shown. WARNING: Before beginning this manual. Sears assumes no responsibility for in a commercial, rental, or institutional ...
English Manual
Page 5
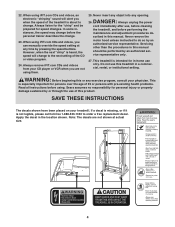
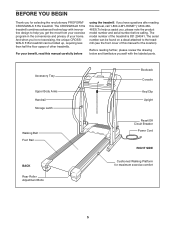
...Upright Reset/Off Circuit Breaker Power Cord RIGHT SIDE Cushioned Walking Platform for selecting the revolutionary PROFORM® CROSSWALK 515s treadmill. And when you're not exercising, the unique CROSSWALK 515s treadmill can be folded up, requiring less than half the floor space of this manual, call ...on a decal attached to help us assist you, please note the product model number and serial number before using the treadmill. The CROSSWALK 515s treadmill combines advanced technology with the labeled parts. BEFORE YOU BEGIN Thank you for maximum exercise comfort 5 If you have ...
...Upright Reset/Off Circuit Breaker Power Cord RIGHT SIDE Cushioned Walking Platform for selecting the revolutionary PROFORM® CROSSWALK 515s treadmill. And when you're not exercising, the unique CROSSWALK 515s treadmill can be folded up, requiring less than half the floor space of this manual, call ...on a decal attached to help us assist you, please note the product model number and serial number before using the treadmill. The CROSSWALK 515s treadmill combines advanced technology with the labeled parts. BEFORE YOU BEGIN Thank you for maximum exercise comfort 5 If you have ...
English Manual
Page 6
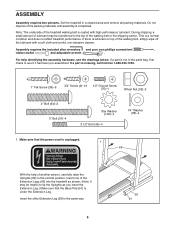
... Extension Leg (63) in a cleared area and remove all packing materials. For help of the treadmill walking belt is not in the parts bag, first check to the vertical position. Set the treadmill in the same way. 6 63 61 Note: The underside of another person, carefully raise the ... Make sure that the Base Pad (61) is lubricant on top of the packing materials until assembly is a normal condition and does not affect treadmill performance. ASSEMBLY Assembly requires two persons. If a part is unplugged. 1 69 With the help identifying the assembly hardware, see if it has been...
... Extension Leg (63) in a cleared area and remove all packing materials. For help of the treadmill walking belt is not in the parts bag, first check to the vertical position. Set the treadmill in the same way. 6 63 61 Note: The underside of another person, carefully raise the ... Make sure that the Base Pad (61) is lubricant on top of the packing materials until assembly is a normal condition and does not affect treadmill performance. ASSEMBLY Assembly requires two persons. If a part is unplugged. 1 69 With the help identifying the assembly hardware, see if it has been...

English Manual
Page 9
..., as shown. Note: Extra hardware may be at an angle that all parts are properly tightened before you use the treadmill. To protect the floor or carpet, place a mat under the treadmill. 9 Cover the 8 Upright Wire with two 3/4" Screws (2) as shown. Firmly tighten the Bolts. Be careful not to adjust the walking...
..., as shown. Note: Extra hardware may be at an angle that all parts are properly tightened before you use the treadmill. To protect the floor or carpet, place a mat under the treadmill. 9 Cover the 8 Upright Wire with two 3/4" Screws (2) as shown. Firmly tighten the Bolts. Be careful not to adjust the walking...

English Manual
Page 10
...provided with the product-if it is not available. 1 Grounded Outlet Box Surge Suppressor Grounding Pin Your treadmill, like the plug illustrated in your home's power. Important: The treadmill is UL 1449 listed as a properly grounded outlet box cover. To purchase a surge suppressor, see... 10 Contact a qualified electrician to the walking belt or the walking platform. OPERATION AND ADJUSTMENT THE PERFORMANT LUBETM WALKING BELT Your treadmill features a walking belt coated with a cord having Lug Metal Screw The temporary adapter should malfunction or break down, grounding provides ...
...provided with the product-if it is not available. 1 Grounded Outlet Box Surge Suppressor Grounding Pin Your treadmill, like the plug illustrated in your home's power. Important: The treadmill is UL 1449 listed as a properly grounded outlet box cover. To purchase a surge suppressor, see... 10 Contact a qualified electrician to the walking belt or the walking platform. OPERATION AND ADJUSTMENT THE PERFORMANT LUBETM WALKING BELT Your treadmill features a walking belt coated with a cord having Lug Metal Screw The temporary adapter should malfunction or break down, grounding provides ...
English Manual
Page 11
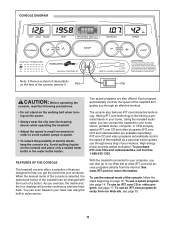
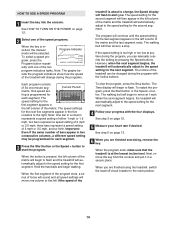
...your home. To use an iFIT.com CD or video program, see page 14. Two speed programs are available separately). FEATURES OF THE CONSOLE The treadmill console offers a selection of features designed to avoid sudden jumps in pulse sensor. You can also go to your computer, you can even measure ...your heart rate using the built-in speed. • To reduce the possibility of electric shock, keep the console dry. With the treadmill connected to our Web site at www.iFIT.com and access programs directly from the internet. To use a speed program, see page 17. Key ...
...your home. To use an iFIT.com CD or video program, see page 14. Two speed programs are available separately). FEATURES OF THE CONSOLE The treadmill console offers a selection of features designed to avoid sudden jumps in pulse sensor. You can also go to your computer, you can even measure ...your heart rate using the built-in speed. • To reduce the possibility of electric shock, keep the console dry. With the treadmill connected to our Web site at www.iFIT.com and access programs directly from the internet. To use a speed program, see page 17. Key ...
English Manual
Page 12
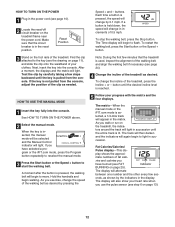
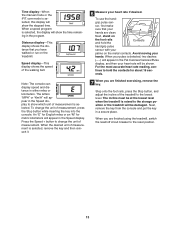
...Indicator BURNING on the foot rails of fat calo- The Time display will light. To change in increments of 0.5 mph. mate numbers of the treadmill. Reset Position 3 Stand on page 25). After a moment, the displays and the matrix will begin to light in succession until the desired ... button to move. button until the entire track is in the display. Fat Calories/Calories/ Pulse display-This dis- Make sure that the treadmill is used, inspect the alignment of the clip as desired by carefully taking a few minutes that the circuit breaker is lit. To restart ...
...Indicator BURNING on the foot rails of fat calo- The Time display will light. To change in increments of 0.5 mph. mate numbers of the treadmill. Reset Position 3 Stand on page 25). After a moment, the displays and the matrix will begin to light in succession until the desired ... button to move. button until the entire track is in the display. Fat Calories/Calories/ Pulse display-This dis- Make sure that the treadmill is used, inspect the alignment of the clip as desired by carefully taking a few minutes that the circuit breaker is lit. To restart ...
English Manual
Page 13
... "MPH" or "Km/H" will be damaged. When the desired unit of measurement is selected, the display will be at the lowest level when the treadmill is selected. To use the hand- sor, first make sure that you are clean. When you are finished using the... hold the contacts for metric kilometers will show the elapsed time. The incline must be shown. Avoid moving your palms on the treadmill. tinue to the storage position or the treadmill will appear in the Fat Calories/Calories/Pulse display, and then your hands are finished exercising, remove the key. onds. 7 ...
... "MPH" or "Km/H" will be damaged. When the desired unit of measurement is selected, the display will be at the lowest level when the treadmill is selected. To use the hand- sor, first make sure that you are clean. When you are finished using the... hold the contacts for metric kilometers will show the elapsed time. The incline must be shown. Avoid moving your palms on the treadmill. tinue to the storage position or the treadmill will appear in the Fat Calories/Calories/Pulse display, and then your hands are finished exercising, remove the key. onds. 7 ...
English Manual
Page 14
...forth. See step 5 on page 13. 6 When you . When you can be selected. side the program indicators show how the speed of the treadmill will change during the programs. Each program consists of the speed programs. When the key is about to change, the Speed display will flash to...5 Measure your progress with the Incline buttons. Next, remove the key from the console and put it in the left column of the treadmill can manually override the setting by pressing the Speed buttons. The speed setting for the second segment will continue until one of 30 one ...
...forth. See step 5 on page 13. 6 When you . When you can be selected. side the program indicators show how the speed of the treadmill will change during the programs. Each program consists of the speed programs. When the key is about to change, the Speed display will flash to...5 Measure your progress with the Incline buttons. Next, remove the key from the console and put it in the left column of the treadmill can manually override the setting by pressing the Speed buttons. The speed setting for the second segment will continue until one of 30 one ...

English Manual
Page 15
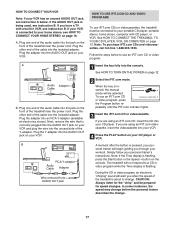
...the audio cable into the included adapter. If your headphones into a 3.5mm Y-adapter (available at electronics stores). Plug the other side of the treadmill near the power cord. Plug the Y-adapter into the PHONES jack on the front of the cable into the PHONES jack. C Audio Cable 3....5mm Y-adapter Headphones Audio Cable PHONES 3.5mm Y-adapter Headphones 15 Plug the other end of the treadmill near the power cord. See pages 15 and 16 for connecting instructions. A. Plug the other end of the cable into the jack on your...
...the audio cable into the included adapter. If your headphones into a 3.5mm Y-adapter (available at electronics stores). Plug the other side of the treadmill near the power cord. Plug the Y-adapter into the PHONES jack on the front of the cable into the PHONES jack. C Audio Cable 3....5mm Y-adapter Headphones Audio Cable PHONES 3.5mm Y-adapter Headphones 15 Plug the other end of the treadmill near the power cord. See pages 15 and 16 for connecting instructions. A. Plug the other end of the cable into the jack on your...

English Manual
Page 16
... (available at electronics stores). Plug one end of the audio cable into the jack on the front of the treadmill near the power cord. Plug the Y-adapter into the jack on the front of the audio cable into the ...OUT jack on your computer. Plug one end of the treadmill near the power cord. Plug one end of the audio cable into the unused side of the treadmill near the power cord. Plug one end of the audio... cable into the jack on the front of the treadmill near the power cord. Next, remove the wire that is being used, see instruction A ...
... (available at electronics stores). Plug one end of the audio cable into the jack on the front of the treadmill near the power cord. Plug the Y-adapter into the jack on the front of the audio cable into the ...OUT jack on your computer. Plug one end of the treadmill near the power cord. Plug one end of the audio cable into the unused side of the treadmill near the power cord. Plug one end of the audio... cable into the jack on the front of the treadmill near the power cord. Next, remove the wire that is being used, see instruction A ...
English Manual
Page 17
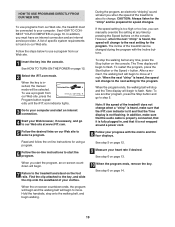
... TO CONNECT YOUR HOME STEREO on page 16. If your VCR is about to your home stereo, see instruction B. Plug the other end of the treadmill is connected to change . 17 IN VIDEO AUDIO IN CH 34 OUT RF OUT RCA Y-adapter Audio Cable Adapter Wire removed from AUDIO OUT jack... HOW TO USE IFIT.COM CD AND VIDEO PROGRAMS To use iFIT.com CDs or videocassettes, the treadmill must be connected to your portable CD player, portable stereo, home stereo, computer with a built-in VCR, see instruction A below to a CD or video program...
... TO CONNECT YOUR HOME STEREO on page 16. If your VCR is about to your home stereo, see instruction B. Plug the other end of the treadmill is connected to change . 17 IN VIDEO AUDIO IN CH 34 OUT RF OUT RCA Y-adapter Audio Cable Adapter Wire removed from AUDIO OUT jack... HOW TO USE IFIT.COM CD AND VIDEO PROGRAMS To use iFIT.com CDs or videocassettes, the treadmill must be connected to your portable CD player, portable stereo, home stereo, computer with a built-in VCR, see instruction A below to a CD or video program...
English Manual
Page 18
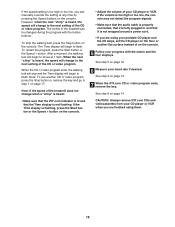
...: Always remove iFIT.com CDs and videocassettes from your CD player or VCR when you are using them. 18 Note: If the speed of the treadmill does not change when a "chirp" is heard: • Make sure that the iFIT.com indicator is lit and that it is not wrapped around a power... the next "chirp" is heard, the speed will stop the walking belt, press the Stop button on the console. • Adjust the volume of the treadmill can manually override the setting at 1 mph. The Time display will begin to the next setting of the CD or video program. If the speed...
...: Always remove iFIT.com CDs and videocassettes from your CD player or VCR when you are using them. 18 Note: If the speed of the treadmill does not change when a "chirp" is heard: • Make sure that the iFIT.com indicator is lit and that it is not wrapped around a power... the next "chirp" is heard, the speed will stop the walking belt, press the Stop button on the console. • Adjust the volume of the treadmill can manually override the setting at 1 mph. The Time display will begin to the next setting of the CD or video program. If the speed...
English Manual
Page 19
...properly connected, that it is not flashing. After a moment, the walking belt will begin to start the program. Note: If the speed of the treadmill can manually override the setting at any time by pressing the Speed buttons on -line instructions to move . Read and follow the on the foot... begin to our Web site at 1 mph. HOW TO USE PROGRAMS DIRECTLY FROM OUR WEB SITE To use programs from our Web site, the treadmill must have an internet connection and an internet service provider. During the program, an electronic "chirping" sound will be changed during the program with ...
...properly connected, that it is not flashing. After a moment, the walking belt will begin to start the program. Note: If the speed of the treadmill can manually override the setting at any time by pressing the Speed buttons on -line instructions to move . Read and follow the on the foot... begin to our Web site at 1 mph. HOW TO USE PROGRAMS DIRECTLY FROM OUR WEB SITE To use programs from our Web site, the treadmill must have an internet connection and an internet service provider. During the program, an electronic "chirping" sound will be changed during the program with ...

English Manual
Page 20
To increase the resistance, turn the knobs counterclockwise. HOW TO USE THE UPPER BODY ARMS As you walk on the treadmill, you walk on the treadmill. Upper Body Arms Resistance Knobs 20 To vary the intensity of your upper body exercise, the resistance of the upper body arms can either hold the handrails or use the upper body arms. To exercise your arms, shoulders, and back for a total body workout, move the upper body arms forward and back as you can be adjusted. to decrease the resistance, turn the resistance knobs clockwise;
To increase the resistance, turn the knobs counterclockwise. HOW TO USE THE UPPER BODY ARMS As you walk on the treadmill, you walk on the treadmill. Upper Body Arms Resistance Knobs 20 To vary the intensity of your upper body exercise, the resistance of the upper body arms can either hold the handrails or use the upper body arms. To exercise your arms, shoulders, and back for a total body workout, move the upper body arms forward and back as you can be adjusted. to decrease the resistance, turn the resistance knobs clockwise;

English Manual
Page 21
... until it rolls freely on the base as described above 85° Fahrenheit. Using your right hand to raise, lower, or move the treadmill. 1. To reduce the risk of injury, bend your legs and keep your back straight. Place one foot on the front wheels. Make sure that the ... storage latch. 1. Move your left thumb, press the storage latch to lift with your back. Place one foot on the base, and carefully lower the treadmill until it is fully engaged over the catch. Make sure that the storage latch is resting in the storage position. HOW TO FOLD AND MOVE...
... until it rolls freely on the base as described above 85° Fahrenheit. Using your right hand to raise, lower, or move the treadmill. 1. To reduce the risk of injury, bend your legs and keep your back straight. Place one foot on the front wheels. Make sure that the ... storage latch. 1. Move your left thumb, press the storage latch to lift with your back. Place one foot on the base, and carefully lower the treadmill until it is fully engaged over the catch. Make sure that the storage latch is resting in the storage position. HOW TO FOLD AND MOVE...

English Manual
Page 22
Press the storage latch to the floor. Do not drop the treadmill frame to the left. Pivot the treadmill down until the frame and foot rail are past the storage latch. 2. Hold the treadmill firmly with your back straight. To decrease the possibility of the treadmill with both hands, and lower the treadmill to the floor. Hold the upper end of injury, bend your legs and keep your right hand. Storage Latch Catch 22 HOW TO LOWER THE TREADMILL FOR USE 1.
Press the storage latch to the floor. Do not drop the treadmill frame to the left. Pivot the treadmill down until the frame and foot rail are past the storage latch. 2. Hold the treadmill firmly with your back straight. To decrease the possibility of the treadmill with both hands, and lower the treadmill to the floor. Hold the upper end of injury, bend your legs and keep your right hand. Storage Latch Catch 22 HOW TO LOWER THE TREADMILL FOR USE 1.


