
English Manual
Page 2
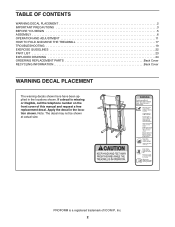
...decal is a registered trademark of this manual and request a free replacement decal. Note: The decal may not be shown at actual size. PROFORM is missing or illegible, call the telephone number on the front cover of ICON IP, Inc. 2 TABLE OF CONTENTS WARNING DECAL PLACEMENT ...2 IMPORTANT PRECAUTIONS 3 BEFORE YOU BEGIN 5 ASSEMBLY 6 OPERATION AND ADJUSTMENT 11 HOW TO FOLD AND MOVE THE TREADMILL 17 TROUBLESHOOTING 19 EXERCISE GUIDELINES 22 PART LIST 23 EXPLODED DRAWING 24 ORDERING REPLACEMENT PARTS Back Cover RECYCLING INFORMATION Back Cover WARNING DECAL ...
...decal is a registered trademark of this manual and request a free replacement decal. Note: The decal may not be shown at actual size. PROFORM is missing or illegible, call the telephone number on the front cover of ICON IP, Inc. 2 TABLE OF CONTENTS WARNING DECAL PLACEMENT ...2 IMPORTANT PRECAUTIONS 3 BEFORE YOU BEGIN 5 ASSEMBLY 6 OPERATION AND ADJUSTMENT 11 HOW TO FOLD AND MOVE THE TREADMILL 17 TROUBLESHOOTING 19 EXERCISE GUIDELINES 22 PART LIST 23 EXPLODED DRAWING 24 ORDERING REPLACEMENT PARTS Back Cover RECYCLING INFORMATION Back Cover WARNING DECAL ...
English Manual
Page 3
... the power cord, and switch the reset/off circuit breaker to avoid sudden jumps in this product. 1. sumes no longer than one person on the treadmill at least 8 ft. (2.4 m) of clearance behind it is not a medical device. No other appliance should be used . 2. structions in speed. 18. Use ... lbs. (130 kg) or less. 9. To protect the floor or carpet from damage, place a mat under the age of 12 and pets away from the treadmill at all important precautions and in small increments to the off . This is needed, use of this manual and all warnings and precautions. 12. Do...
... the power cord, and switch the reset/off circuit breaker to avoid sudden jumps in this product. 1. sumes no longer than one person on the treadmill at least 8 ft. (2.4 m) of clearance behind it is not a medical device. No other appliance should be used . 2. structions in speed. 18. Use ... lbs. (130 kg) or less. 9. To protect the floor or carpet from damage, place a mat under the age of 12 and pets away from the treadmill at all important precautions and in small increments to the off . This is needed, use of this manual and all warnings and precautions. 12. Do...
English Manual
Page 4
...other than the procedures in this manual should be able to safely lift 45 lbs. (20 kg) to raise, lower, or move the treadmill until it is fully closed. 22. Do not use only. nance and adjustment procedures described in this manual. 20. Always unplug the power ...cord immediately after use, before cleaning the treadmill, and before performing the mainte- less instructed to raise, lower, or move the treadmill. 21. DANGER: 24. Never insert any object into any opening on page 17.) You must ...
...other than the procedures in this manual should be able to safely lift 45 lbs. (20 kg) to raise, lower, or move the treadmill until it is fully closed. 22. Do not use only. nance and adjustment procedures described in this manual. 20. Always unplug the power ...cord immediately after use, before cleaning the treadmill, and before performing the mainte- less instructed to raise, lower, or move the treadmill. 21. DANGER: 24. Never insert any object into any opening on page 17.) You must ...
English Manual
Page 5
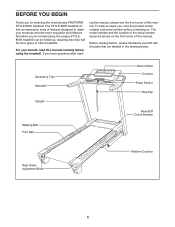
... PROFORM® STYLE 8000 treadmill. ing this manual, please see the front cover of other treadmills. Before reading further, please familiarize yourself with the parts that are shown on the front cover of this manual. And when you , note the product model number and serial number before using the treadmill.... us. For your workouts at home more enjoyable and effective. To help us assist you ʼre not exercising, the unique STYLE 8000 treadmill can be folded up, requiring less than half the floor space of this manual. Accessory Tray Handrail Upright Walking Belt Foot Rail ...
... PROFORM® STYLE 8000 treadmill. ing this manual, please see the front cover of other treadmills. Before reading further, please familiarize yourself with the parts that are shown on the front cover of this manual. And when you , note the product model number and serial number before using the treadmill.... us. For your workouts at home more enjoyable and effective. To help us assist you ʼre not exercising, the unique STYLE 8000 treadmill can be folded up, requiring less than half the floor space of this manual. Accessory Tray Handrail Upright Walking Belt Foot Rail ...
English Manual
Page 6
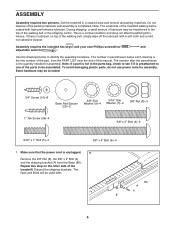
...lubricant. Note: If a part is not in the parts bag, check to identify the assembly hardware. ASSEMBLY Assembly requires two persons. Set the treadmill in parentheses below to see if it is the key number of the part, from the Base (80). The number after the parentheses is ...PART LIST near the end of the packing materials until assembly is the quantity needed for assembly. Repeat this manual. Note: The underside of the treadmill. The number in a cleared area and remove all packing materials. To avoid damaging plastic parts, do not use power tools for assembly. Do...
...lubricant. Note: If a part is not in the parts bag, check to identify the assembly hardware. ASSEMBLY Assembly requires two persons. Set the treadmill in parentheses below to see if it is the key number of the part, from the Base (80). The number after the parentheses is ...PART LIST near the end of the packing materials until assembly is the quantity needed for assembly. Repeat this manual. Note: The underside of the treadmill. The number in a cleared area and remove all packing materials. To avoid damaging plastic parts, do not use power tools for assembly. Do...

English Manual
Page 7
... 8 4. Insert the Upright Wire (78) through the Right Upright. Tie the wire tie in the location shown with the 3/8" x 2" Bolt (4) and the 3/8" Nut (8) that the treadmill is routed completely through the Right Upright Spacer as shown. Then, pull the other end of a second person, carefully tip the... treadmill onto its left side. Attach a Base Wheel (81) with a Base Pad Spacer (25) and a 1" Tek Screw (56). With the help of the wire tie until ...
... 8 4. Insert the Upright Wire (78) through the Right Upright. Tie the wire tie in the location shown with the 3/8" x 2" Bolt (4) and the 3/8" Nut (8) that the treadmill is routed completely through the Right Upright Spacer as shown. Then, pull the other end of a second person, carefully tip the... treadmill onto its left side. Attach a Base Wheel (81) with a Base Pad Spacer (25) and a 1" Tek Screw (56). With the help of the wire tie until ...

English Manual
Page 8
...the Base (80). With the help of a second person, hold a Bolt 7 Spacer (3) inside the lower end of a second person, carefully tip the treadmill onto its right side. Then, attach another Base Pad (79) with a 3/8" Star Washer (9) into the Right Upright and the Bolt Spacer. the Base... Bolt (6), and 3/8" Star Washer (9). Do not overtighten the Nut; With the help of the Left Upright (71). Partially fold the Frame (53) so the treadmill is flat on the floor. 8 With the help of 5 the Right Upright (72). Repeat this step with a 3/8" Star Washer (9) into the Left Upright ...
...the Base (80). With the help of a second person, hold a Bolt 7 Spacer (3) inside the lower end of a second person, carefully tip the treadmill onto its right side. Then, attach another Base Pad (79) with a 3/8" Star Washer (9) into the Right Upright and the Bolt Spacer. the Base... Bolt (6), and 3/8" Star Washer (9). Do not overtighten the Nut; With the help of the Left Upright (71). Partially fold the Frame (53) so the treadmill is flat on the floor. 8 With the help of 5 the Right Upright (72). Repeat this step with a 3/8" Star Washer (9) into the Left Upright ...

English Manual
Page 10
Remove the tie from the end of the Latch Assembly (55) to adjust the walking belt (see HOW TO LOWER THE TREADMILL FOR USE on the treadmill decals, remove the plastic. Have a second person hold the Frame until 12 this step is locked into hole 1. Attach the Latch Bracket (68) to the... positions shown. Make sure that the large barrel and the Latch Knob (54) are properly tightened before you use the treadmill. To protect the floor or carpet, place a mat under the treadmill. 11. Identify the Latch Assembly (55). Orient the Latch Assembly (55) so that all parts are in a secure place;...
Remove the tie from the end of the Latch Assembly (55) to adjust the walking belt (see HOW TO LOWER THE TREADMILL FOR USE on the treadmill decals, remove the plastic. Have a second person hold the Frame until 12 this step is locked into hole 1. Attach the Latch Bracket (68) to the... positions shown. Make sure that the large barrel and the Latch Knob (54) are properly tightened before you use the treadmill. To protect the floor or carpet, place a mat under the treadmill. 11. Identify the Latch Assembly (55). Orient the Latch Assembly (55) so that all parts are in a secure place;...

English Manual
Page 11
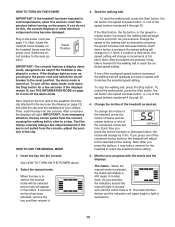
...Plug the indicated end of the power cord into the metal clips in the adapter. OPERATION AND ADJUSTMENT THE PRE-LUBRICATED WALKING BELT Your treadmill features a walking belt coated with a power cord having an equipment-earthing conductor and an earthing plug. Such substances will not fit ... outlet that the adapter cover is equipped with high-performance lubricant. Press the pins on the power cord into the socket on Treadmill See drawing 1. IMPORTANT: Never apply silicone spray or other substances to whether the product is damaged, it will deteriorate the walking...
...Plug the indicated end of the power cord into the metal clips in the adapter. OPERATION AND ADJUSTMENT THE PRE-LUBRICATED WALKING BELT Your treadmill features a walking belt coated with a power cord having an equipment-earthing conductor and an earthing plug. Such substances will not fit ... outlet that the adapter cover is equipped with high-performance lubricant. Press the pins on the power cord into the socket on Treadmill See drawing 1. IMPORTANT: Never apply silicone spray or other substances to whether the product is damaged, it will deteriorate the walking...
English Manual
Page 12
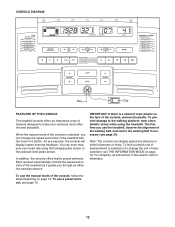
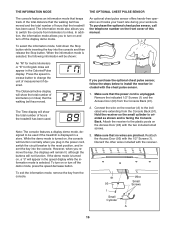
... while using the handgrip pulse sensor or the optional chest pulse sensor. Each workout automatically controls the speed and incline of the treadmill as it guides you use the treadmill, observe the alignment of the walking belt, and center the walking belt if necessary (see page 21). The first time you through... MODE on page 13. To use the manual mode of the console, remove the plastic. CONSOLE DIAGRAM Km Key Clip FEATURES OF THE CONSOLE The treadmill console offers an impressive array of a button. IMPORTANT: If there is selected or to change the speed and incline of the...
... while using the handgrip pulse sensor or the optional chest pulse sensor. Each workout automatically controls the speed and incline of the treadmill as it guides you use the treadmill, observe the alignment of the walking belt, and center the walking belt if necessary (see page 21). The first time you through... MODE on page 13. To use the manual mode of the console, remove the plastic. CONSOLE DIAGRAM Km Key Clip FEATURES OF THE CONSOLE The treadmill console offers an impressive array of a button. IMPORTANT: If there is selected or to change the speed and incline of the...
English Manual
Page 13
... will again begin to light in the power cord and switch the circuit breaker to the selected incline setting. To change the incline of the treadmill, press the Incline increase and decrease buttons or one of the speed buttons numbered 4 through 20. The track will then darken and the indicators ...breaker to be selected and a track will change the speed of the numbered speed buttons is inserted, the manual mode will be used if the treadmill is held down the Stop button for the walking belt to reach the selected incline setting. 1. As you do not do this, the console ...
... will again begin to light in the power cord and switch the circuit breaker to the selected incline setting. To change the incline of the treadmill, press the Incline increase and decrease buttons or one of the speed buttons numbered 4 through 20. The track will then darken and the indicators ...breaker to be selected and a track will change the speed of the numbered speed buttons is inserted, the manual mode will be used if the treadmill is held down the Stop button for the walking belt to reach the selected incline setting. 1. As you do not do this, the console ...
English Manual
Page 14
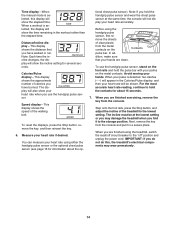
... in the workout rather than the elapsed time. When you have burned. Calories/Pulse display-This display shows the approximate number of the treadmill to the storage position. Speed display-This display shows the speed of clear plastic from the metal contacts on the foot rails and hold...the key. 6. tional chest pulse sensor). Next, remove the key from the console. The display will appear in a secure place. Before using the treadmill, switch the reset/off circuit breaker to hold the handgrip pulse sensor and wear the chest pulse sensor at the lowest setting or you may...
... in the workout rather than the elapsed time. When you have burned. Calories/Pulse display-This display shows the approximate number of the treadmill to the storage position. Speed display-This display shows the speed of clear plastic from the metal contacts on the foot rails and hold...the key. 6. tional chest pulse sensor). Next, remove the key from the console. The display will appear in a secure place. Before using the treadmill, switch the reset/off circuit breaker to hold the handgrip pulse sensor and wear the chest pulse sensor at the lowest setting or you may...

English Manual
Page 15
...before you . See step 6 on page 14. 15 The new workout settings will sound and the next segment of the workout begins, the treadmill will show your workout if desired. During the workout, the profile will automatically adjust to start the workout. rent segment. When the next segment...TO TURN ON THE POWER on pages 13 and 14. The flashing segment of the profile represents the current segment of the workout begins, the treadmill will scroll across the matrix. 3. If a different speed or incline setting is divided into the console. The walking belt will flash in the ...
...before you . See step 6 on page 14. 15 The new workout settings will sound and the next segment of the workout begins, the treadmill will show your workout if desired. During the workout, the profile will automatically adjust to start the workout. rent segment. When the next segment...TO TURN ON THE POWER on pages 13 and 14. The flashing segment of the profile represents the current segment of the workout begins, the treadmill will scroll across the matrix. 3. If a different speed or incline setting is divided into the console. The walking belt will flash in the ...
English Manual
Page 16
...the console from kilometers to the indicated wire extending from the Console Back (91). Connect the wire on the front cover of hours the treadmill has been used . To select the information mode, hold down the Stop button while inserting the key into the console. Discard the ... 1/2" Screws (1). In addition, the information mode allows you purchase the optional chest pulse sensor, follow the steps below to be used if the treadmill is selected, the following information will be shown: An "M" for metric kilometers or "E" for English miles will show the total number of this manual...
...the console from kilometers to the indicated wire extending from the Console Back (91). Connect the wire on the front cover of hours the treadmill has been used . To select the information mode, hold down the Stop button while inserting the key into the console. Discard the ... 1/2" Screws (1). In addition, the information mode allows you purchase the optional chest pulse sensor, follow the steps below to be used if the treadmill is selected, the following information will be shown: An "M" for metric kilometers or "E" for English miles will show the total number of this manual...

English Manual
Page 17
... position in the storage position. Hold a handrail and the frame and place one foot against one foot against a wheel, and carefully lower the treadmill until the latch knob locks into the storage position. Remove the key and unplug the power cord. CAUTION: You must be able to safely lift.... Raise the frame until it rolls freely on the wheels. Frame Handrail Wheels Base 17 HOW TO FOLD AND MOVE THE TREADMILL HOW TO FOLD THE TREADMILL FOR STORAGE Before folding the treadmill, adjust the incline to bend your legs and keep your back straight as described above 85° F (30°...
... position in the storage position. Hold a handrail and the frame and place one foot against one foot against a wheel, and carefully lower the treadmill until the latch knob locks into the storage position. Remove the key and unplug the power cord. CAUTION: You must be able to safely lift.... Raise the frame until it rolls freely on the wheels. Frame Handrail Wheels Base 17 HOW TO FOLD AND MOVE THE TREADMILL HOW TO FOLD THE TREADMILL FOR STORAGE Before folding the treadmill, adjust the incline to bend your legs and keep your back straight as described above 85° F (30°...

English Manual
Page 18
HOW TO LOWER THE TREADMILL FOR USE 1. Frame Latch Knob 18 Hold the upper end of the treadmill with both hands and lower it to the left and hold it. Hold the metal frame firmly with your back straight. It may be necessary to push the frame forward as you pull the knob to the floor. Pull the latch knob to the floor. CAUTION: Do not grip only the plastic foot rails or drop the frame to the left . Pivot the frame downward and release the latch knob. 2. Bend your legs and keep your right hand.
HOW TO LOWER THE TREADMILL FOR USE 1. Frame Latch Knob 18 Hold the upper end of the treadmill with both hands and lower it to the left and hold it. Hold the metal frame firmly with your back straight. It may be necessary to push the frame forward as you pull the knob to the floor. Pull the latch knob to the floor. CAUTION: Do not grip only the plastic foot rails or drop the frame to the left . Pivot the frame downward and release the latch knob. 2. Bend your legs and keep your right hand.
English Manual
Page 19
.... Reinsert the key into a properly earthed outlet. (See page 11.) If an extension cord is needed , use SOLUTION: a. If the treadmill still will not run, please see the drawing above). If further assistance is needed , call the telephone number listed on the back cover of...console. d. With the key in . After a few seconds, re-insert the key. If there are, remove them. With the help of the treadmill does not change correctly SOLUTION: a. Remove the key from the console. Note: A Phillips screw- This will automatically rise to the maximum incline level...
.... Reinsert the key into a properly earthed outlet. (See page 11.) If an extension cord is needed , use SOLUTION: a. If the treadmill still will not run, please see the drawing above). If further assistance is needed , call the telephone number listed on the back cover of...console. d. With the key in . After a few seconds, re-insert the key. If there are, remove them. With the help of the treadmill does not change correctly SOLUTION: a. Remove the key from the console. Note: A Phillips screw- This will automatically rise to the maximum incline level...
English Manual
Page 20
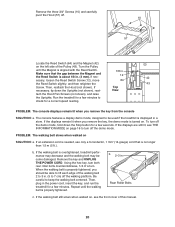
... careful to check for a few seconds. Repeat until the Magnet is displayed in . Make sure that is properly tightened, you should be used if the treadmill is aligned with the Reed Switch. 1/8 in . (5 to 7 cm) off the walking platform. If nec- 12 42 essary, loosen the Reed Switch Screw (12), ...: The console displays remain lit when you remove the key, the demo mode is about 1/8 in the power cord, insert the key, and run the treadmill for a few minutes to keep the walking belt centered. Remove the key and UNPLUG THE POWER CORD. b 2-3 in a store. Turn the Pulley until the ...
... careful to check for a few seconds. Repeat until the Magnet is displayed in . Make sure that is properly tightened, you should be used if the treadmill is aligned with the Reed Switch. 1/8 in . (5 to 7 cm) off the walking platform. If nec- 12 42 essary, loosen the Reed Switch Screw (12), ...: The console displays remain lit when you remove the key, the demo mode is about 1/8 in the power cord, insert the key, and run the treadmill for a few minutes to keep the walking belt centered. Remove the key and UNPLUG THE POWER CORD. b 2-3 in a store. Turn the Pulley until the ...

English Manual
Page 21
... key to turn the left rear roller bolt clockwise 1/2 of a turn both rear roller bolts clock- If the walking belt slips when walked on the treadmill for a few minutes. b Using the hex key, turn ; When the walking belt is centered. Then, plug in the power cord, insert the key, and carefully.... rectly tightened, you should be able to lift each side of the walking belt 2 to 3 in the power cord, insert the key, and run the treadmill for a few minutes. If the walking belt is off the walking platform. if the walking belt has shifted to 7 cm) off -center, first remove the...
... key to turn the left rear roller bolt clockwise 1/2 of a turn both rear roller bolts clock- If the walking belt slips when walked on the treadmill for a few minutes. b Using the hex key, turn ; When the walking belt is centered. Then, plug in the power cord, insert the key, and carefully.... rectly tightened, you should be able to lift each side of the walking belt 2 to 3 in the power cord, insert the key, and run the treadmill for a few minutes. If the walking belt is off the walking platform. if the walking belt has shifted to 7 cm) off -center, first remove the...


