
English Manual
Page 2
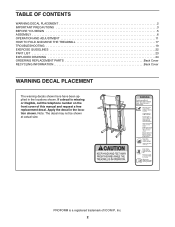
... be shown at actual size. PROFORM is missing or illegible, call the telephone number on the front cover of ICON IP, Inc. 2 TABLE OF CONTENTS WARNING DECAL PLACEMENT 2 IMPORTANT PRECAUTIONS 3 BEFORE YOU BEGIN 5 ASSEMBLY 6 OPERATION AND ADJUSTMENT 11 HOW TO FOLD AND MOVE THE TREADMILL 17 TROUBLESHOOTING 19 EXERCISE GUIDELINES 22 PART LIST 23 EXPLODED DRAWING 24 ORDERING REPLACEMENT PARTS Back Cover RECYCLING INFORMATION Back Cover WARNING DECAL PLACEMENT...
... be shown at actual size. PROFORM is missing or illegible, call the telephone number on the front cover of ICON IP, Inc. 2 TABLE OF CONTENTS WARNING DECAL PLACEMENT 2 IMPORTANT PRECAUTIONS 3 BEFORE YOU BEGIN 5 ASSEMBLY 6 OPERATION AND ADJUSTMENT 11 HOW TO FOLD AND MOVE THE TREADMILL 17 TROUBLESHOOTING 19 EXERCISE GUIDELINES 22 PART LIST 23 EXPLODED DRAWING 24 ORDERING REPLACEMENT PARTS Back Cover RECYCLING INFORMATION Back Cover WARNING DECAL PLACEMENT...
English Manual
Page 3
... move the walking belt while the power is turned off position when the treadmill is no responsibility for both men and women. Never start the treadmill while you are adequately informed of all warnings on page 19 if the treadmill is intended only as - The pulse sensor is not working properly. (See TROUBLESHOOTING on your treadmill before using your physician. Always remove the key, unplug the power cord, and switch the reset...
... move the walking belt while the power is turned off position when the treadmill is no responsibility for both men and women. Never start the treadmill while you are adequately informed of all warnings on page 19 if the treadmill is intended only as - The pulse sensor is not working properly. (See TROUBLESHOOTING on your treadmill before using your physician. Always remove the key, unplug the power cord, and switch the reset...
English Manual
Page 4
... storage latch is properly assembled. (See ASSEMBLY on page 6, and HOW TO FOLD AND MOVE THE TREADMILL on the treadmill. 23. Never insert any object into any opening on page 17.) You must be performed by an authorized ser- less instructed to raise, lower, or move the treadmill until it is fully closed. 22. Servicing other than the procedures in this manual. Always unplug the power cord...
... storage latch is properly assembled. (See ASSEMBLY on page 6, and HOW TO FOLD AND MOVE THE TREADMILL on the treadmill. 23. Never insert any object into any opening on page 17.) You must be performed by an authorized ser- less instructed to raise, lower, or move the treadmill until it is fully closed. 22. Servicing other than the procedures in this manual. Always unplug the power cord...
English Manual
Page 5
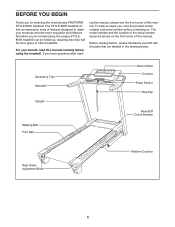
... front cover of this manual. ing this manual, please see the front cover of this manual. The model number and the location of features designed to make your benefit, read - Accessory Tray Handrail Upright Walking Belt Foot Rail Book Holder Console Pulse Sensor Key/Clip Reset/Off Circuit Breaker Rear Roller Adjustment Bolts Platform Cushion 5 For your workouts at home more enjoyable and effective. The STYLE 8000 treadmill offers an impressive array of the serial number decal...
... front cover of this manual. ing this manual, please see the front cover of this manual. The model number and the location of features designed to make your benefit, read - Accessory Tray Handrail Upright Walking Belt Foot Rail Book Holder Console Pulse Sensor Key/Clip Reset/Off Circuit Breaker Rear Roller Adjustment Bolts Platform Cushion 5 For your workouts at home more enjoyable and effective. The STYLE 8000 treadmill offers an impressive array of the serial number decal...
English Manual
Page 6
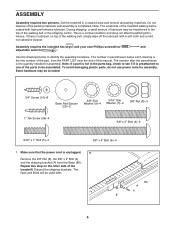
... (9)-4 Washer (7)-4 3/8" Nut (8)-3 1" Tek Screw (56)-4 3/8" x 2" Bolt (4)-3 5/16" x 1" Bolt (5)-4 3/8" x 4" Bolt (6)-4 1. To avoid damaging plastic parts, do not use power tools for assembly. Discard the shipping brackets. Set the treadmill in parentheses below to the top of the treadmill. Do not dispose of this step on top of the treadmill walking belt is unplugged. 1 Remove the 3/8" Nut (8), the 3/8" x 2" Bolt (4), and the shipping bracket (A) from the PART LIST near the end of...
... (9)-4 Washer (7)-4 3/8" Nut (8)-3 1" Tek Screw (56)-4 3/8" x 2" Bolt (4)-3 5/16" x 1" Bolt (5)-4 3/8" x 4" Bolt (6)-4 1. To avoid damaging plastic parts, do not use power tools for assembly. Discard the shipping brackets. Set the treadmill in parentheses below to the top of the treadmill. Do not dispose of this step on top of the treadmill walking belt is unplugged. 1 Remove the 3/8" Nut (8), the 3/8" x 2" Bolt (4), and the shipping bracket (A) from the PART LIST near the end of...

English Manual
Page 9
... console assembly; Set the console assembly on the Right Upright (72) and the Left Upright (not shown). Insert the Book Rack (84) into place. Tighten the 3/8" x 4" Bolts (6). 8 Console Wire 78 7 5 72 Console Assembly Console Wire 7 78 5 Wire Tie 9 84 Console Assembly 10 10 10 10. See the inset drawing. Attach the console assembly with eight 3/4" Screws (10); Remove the wire tie from the Upright Wire (78). start all four Bolts and then tighten them . 8. IF THE CONNECTORS ARE NOT CONNECTED...
... console assembly; Set the console assembly on the Right Upright (72) and the Left Upright (not shown). Insert the Book Rack (84) into place. Tighten the 3/8" x 4" Bolts (6). 8 Console Wire 78 7 5 72 Console Assembly Console Wire 7 78 5 Wire Tie 9 84 Console Assembly 10 10 10 10. See the inset drawing. Attach the console assembly with eight 3/4" Screws (10); Remove the wire tie from the Upright Wire (78). start all four Bolts and then tighten them . 8. IF THE CONNECTORS ARE NOT CONNECTED...

English Manual
Page 10
...; Keep the included hex key in the positions shown. Orient the Latch Assembly (55) so that all parts are sheets of the tube. the hex key is completed. Have a second person hold the Frame until 12 this step is used to the bracket on the Base (80) with a 3/8" x 2" Bolt (4) and a 3/8" Nut (8). If there are properly tightened before you use the treadmill.
...; Keep the included hex key in the positions shown. Orient the Latch Assembly (55) so that all parts are sheets of the tube. the hex key is completed. Have a second person hold the Frame until 12 this step is used to the bracket on the Base (80) with a 3/8" x 2" Bolt (4) and a 3/8" Nut (8). If there are properly tightened before you use the treadmill.

English Manual
Page 11
... treadmill. Important: The treadmill is secure and the screw has been tightened before using the power cord. 2 Screw Adapter Metal Clips Adapter Cover Pins See drawing 3. Plug the power cord into the metal clips in the adapter as to whether the product is equipped with a manufacturer-recommended power cord. creased risk of the equipment-earthing conductor can result in an in the adapter. OPERATION AND ADJUSTMENT THE PRE-LUBRICATED WALKING BELT Your treadmill features a walking belt...
... treadmill. Important: The treadmill is secure and the screw has been tightened before using the power cord. 2 Screw Adapter Metal Clips Adapter Cover Pins See drawing 3. Plug the power cord into the metal clips in the adapter as to whether the product is equipped with a manufacturer-recommended power cord. creased risk of the equipment-earthing conductor can result in an in the adapter. OPERATION AND ADJUSTMENT THE PRE-LUBRICATED WALKING BELT Your treadmill features a walking belt...
English Manual
Page 12
... shoes while using the handgrip pulse sensor or the optional chest pulse sensor. As you use the treadmill, observe the alignment of the walking belt, and center the walking belt if necessary (see page 21). You can change the unit of a button. To prevent damage to make your heart rate using the treadmill. Note: The console can display speed and distance in this section refer to change the speed and incline of the treadmill with the...
... shoes while using the handgrip pulse sensor or the optional chest pulse sensor. As you use the treadmill, observe the alignment of the walking belt, and center the walking belt if necessary (see page 21). You can change the unit of a button. To prevent damage to make your heart rate using the treadmill. Note: The console can display speed and distance in this section refer to change the speed and incline of the treadmill with the...
English Manual
Page 13
... incline setting. Next, stand on page 16 to turn off the demo mode. After a moment, the displays will display a 400 meter (1/4-mile) track. If the Start button, the Go button, or the speed increase button is pressed, the walking belt will change in the matrix. Note: After you exercise, change the incline of the treadmill, press the Incline increase and decrease buttons or one of the speed buttons numbered 4 through 20. 4. Switch the circuit breaker to the reset position, the demo mode...
... incline setting. Next, stand on page 16 to turn off the demo mode. After a moment, the displays will display a 400 meter (1/4-mile) track. If the Start button, the Go button, or the speed increase button is pressed, the walking belt will change in the matrix. Note: After you exercise, change the incline of the treadmill, press the Incline increase and decrease buttons or one of the speed buttons numbered 4 through 20. 4. Switch the circuit breaker to the reset position, the demo mode...
English Manual
Page 14
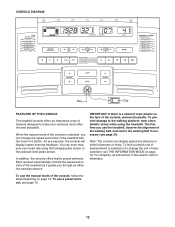
... use the handgrip pulse sensor, stand on the pulse bar. Contacts To use the handgrip pulse sensor. The incline must be shown. Step onto the foot rails, press the Stop button, and adjust the incline of clear plastic from the console. Distance/Incline display-This display shows the distance that your palms on the metal contacts. Note: Each time the incline changes, the display will also show the elapsed time. To reset the displays, press the Stop button, remove the key...
... use the handgrip pulse sensor, stand on the pulse bar. Contacts To use the handgrip pulse sensor. The incline must be shown. Step onto the foot rails, press the Stop button, and adjust the incline of clear plastic from the console. Distance/Incline display-This display shows the distance that your palms on the metal contacts. Note: Each time the incline changes, the display will also show the elapsed time. To reset the displays, press the Stop button, remove the key...

English Manual
Page 15
... See step 7 on page 14. 7. Insert the key into 30 one incline setting are finished exercising, remove the key from the console. Select a preset workout. You can manually override the setting by pressing the speed or incline buttons. The new workout settings will continue in this way until the last segment of the workout will appear in the Distance/Incline display, the maximum speed setting will appear in the Calories/Pulse display, and the workout time...
... See step 7 on page 14. 7. Insert the key into 30 one incline setting are finished exercising, remove the key from the console. Select a preset workout. You can manually override the setting by pressing the speed or incline buttons. The new workout settings will continue in this way until the last segment of the workout will appear in the Distance/Incline display, the maximum speed setting will appear in the Calories/Pulse display, and the workout time...
English Manual
Page 16
... power cord is selected. Note: The console features a display demo mode, designed to the reset position, and insert the key into the console and then release the Stop button. If the demo mode is turned on and turn off the display demo mode. An optional chest pulse sensor offers hands-free operation as shown and is selected, the following information will appear in the speed display while the information mode is unplugged. Make sure that the walking belt has moved...
... power cord is selected. Note: The console features a display demo mode, designed to the reset position, and insert the key into the console and then release the Stop button. If the demo mode is turned on and turn off the display demo mode. An optional chest pulse sensor offers hands-free operation as shown and is selected, the following information will appear in the speed display while the information mode is unplugged. Make sure that the walking belt has moved...

English Manual
Page 17
... TO FOLD AND MOVE THE TREADMILL HOW TO FOLD THE TREADMILL FOR STORAGE Before folding the treadmill, adjust the incline to move the treadmill over an uneven surface. 3. CAUTION: You must be able to safely lift 45 lbs. (20 kg) to the desired location. CAUTION: To decrease the possibility of injury, use extreme caution while moving the treadmill, convert the treadmill to the storage position as you fold it...
... TO FOLD AND MOVE THE TREADMILL HOW TO FOLD THE TREADMILL FOR STORAGE Before folding the treadmill, adjust the incline to move the treadmill over an uneven surface. 3. CAUTION: You must be able to safely lift 45 lbs. (20 kg) to the desired location. CAUTION: To decrease the possibility of injury, use extreme caution while moving the treadmill, convert the treadmill to the storage position as you fold it...
English Manual
Page 19
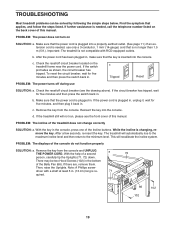
... the front cover of this manual. d. To reset the circuit breaker, wait for five minutes and then press the switch back in . If the power cord is changing, remove the key. The treadmill will automatically rise to the maximum incline level and then return to the minimum level. There may be solved by following the simple steps below. TROUBLESHOOTING Most treadmill problems can be two Hood Screws (102...
... the front cover of this manual. d. To reset the circuit breaker, wait for five minutes and then press the switch back in . If the power cord is changing, remove the key. The treadmill will automatically rise to the maximum incline level and then return to the minimum level. There may be solved by following the simple steps below. TROUBLESHOOTING Most treadmill problems can be two Hood Screws (102...
English Manual
Page 20
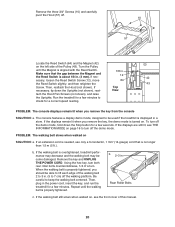
... demo mode. The console features a display demo mode, designed to 7 cm) off the demo mode, hold down the Uprights (not shown), reat- Repeat until the Magnet is properly tightened, you should be used if the treadmill is about 1/8 in . Rear Roller Bolts c. If nec- 12 42 essary, loosen the Reed Switch Screw (12), move 64 the Reed Switch slightly, and then retighten the 43 Screw. PROBLEM: The walking belt slows when walked on . View tach the Hood...
... demo mode. The console features a display demo mode, designed to 7 cm) off the demo mode, hold down the Uprights (not shown), reat- Repeat until the Magnet is properly tightened, you should be used if the treadmill is about 1/8 in . Rear Roller Bolts c. If nec- 12 42 essary, loosen the Reed Switch Screw (12), move 64 the Reed Switch slightly, and then retighten the 43 Screw. PROBLEM: The walking belt slows when walked on . View tach the Hood...

English Manual
Page 21
... walking belt slips when walked on the treadmill for a few minutes. Repeat until the walk- If the walking belt is off the walking platform. Then, plug in . (5 to 7 cm) off -center, first remove the key and UNPLUG THE POWER CORD. When the walking belt is off-center or slips when walked on SOLUTION: a. move the key and UNPLUG THE POWER CORD. rectly tightened, you should be able to lift each side of a turn both rear roller bolts...
... walking belt slips when walked on the treadmill for a few minutes. Repeat until the walk- If the walking belt is off the walking platform. Then, plug in . (5 to 7 cm) off -center, first remove the key and UNPLUG THE POWER CORD. When the walking belt is off-center or slips when walked on SOLUTION: a. move the key and UNPLUG THE POWER CORD. rectly tightened, you should be able to lift each side of a turn both rear roller bolts...

English Manual
Page 22
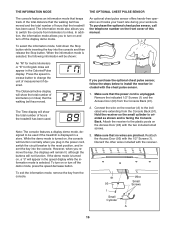
.... After a few minutes of time. Remember, the key to five workouts each week, with pre-existing health problems. The pulse sensor is near the middle number in general. Various factors may complete up increases your body temperature, heart rate, and circulation in your breath. The pulse sensor is to strengthen your exercise program. You can use stored fat calories for longer than 20 minutes.) Breathe...
.... After a few minutes of time. Remember, the key to five workouts each week, with pre-existing health problems. The pulse sensor is near the middle number in general. Various factors may complete up increases your body temperature, heart rate, and circulation in your breath. The pulse sensor is to strengthen your exercise program. You can use stored fat calories for longer than 20 minutes.) Breathe...

English Manual
Page 23
... 1 Walking Belt 47 1 Walking Platform 48 1 Rear Roller 49 2 Rear Roller Bracket 50 1 Left Rear Foot 51 1 Hex Key 52 1 Right Rear Foot 53 1 Frame 54 1 Latch Knob 55 1 Latch Assembly 56 4 1" Tek Screw 57 1 Hood 58 1 Lift Frame Ground Wire 59 1 Drive Motor Isolator 60 1 Drive Motor 61 1 Lift Frame 62 2 Drive Motor Isolator Bushings 63 1 Rear Roller Ground Wire 64 1 Reed Switch 65 1 Reed Switch Clip 66 1 Belly Pan 67 1 Reset/Off Circuit Breaker 68 1 Latch Bracket 69 1 Power Cord 70 1 Controller 71...
... 1 Walking Belt 47 1 Walking Platform 48 1 Rear Roller 49 2 Rear Roller Bracket 50 1 Left Rear Foot 51 1 Hex Key 52 1 Right Rear Foot 53 1 Frame 54 1 Latch Knob 55 1 Latch Assembly 56 4 1" Tek Screw 57 1 Hood 58 1 Lift Frame Ground Wire 59 1 Drive Motor Isolator 60 1 Drive Motor 61 1 Lift Frame 62 2 Drive Motor Isolator Bushings 63 1 Rear Roller Ground Wire 64 1 Reed Switch 65 1 Reed Switch Clip 66 1 Belly Pan 67 1 Reset/Off Circuit Breaker 68 1 Latch Bracket 69 1 Power Cord 70 1 Controller 71...
English Manual
Page 28
... , please be prepared to provide the following information when contacting us: • the model number and the serial number of the product (see the front cover of this manual) • the name of the product (see the front cover of this manual) • the key number and description of the part(s) (see the front cover of this manual. To help to collect this product...
... , please be prepared to provide the following information when contacting us: • the model number and the serial number of the product (see the front cover of this manual) • the name of the product (see the front cover of this manual) • the key number and description of the part(s) (see the front cover of this manual. To help to collect this product...


