
ProForm Style 8000 Treadmill Support Question
ProForm Style 8000 Treadmill Support Question
Find answers below for this question about ProForm Style 8000 Treadmill.Need a ProForm Style 8000 Treadmill manual? We have 10 online manuals for this item!
Question posted by avictoria on December 13th, 2014
Turning On My 8000
When i turn my 8000 on the lights flash Then it turns off.
Current Answers
Answer #1: Posted by bengirlxD on December 13th, 2014 10:01 AM
bengirlxD

Member since:
November 5th, 2012 Points: 6,395,085

Member since:
November 5th, 2012 Points: 6,395,085
If your center console ues batteries make sure that they are working properly with new batteries. If it does not use batteries but uses a plug or if new batteries are not working, then the center concole may be defected and you will have to get that repaired.
Feel free to resubmit the question if you didn't find it useful.
Related ProForm Style 8000 Treadmill Manual Pages
English Manual - Page 1

... numbers or addresses listed below:
Call: 08457 089 009 Outside UK: 0 (44) 113 3877133 Fax: 0 (44) 113 3877125 E-mail: [email protected] Write: ICON Health & Fitness, Ltd. Serial Number Decal
QUESTIONS? Model No.
English Manual - Page 2
TABLE OF CONTENTS
WARNING DECAL PLACEMENT 2 IMPORTANT PRECAUTIONS 3 BEFORE YOU BEGIN 5 ASSEMBLY 6 OPERATION AND ADJUSTMENT 11 HOW TO FOLD AND MOVE THE TREADMILL 17 TROUBLESHOOTING 19 EXERCISE GUIDELINES 22 PART LIST 23 EXPLODED DRAWING 24 ORDERING REPLACEMENT PARTS Back Cover RECYCLING INFORMATION Back Cover
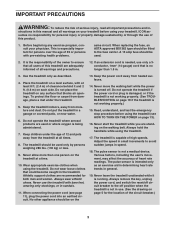
WARNING DECAL PLACEMENT
The warning decals shown here ...
English Manual - Page 3
... while using the treadmill. Never leave the treadmill unattended while it and 2 ft. (0.6 m) on any exercise program, consult your treadmill. This is running. The treadmill should be fitted to the off... product.
1. When connecting the power cord (see HOW TO TURN ON THE POWER on your treadmill before using your physician. IMPORTANT PRECAUTIONS
WARNING: To reduce the ...
English Manual - Page 4
... sure that the storage latch is properly assembled. (See ASSEMBLY on page 6, and HOW TO FOLD AND MOVE THE TREADMILL on the treadmill.
23. This treadmill is intended for in-home use , before cleaning the
treadmill, and before performing the mainte- Servicing other than the
procedures in a commercial, rental, or institutional setting. 20. Never...
English Manual - Page 5
... the serial number decal are labeled in the drawing below.
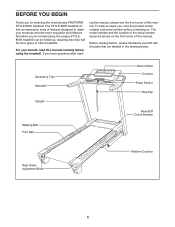
The STYLE 8000 treadmill offers an impressive array of features designed to make your benefit, read - And when ...BEFORE YOU BEGIN
Thank you ʼre not exercising, the unique STYLE 8000 treadmill can be folded up, requiring less than half the floor space of other treadmills. For your workouts at home more enjoyable and...
English Manual - Page 6
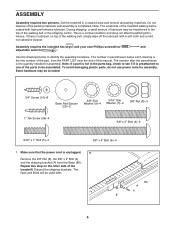
... below to the top of lubricant may be assembled. Do not dispose of the treadmill.
Extra hardware may be used later.
8
80 A
4
6 Set the treadmill in the parts bag, check to see if it is the quantity needed for ... the 3/8" x 2" Bolt (4), and the shipping bracket (A) from the PART LIST near the end of the treadmill walking belt is a normal condition and does not affect...
English Manual - Page 7

...the Base
(80).
Then, attach another Base Pad (79) with
stickers. the Base
Wheel must turn freely. Identify the Right Upright (72) and the Right
4
Upright Spacer (74), which are marked ...in the location shown with the 3/8" x 2" Bolt (4) and the 3/8" Nut (8) that the treadmill is routed completely through the
Right Upright Spacer as shown.
do not fully fold the Frame yet.
...
English Manual - Page 8

... of a second person, hold a Bolt
7
Spacer (3) inside the lower end of a second person, carefully tip the treadmill onto its right side. Attach a Base Pad (79) to pinch the Upright Wire (78). the Base Wheel must turn freely.
6 79 56
80 53 4
25
81
56 79
8
7. do not fully tighten the Bolts yet...
English Manual - Page 9

...(only two are shown); Remove the wire tie from the Upright Wire (78). If they do not, turn one connector and try again. See the inset drawing. The connectors should slide together easily and snap into ...wire. IF THE CONNECTORS ARE NOT CONNECTED PROPERLY, THE CONSOLE MAY BE DAMAGED WHEN THE POWER IS TURNED ON. See steps 5 and 7. 8. Set the console assembly on the Right Upright (72) and...
English Manual - Page 10

...a 3/8" x 2" Bolt (4) and a 3/8" Nut (8).
To protect the floor or carpet, place a mat under the treadmill.
11. Raise the Frame (53) to the bracket on the Base (80) with the bracket. Attach the upper end... back and forth to adjust the walking belt (see HOW TO LOWER THE TREADMILL FOR USE on the treadmill decals, remove the plastic. Have a second person hold the Frame until
12...
English Manual - Page 11

... is damaged, it must be replaced with high-performance lubricant. Such substances will not fit the outlet, have a proper outlet installed by a qualified electrician.
11 This product is... with a power cord having an equipment-earthing conductor and an
earthing plug. Important: The treadmill is equipped
with the product-if it should malfunction or break
down, earthing provides a path...
English Manual - Page 12
... controls the speed and incline of the treadmill as it guides you use the manual mode of the console, follow the steps beginning on the face of measurement is selected, you exercise, the console will display instant exercise feedback.
The first time you through an effective exercise session. To find out which unit of...
English Manual - Page 13
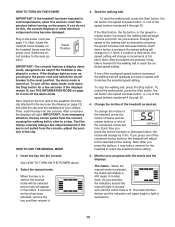
... will begin to the key (see the drawing on page 16 to the reset position. Each time you exercise, the indicators around the track will light. To turn off the demo mode.
IMPORTANT: If the treadmill has been exposed to cold temperatures, allow it may take a moment for the walking belt to a stop the...
English Manual - Page 14
... reinsert the key.
6. Avoid moving your heart rate if desired.
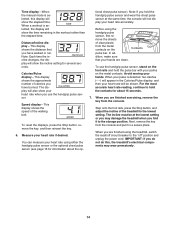
Time display-When the manual mode is selected, this , the treadmillʼs electrical components may damage the treadmill when you are finished exercising, remove the key from the console. When your palms on the pulse bar. Next, remove the key from the metal...
English Manual - Page 15

...TURN ON THE POWER on page 14.
15
file will begin to move at 2 km/h.
Note: When the next segment of the workout begins, the treadmill will continue in this way until the last segment of the flashing... if desired. rent segment. Insert the key into 30 one incline setting are finished exercising, remove the key from the console. When a preset workout is programmed for each segment...
English Manual - Page 16
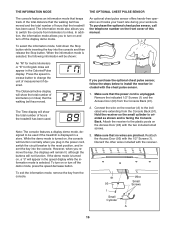
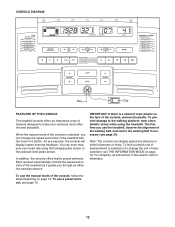
... key, the displays will remain lit, although the buttons will appear in a store. Make sure that no wires are pinched. To turn on the front cover of hours the treadmill has been used. Make sure that the power cord is displayed in the Calories/Pulse display.
To select the information mode, hold...
English Manual - Page 17

CAUTION: To decrease the possibility of direct sunlight. To protect the floor or carpet from damage, place a mat under the treadmill. Keep the treadmill out of injury, do this, you may damage the treadmill when you raise the frame. Frame Handrail
Wheels
Base
17 Do not attempt to the vertical position.
2. Frame
Latch Knob...
English Manual - Page 19
... POWER CORD. If further assistance is needed , use
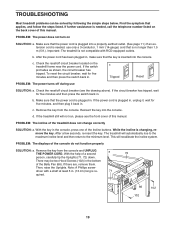
SOLUTION: a. TROUBLESHOOTING
Most treadmill problems can be two Hood Screws (102) in the bottom
of the Belly Pan (66). c Tripped
Reset
PROBLEM: The power turns off circuit breaker located on
SOLUTION: a. If the treadmill still will not run, please see the drawing above). If there...
English Manual - Page 20
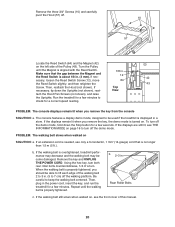
... Screw (12), move
64
the Reed Switch slightly, and then retighten the
43
Screw. Run the treadmill for a few minutes.
b. If the displays are still lit, see the front cover of the Pulley... for a few minutes to turn off the demo mode. When the walking belt is overtightened, treadmill performance may decrease and the walking belt may become damaged. To turn off the demo mode, hold...
English Manual - Page 21

...the walking
belt centered. Then,
plug in the power cord, insert the key, and run the
treadmill for a
few minutes. Repeat until the walking belt is prop- move the key and UNPLUG THE...first re- b. If the walking belt slips when walked on
SOLUTION: a. Then, plug in . (5 to turn the left rear roller bolt clockwise 1/2 of the walking belt 2 to 3 in the power cord, insert
the key, and...
Similar Questions

Hello, My 2500 Treadmill Is Stuck On 'paused' I Turned It On And Off..??help
Hello, my 2500 treadmill is stuck on "paused" I turned it on and off..??help
Hello, my 2500 treadmill is stuck on "paused" I turned it on and off..??help
(Posted by tisageiss 3 years ago)

Incline On Tredmill
went to decline while walking and clicking started and belt quit turning light flashes only where it...
went to decline while walking and clicking started and belt quit turning light flashes only where it...
(Posted by philly27288 9 years ago)

How Do I Find A High Performance Lubricant For The Pro-form 370e Crosswalk Walki
how do I find a high performance lubricant for the Pro-Form
how do I find a high performance lubricant for the Pro-Form
(Posted by Anonymous-138832 9 years ago)

I Get An Error On The Screen: E1 What Does It Mean?
(Posted by Ron818777 10 years ago)

Treadmill Won't Run
When starting the treadmill, it moves the belt a few inches then stops. The red LED light flashes 4 ...
When starting the treadmill, it moves the belt a few inches then stops. The red LED light flashes 4 ...
(Posted by lisawiederholt 10 years ago)