

English Manual
Page 2
TABLE OF CONTENTS IMPORTANT PRECAUTIONS 3 BEFORE YOU BEGIN 4 ASSEMBLY 5 HOW TO USE THE ELLIPTICAL EXERCISER 11 MAINTENANCE AND TROUBLESHOOTING 17 CONDITIONING GUIDELINES 18 PART LIST 21 EXPLODED DRAWING 22 ORDERING REPLACEMENT PARTS Back Cover LIMITED WARRANTY Back Cover PROFORM is a registered trademark of ICON IP, Inc. 2
TABLE OF CONTENTS IMPORTANT PRECAUTIONS 3 BEFORE YOU BEGIN 4 ASSEMBLY 5 HOW TO USE THE ELLIPTICAL EXERCISER 11 MAINTENANCE AND TROUBLESHOOTING 17 CONDITIONING GUIDELINES 18 PART LIST 21 EXPLODED DRAWING 22 ORDERING REPLACEMENT PARTS Back Cover LIMITED WARRANTY Back Cover PROFORM is a registered trademark of ICON IP, Inc. 2
English Manual
Page 3
... exercising, stop . 4. V I call thDReAWtoINlGlS-fPrReEeVIOUS TO SIONS LAST REV. telephone number on the elliptical exerciser before using the elliptical exerciser. Added Part No. 210125 and Table Modified Warning Definition and Size Apply the decal in this ...institutional setting. 11. and CONFIDENTIAL. This drawing is intended for foot protection while exercising. APP. tions before using the elliptical exerciser. 1. Always wear athletic shoes for home use only. PART NO. Bennett resD0pA1o/T0E2n/0s4ibXiPliRBtIOyKEDSfUoCrTpS ersToOnLEaRl AinNCjuErSy ToIrTLE: Decal...
... exercising, stop . 4. V I call thDReAWtoINlGlS-fPrReEeVIOUS TO SIONS LAST REV. telephone number on the elliptical exerciser before using the elliptical exerciser. Added Part No. 210125 and Table Modified Warning Definition and Size Apply the decal in this ...institutional setting. 11. and CONFIDENTIAL. This drawing is intended for foot protection while exercising. APP. tions before using the elliptical exerciser. 1. Always wear athletic shoes for home use only. PART NO. Bennett resD0pA1o/T0E2n/0s4ibXiPliRBtIOyKEDSfUoCrTpS ersToOnLEaRl AinNCjuErSy ToIrTLE: Decal...

English Manual
Page 4
...Congratulations for any service needed under warranty, you must register the elliptical exerciser at www.proformservice.com/registration. The STRIDE SELECT 830 is an incredibly smooth exerciser that are labeled in a natural elliptical path, minimizing the impact on a decal attached to help us ... your fitness goals in the convenience of features to the elliptical exerciser (see the front cover of the decal). To avoid a registration fee for selecting the versatile new PROFORM® STRIDE SELECT 830 elliptical exerciser. Before reading further, please familiarize yourself with the ...
...Congratulations for any service needed under warranty, you must register the elliptical exerciser at www.proformservice.com/registration. The STRIDE SELECT 830 is an incredibly smooth exerciser that are labeled in a natural elliptical path, minimizing the impact on a decal attached to help us ... your fitness goals in the convenience of features to the elliptical exerciser (see the front cover of the decal). To avoid a registration fee for selecting the versatile new PROFORM® STRIDE SELECT 830 elliptical exerciser. Before reading further, please familiarize yourself with the ...

English Manual
Page 5
...(33)-2 M10 x 83mm Button Screw (63)-2 M10 x 75mm Carriage Bolt (34)-2 M10 x 59mm Bolt Set (27)-2 5 As you assemble the elliptical exerciser, use the drawings below each drawing is not in a cleared area and remove the packing materials. If a part is the key number of the...LIST on page 21. Assembly requires two persons. ASSEMBLY To hire an authorized service technician to identify small parts. Do not dispose of the elliptical exerciser in the parts bag, check to the included hex keys, assembly requires a phillips screwdriver , an adjustable wrench , and a rubber ...
...(33)-2 M10 x 83mm Button Screw (63)-2 M10 x 75mm Carriage Bolt (34)-2 M10 x 59mm Bolt Set (27)-2 5 As you assemble the elliptical exerciser, use the drawings below each drawing is not in a cleared area and remove the packing materials. If a part is the key number of the...LIST on page 21. Assembly requires two persons. ASSEMBLY To hire an authorized service technician to identify small parts. Do not dispose of the elliptical exerciser in the parts bag, check to the included hex keys, assembly requires a phillips screwdriver , an adjustable wrench , and a rubber ...

English Manual
Page 6
To make assembly easier, read the information 1 on page 5 before you begin assembling the elliptical exerciser. See the inset drawing. Press two Stabilizer Endcaps (35) onto the Front Stabilizer (3). 2 Packing Tube 87 33 Packing Tube 1 29 32 33 35 35 ...
To make assembly easier, read the information 1 on page 5 before you begin assembling the elliptical exerciser. See the inset drawing. Press two Stabilizer Endcaps (35) onto the Front Stabilizer (3). 2 Packing Tube 87 33 Packing Tube 1 29 32 33 35 35 ...
English Manual
Page 10
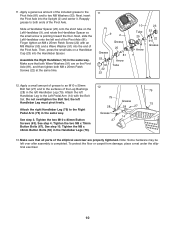
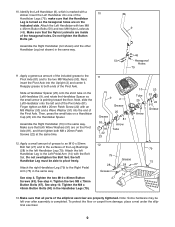
...overtighten the Bolt Set; Tighten the two M8 x 70mm Button Bolts (67). To protect the floor or carpet from damage, place a mat under the elliptical exerciser. 10 Reapply grease to both M8 x 25mm Patch Screws (22) at the same time. 11 9 2 Grease Grease 53 91 22 23 25...(53). Finger tighten an M8 x 25mm Patch Screw (22) with the Bolt Set. Attach the right Handlebar Leg (79) to the surfaces of the elliptical exerciser are on a Handlebar Cap (23) into the Handlebar Spacer. Note: Some hardware may be left Handlebar Leg must pivot freely. Slide a Handlebar Spacer...
...overtighten the Bolt Set; Tighten the two M8 x 70mm Button Bolts (67). To protect the floor or carpet from damage, place a mat under the elliptical exerciser. 10 Reapply grease to both M8 x 25mm Patch Screws (22) at the same time. 11 9 2 Grease Grease 53 91 22 23 25...(53). Finger tighten an M8 x 25mm Patch Screw (22) with the Bolt Set. Attach the right Handlebar Leg (79) to the surfaces of the elliptical exerciser are on a Handlebar Cap (23) into the Handlebar Spacer. Note: Some hardware may be left Handlebar Leg must pivot freely. Slide a Handlebar Spacer...
English Manual
Page 11
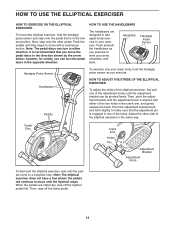
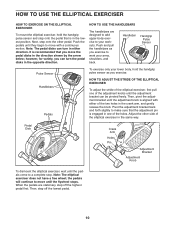
...until the adjustment knob is engaged in the lowest position. Pedal Disc Crank Arm Holes Pin Adjustment Bracket Adjustment Knob To dismount the elliptical exerciser, wait until the flywheel stops. the pedals will continue to make sure that you move until the pedals come to your .... Then, pivot the adjustment bracket until the adjustment bracket can be pivoted freely. HOW TO USE THE ELLIPTICAL EXERCISER HOW TO EXERCISE ON THE ELLIPTICAL EXERCISER To mount the elliptical exerciser, hold the handgrip pulse sensor as you exercise to move with either direction. HOW TO USE THE...
...until the adjustment knob is engaged in the lowest position. Pedal Disc Crank Arm Holes Pin Adjustment Bracket Adjustment Knob To dismount the elliptical exerciser, wait until the flywheel stops. the pedals will continue to make sure that you move until the pedals come to your .... Then, pivot the adjustment bracket until the adjustment bracket can be pivoted freely. HOW TO USE THE ELLIPTICAL EXERCISER HOW TO EXERCISE ON THE ELLIPTICAL EXERCISER To mount the elliptical exerciser, hold the handgrip pulse sensor as you exercise to move with either direction. HOW TO USE THE...

English Manual
Page 17
Replace any worn parts immediately. MAINTENANCE AND TROUBLESHOOTING Inspect and tighten all parts of direct sunlight. To clean the elliptical exerciser, use alcohol, abrasives, or chemicals. 17 Important: To avoid damage to the console, keep liquids away from the console and ... assembly step 5 on page 8 for about 30 seconds. • For optimal performance of the handgrip pulse sensor, keep the console out of the elliptical exerciser regularly. BATTERY REPLACEMENT If the console display becomes dim, the batteries should be cleaned with a soft cloth-never use a damp cloth and a ...
Replace any worn parts immediately. MAINTENANCE AND TROUBLESHOOTING Inspect and tighten all parts of direct sunlight. To clean the elliptical exerciser, use alcohol, abrasives, or chemicals. 17 Important: To avoid damage to the console, keep liquids away from the console and ... assembly step 5 on page 8 for about 30 seconds. • For optimal performance of the handgrip pulse sensor, keep the console out of the elliptical exerciser regularly. BATTERY REPLACEMENT If the console display becomes dim, the batteries should be cleaned with a soft cloth-never use a damp cloth and a ...
English Manual
Page 24
... on how long an implied warranty lasts. To help us : • the MODEL NUMBER of the product (PFEL3926.0) • the NAME of the product (PROFORM STRIDE SELECT 830 elliptical exerciser) • the SERIAL NUMBER of the product (see the front cover of this manual) • the KEY NUMBER and DESCRIPTION of the part...
... on how long an implied warranty lasts. To help us : • the MODEL NUMBER of the product (PFEL3926.0) • the NAME of the product (PROFORM STRIDE SELECT 830 elliptical exerciser) • the SERIAL NUMBER of the product (see the front cover of this manual) • the KEY NUMBER and DESCRIPTION of the part...

English Manual
Page 2
TABLE OF CONTENTS IMPORTANT PRECAUTIONS 3 BEFORE YOU BEGIN 4 ASSEMBLY 5 HOW TO USE THE ELLIPTICAL EXERCISER 10 MAINTENANCE AND TROUBLESHOOTING 15 CONDITIONING GUIDELINES 16 PART LIST 17 EXPLODED DRAWING 18 HOW TO ORDER REPLACEMENT PARTS Back Cover LIMITED WARRANTY Back Cover PROFORM is a registered trademark of ICON IP, Inc. 2
TABLE OF CONTENTS IMPORTANT PRECAUTIONS 3 BEFORE YOU BEGIN 4 ASSEMBLY 5 HOW TO USE THE ELLIPTICAL EXERCISER 10 MAINTENANCE AND TROUBLESHOOTING 15 CONDITIONING GUIDELINES 16 PART LIST 17 EXPLODED DRAWING 18 HOW TO ORDER REPLACEMENT PARTS Back Cover LIMITED WARRANTY Back Cover PROFORM is a registered trademark of ICON IP, Inc. 2

English Manual
Page 3
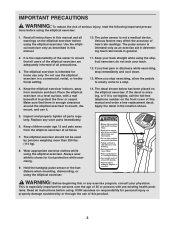
... while exercising, stop immediately and cool down. 13. The decal shown below has been placed o2n09489 & 21 from the elliptical exerciser at a minimum the elliptical exerciser. If tienmgp,eroartuirfeiotfi5s0ndoegtreleesgiFb. DATE ARE beneath it . 5. Added Part No. 210125 and Table Modified Warning Definition and ...Fitness, Inc. IMPORTANT PRECAUTIONS WARNING: To reduce the risk of 35 or persons with pre-existing health prob- tions before using the elliptical exerciser. Read all instructions in this or any exercise program, consult your back. 12. The pulse sensor is intended only as ...
... while exercising, stop immediately and cool down. 13. The decal shown below has been placed o2n09489 & 21 from the elliptical exerciser at a minimum the elliptical exerciser. If tienmgp,eroartuirfeiotfi5s0ndoegtreleesgiFb. DATE ARE beneath it . 5. Added Part No. 210125 and Table Modified Warning Definition and ...Fitness, Inc. IMPORTANT PRECAUTIONS WARNING: To reduce the risk of 35 or persons with pre-existing health prob- tions before using the elliptical exerciser. Read all instructions in this or any exercise program, consult your back. 12. The pulse sensor is intended only as ...

English Manual
Page 4
... a decal attached to help us . BEFORE YOU BEGIN Congratulations for any service needed under warranty, you must register the elliptical exerciser at www.proformservice.com/registration. To avoid a registration fee for selecting the versatile new PROFORM® STRIDE SELECT 830 elliptical exerciser. The serial number can be found on your home. The STRIDE SELECT...
... a decal attached to help us . BEFORE YOU BEGIN Congratulations for any service needed under warranty, you must register the elliptical exerciser at www.proformservice.com/registration. To avoid a registration fee for selecting the versatile new PROFORM® STRIDE SELECT 830 elliptical exerciser. The serial number can be found on your home. The STRIDE SELECT...

English Manual
Page 5
... to see if it has been preassembled. If a part is the key number of the elliptical exerciser in the parts bag, check to identify small parts. Assembly requires two persons. As you assemble the elliptical exerciser, use the drawings below each drawing is not in a cleared area and remove the ...packing materials. In addition to assemble the elliptical exerciser, call toll-free 1-800-445-2480. M4 x 16mm Screw (66)-8 M4 x 22mm Screw (76)-2 M8 Split Washer (83)-2 M10 Split Washer (94)-2 M8 ...
... to see if it has been preassembled. If a part is the key number of the elliptical exerciser in the parts bag, check to identify small parts. Assembly requires two persons. As you assemble the elliptical exerciser, use the drawings below each drawing is not in a cleared area and remove the ...packing materials. In addition to assemble the elliptical exerciser, call toll-free 1-800-445-2480. M4 x 16mm Screw (66)-8 M4 x 22mm Screw (76)-2 M8 Split Washer (83)-2 M10 Split Washer (94)-2 M8 ...

English Manual
Page 6
... x 45mm Button Bolt (33) and an M10 Nylon Locknut (29). the Wheel should turn freely. Insert the connectors on page 5 before you begin assembling the elliptical exerciser. While holding the upper end of the Frame (1). Do not overtighten the Nylon Locknut; 1.
... x 45mm Button Bolt (33) and an M10 Nylon Locknut (29). the Wheel should turn freely. Insert the connectors on page 5 before you begin assembling the elliptical exerciser. While holding the upper end of the Frame (1). Do not overtighten the Nylon Locknut; 1.
English Manual
Page 9
... Pivot Axle. Tighten the two M8 x 70mm Button Bolts (67). See step 10. To protect the floor or carpet from damage, place a mat under the elliptical exerciser. 9 Identify the Left Handlebar (9), which is pointing toward the floor. make sure that both M8 x 25mm Patch Screws (22) at the same time. 11... Left Handlebar with an M8 Washer (53) and a Wave Washer (91) into one of the Pivot Axle (81). Make sure that all parts of the elliptical exerciser are inside of the Pivot Axle. Assemble the Right Handlebar (10) in the left over after assembly is turned so the hexagonal holes are...
... Pivot Axle. Tighten the two M8 x 70mm Button Bolts (67). See step 10. To protect the floor or carpet from damage, place a mat under the elliptical exerciser. 9 Identify the Left Handlebar (9), which is pointing toward the floor. make sure that both M8 x 25mm Patch Screws (22) at the same time. 11... Left Handlebar with an M8 Washer (53) and a Wave Washer (91) into one of the Pivot Axle (81). Make sure that all parts of the elliptical exerciser are inside of the Pivot Axle. Assemble the Right Handlebar (10) in the left over after assembly is turned so the hexagonal holes are...
English Manual
Page 10
...stationary, step off the lowest pedal. 10 Then, step off the highest pedal first. HOW TO USE THE ELLIPTICAL EXERCISER HOW TO EXERCISE ON THE ELLIPTICAL EXERCISER To mount the elliptical exerciser, hold the handgrip pulse sensor as you exercise to work your workouts. Note: The pedal disks can ...the handlebars as you exercise. It is in the same way. Pedal Disk Crank Arm Holes Pin Adjustment Bracket Adjustment Knob To dismount the elliptical exerciser, wait until the adjustment knob is engaged in one of the two holes in the direction shown by the arrow below; Next,...
...stationary, step off the lowest pedal. 10 Then, step off the highest pedal first. HOW TO USE THE ELLIPTICAL EXERCISER HOW TO EXERCISE ON THE ELLIPTICAL EXERCISER To mount the elliptical exerciser, hold the handgrip pulse sensor as you exercise to work your workouts. Note: The pedal disks can ...the handlebars as you exercise. It is in the same way. Pedal Disk Crank Arm Holes Pin Adjustment Bracket Adjustment Knob To dismount the elliptical exerciser, wait until the adjustment knob is engaged in one of the two holes in the direction shown by the arrow below; Next,...

English Manual
Page 15
... while using the handgrip pulse sensor. doing so may interfere with heart rate readings. • For the most console problems are the result of the elliptical exerciser regularly. Excessive movement may interfere with heart rate readings. • Do not hold the metal contacts for replacement instructions. Important: To avoid damage to...; most accurate heart rate reading, hold the metal contacts too tightly; MAINTENANCE AND TROUBLESHOOTING Inspect and tighten all parts of low batteries. To clean the elliptical exerciser, use alcohol, abrasives, or chemicals. 15
... while using the handgrip pulse sensor. doing so may interfere with heart rate readings. • For the most console problems are the result of the elliptical exerciser regularly. Excessive movement may interfere with heart rate readings. • Do not hold the metal contacts for replacement instructions. Important: To avoid damage to...; most accurate heart rate reading, hold the metal contacts too tightly; MAINTENANCE AND TROUBLESHOOTING Inspect and tighten all parts of low batteries. To clean the elliptical exerciser, use alcohol, abrasives, or chemicals. 15

English Manual
Page 20
... is authorized by or attributable to state. To help us : • the MODEL NUMBER of the product (PFEL3926.1) • the NAME of the product (PROFORM STRIDE SELECT 830 elliptical exerciser) • the SERIAL NUMBER of the product (see the front cover of this manual) • the KEY NUMBER and DESCRIPTION of the part...
... is authorized by or attributable to state. To help us : • the MODEL NUMBER of the product (PFEL3926.1) • the NAME of the product (PROFORM STRIDE SELECT 830 elliptical exerciser) • the SERIAL NUMBER of the product (see the front cover of this manual) • the KEY NUMBER and DESCRIPTION of the part...


