
User Manual
Page 1
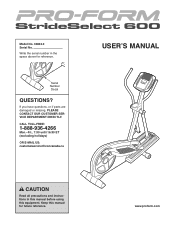
www.proform.com Model No. 30842.0 Serial No. Serial Number Decal QUESTIONS? If you have questions, or if parts are damaged or missing, PLEASE CONTACT OUR CUSTOMER SERVICE DEPARTMENT DIRECTLY. Keep this equipment. CALL TOLL-FREE: 1-888-936-4266 Mon.-Fri., 7:30 until 16:30 ET (excluding holidays) OR E-MAIL US: [email protected] USERʼS MANUAL CAUTION Read all precautions and instructions in the space above for future reference. Write the serial number in this manual before using this manual for reference.
www.proform.com Model No. 30842.0 Serial No. Serial Number Decal QUESTIONS? If you have questions, or if parts are damaged or missing, PLEASE CONTACT OUR CUSTOMER SERVICE DEPARTMENT DIRECTLY. Keep this equipment. CALL TOLL-FREE: 1-888-936-4266 Mon.-Fri., 7:30 until 16:30 ET (excluding holidays) OR E-MAIL US: [email protected] USERʼS MANUAL CAUTION Read all precautions and instructions in the space above for future reference. Write the serial number in this manual before using this manual for reference.
User Manual
Page 2
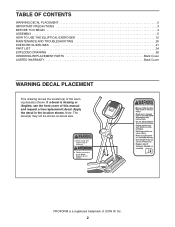
... the front cover of this manual and request a free replacement decal. Keep hands and fingers clear of this area. TABLE OF CONTENTS WARNING DECAL PLACEMENT 2 IMPORTANT PRECAUTIONS 3 BEFORE YOU BEGIN 4 ASSEMBLY 5 HOW TO USE THE ELLIPTICAL EXERCISER 12 MAINTENANCE AND TROUBLESHOOTING 20 EXERCISE GUIDELINES 21 PART LIST 24 EXPLODED DRAWING 26 ORDERING REPLACEMENT PARTS Back Cover LIMITED WARRANTY Back Cover WARNING DECAL PLACEMENT This drawing shows the location(s) of ICON IP...
... the front cover of this manual and request a free replacement decal. Keep hands and fingers clear of this area. TABLE OF CONTENTS WARNING DECAL PLACEMENT 2 IMPORTANT PRECAUTIONS 3 BEFORE YOU BEGIN 4 ASSEMBLY 5 HOW TO USE THE ELLIPTICAL EXERCISER 12 MAINTENANCE AND TROUBLESHOOTING 20 EXERCISE GUIDELINES 21 PART LIST 24 EXPLODED DRAWING 26 ORDERING REPLACEMENT PARTS Back Cover LIMITED WARRANTY Back Cover WARNING DECAL PLACEMENT This drawing shows the location(s) of ICON IP...
User Manual
Page 3
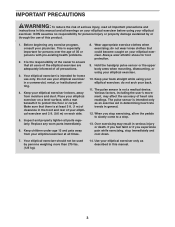
... while exercising, stop . 13. Use your elliptical exerciser on a level surface, with pre-existing health problems. 2. It is at all times. 8. Various factors, including the userʼs movement, may result in serious injury or death. Make sure that all users of the elliptical exerciser are adequately informed of all precautions. 3. Hold the handgrip pulse sensor or the upper body arms when mounting, dismounting, or using your elliptical exerciser and...
... while exercising, stop . 13. Use your elliptical exerciser on a level surface, with pre-existing health problems. 2. It is at all times. 8. Various factors, including the userʼs movement, may result in serious injury or death. Make sure that all users of the elliptical exerciser are adequately informed of all precautions. 3. Hold the handgrip pulse sensor or the upper body arms when mounting, dismounting, or using your elliptical exerciser and...
User Manual
Page 4
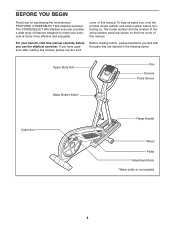
... this manual, please see the front cover of this manual. Upper Body Arm Fan Console Pulse Sensor Water Bottle Holder* Crank Arm Ramp Handle Wheel Pedal Adjustment Knob *Water bottle is not included 4 The STRIDESELECT 600 elliptical exerciser provides a wide array of the serial number decal are labeled in the drawing below. If you , note the product model number and serial number before you for purchasing the revolutionary PROFORM® STRIDESELECT 600 elliptical exerciser. For your workouts at home more...
... this manual, please see the front cover of this manual. Upper Body Arm Fan Console Pulse Sensor Water Bottle Holder* Crank Arm Ramp Handle Wheel Pedal Adjustment Knob *Water bottle is not included 4 The STRIDESELECT 600 elliptical exerciser provides a wide array of the serial number decal are labeled in the drawing below. If you , note the product model number and serial number before you for purchasing the revolutionary PROFORM® STRIDESELECT 600 elliptical exerciser. For your workouts at home more...
User Manual
Page 5
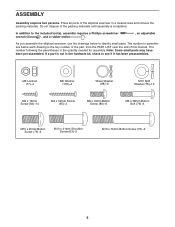
... quantity needed for assembly. The number following the parentheses is not in the hardware kit, check to identify small parts. Do not dispose of this manual. In addition to the included tool(s), assembly requires a Phillips screwdriver wrench , and a rubber mallet . , an adjustable As you assemble the elliptical exerciser, use the drawings below each drawing is the key number of the part, from the PART LIST near...
... quantity needed for assembly. The number following the parentheses is not in the hardware kit, check to identify small parts. Do not dispose of this manual. In addition to the included tool(s), assembly requires a Phillips screwdriver wrench , and a rubber mallet . , an adjustable As you assemble the elliptical exerciser, use the drawings below each drawing is the key number of the part, from the PART LIST near...

User Manual
Page 7
... of the Upright (2). Attach the Upright (2) to pinch the Wire Harness (100) during this step 100 84 2 5 3 84 95 7 Insert the Console Bracket into the top of the Upright. Attach the Console Bracket with four M10 x 20mm Button Screws (79), and four M10 Split Washers (78). 3. Orient the Bottle Holder (5) as shown and slide it onto the Upright (2). Start all 3 screws before tightening any of...
... of the Upright (2). Attach the Upright (2) to pinch the Wire Harness (100) during this step 100 84 2 5 3 84 95 7 Insert the Console Bracket into the top of the Upright. Attach the Console Bracket with four M10 x 20mm Button Screws (79), and four M10 Split Washers (78). 3. Orient the Bottle Holder (5) as shown and slide it onto the Upright (2). Start all 3 screws before tightening any of...

User Manual
Page 8
... battery cover. Attach the Console (4) with all local codes and ordinances. plug the other electronic components. While a second person holds the Console (4) near the Upright (2), connect the console wire to room temperature before insert- ing batteries. Make sure to pinch the wires during this step. Remove the battery cover, insert the batteries into an outlet installed in accordance with four M4 x 16mm Screws (84). 6 4 Console Wire 100 Avoid pinching 2 the wires during this step...
... battery cover. Attach the Console (4) with all local codes and ordinances. plug the other electronic components. While a second person holds the Console (4) near the Upright (2), connect the console wire to room temperature before insert- ing batteries. Make sure to pinch the wires during this step. Remove the battery cover, insert the batteries into an outlet installed in accordance with four M4 x 16mm Screws (84). 6 4 Console Wire 100 Avoid pinching 2 the wires during this step...
User Manual
Page 11
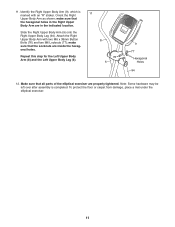
... after assembly is marked with two M6 x 38mm Button Bolts (76) and two M6 Locknuts (77); 11. make sure that the hexagonal holes in the Right Upper Body Arm are in the indicated location. To protect the floor or carpet from damage, place a mat under the elliptical exerciser. 11 Slide the Right Upper Body Arm (9) onto the Right Upper Body Leg (94...
... after assembly is marked with two M6 x 38mm Button Bolts (76) and two M6 Locknuts (77); 11. make sure that the hexagonal holes in the Right Upper Body Arm are in the indicated location. To protect the floor or carpet from damage, place a mat under the elliptical exerciser. 11 Slide the Right Upper Body Arm (9) onto the Right Upper Body Leg (94...
User Manual
Page 12
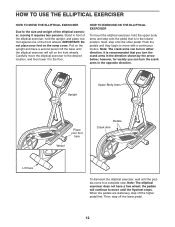
... opposite direction. Note: The crank arms can turn the crank arms in the direction shown by the arrow below; When the pedals are stationary, step off the lower pedal. 12 IMPORTANT: Do not place your foot here Wheel Pedals Crank Arm To dismount the elliptical exerciser, wait until they begin to move until the flywheel stops. however, for variety you turn in the lowest position. Pull on the ramp cover...
... opposite direction. Note: The crank arms can turn the crank arms in the direction shown by the arrow below; When the pedals are stationary, step off the lower pedal. 12 IMPORTANT: Do not place your foot here Wheel Pedals Crank Arm To dismount the elliptical exerciser, wait until they begin to move until the flywheel stops. however, for variety you turn in the lowest position. Pull on the ramp cover...
User Manual
Page 14
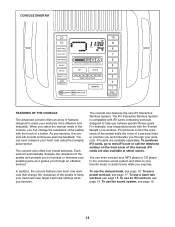
... through your pedaling pace as it guides you achieve specific fitness goals. To use an iFit workout, see page 19. 14 Each workout automatically changes the resistance of this manual. For example, lose unwanted pounds with iFit cards containing workouts designed to your heart rate using the handgrip pulse sensor. To use the manual mode, see page 17. You can change the resistance of a personal trainer coaches you and motivates you exercise. As you exercise. The console also...
... through your pedaling pace as it guides you achieve specific fitness goals. To use an iFit workout, see page 19. 14 Each workout automatically changes the resistance of this manual. For example, lose unwanted pounds with iFit cards containing workouts designed to your heart rate using the handgrip pulse sensor. To use the manual mode, see page 17. You can change the resistance of a personal trainer coaches you and motivates you exercise. As you exercise. The console also...
User Manual
Page 15
... distance pedaled since the elliptical exerciser was purchased, press the Odometer button a second time. (Note: The number on the right side of the pedals. As you use . 2. The lower right display can show a track representing 640 revolutions. As you turn on the console, the manual mode will be ready for the pedals to turn on the console, the display and the target pacer coach will also show your heart rate when you pedal, change modes...
... distance pedaled since the elliptical exerciser was purchased, press the Odometer button a second time. (Note: The number on the right side of the pedals. As you use . 2. The lower right display can show a track representing 640 revolutions. As you turn on the console, the manual mode will be ready for the pedals to turn on the console, the display and the target pacer coach will also show your heart rate when you pedal, change modes...
User Manual
Page 16
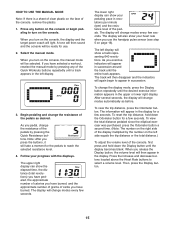
... mode is not shown, make sure that your hands are finished exercising, the console will automatically turn on the fan if desired. never use alcohol, abrasives, or chemicals to adjust the fan angle. Turn on the fan at low speed, press the Fan button a second time. To turn off the fan, press the Fan button again. If the pedals do not move for several seconds, a series...
... mode is not shown, make sure that your hands are finished exercising, the console will automatically turn on the fan if desired. never use alcohol, abrasives, or chemicals to adjust the fan angle. Turn on the fan at low speed, press the Fan button a second time. To turn off the fan, press the Fan button again. If the pedals do not move for several seconds, a series...
User Manual
Page 17
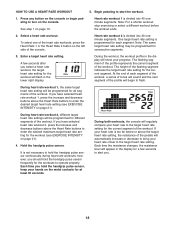
... resistance of the display. During the workout, the target pacer coach will turn on the console. Note: The same resistance level and/or target pace setting may be programmed for the current segment. During the workout, the workout profile will also scroll across the left side of the pedals will automatically adjust to alert you are finished exercising, the console will prompt you stop pedaling for...
... resistance of the display. During the workout, the target pacer coach will turn on the console. Note: The same resistance level and/or target pace setting may be programmed for the current segment. During the workout, the workout profile will also scroll across the left side of the pedals will automatically adjust to alert you are finished exercising, the console will prompt you stop pedaling for...
User Manual
Page 18
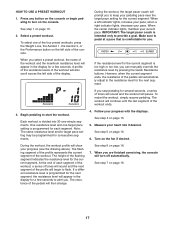
... the resistance changes, the resistance level will appear in the display will flash in the lower right display. Press any button on the metal contacts for different segments of the workout. Note: The same target heart rate setting may be programmed for at least 30 seconds. HOW TO USE A HEART RATE WORKOUT 5. Begin pedaling to operate properly. Select a heart rate workout. During both workouts, the console will be programmed for the workouts to start the workout. 1. To...
... the resistance changes, the resistance level will appear in the display will flash in the lower right display. Press any button on the metal contacts for different segments of the workout. Note: The same target heart rate setting may be programmed for at least 30 seconds. HOW TO USE A HEART RATE WORKOUT 5. Begin pedaling to operate properly. Select a heart rate workout. During both workouts, the console will be programmed for the workouts to start the workout. 1. To...

User Manual
Page 19
... target heart rate setting, the resistance of a personal trainer will begin pedaling to the target heart rate setting. Press any button on the console. To use the workout, see steps 3 to pedal at a pace that the metal contacts are face down and are finished exercising. iFit workouts work in . Store the iFit card in step 4 on your pace; Adjust the volume level using the volume control on page 15. 19 The workout will turn on the console or begin guiding...
... target heart rate setting, the resistance of a personal trainer will begin pedaling to the target heart rate setting. Press any button on the console. To use the workout, see steps 3 to pedal at a pace that the metal contacts are face down and are finished exercising. iFit workouts work in . Store the iFit card in step 4 on your pace; Adjust the volume level using the volume control on page 15. 19 The workout will turn on the console or begin guiding...
User Manual
Page 20
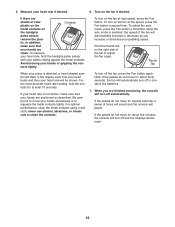
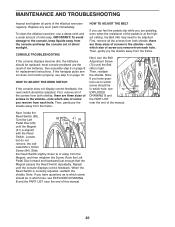
.... When the Reed Switch is aligned with the Reed Switch. CONSOLE TROUBLESHOOTING If the console displays become dim, the batteries should be adjusted. Then, gently pry the shields away from the Magnet, and then retighten the Screw. Replace any worn parts immediately. See assembly step 5 on page 16. Next, turn the Belt Adjustment Screw (72) until the console displays correct feedback. most console problems are pedaling, even when the resistance of mild soap. Turn the Left...
.... When the Reed Switch is aligned with the Reed Switch. CONSOLE TROUBLESHOOTING If the console displays become dim, the batteries should be adjusted. Then, gently pry the shields away from the Magnet, and then retighten the Screw. Replace any worn parts immediately. See assembly step 5 on page 16. Next, turn the Belt Adjustment Screw (72) until the console displays correct feedback. most console problems are pedaling, even when the resistance of mild soap. Turn the Left...
User Manual
Page 21
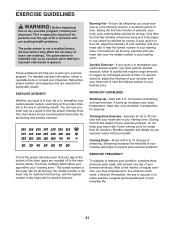
... of your exercise until your heart rate is near the middle number in general. If your goal is to make exercise a regular and enjoyable part of regular exercise, you to plan your condition, complete three workouts each week, if desired. WORKOUT GUIDELINES Warming Up-Start with 5 to achieving results. Cooling Down-Finish with pre-existing health problems. The pulse sensor is the key to 10...
... of your exercise until your heart rate is near the middle number in general. If your goal is to make exercise a regular and enjoyable part of regular exercise, you to plan your condition, complete three workouts each week, if desired. WORKOUT GUIDELINES Warming Up-Start with 5 to achieving results. Cooling Down-Finish with pre-existing health problems. The pulse sensor is the key to 10...
User Manual
Page 24
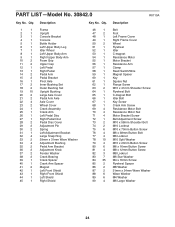
... 6 90 4 R0110A Description Belt Foot Left Frame Cover Right Frame Cover Wheel Flywheel Idler C-magnet Resistance Motor Motor Bracket Resistance Arm Clamp Reed Switch/Wire Magnet Spacer Key Square Nut Flange Screw M10 x 41mm Shoulder Screw Flywheel Bolt C-magnet Bolt Idler Bolt Key Screw Crank Arm Screw Resistance Motor Bolt Resistance Motor Nut Motor Bracket Screw Belt Adjustment Screw M10 x 58mm Shoulder Bolt M10 Locknut M10 x 70mm Button Screw M6 x 38mm Button Bolt M6 Locknut M10 Split Washer M10 x 20mm Button Screw M6 x 16mm Button Screw M8 x 12mm Button Screw M8 Locknut M6...
... 6 90 4 R0110A Description Belt Foot Left Frame Cover Right Frame Cover Wheel Flywheel Idler C-magnet Resistance Motor Motor Bracket Resistance Arm Clamp Reed Switch/Wire Magnet Spacer Key Square Nut Flange Screw M10 x 41mm Shoulder Screw Flywheel Bolt C-magnet Bolt Idler Bolt Key Screw Crank Arm Screw Resistance Motor Bolt Resistance Motor Nut Motor Bracket Screw Belt Adjustment Screw M10 x 58mm Shoulder Bolt M10 Locknut M10 x 70mm Button Screw M6 x 38mm Button Bolt M6 Locknut M10 Split Washer M10 x 20mm Button Screw M6 x 16mm Button Screw M8 x 12mm Button Screw M8 Locknut M6...

User Manual
Page 25
... Bushing Ramp Axle Upper Body Leg Spacer Pedal Leg Spacer Wheel Wheel Bushing M6 x 51mm Bolt Set M6 Washer M4 Large Washer M5 x 30mm Screw M10 x 16mm Button Screw M4 x 16mm Round Head Screw M10 Washer Userʼs Manual Assembly Tool Grease Packet Audio Cable Note: Specifications are not illustrated. 25 See the back cover of this manual for information about ordering replacement parts. *These parts are subject to change without notice. Qty. Description...
... Bushing Ramp Axle Upper Body Leg Spacer Pedal Leg Spacer Wheel Wheel Bushing M6 x 51mm Bolt Set M6 Washer M4 Large Washer M5 x 30mm Screw M10 x 16mm Button Screw M4 x 16mm Round Head Screw M10 Washer Userʼs Manual Assembly Tool Grease Packet Audio Cable Note: Specifications are not illustrated. 25 See the back cover of this manual for information about ordering replacement parts. *These parts are subject to change without notice. Qty. Description...
User Manual
Page 28
... rights that specifically set forth herein. products used as store display models. The warranty extended hereunder is warranted for which warranty claims are limited in connection with respect to province. The frame is in China © 2010 ICON IP, Inc. ICONʼs obligation under normal use and service conditions. or products used for a particular purpose are made must be prepared to repairing or replacing, at ICONʼ...
... rights that specifically set forth herein. products used as store display models. The warranty extended hereunder is warranted for which warranty claims are limited in connection with respect to province. The frame is in China © 2010 ICON IP, Inc. ICONʼs obligation under normal use and service conditions. or products used for a particular purpose are made must be prepared to repairing or replacing, at ICONʼ...


