

Instruction Manual
Page 1
....com Write: ICON Health & Fitness, Ltd. Model No. USERʼS MANUAL Visit our website www.iconsupport.eu c/o HI Group PLC Express Way Whitwood, West Yorkshire WF10 5QJ UK CAUTION Read all precautions and instructions in the space above for future reference. Keep this equipment. PFIVEX86012.0 Serial No Serial No Decal serial no. QUESTIONS ? Write the serial number in this manual before using this manual for reference.
....com Write: ICON Health & Fitness, Ltd. Model No. USERʼS MANUAL Visit our website www.iconsupport.eu c/o HI Group PLC Express Way Whitwood, West Yorkshire WF10 5QJ UK CAUTION Read all precautions and instructions in the space above for future reference. Keep this equipment. PFIVEX86012.0 Serial No Serial No Decal serial no. QUESTIONS ? Write the serial number in this manual before using this manual for reference.
Instruction Manual
Page 2
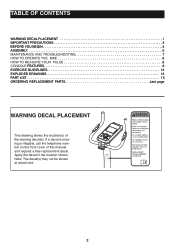
... 1 IMPORTANT PRECAUTIONS 3 BEFORE YOU BEGIN 4 ASSEMBLY 5 MAINTENANCE AND TROUBLESHOOTING 7 HOW TO OPERATE THE BIKE 8 HOW TO MEASURE YOUR PULSE 8 CONSOLE FEATURES 9 EXERCISE GUIDELINES 12 EXPLODED DRAWINGS 13 PART LIST 15 ORDERING REPLACEMENT PARTS Last page WARNING DECAL PLACEMENT This drawing shows the location(s) of this manual and request a free replacement decal. Note: The decal(s) may not be shown at actual size. 2 ing or illegible, call the...
... 1 IMPORTANT PRECAUTIONS 3 BEFORE YOU BEGIN 4 ASSEMBLY 5 MAINTENANCE AND TROUBLESHOOTING 7 HOW TO OPERATE THE BIKE 8 HOW TO MEASURE YOUR PULSE 8 CONSOLE FEATURES 9 EXERCISE GUIDELINES 12 EXPLODED DRAWINGS 13 PART LIST 15 ORDERING REPLACEMENT PARTS Last page WARNING DECAL PLACEMENT This drawing shows the location(s) of this manual and request a free replacement decal. Note: The decal(s) may not be shown at actual size. 2 ing or illegible, call the...

Instruction Manual
Page 3
.... 13. Always wear athletic shoes for home use only. Use this bike only as an exercise aid in determining heart rate trends in general. 12. Keep the bike indoors, away from the bike at least 3 ft. (0.9 m) of clearance in the front and rear of the bike and 2 ft. (0.6 m) on a level surface, with pre-existing health problems. 2. Make sure that there is intended only...
.... 13. Always wear athletic shoes for home use only. Use this bike only as an exercise aid in determining heart rate trends in general. 12. Keep the bike indoors, away from the bike at least 3 ft. (0.9 m) of clearance in the front and rear of the bike and 2 ft. (0.6 m) on a level surface, with pre-existing health problems. 2. Make sure that there is intended only...

Instruction Manual
Page 4
To help us . If you , note the product model number and serial number before you for purchasing the ProForm® Racer 5.0. The model number is PFIVEX86012.0 and the location of the serial number decal are shown on the front cover of features designed to make your benefit, read this manual carefully before contacting us assist you have questions after reading this manual, please see the front cover of this manual. 4 BEFORE YOU BEGIN Thank you use the bike. The bike provides an array of this manual. For your workouts at home more effective and enjoyable.
To help us . If you , note the product model number and serial number before you for purchasing the ProForm® Racer 5.0. The model number is PFIVEX86012.0 and the location of the serial number decal are shown on the front cover of features designed to make your benefit, read this manual carefully before contacting us assist you have questions after reading this manual, please see the front cover of this manual. 4 BEFORE YOU BEGIN Thank you use the bike. The bike provides an array of this manual. For your workouts at home more effective and enjoyable.
Instruction Manual
Page 5
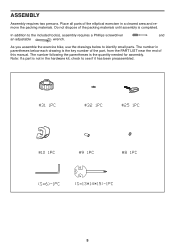
... to identify small parts. The number in a cleared area and remove the packing materials. ASSEMBLY Assembly requires two persons. Place all parts of the elliptical exerciser in parentheses below to the included tool(s), assembly requires a Phillips screwdriver and an adjustable wrench. Do not dispose of this manual. The number following the parentheses is completed. As you assemble the exercice bike, use the drawings below each...
... to identify small parts. The number in a cleared area and remove the packing materials. ASSEMBLY Assembly requires two persons. Place all parts of the elliptical exerciser in parentheses below to the included tool(s), assembly requires a Phillips screwdriver and an adjustable wrench. Do not dispose of this manual. The number following the parentheses is completed. As you assemble the exercice bike, use the drawings below each...

Instruction Manual
Page 6
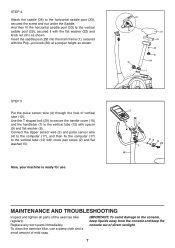
Note: The left pedal (22L) should be tighten in the counterclockwise direction, the right pedal (22R) should be tighten in the clockwise direction. 01` : 1>8 X3YV 3 114 S ab ?X3 3 124 STEP 2 Attach the Pedal (22L/R) to the main frame (1) with the Carriage bolts (28),arc washers (13) and Acorn nuts (19) . STEP 1 Attach the front stabilizer (20) and rear stabilizer (27) to the Crank (21L/R) of the Main frame (1) use the Cross solid wrench.
Note: The left pedal (22L) should be tighten in the counterclockwise direction, the right pedal (22R) should be tighten in the clockwise direction. 01` : 1>8 X3YV 3 114 S ab ?X3 3 124 STEP 2 Attach the Pedal (22L/R) to the main frame (1) with the Carriage bolts (28),arc washers (13) and Acorn nuts (19) . STEP 1 Attach the front stabilizer (20) and rear stabilizer (27) to the Crank (21L/R) of the Main frame (1) use the Cross solid wrench.
Instruction Manual
Page 7
...) and knob nut (31) as shown. Connect the Upper sensor wire (3) and pulse sensor wire (4) to the computer (17), and then fix the computer (17) to the vertical saddle post (29), secured it with cross pan screw (2) and flat washer(15). Replace any worn parts immediately. STEP 4 Attach the saddle (34) to the console, keep liquids away from the console and keep the console out of direct sunlight...
...) and knob nut (31) as shown. Connect the Upper sensor wire (3) and pulse sensor wire (4) to the computer (17), and then fix the computer (17) to the vertical saddle post (29), secured it with cross pan screw (2) and flat washer(15). Replace any worn parts immediately. STEP 4 Attach the saddle (34) to the console, keep liquids away from the console and keep the console out of direct sunlight...
Instruction Manual
Page 8
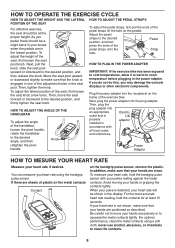
... exercise bike has been exposed to cold temperatures, allow it to warm to squeeze the metal contacts tightly. Then, move your heart rate, hold the contacts for at the proper height. When your knees when the pedals are clean. As you pedal, there should be at least 15 seconds. Adjust the pedal straps to the desired angle, and then Knob Plug the power adapter...
... exercise bike has been exposed to cold temperatures, allow it to warm to squeeze the metal contacts tightly. Then, move your heart rate, hold the contacts for at the proper height. When your knees when the pedals are clean. As you pedal, there should be at least 15 seconds. Adjust the pedal straps to the desired angle, and then Knob Plug the power adapter...
Instruction Manual
Page 9
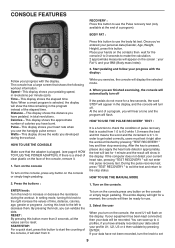
... MANUAL MODE 2. To turn off. If your data have burnt. BODY FAT : Press this button. The console has a large screen that shows the following workout information: Speed-This display shows your heart rate when you will hear a tone and the program will appear in the program instead of the console, it right after the workout finished by pressing ENTER. Calories-This display shows the approximate number of a program, you use the handgrip pulse sensor...
... MANUAL MODE 2. To turn off. If your data have burnt. BODY FAT : Press this button. The console has a large screen that shows the following workout information: Speed-This display shows your heart rate when you will hear a tone and the program will appear in the program instead of the console, it right after the workout finished by pressing ENTER. Calories-This display shows the approximate number of a program, you use the handgrip pulse sensor...

Instruction Manual
Page 10
... you pedal, change the resistance of the elapsed time.It also displays your pedaling speed (in RPM), the calories and fat calories you've burnt and also your heart rate when you can turn the knob to start. 4. Enter your data Once the user is free to modify the values of a program, you are finished exercising, the console will appear. For a quicker start, press the Quick start button and start . You...
... you pedal, change the resistance of the elapsed time.It also displays your pedaling speed (in RPM), the calories and fat calories you've burnt and also your heart rate when you can turn the knob to start. 4. Enter your data Once the user is free to modify the values of a program, you are finished exercising, the console will appear. For a quicker start, press the Quick start button and start . You...
Instruction Manual
Page 11
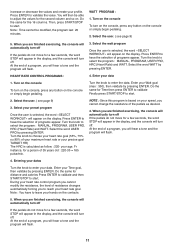
... your speed, you are finished exercising, the console will automatically turn off If the pedals do not move for Time then press ENTER to validate Finally press START/STOP to have the selection of 35 years old : 220-35 = 185 pulse/min. Select the user. ( see page 9) 5. Turn the knob to choose your datas Turn the knob to select the program : MANUAL, PROGRAM, USER PRO, HRC (Heart Rate) and WATT. Entering your heart rate goal...
... your speed, you are finished exercising, the console will automatically turn off If the pedals do not move for Time then press ENTER to validate Finally press START/STOP to have the selection of 35 years old : 220-35 = 185 pulse/min. Select the user. ( see page 9) 5. Turn the knob to choose your datas Turn the knob to select the program : MANUAL, PROGRAM, USER PRO, HRC (Heart Rate) and WATT. Entering your heart rate goal...
Instruction Manual
Page 12
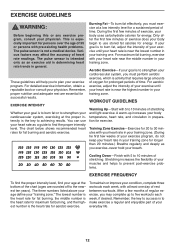
... part of time. For aerobic exercise, adjust the intensity of your exercise until your heart rate is near the highest number in your cardiovascular system, you must exercise at the proper intensity is to 10 minutes of time. WORKOUT GUIDELINES Warming Up-Start with your body uses carbohydrate calories for a sustained period of stretching and light exercise. Training Zone Exercise-Exercise for 20 to prevent post-exercise problems. EXERCISE...
... part of time. For aerobic exercise, adjust the intensity of your exercise until your heart rate is near the highest number in your cardiovascular system, you must exercise at the proper intensity is to 10 minutes of time. WORKOUT GUIDELINES Warming Up-Start with your body uses carbohydrate calories for a sustained period of stretching and light exercise. Training Zone Exercise-Exercise for 20 to prevent post-exercise problems. EXERCISE...
Instruction Manual
Page 15
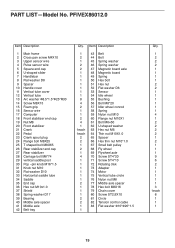
... Rotating disk 73 Adapter 74 Motor 75 Vertical tube circle 76 Nylon nut M8 77 Middle axle spacer 78 Hex bolt M8X16 79 Chain cover 80 Screw ST2.9X10 81 Circle 82 Tension control cable 83 Flat washer Φ10*Φ20*1.5 Qty. 1 2 2 2 1 1 1 1 2 2 1 1 1 1 1 1 4 1 2 2 2 2 1 2 1 1 1 9 6 2 1 1 1 1 1 3 1each 8 1 1 1 15 PART LIST-Model No. PFIVEX86012.0 Item Description 1 Main frame 2 Cross pan screw M4X10 3 Upper sensor wire 4 Pulse sensor wire 5 Square end cap...
... Rotating disk 73 Adapter 74 Motor 75 Vertical tube circle 76 Nylon nut M8 77 Middle axle spacer 78 Hex bolt M8X16 79 Chain cover 80 Screw ST2.9X10 81 Circle 82 Tension control cable 83 Flat washer Φ10*Φ20*1.5 Qty. 1 2 2 2 1 1 1 1 2 2 1 1 1 1 1 1 4 1 2 2 2 2 1 2 1 1 1 9 6 2 1 1 1 1 1 3 1each 8 1 1 1 15 PART LIST-Model No. PFIVEX86012.0 Item Description 1 Main frame 2 Cross pan screw M4X10 3 Upper sensor wire 4 Pulse sensor wire 5 Square end cap...
Instruction Manual
Page 16
... doing so, you will help us : • the model number and serial number of the product (see the front cover of this manual) • the name of the product (see the front cover of this manual) • the key number and description of the replacement part(s) (see the front cover of this manual. SPECIFICATION : Open Dimension : (L x l x h): 120x67x154 cm Product Weight : 26,3 Kg Printed in your local city office...
... doing so, you will help us : • the model number and serial number of the product (see the front cover of this manual) • the name of the product (see the front cover of this manual) • the key number and description of the replacement part(s) (see the front cover of this manual. SPECIFICATION : Open Dimension : (L x l x h): 120x67x154 cm Product Weight : 26,3 Kg Printed in your local city office...

