
English Manual
Page 1
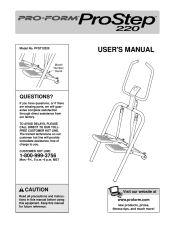
... all precautions and instructions in this manual before using this manual for future reference. USER'S MANUAL Visit our website at www.proform.com new products, prizes, fitness tips, and much more! CUSTOMER HOT LINE: 1-800-999-3756 Mon.-Fri., 6 a.m.-6 p.m. PFST12020 Model Number Decal QUESTIONS? If you . The trained technicians on our customer hot line will provide immediate assistance, free of charge to...
... all precautions and instructions in this manual before using this manual for future reference. USER'S MANUAL Visit our website at www.proform.com new products, prizes, fitness tips, and much more! CUSTOMER HOT LINE: 1-800-999-3756 Mon.-Fri., 6 a.m.-6 p.m. PFST12020 Model Number Decal QUESTIONS? If you . The trained technicians on our customer hot line will provide immediate assistance, free of charge to...
English Manual
Page 2
... in the location shown. The stepper should not be used by or through the use only. Keep children under the stepper to cool before using . Allow the resistance cylinders to protect the floor. 5. TABLE OF CONTENTS IMPORTANT PRECAUTIONS 2 BEFORE YOU BEGIN 3 ASSEMBLY 4 HOW TO OPERATE THE STEPPER 6 MAINTENANCE AND TROUBLESHOOTING 7 CONDITIONING GUIDELINES 8 PART LIST 10 EXPLODED DRAWING 11 ORDERING REPLACEMENT PARTS Back Cover LIMITED DAY WARRANTY Back Cover IMPORTANT...
... in the location shown. The stepper should not be used by or through the use only. Keep children under the stepper to cool before using . Allow the resistance cylinders to protect the floor. 5. TABLE OF CONTENTS IMPORTANT PRECAUTIONS 2 BEFORE YOU BEGIN 3 ASSEMBLY 4 HOW TO OPERATE THE STEPPER 6 MAINTENANCE AND TROUBLESHOOTING 7 CONDITIONING GUIDELINES 8 PART LIST 10 EXPLODED DRAWING 11 ORDERING REPLACEMENT PARTS Back Cover LIMITED DAY WARRANTY Back Cover IMPORTANT...
English Manual
Page 3
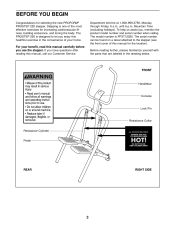
... model number and serial number when calling. until 6 p.m. Mountain Time (excluding holidays). Before reading further, please familiarize yourself with the parts that are labeled in the convenience of your benefit, read this healthful exercise in the drawing below. Stepping is PFST12020. Resistance Cylinder Pedal FRONT Handlebar Console Lock Pin Resistance Collar REAR RIGHT SIDE 3 The model number is one of this manual, call our Customer Service Department toll-free...
... model number and serial number when calling. until 6 p.m. Mountain Time (excluding holidays). Before reading further, please familiarize yourself with the parts that are labeled in the convenience of your benefit, read this healthful exercise in the drawing below. Stepping is PFST12020. Resistance Cylinder Pedal FRONT Handlebar Console Lock Pin Resistance Collar REAR RIGHT SIDE 3 The model number is one of this manual, call our Customer Service Department toll-free...

English Manual
Page 4
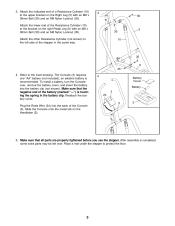
ASSEMBLY Place all parts of the Lock Pin. Assembly requires only the included tools. 1. Attach a Foot (21) to the Left Pivot Arm (7) with an M5 1 x 25mm Screw (34) and an M5 Washer (39). 8 Attach the other Foot (21) to the Right Pivot Arm (8) in the inset drawing. Raise the Left and Right Legs (4, 5) and the Handlebar 2 (2) until assembly is not in a cleared...
ASSEMBLY Place all parts of the Lock Pin. Assembly requires only the included tools. 1. Attach a Foot (21) to the Left Pivot Arm (7) with an M5 1 x 25mm Screw (34) and an M5 Washer (39). 8 Attach the other Foot (21) to the Right Pivot Arm (8) in the inset drawing. Raise the Left and Right Legs (4, 5) and the Handlebar 2 (2) until assembly is not in a cleared...
English Manual
Page 5
... Right Leg (5) with an M8 x 38mm Bolt (30) and an M8 Nylon Locknut (35). 5 35 Attach the other Resistance Cylinder (not shown) to the upper bracket on the Handlebar (2). 35 4 3 24 2 30 6 Battery Cover Battery 3 5. Attach the lower end of the Console (3). Reattach the battery cover. Place a mat under the stepper to the inset drawing. To install a battery, turn the Console over . Plug the Reed Wire (24) into the battery clip...
... Right Leg (5) with an M8 x 38mm Bolt (30) and an M8 Nylon Locknut (35). 5 35 Attach the other Resistance Cylinder (not shown) to the upper bracket on the Handlebar (2). 35 4 3 24 2 30 6 Battery Cover Battery 3 5. Attach the lower end of the Console (3). Reattach the battery cover. Place a mat under the stepper to the inset drawing. To install a battery, turn the Console over . Plug the Reed Wire (24) into the battery clip...
English Manual
Page 6
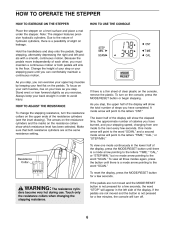
... ADJUST THE RESISTANCE To change the stepping resistance, turn on the console, remove the plastic. The arrows on the resistance cylinders and the marks on the upper ends of clear plastic on the console, press the MODE/RESET button or begin stepping. Touch only the resistance collars when changing the stepping resistance. As you step, the upper half of the display will show the total number of steps you have burned, and your stepping speed, changing...
... ADJUST THE RESISTANCE To change the stepping resistance, turn on the console, remove the plastic. The arrows on the resistance cylinders and the marks on the upper ends of clear plastic on the console, press the MODE/RESET button or begin stepping. Touch only the resistance collars when changing the stepping resistance. As you step, the upper half of the display will show the total number of steps you have burned, and your stepping speed, changing...
English Manual
Page 7
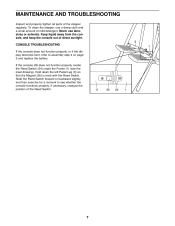
... slightly, and then exercise for a moment to assembly step 4 on page 5 and replace the battery. MAINTENANCE AND TROUBLESHOOTING Inspect and properly tighten all parts of the Reed Switch. 6 1 6 26 24 1 7 Never use a damp cloth and a small amount of direct sunlight. If the console still does not function properly, locate the Reed Switch (24) under the Frame (1) (see whether the console functions properly. Hold down the left Pedal Leg (6) so that...
... slightly, and then exercise for a moment to assembly step 4 on page 5 and replace the battery. MAINTENANCE AND TROUBLESHOOTING Inspect and properly tighten all parts of the Reed Switch. 6 1 6 26 24 1 7 Never use a damp cloth and a small amount of direct sunlight. If the console still does not function properly, locate the Reed Switch (24) under the Frame (1) (see whether the console functions properly. Hold down the left Pedal Leg (6) so that...
English Manual
Page 8
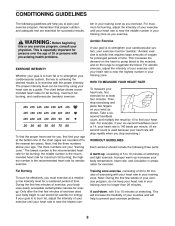
... 14, your heart rate is 140 beats per minute. (A sixsecond count is to prevent post-exercise problems. 8 If your goal is used because your heart rate will help to burn fat, adjust the intensity of your exercise program, do not keep your heart rate in your training zone. Note: During the first few minutes of the chart (ages are your exercise must exercise at least four...
... 14, your heart rate is 140 beats per minute. (A sixsecond count is to prevent post-exercise problems. 8 If your goal is used because your heart rate will help to burn fat, adjust the intensity of your exercise program, do not keep your heart rate in your training zone. Note: During the first few minutes of the chart (ages are your exercise must exercise at least four...
English Manual
Page 9
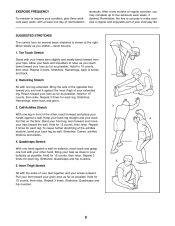
...hands against a wall for several basic stretches is make exercise a regular and enjoyable part of your feet together and your other , reach forward and place your back leg as close to relax as possible. Allow your back...key to five workouts each week, if desired. Stretches: Hamstrings, back of regular exercise, you reach down toward your hips. Repeat 3 times for each leg. Stretches: Calves, achilles tendons and ankles. 4. Repeat 3 times for each leg. Stretches: Quadriceps and hip muscles. 5 5. Repeat 3 times. Repeat 3 times. Bend your front leg, lean forward and move...
...hands against a wall for several basic stretches is make exercise a regular and enjoyable part of your feet together and your other , reach forward and place your back leg as close to relax as possible. Allow your back...key to five workouts each week, if desired. Stretches: Hamstrings, back of regular exercise, you reach down toward your hips. Repeat 3 times for each leg. Stretches: Calves, achilles tendons and ankles. 4. Repeat 3 times for each leg. Stretches: Quadriceps and hip muscles. 5 5. Repeat 3 times. Repeat 3 times. Bend your front leg, lean forward and move...
English Manual
Page 10
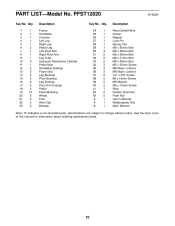
... 2 41 1 42 2 43 2 # 1 # 1 # 1 Description Reed Switch/Wire Clamp Magnet Lock Pin Spring Clip M8 x 85mm Bolt M8 x 38mm Bolt M8 x 60mm Bolt M6 x 31mm Bolt M8 x 48mm Bolt M5 x 25mm Screw M8 Nylon Locknut M6 Nylon Locknut 1/4" x 5/8" Screw #8 x 19mm Screw M5 Washer M5 x 10mm Screw Stop Rubber Grommet Push Nut User's Manual Multipurpose Tool Allen Wrench Note: "#" indicates a non-illustrated part. PART LIST-Model No. PFST12020 R1202A Key No. Qty. 1 1 2 1 3 1 4 1 5 1 6 2 7 1 8 1 9 1 10...
... 2 41 1 42 2 43 2 # 1 # 1 # 1 Description Reed Switch/Wire Clamp Magnet Lock Pin Spring Clip M8 x 85mm Bolt M8 x 38mm Bolt M8 x 60mm Bolt M6 x 31mm Bolt M8 x 48mm Bolt M5 x 25mm Screw M8 Nylon Locknut M6 Nylon Locknut 1/4" x 5/8" Screw #8 x 19mm Screw M5 Washer M5 x 10mm Screw Stop Rubber Grommet Push Nut User's Manual Multipurpose Tool Allen Wrench Note: "#" indicates a non-illustrated part. PART LIST-Model No. PFST12020 R1202A Key No. Qty. 1 1 2 1 3 1 4 1 5 1 6 2 7 1 8 1 9 1 10...
English Manual
Page 11
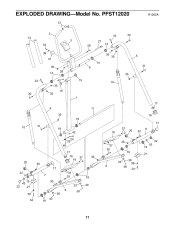
PFST12020 12 R1202A 2 13 34 33 30 3 27 29 14 39 41 35 14 28 33 30 42 35 15 35 14 9 15 1 4 35 11 19 10 31 19 42 24 25 40 20 32 19 43 22 21 36 17 7 30 39 26 34 40 19 17 16 37 35 18 37 35 19 23 39 6 38 35 35 10 5 31 35 17 16 17 18 37 20 8 32 37 30 36 19 23 39 39 6 38 34 22 43 19 21 11 EXPLODED DRAWING-Model No.
PFST12020 12 R1202A 2 13 34 33 30 3 27 29 14 39 41 35 14 28 33 30 42 35 15 35 14 9 15 1 4 35 11 19 10 31 19 42 24 25 40 20 32 19 43 22 21 36 17 7 30 39 26 34 40 19 17 16 37 35 18 37 35 19 23 39 6 38 35 35 10 5 31 35 17 16 17 18 37 20 8 32 37 30 36 19 23 39 39 6 38 34 22 43 19 21 11 EXPLODED DRAWING-Model No.
English Manual
Page 12
... repairs for commercial or rental purposes; This warranty extends only to you . or to give the following information when calling: • The MODEL NUMBER of the product (PFST12020) • The NAME of the product (PROFORM® PROSTEP 220 stepper) • The SERIAL NUMBER of the product (see the front cover of this manual) • The KEY NUMBER and DESCRIPTION of the part(s) (see the PART LIST on...
... repairs for commercial or rental purposes; This warranty extends only to you . or to give the following information when calling: • The MODEL NUMBER of the product (PFST12020) • The NAME of the product (PROFORM® PROSTEP 220 stepper) • The SERIAL NUMBER of the product (see the front cover of this manual) • The KEY NUMBER and DESCRIPTION of the part(s) (see the PART LIST on...

