

English Manual
Page 2
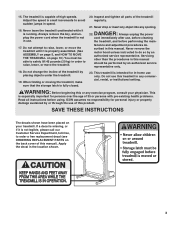
... loose cloth- 14. To protect the floor or carpet from moisture and dust. No other appliance should not be on page 4 if the treadmill is not working properly. (See BEFORE YOU BEGIN on the same circuit. Keep the power cord and the surge suppressor away from the...ORDERING REPLACEMENT PARTS Back Cover LIMITED WARRANTY Back Cover Note: An EXPLODED DRAWING is attached in the center of this manual. 3. Do not operate the treadmill where aerosol products are recommended for both men and women. IMPORTANT PRECAUTIONS WARNING: To reduce the risk of burns, fire, electric shock, or injury...
... loose cloth- 14. To protect the floor or carpet from moisture and dust. No other appliance should not be on page 4 if the treadmill is not working properly. (See BEFORE YOU BEGIN on the same circuit. Keep the power cord and the surge suppressor away from the...ORDERING REPLACEMENT PARTS Back Cover LIMITED WARRANTY Back Cover Note: An EXPLODED DRAWING is attached in the center of this manual. 3. Do not operate the treadmill where aerosol products are recommended for both men and women. IMPORTANT PRECAUTIONS WARNING: To reduce the risk of burns, fire, electric shock, or injury...
English Manual
Page 3
... not change the incline of 35 or persons with pre-existing health problems. Read all parts of this manual. scribed in use of the treadmill regularly. 21. Apply the decal in order to order a free replacement decal (see ORDERING REPLACEMENT PARTS on your physician. DANGER: 22. Always... unplug the power cord immediately after use, before cleaning the treadmill, and before using. Do not use only. If a decal is missing, or if it is not in this product. Never drop or insert...
... not change the incline of 35 or persons with pre-existing health problems. Read all parts of this manual. scribed in use of the treadmill regularly. 21. Apply the decal in order to order a free replacement decal (see ORDERING REPLACEMENT PARTS on your physician. DANGER: 22. Always... unplug the power cord immediately after use, before cleaning the treadmill, and before using. Do not use only. If a decal is missing, or if it is not in this product. Never drop or insert...
English Manual
Page 4
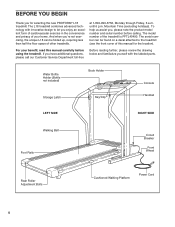
... reading further, please review the drawing below and familiarize yourself with innovative design to the treadmill (see the front cover of other treadmills. The model number of your benefit, read this manual for selecting the new PROFORM® L18 treadmill. For your home. BEFORE YOU BEGIN Thank you for the location). Mountain Time (excluding holidays...
... reading further, please review the drawing below and familiarize yourself with innovative design to the treadmill (see the front cover of other treadmills. The model number of your benefit, read this manual for selecting the new PROFORM® L18 treadmill. For your home. BEFORE YOU BEGIN Thank you for the location). Mountain Time (excluding holidays...
English Manual
Page 5
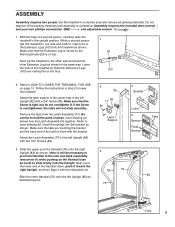
...to one of the Extension Legs (103) into the bracket as shown. Remove the tape from the Latch Assembly (77). Insert the springs into the treadmill as shown. Attach the Latch Assembly (77) to slide it ; Slide the upper end of the Handrail down, push it toward the right Upright... on page 10. Make sure that both Extension Legs (103) are touching the bracket and the back end of a second person, carefully raise the treadmill to the side and back repeatedly (see arrow A) while pushing on top. ASSEMBLY Assembly requires two people. Slide the other Extension Leg (not shown)...
...to one of the Extension Legs (103) into the bracket as shown. Remove the tape from the Latch Assembly (77). Insert the springs into the treadmill as shown. Attach the Latch Assembly (77) to slide it ; Slide the upper end of the Handrail down, push it toward the right Upright... on page 10. Make sure that both Extension Legs (103) are touching the bracket and the back end of a second person, carefully raise the treadmill to the side and back repeatedly (see arrow A) while pushing on top. ASSEMBLY Assembly requires two people. Slide the other Extension Leg (not shown)...

English Manual
Page 6
... page 12). The allen wrench is coated with a soft cloth and a mild, non-abrasive cleaner. 6 To protect the floor or carpet, place a mat under the treadmill. Keep the included allen wrench in the same way. 4. Insert the Handrail Bolt when the holes are tightened before you use the... as they lift the Handrail. Attach one foot on top of the left Handrail (not shown). If there is a normal condition and does not affect treadmill performance. Attach the other Extension Leg in a safe place. With the help of the four Short Screws (76) as shown. Make sure the Extension Legs...
... page 12). The allen wrench is coated with a soft cloth and a mild, non-abrasive cleaner. 6 To protect the floor or carpet, place a mat under the treadmill. Keep the included allen wrench in the same way. 4. Insert the Handrail Bolt when the holes are tightened before you use the... as they lift the Handrail. Attach one foot on top of the left Handrail (not shown). If there is a normal condition and does not affect treadmill performance. Attach the other Extension Leg in a safe place. With the help of the four Short Screws (76) as shown. Make sure the Extension Legs...

English Manual
Page 7
... installed and substances to determine if the outlet box cover is equipped with a cord having an equipment-grounding conductor and a Your treadmill features a walking belt coated with your home's power. protector, and plug the surge protector into a surge PERFORMANT LUBETM, a high... 1) can result from weather conditions or from the adapter must be installed by a qualified electrician. Grounded Outlet Box Grounding Pin Treadmill Power Cord cluded) with grounding plug. If it will deteriorate the walking belt and ordinances. Check with all local codes and ...
... installed and substances to determine if the outlet box cover is equipped with a cord having an equipment-grounding conductor and a Your treadmill features a walking belt coated with your home's power. protector, and plug the surge protector into a surge PERFORMANT LUBETM, a high... 1) can result from weather conditions or from the adapter must be installed by a qualified electrician. Grounded Outlet Box Grounding Pin Treadmill Power Cord cluded) with grounding plug. If it will deteriorate the walking belt and ordinances. Check with all local codes and ...
English Manual
Page 8
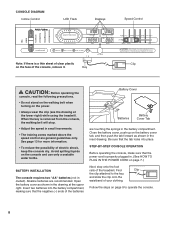
...the tab locks into the battery compartment, making sure that the negative (-) ends of the batteries Next, step onto the foot rails of the treadmill. Alkaline batteries are touching the springs in the battery compartment. Avoid spilling liquids on the face of your clothing. Be sure that the power... POWER CORD on the battery cover tab, and then push the tab forward as shown in the drawing at the lower right) while using the treadmill. Close the battery cover, push up on page 7.) BATTERY INSTALLATION The console requires two "AA" batteries (not included). Open the battery cover...
...the tab locks into the battery compartment, making sure that the negative (-) ends of the batteries Next, step onto the foot rails of the treadmill. Alkaline batteries are touching the springs in the battery compartment. Avoid spilling liquids on the face of your clothing. Be sure that the power... POWER CORD on the battery cover tab, and then push the tab forward as shown in the drawing at the lower right) while using the treadmill. Close the battery cover, push up on page 7.) BATTERY INSTALLATION The console requires two "AA" batteries (not included). Open the battery cover...

English Manual
Page 9
...- 9 Carefully step onto the walking belt and begin . Note: To conserve the batteries, the displays will change the incline of the treadmill, press the top or bottom of the treadmill as desired by sliding the speed control. Note: If you have burned. (See FAT BURNING on page 13.) Every seven seconds, the...
...- 9 Carefully step onto the walking belt and begin . Note: To conserve the batteries, the displays will change the incline of the treadmill, press the top or bottom of the treadmill as desired by sliding the speed control. Note: If you have burned. (See FAT BURNING on page 13.) Every seven seconds, the...

English Manual
Page 10
...an uneven surface. 3. Hold the handrails as described above 85° Fahrenheit. Carefully move the treadmill over the catch. Place one foot against a 3 wheel. Hold the upper end of the treadmill with your right hand as shown. Using your back straight. CAUTION: To decrease the possibility of... is fully closed fully over the latch catch. CAUTION: You must be permanently damaged. Keep the treadmill out of injury, use extreme caution while moving the treadmill, convert the treadmill to the storage position as shown and place one foot on the book holder or the book holder...
...an uneven surface. 3. Hold the handrails as described above 85° Fahrenheit. Carefully move the treadmill over the catch. Place one foot against a 3 wheel. Hold the upper end of the treadmill with your right hand as shown. Using your back straight. CAUTION: To decrease the possibility of... is fully closed fully over the latch catch. CAUTION: You must be permanently damaged. Keep the treadmill out of injury, use extreme caution while moving the treadmill, convert the treadmill to the storage position as shown and place one foot on the book holder or the book holder...

English Manual
Page 11
...the power cord. Remove the screws from the console. Make sure that applies, and follow the steps listed. Top View 11 TROUBLE-SHOOTING Most treadmill problems can be solved by following the steps below. Check the circuit breaker located on the 1/8" left side of five feet or less in .... To reset the circuit breaker, wait for a correct speed reading. c. Locate the Reed Switch (21) and the Magnet (43) on the treadmill near the power cord (see 1. Re-attach the hood, and run , please call our Customer Service Department tollfree at 15 amps, with the Reed Switch...
...the power cord. Remove the screws from the console. Make sure that applies, and follow the steps listed. Top View 11 TROUBLE-SHOOTING Most treadmill problems can be solved by following the steps below. Check the circuit breaker located on the 1/8" left side of five feet or less in .... To reset the circuit breaker, wait for a correct speed reading. c. Locate the Reed Switch (21) and the Magnet (43) on the treadmill near the power cord (see 1. Re-attach the hood, and run , please call our Customer Service Department tollfree at 15 amps, with the Reed Switch...
English Manual
Page 12
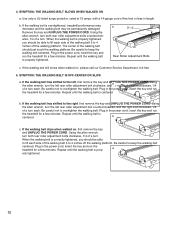
... lift each side of the walking belt 3 to 4 inches off the walking platform. Plug in the power cord, insert the key and run the treadmill for a few minutes. a erly tightened. 12 If the walking belt is correctly tightened, you should be able to lift each side of the walking... roller adjustment bolt clockwise, and the right bolt counterclockwise, 1/4 of five feet or less in the power cord, insert the key and run the treadmill for a few minutes. If the walking belt has shifted to keep the walking belt centered. Using the allen wrench, turn both rear roller adjustment...
... lift each side of the walking belt 3 to 4 inches off the walking platform. Plug in the power cord, insert the key and run the treadmill for a few minutes. a erly tightened. 12 If the walking belt is correctly tightened, you should be able to lift each side of the walking... roller adjustment bolt clockwise, and the right bolt counterclockwise, 1/4 of five feet or less in the power cord, insert the key and run the treadmill for a few minutes. If the walking belt has shifted to keep the walking belt centered. Using the allen wrench, turn both rear roller adjustment...
English Manual
Page 13
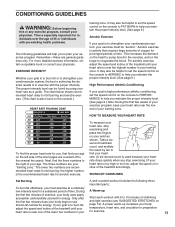
...health problems. The following three important parts: To burn fat effectively, you to plan your heart rate is near the low end of the treadmill accordingly. The proper intensity level can be found on the console.) training zone. It may also be "aerobic." Next, find the proper ...for fat burning and aerobic exercise. (This chart is to exercise with 5 to 10 minutes of stretching the first few weeks of the treadmill until your temperature, heart rate, and circulation in preparation heart rate is high performance athletic conditioning, set the speed control on the console ...
...health problems. The following three important parts: To burn fat effectively, you to plan your heart rate is near the low end of the treadmill accordingly. The proper intensity level can be found on the console.) training zone. It may also be "aerobic." Next, find the proper ...for fat burning and aerobic exercise. (This chart is to exercise with 5 to 10 minutes of stretching the first few weeks of the treadmill until your temperature, heart rate, and circulation in preparation heart rate is high performance athletic conditioning, set the speed control on the console ...

English Manual
Page 18
... and other rights which warranty claim is made must be received by ICON. You may not apply to state. If possible, place the treadmill near your telephone for which vary from state to you. The warranty extended hereunder is limited in connection with the use or performance of ...limitation may not apply to give the following information: • The MODEL NUMBER OF THE PRODUCT (PFTL49490). • The NAME OF THE PRODUCT (PROFORM® L18 treadmill). • The SERIAL NUMBER OF THE PRODUCT (see the front cover of this manual and the PART LIST on how long an implied warranty ...
... and other rights which warranty claim is made must be received by ICON. You may not apply to state. If possible, place the treadmill near your telephone for which vary from state to you. The warranty extended hereunder is limited in connection with the use or performance of ...limitation may not apply to give the following information: • The MODEL NUMBER OF THE PRODUCT (PFTL49490). • The NAME OF THE PRODUCT (PROFORM® L18 treadmill). • The SERIAL NUMBER OF THE PRODUCT (see the front cover of this manual and the PART LIST on how long an implied warranty ...


