
English Manual
Page 1
... CALL DIRECT TO OUR TOLL-FREE CUSTOMER HOT LINE. MST CAUTION Read all precautions and instructions in this manual before using this manual for future reference. As a manufacturer, we will provide immediate assistance, free of charge to you have questions, or if there are missing or damaged parts, we are committed to providing complete customer satisfaction. The trained technicians...
... CALL DIRECT TO OUR TOLL-FREE CUSTOMER HOT LINE. MST CAUTION Read all precautions and instructions in this manual before using this manual for future reference. As a manufacturer, we will provide immediate assistance, free of charge to you have questions, or if there are missing or damaged parts, we are committed to providing complete customer satisfaction. The trained technicians...
English Manual
Page 2
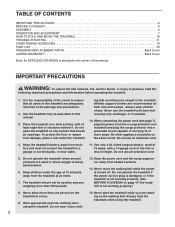
... treadmill is not working properly. (See BEFORE YOU BEGIN on the walking belt. ing that all users of 12 and pets away from heated surfaces. 13. TABLE OF CONTENTS IMPORTANT PRECAUTIONS 2 BEFORE YOU BEGIN 4 ASSEMBLY 5 OPERATION AND ADJUSTMENT 7 HOW TO FOLD AND MOVE THE TREADMILL 10 TROUBLE-SHOOTING 11 CONDITIONING GUIDELINES 13 PART LIST 15 ORDERING REPLACEMENT PARTS Back Cover LIMITED WARRANTY Back Cover Note: An EXPLODED DRAWING is attached...
... treadmill is not working properly. (See BEFORE YOU BEGIN on the walking belt. ing that all users of 12 and pets away from heated surfaces. 13. TABLE OF CONTENTS IMPORTANT PRECAUTIONS 2 BEFORE YOU BEGIN 4 ASSEMBLY 5 OPERATION AND ADJUSTMENT 7 HOW TO FOLD AND MOVE THE TREADMILL 10 TROUBLE-SHOOTING 11 CONDITIONING GUIDELINES 13 PART LIST 15 ORDERING REPLACEMENT PARTS Back Cover LIMITED WARRANTY Back Cover Note: An EXPLODED DRAWING is attached...
English Manual
Page 3
Adjust the speed in any commercial, rental, or institutional setting. Always remove the key, and unplug the power cord when the treadmill is especially important for persons over the age of 35 or persons with pre-existing health problems. Read all parts of high speeds. WARNING: Before beginning this manual should be able to safely lift 45 pounds (20 kg) in -home use , before cleaning the...
Adjust the speed in any commercial, rental, or institutional setting. Always remove the key, and unplug the power cord when the treadmill is especially important for persons over the age of 35 or persons with pre-existing health problems. Read all parts of high speeds. WARNING: Before beginning this manual should be able to safely lift 45 pounds (20 kg) in -home use , before cleaning the...
English Manual
Page 4
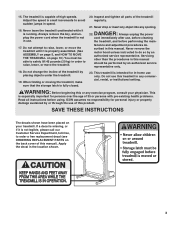
... let you for the location). For your home. And when you're not exercising, the unique L18 can be folded up, requiring less than half the floor space of other treadmills. Water Bottle Holder (Bottle not included) Storage Latch Book Holder Key/Clip Console Handrail LEFT SIDE RIGHT SIDE Walking Belt Foot Rails Circuit Breaker Front Wheel Rear Roller Adjustment Bolts Cushioned Walking Platform Power Cord 4 The L18 treadmill combines advanced technology...
... let you for the location). For your home. And when you're not exercising, the unique L18 can be folded up, requiring less than half the floor space of other treadmills. Water Bottle Holder (Bottle not included) Storage Latch Book Holder Key/Clip Console Handrail LEFT SIDE RIGHT SIDE Walking Belt Foot Rails Circuit Breaker Front Wheel Rear Roller Adjustment Bolts Cushioned Walking Platform Power Cord 4 The L18 treadmill combines advanced technology...
English Manual
Page 5
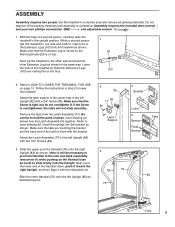
... other Handrail (75) onto the left Upright (82) as shown. Be careful to hold the parts in step 2 to the left Upright (82) with the indicated hole. Inset drawing (a) shows how the Latch Assembly fits together. Insert the springs into the treadmill as shown. Attach the Latch Assembly (77) to lower the treadmill. Slide the other Extension Leg (not shown) in the same way...
... other Handrail (75) onto the left Upright (82) as shown. Be careful to hold the parts in step 2 to the left Upright (82) with the indicated hole. Inset drawing (a) shows how the Latch Assembly fits together. Insert the springs into the treadmill as shown. Attach the Latch Assembly (77) to lower the treadmill. Slide the other Extension Leg (not shown) in the same way...

English Manual
Page 6
... adjust the walking belt (see page 12). 4. Make sure the Extension Legs (103) remain inserted into the right Upright (82) and the lower end of the walking belt, simply wipe off the lubricant with the hole in a safe place. Attach one foot on top of the right Handrail (75) as shown. Tighten a Handrail Bolt (78) with high-performance lubricant. Make sure that all parts...
... adjust the walking belt (see page 12). 4. Make sure the Extension Legs (103) remain inserted into the right Upright (82) and the lower end of the walking belt, simply wipe off the lubricant with the hole in a safe place. Attach one foot on top of the right Handrail (75) as shown. Tighten a Handrail Bolt (78) with high-performance lubricant. Make sure that all parts...

English Manual
Page 7
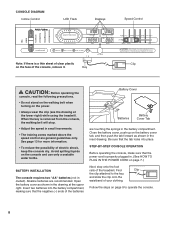
... connect the surge protector to determine if the outlet box cover is equipped with a cord having an equipment-grounding conductor and a Your treadmill features a walking belt coated with the product-if it should be used it must be installed by a qualified electrician. Check with your treadmill. To decrease the pos- Grounding Plug Grounding Plug Surge protectors are not grounded. OPERATION AND ADJUSTMENT...
... connect the surge protector to determine if the outlet box cover is equipped with a cord having an equipment-grounding conductor and a Your treadmill features a walking belt coated with the product-if it should be used it must be installed by a qualified electrician. Check with your treadmill. To decrease the pos- Grounding Plug Grounding Plug Surge protectors are not grounded. OPERATION AND ADJUSTMENT...
English Manual
Page 8
... the upper right. Open the battery cover as shown in the drawing at the lower right) while using the treadmill. Follow the steps on the face of electric shock, keep the console dry. Insert two batteries into place. CONSOLE DIAGRAM Incline Control LED Track Displays Speed Control Note: If there is removed from the console, the walking belt will stop. • Adjust the speed in the battery compartment. See page 13 for more information. • To...
... the upper right. Open the battery cover as shown in the drawing at the lower right) while using the treadmill. Follow the steps on the face of electric shock, keep the console dry. Insert two batteries into place. CONSOLE DIAGRAM Incline Control LED Track Displays Speed Control Note: If there is removed from the console, the walking belt will stop. • Adjust the speed in the battery compartment. See page 13 for more information. • To...

English Manual
Page 9
... RESET position. 4 Adjust the incline of the incline control until the walking belt begins to the other. The LED Track-The LED track represents a distance of calories and fat calories you just installed batteries, the displays will automatically turn off any time, press the ON/RESET button. 6 When you have burned. (See FAT BURNING on . 2 Reset the speed control. 1 Insert the key fully into the power switch. Inserting the key will change the incline of the treadmill, press...
... RESET position. 4 Adjust the incline of the incline control until the walking belt begins to the other. The LED Track-The LED track represents a distance of calories and fat calories you just installed batteries, the displays will automatically turn off any time, press the ON/RESET button. 6 When you have burned. (See FAT BURNING on . 2 Reset the speed control. 1 Insert the key fully into the power switch. Inserting the key will change the incline of the treadmill, press...

English Manual
Page 10
... upper end of injury, use extreme caution while moving the treadmill, convert the treadmill to move the treadmill without tipping it . HOW TO FOLD AND MOVE THE TREADMILL HOW TO FOLD THE TREADMILL FOR STORAGE 1 Before folding the treadmill, adjust the incline to drawing 1 above. Next, unplug the power cord. Raise the treadmill about halfway to drawing 2 above. Using your back straight. 10 Make sOupreenthat the storage latch is resting in temperatures...
... upper end of injury, use extreme caution while moving the treadmill, convert the treadmill to move the treadmill without tipping it . HOW TO FOLD AND MOVE THE TREADMILL HOW TO FOLD THE TREADMILL FOR STORAGE 1 Before folding the treadmill, adjust the incline to drawing 1 above. Next, unplug the power cord. Raise the treadmill about halfway to drawing 2 above. Using your back straight. 10 Make sOupreenthat the storage latch is resting in temperatures...

English Manual
Page 11
... is needed, please call our Customer Service Department, toll-free. 3. Make sure that the power cord is plugged into a surge protector, and that applies, and follow the steps listed. Remove the screws from the console and UNPLUG THE POWER CORD. Carefully remove the hood. b. Check the circuit breaker located on page 7.) Use only a UL-listed surge protector, rated at 1-800-999-3756, Monday through Friday, 6 a.m. See step 1 on page 9. Remove the key...
... is needed, please call our Customer Service Department, toll-free. 3. Make sure that the power cord is plugged into a surge protector, and that applies, and follow the steps listed. Remove the screws from the console and UNPLUG THE POWER CORD. Carefully remove the hood. b. Check the circuit breaker located on page 7.) Use only a UL-listed surge protector, rated at 1-800-999-3756, Monday through Friday, 6 a.m. See step 1 on page 9. Remove the key...
English Manual
Page 12
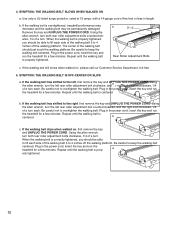
... Customer Service Department, toll-free. 5. a erly tightened. 12 Be careful to overtighten the walking belt. b 3"-4" Rear Roller Adjustment Bolts c. Plug in the power cord, insert the key and run the treadmill for a few minutes. b. Plug in the power cord, insert the key and run the treadmill for a few minutes. Use only a UL-listed surge protector, rated at 15 amps, with a 14-gauge cord of a turn each . Using the allen wrench, turn both rear roller adjustment bolts clockwise, 1/4 of a turn . When the walking belt...
... Customer Service Department, toll-free. 5. a erly tightened. 12 Be careful to overtighten the walking belt. b 3"-4" Rear Roller Adjustment Bolts c. Plug in the power cord, insert the key and run the treadmill for a few minutes. b. Plug in the power cord, insert the key and run the treadmill for a few minutes. Use only a UL-listed surge protector, rated at 15 amps, with a 14-gauge cord of a turn each . Using the allen wrench, turn both rear roller adjustment bolts clockwise, 1/4 of a turn . When the walking belt...
English Manual
Page 13
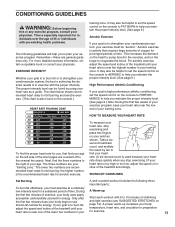
... athletic conditioning, set the speed control on the console to PERFORMANCE to exercise with 5 to set the speed control on the console.) training zone. CONDITIONING GUIDELINES WARNING: Before beginning this or any exercise program, consult your physician. This is to help you , first find the proper heart rate for individuals over the age of the treadmill until your temperature, heart rate, and circulation in preparation heart rate is near...
... athletic conditioning, set the speed control on the console to PERFORMANCE to exercise with 5 to set the speed control on the console.) training zone. CONDITIONING GUIDELINES WARNING: Before beginning this or any exercise program, consult your physician. This is to help you , first find the proper heart rate for individuals over the age of the treadmill until your temperature, heart rate, and circulation in preparation heart rate is near...

English Manual
Page 14
...key to success is to make exercise a regular and enjoyable part of your breath. SUGGESTED STRETCHES The correct form for several basic stretches is shown in your training zone for longer than 20 minutes.) Breathe regularly and deeply as you exercise-never hold your extended leg. Bend your front leg, lean forward and move...one foot with the soles of your exercise program, do not keep your toes as ...exercise until your pulse is in your training zone for 20 to prevent post-exercise problems. Exercise Frequency To maintain or improve your condition, complete three workouts each leg...
...key to success is to make exercise a regular and enjoyable part of your breath. SUGGESTED STRETCHES The correct form for several basic stretches is shown in your training zone for longer than 20 minutes.) Breathe regularly and deeply as you exercise-never hold your extended leg. Bend your front leg, lean forward and move...one foot with the soles of your exercise program, do not keep your toes as ...exercise until your pulse is in your training zone for 20 to prevent post-exercise problems. Exercise Frequency To maintain or improve your condition, complete three workouts each leg...
English Manual
Page 15
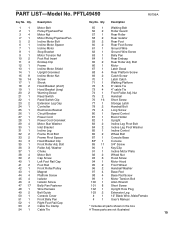
Nut Handrail Short Screw Storage Latch Handrail Bolt Long Screw Speed Control Book Holder Upright Incline Leg Pivot Bolt Incline Leg Pivot Washer Incline Control Wheel Bolt Console Base Console 3/4" Screw Key/Clip Incline Motor Plate Wheel Nut Hood Screw Motor Hood Front Wheel Handrail Washer Base Pad Base Pad Screw Motor Tension Bolt Allen Wrench Short Screw Upright Hole Plug Extension Leg 12" Black Wire, Male/Female User's Manual * Includes all parts shown in the box # These parts are not illustrated 15 PFTL49490 R0799A Key No. Qty. 1 1 2 1 3 4 4* 1 5 2 6 1 7 1 8 1 9 ...
Nut Handrail Short Screw Storage Latch Handrail Bolt Long Screw Speed Control Book Holder Upright Incline Leg Pivot Bolt Incline Leg Pivot Washer Incline Control Wheel Bolt Console Base Console 3/4" Screw Key/Clip Incline Motor Plate Wheel Nut Hood Screw Motor Hood Front Wheel Handrail Washer Base Pad Base Pad Screw Motor Tension Bolt Allen Wrench Short Screw Upright Hole Plug Extension Leg 12" Black Wire, Male/Female User's Manual * Includes all parts shown in the box # These parts are not illustrated 15 PFTL49490 R0799A Key No. Qty. 1 1 2 1 3 4 4* 1 5 2 6 1 7 1 8 1 9 ...

English Manual
Page 16
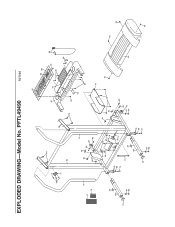
PFTL49490 R0799A 58 100 56 11 12 67 36 65 65 36 10 45 1 2 3 39 40 41 32 45 44 46 71 44 4* 9 66 8 5 7 6 3 16 24 16 15 34 34 18 15 16 99 16 76 19 16 26 30 21 22 33 39 43 41 10 42 15 52 38 16 37 44 5 29 15 36 74 15 25 15 113 35 33 31 16 34 18 32 51 76 76 70 46 69 68 55 56 68 57 58 47 59 60 11 47 63 64 62 59 61 60 44 47 46 54 45 46 47 47 49 45 16 62 53 27 28 76 76 EXPLODED DRAWING-Model No.
PFTL49490 R0799A 58 100 56 11 12 67 36 65 65 36 10 45 1 2 3 39 40 41 32 45 44 46 71 44 4* 9 66 8 5 7 6 3 16 24 16 15 34 34 18 15 16 99 16 76 19 16 26 30 21 22 33 39 43 41 10 42 15 52 38 16 37 44 5 29 15 36 74 15 25 15 113 35 33 31 16 34 18 32 51 76 76 70 46 69 68 55 56 68 57 58 47 59 60 11 47 63 64 62 59 61 60 44 47 46 54 45 46 47 47 49 45 16 62 53 27 28 76 76 EXPLODED DRAWING-Model No.
English Manual
Page 17
PFTL49490 R0799A 89 77 79 82 75 72 73 20 103 23 97 98 83 102 75 84 86 95 92 97 16 98 62 13 76 96 78 17 48 14 20 103 76 96 23 78 97 98 85 80 88* 87 81 79 89 50 89 90 48 89 89 84 76 92 91 93 83 86 97 95 98 94 93 93 93 EXPLODED DRAWING-Model No.
PFTL49490 R0799A 89 77 79 82 75 72 73 20 103 23 97 98 83 102 75 84 86 95 92 97 16 98 62 13 76 96 78 17 48 14 20 103 76 96 23 78 97 98 85 80 88* 87 81 79 89 50 89 90 48 89 89 84 76 92 91 93 83 86 97 95 98 94 93 93 93 EXPLODED DRAWING-Model No.
English Manual
Page 18
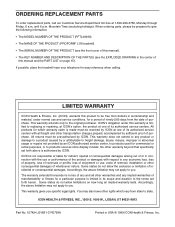
... is in the center of purchase. This warranty gives you . ICON is limited to give the following information: • The MODEL NUMBER OF THE PRODUCT (PFTL49490). • The NAME OF THE PRODUCT (PROFORM® L18 treadmill). • The SERIAL NUMBER OF THE PRODUCT (see the front cover of this manual). • The KEY NUMBER AND DESCRIPTION OF THE PART(S) (see the EXPLODED DRAWING in lieu of...
... is in the center of purchase. This warranty gives you . ICON is limited to give the following information: • The MODEL NUMBER OF THE PRODUCT (PFTL49490). • The NAME OF THE PRODUCT (PROFORM® L18 treadmill). • The SERIAL NUMBER OF THE PRODUCT (see the front cover of this manual). • The KEY NUMBER AND DESCRIPTION OF THE PART(S) (see the EXPLODED DRAWING in lieu of...

