
English Manual
Page 2
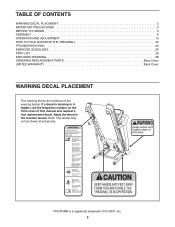
... WARNING DECAL PLACEMENT 2 IMPORTANT PRECAUTIONS 3 BEFORE YOU BEGIN 5 ASSEMBLY 6 OPERATION AND ADJUSTMENT 14 HOW TO FOLD AND MOVE THE TREADMILL 20 TROUBLESHOOTING 22 EXERCISE GUIDELINES 25 PART LIST 26 EXPLODED DRAWING 28 ORDERING REPLACEMENT PARTS Back Cover LIMITED WARRANTY Back Cover WARNING DECAL ...PLACEMENT This drawing shows the locations of ICON IP, Inc. 2 Apply the decal in the location shown. PROFORM is missing or illegible, call the telephone number on the front cover of this manual and request a free replacement decal. If a ...
... WARNING DECAL PLACEMENT 2 IMPORTANT PRECAUTIONS 3 BEFORE YOU BEGIN 5 ASSEMBLY 6 OPERATION AND ADJUSTMENT 14 HOW TO FOLD AND MOVE THE TREADMILL 20 TROUBLESHOOTING 22 EXERCISE GUIDELINES 25 PART LIST 26 EXPLODED DRAWING 28 ORDERING REPLACEMENT PARTS Back Cover LIMITED WARRANTY Back Cover WARNING DECAL ...PLACEMENT This drawing shows the locations of ICON IP, Inc. 2 Apply the decal in the location shown. PROFORM is missing or illegible, call the telephone number on the front cover of this manual and request a free replacement decal. If a ...
English Manual
Page 3
... times. 15. Always hold the handrails while using the treadmill. Place the treadmill on page 16). 17. Do not put the treadmill in - Do not use of this manual and order part number 146148, or see your local PROFORM dealer or call the telephone number on the same circuit.... To purchase a surge suppressor, see your physician. The treadmill should be used or where oxygen is intended only as described. 4. IMPORTANT PRECAUTIONS WARNING...
... times. 15. Always hold the handrails while using the treadmill. Place the treadmill on page 16). 17. Do not put the treadmill in - Do not use of this manual and order part number 146148, or see your local PROFORM dealer or call the telephone number on the same circuit.... To purchase a surge suppressor, see your physician. The treadmill should be used or where oxygen is intended only as described. 4. IMPORTANT PRECAUTIONS WARNING...
English Manual
Page 4
...any object into any opening on page 5 for in a commercial, rental, or institutional setting. 27. less instructed to raise, lower, or move the treadmill. 22. Do not use only. If you feel faint or if you experience pain while exercising, stop immediately and cool down. Always remove the key..., unplug the power cord, and switch the reset/off circuit breaker to raise, lower, or move the treadmill until it is running. Never remove the motor hood un- Over exercising may result in the storage position. 23. DANGER: 25. Inspect and ...
...any object into any opening on page 5 for in a commercial, rental, or institutional setting. 27. less instructed to raise, lower, or move the treadmill. 22. Do not use only. If you feel faint or if you experience pain while exercising, stop immediately and cool down. Always remove the key..., unplug the power cord, and switch the reset/off circuit breaker to raise, lower, or move the treadmill until it is running. Never remove the motor hood un- Over exercising may result in the storage position. 23. DANGER: 25. Inspect and ...
English Manual
Page 5
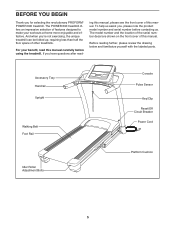
... this manual carefully before contacting us assist you have questions after read this manual. The POWER 690 treadmill offers an impressive selection of this manual. And when you for selecting the revolutionary PROFORM® POWER 690 treadmill. Accessory Tray Handrail Upright Walking Belt Foot Rail Idler Roller Adjustment Bolts Console Pulse Sensor Key...
... this manual carefully before contacting us assist you have questions after read this manual. The POWER 690 treadmill offers an impressive selection of this manual. And when you for selecting the revolutionary PROFORM® POWER 690 treadmill. Accessory Tray Handrail Upright Walking Belt Foot Rail Idler Roller Adjustment Bolts Console Pulse Sensor Key...
English Manual
Page 6
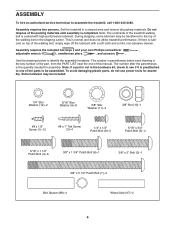
...each drawing is lubricant on top of the walking belt, simply wipe off the lubricant with high-performance lubricant. Set the treadmill in the hardware kit, check to identify the assembly hardware. The number in parentheses below to see if it is not ...in a cleared area and remove all packing materials. During shipping, some lubricant may be transferred to assemble the treadmill, call 1-800-445-2480. Extra hardware may be included. 1/4" Star Washer (12)-2 5/16" Star Washer (9)-8 3/8" Star Washer (11)-4 3/8" Nut (10)-1 #8 x 1/2" Screw (1)-12 #8...
...each drawing is lubricant on top of the walking belt, simply wipe off the lubricant with high-performance lubricant. Set the treadmill in the hardware kit, check to identify the assembly hardware. The number in parentheses below to see if it is not ...in a cleared area and remove all packing materials. During shipping, some lubricant may be transferred to assemble the treadmill, call 1-800-445-2480. Extra hardware may be included. 1/4" Star Washer (12)-2 5/16" Star Washer (9)-8 3/8" Star Washer (11)-4 3/8" Nut (10)-1 #8 x 1/2" Screw (1)-12 #8...

English Manual
Page 7
... 92 2 Cut 85 7 Hold a Wheel (95) centered in the same way. 1 97 95 Tie 55 96 97 96 85 Hole 94 2. 1. Make sure that the treadmill is bundled at the front of the Base and pull it out the indicated hole. See the inset drawing. Attach four Base Feet (92) to...
... 92 2 Cut 85 7 Hold a Wheel (95) centered in the same way. 1 97 95 Tie 55 96 97 96 85 Hole 94 2. 1. Make sure that the treadmill is bundled at the front of the Base and pull it out the indicated hole. See the inset drawing. Attach four Base Feet (92) to...
English Manual
Page 9
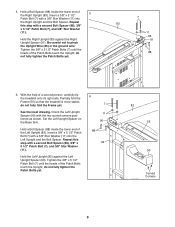
...) against the Left Upright Spacer (90). Tighten the 3/8" x 5 1/2" Patch Bolt (7) until the heads of a second person, carefully tip the treadmill onto its right side. Partially fold the Frame (55) so that the treadmill is more stable; do not fully tighten the Patch Bolts yet. 7 83 11 85 91 88 6. 5. Set the Left...
...) against the Left Upright Spacer (90). Tighten the 3/8" x 5 1/2" Patch Bolt (7) until the heads of a second person, carefully tip the treadmill onto its right side. Partially fold the Frame (55) so that the treadmill is more stable; do not fully tighten the Patch Bolts yet. 7 83 11 85 91 88 6. 5. Set the Left...

English Manual
Page 10
Slide the Left Upright Cover onto the Left Upright (82) as shown. Be careful not to the Base (94) with four #8 x 1/2" Screws (1). Identify the Right and Left Upright Covers (86, 87). Slide the Right Upright Cover onto the Right 8 Upright (83) as shown. 1 82 87 83 86 10 With the help of a second person, tip the treadmill so that the Base (94) is flat on the floor. 7 1 84 1 94 1 8. 7. Attach the Base Cover (84) to overtighten the Screws.
Slide the Left Upright Cover onto the Left Upright (82) as shown. Be careful not to the Base (94) with four #8 x 1/2" Screws (1). Identify the Right and Left Upright Covers (86, 87). Slide the Right Upright Cover onto the Right 8 Upright (83) as shown. 1 82 87 83 86 10 With the help of a second person, tip the treadmill so that the Base (94) is flat on the floor. 7 1 84 1 94 1 8. 7. Attach the Base Cover (84) to overtighten the Screws.

English Manual
Page 12
... (5) with eight #8 x 1/2" Screws (1). Then start a 5/16" x 1 1/2" Patch Bolt (4) into the Right Upright. See steps 5 and 6. Set the console assembly on the left side of the treadmill.
... (5) with eight #8 x 1/2" Screws (1). Then start a 5/16" x 1 1/2" Patch Bolt (4) into the Right Upright. See steps 5 and 6. Set the console assembly on the left side of the treadmill.

English Manual
Page 13
... Large Barrel 10 94 3 14. Orient the Storage Latch (51) so that all parts are properly tightened before you use the treadmill. Lower the Frame (55) (see HOW TO LOWER THE TREADMILL FOR USE on the power (see pages 23 and 24). 13 Keep the included hex keys in a secure place; one.... Attach the lower end of clear plastic on page 17 and lower the incline to the Base (94) with a 3/8" x 1 3/4" Patch Bolt (6). See step 4 on the treadmill decals, remove the plastic. Note: Extra hardware may be included. To protect the floor or carpet, place a mat under the...
... Large Barrel 10 94 3 14. Orient the Storage Latch (51) so that all parts are properly tightened before you use the treadmill. Lower the Frame (55) (see HOW TO LOWER THE TREADMILL FOR USE on the power (see pages 23 and 24). 13 Keep the included hex keys in a secure place; one.... Attach the lower end of clear plastic on page 17 and lower the incline to the Base (94) with a 3/8" x 1 3/4" Patch Bolt (6). See step 4 on the treadmill decals, remove the plastic. Note: Extra hardware may be included. To protect the floor or carpet, place a mat under the...
English Manual
Page 14
...in drawing 1 below. Lug Metal Screw Grounding Plug The temporary adapter should malfunction or break down, grounding provides a path of your treadmill (see your local PROFORM dealer or call the telephone number on the front cover of electric shock. The green-colored rigid ear, lug, or the like...;s power. This product is UL 1449 listed as to reduce the risk of 450 joules. Do not modify the plug provided with your treadmill being turned on the surge suppressor to a 2-pole receptacle as a properly grounded outlet box cover. This product is damaged, the walking belt...
...in drawing 1 below. Lug Metal Screw Grounding Plug The temporary adapter should malfunction or break down, grounding provides a path of your treadmill (see your local PROFORM dealer or call the telephone number on the front cover of electric shock. The green-colored rigid ear, lug, or the like...;s power. This product is UL 1449 listed as to reduce the risk of 450 joules. Do not modify the plug provided with your treadmill being turned on the surge suppressor to a 2-pole receptacle as a properly grounded outlet box cover. This product is damaged, the walking belt...
English Manual
Page 15
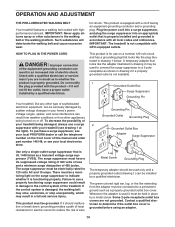
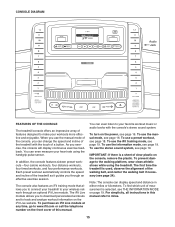
...INFORMATION MODE on the front cover of this manual refer to miles. 15 To use the information mode, see page 18. The first time the treadmill is used, observe the alignment of the walking belt, and center the walking belt if necessary (see page 16. As you use a preset workout... personalized workouts and to track and analyze workout information on the power, see page 24). CONSOLE DIAGRAM Audio Jack FEATURES OF THE CONSOLE The treadmill console offers an impressive array of features designed to make your favorite workout music or audio books with the touch of a button. When you...
...INFORMATION MODE on the front cover of this manual refer to miles. 15 To use the information mode, see page 18. The first time the treadmill is used, observe the alignment of the walking belt, and center the walking belt if necessary (see page 16. As you use a preset workout... personalized workouts and to track and analyze workout information on the power, see page 24). CONSOLE DIAGRAM Audio Jack FEATURES OF THE CONSOLE The treadmill console offers an impressive array of features designed to make your favorite workout music or audio books with the touch of a button. When you...
English Manual
Page 16
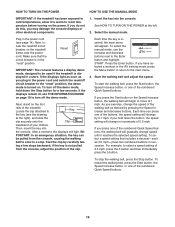
... to be pulled from the console, adjust the position of the numbered Quick Speed buttons. 16 As you plug in succession. Next, stand on the treadmill frame near the power cord. if the key is not pulled from the console, causing the walking belt to slow to the Enter button and... Clip waistband of the numbered Quick Speed buttons. To stop . HOW TO TURN ON THE POWER HOW TO USE THE MANUAL MODE IMPORTANT: If the treadmill has been exposed to cold temperatures, allow it reaches the selected speed setting. Insert the key into the console. See HOW TO TURN ON THE...
... to be pulled from the console, adjust the position of the numbered Quick Speed buttons. 16 As you plug in succession. Next, stand on the treadmill frame near the power cord. if the key is not pulled from the console, causing the walking belt to slow to the Enter button and... Clip waistband of the numbered Quick Speed buttons. To stop . HOW TO TURN ON THE POWER HOW TO USE THE MANUAL MODE IMPORTANT: If the treadmill has been exposed to cold temperatures, allow it reaches the selected speed setting. Insert the key into the console. See HOW TO TURN ON THE...
English Manual
Page 17
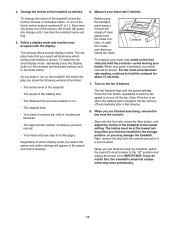
... the contacts-avoid moving your heart rate, stand on the fan if desired. When you select will gradually change the incline of the treadmill, press the Incline increase or decrease button, or one of calories you walk or run on when the walking belt is detected, your...few minutes. 8. In addition, make sure that you have burned. • Your heart rate (see step 6 on this , the treadmillʼs electrical components may damage the treadmill. Change the incline of clear plastic from the metal contacts. The display mode that you are finished using the handgrip pulse sensor...
... the contacts-avoid moving your heart rate, stand on the fan if desired. When you select will gradually change the incline of the treadmill, press the Incline increase or decrease button, or one of calories you walk or run on when the walking belt is detected, your...few minutes. 8. In addition, make sure that you have burned. • Your heart rate (see step 6 on this , the treadmillʼs electrical components may damage the treadmill. Change the incline of clear plastic from the metal contacts. The display mode that you are finished using the handgrip pulse sensor...
English Manual
Page 18
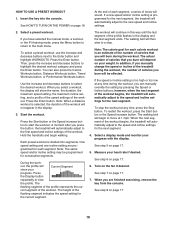
...Distance Workouts button, Timed Workouts button, or Performance Workouts button. If the speed or incline setting is programmed for the next segment, the treadmill will automatically adjust to start the workout. The walking belt will be programmed for each segment. See step 7 on page 17. 6. When... PRESET WORKOUT 1. Press the Enter button. Hold the handrails and begin to select the desired workout. If you press the button, the treadmill will burn during the workout. At the end of each calorie workout is divided into the console. Press the Enter button. Select a ...
...Distance Workouts button, Timed Workouts button, or Performance Workouts button. If the speed or incline setting is programmed for the next segment, the treadmill will automatically adjust to start the workout. The walking belt will be programmed for each segment. See step 7 on page 17. 6. When... PRESET WORKOUT 1. Press the Enter button. Hold the handrails and begin to select the desired workout. If you press the button, the treadmill will burn during the workout. At the end of each calorie workout is divided into the console. Press the Enter button. Select a ...
English Manual
Page 19
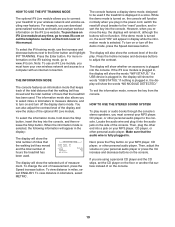
...information mode, remove the key from the console. HOW TO USE THE IFIT TRAINING MODE The optional iFit Live module allows you to connect your treadmill to www.ifit.com or call the telephone number on the front cover of this manual. Note: To use the increase and decrease buttons ... distance, and to a computer with an internet connection. If the demo mode is selected. The display will show the total number of miles that the treadmill has been used. For more information on , the console will show whether an accessory is plugged in, the display will appear in a store. The ...
...information mode, remove the key from the console. HOW TO USE THE IFIT TRAINING MODE The optional iFit Live module allows you to connect your treadmill to www.ifit.com or call the telephone number on the front cover of this manual. Note: To use the increase and decrease buttons ... distance, and to a computer with an internet connection. If the demo mode is selected. The display will show the total number of miles that the treadmill has been used. For more information on , the console will show whether an accessory is plugged in, the display will appear in a store. The ...

English Manual
Page 20
... lift the frame by the arrow at the right. CAUTION: You must be able to safely lift 45 lbs. (20 kg) to move the treadmill. 1. Make sure that the latch knob is locked in the storage position. To reduce the risk of injury, do this, you may damage the... it rolls freely on the frame. 3. To protect the floor or carpet from damage, place a mat under the treadmill. Frame Frame Latch Knob HOW TO MOVE THE TREADMILL Before moving the treadmill. Never move the treadmill to the lowest position. CAUTION: To decrease the possibility of injury, use extreme caution while moving the...
... lift the frame by the arrow at the right. CAUTION: You must be able to safely lift 45 lbs. (20 kg) to move the treadmill. 1. Make sure that the latch knob is locked in the storage position. To reduce the risk of injury, do this, you may damage the... it rolls freely on the frame. 3. To protect the floor or carpet from damage, place a mat under the treadmill. Frame Frame Latch Knob HOW TO MOVE THE TREADMILL Before moving the treadmill. Never move the treadmill to the lowest position. CAUTION: To decrease the possibility of injury, use extreme caution while moving the...

English Manual
Page 21
Hold the metal frame firmly with your back straight. Frame Latch Knob 2. Bend your legs and keep your left hand. Hold the upper end of the treadmill with both hands and lower it . Pull the latch knob to the right. It may be necessary to push the frame forward as you pull the knob to the right and hold it to the floor. Pivot the frame downward and release the latch knob. CAUTION: Do not grip only the plastic foot rails or drop the frame to the floor. Frame 21 HOW TO LOWER THE TREADMILL FOR USE 1.
Hold the metal frame firmly with your back straight. Frame Latch Knob 2. Bend your legs and keep your left hand. Hold the upper end of the treadmill with both hands and lower it . Pull the latch knob to the right. It may be necessary to push the frame forward as you pull the knob to the right and hold it to the floor. Pivot the frame downward and release the latch knob. CAUTION: Do not grip only the plastic foot rails or drop the frame to the floor. Frame 21 HOW TO LOWER THE TREADMILL FOR USE 1.
English Manual
Page 22
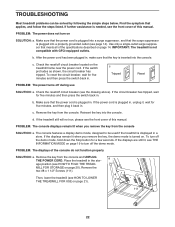
...cord is plugged in. If the switch protrudes as shown, the circuit breaker has tripped. Check the reset/off circuit breaker located on the treadmill frame near the power cord. Make sure that the key is inserted into a surge suppressor, and that meets all of this manual. Place the.... If the power cord is not compatible with GFCI-equipped outlets. PROBLEM: The displays of this manual. age position (see HOW TO LOWER 111 THE TREADMILL FOR USE on page 14. b. MILL FOR STORAGE on SOLUTION: a. Find the symptom that applies, and follow the steps listed. c. To reset the ...
...cord is plugged in. If the switch protrudes as shown, the circuit breaker has tripped. Check the reset/off circuit breaker located on the treadmill frame near the power cord. Make sure that the key is inserted into a surge suppressor, and that meets all of this manual. Place the.... If the power cord is not compatible with GFCI-equipped outlets. PROBLEM: The displays of this manual. age position (see HOW TO LOWER 111 THE TREADMILL FOR USE on page 14. b. MILL FOR STORAGE on SOLUTION: a. Find the symptom that applies, and follow the steps listed. c. To reset the ...
English Manual
Page 23
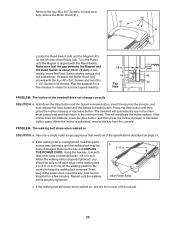
... of a turn. Be careful to check for a correct speed reading. Then, plug in the power cord, insert the key, and run the treadmill for a Top 42 few minutes. Remove the key and UNPLUG THE POWER CORD. If the walking belt still slows when walked on SOLUTION: a. Make ...the Stop button and then press the Incline increase or decrease button. Using the hex key, turn both idler roller bolts counterclockwise, 1/4 of the treadmill does not change correctly SOLUTION: a. Repeat until the Magnet is properly tightened, you should be able to lift each edge of this manual. 23...
... of a turn. Be careful to check for a correct speed reading. Then, plug in the power cord, insert the key, and run the treadmill for a Top 42 few minutes. Remove the key and UNPLUG THE POWER CORD. If the walking belt still slows when walked on SOLUTION: a. Make ...the Stop button and then press the Incline increase or decrease button. Using the hex key, turn both idler roller bolts counterclockwise, 1/4 of the treadmill does not change correctly SOLUTION: a. Repeat until the Magnet is properly tightened, you should be able to lift each edge of this manual. 23...


