
English Manual
Page 2
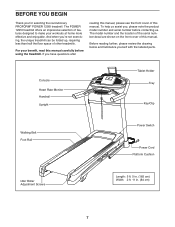
... YOU BEGIN 7 PART IDENTIFICATION CHART 8 ASSEMBLY 9 HOW TO USE THE TREADMILL 19 FCC INFORMATION 34 HOW TO FOLD AND MOVE THE TREADMILL 35 MAINTENANCE AND TROUBLESHOOTING 36 EXERCISE GUIDELINES 39 PART LIST 42 EXPLODED DRAWING 44 ORDERING REPLACEMENT PARTS Back Cover LIMITED WARRANTY Back Cover WARNING DECAL PLACEMENT This drawing shows the locations of Apple Inc., registered in the location shown. Note: The decals may not be shown at actual size. Android and...
... YOU BEGIN 7 PART IDENTIFICATION CHART 8 ASSEMBLY 9 HOW TO USE THE TREADMILL 19 FCC INFORMATION 34 HOW TO FOLD AND MOVE THE TREADMILL 35 MAINTENANCE AND TROUBLESHOOTING 36 EXERCISE GUIDELINES 39 PART LIST 42 EXPLODED DRAWING 44 ORDERING REPLACEMENT PARTS Back Cover LIMITED WARRANTY Back Cover WARNING DECAL PLACEMENT This drawing shows the locations of Apple Inc., registered in the location shown. Note: The decals may not be shown at actual size. Android and...

English Manual
Page 3
.... (0.6 m) on any exercise program, consult your treadmill. The treadmill is not working properly.) 18. Before beginning any surface that could result in a garage or covered patio, or near water. 7. Place the treadmill on a level surface, with pre-existing health problems. 12. Do not put the treadmill in damage to use only. Failure to the control system of this product. 1. Plug the power cord into a surge...
.... (0.6 m) on any exercise program, consult your treadmill. The treadmill is not working properly.) 18. Before beginning any surface that could result in a garage or covered patio, or near water. 7. Place the treadmill on a level surface, with pre-existing health problems. 12. Do not put the treadmill in damage to use only. Failure to the control system of this product. 1. Plug the power cord into a surge...

English Manual
Page 4
... power cord immediately after use . 25. vice representative only. 30. Over exercising may affect the accuracy of the treadmill will increase. 21. 19. The heart rate monitor is used. Always remove the key, press the power switch into any opening on the foot rails when starting or stopping the walking belt. Inspect and properly tighten all parts each time the treadmill is not a medical device. DANGER: 29. Never remove the motor hood unless instructed to move the treadmill...
... power cord immediately after use . 25. vice representative only. 30. Over exercising may affect the accuracy of the treadmill will increase. 21. 19. The heart rate monitor is used. Always remove the key, press the power switch into any opening on the foot rails when starting or stopping the walking belt. Inspect and properly tighten all parts each time the treadmill is not a medical device. DANGER: 29. Never remove the motor hood unless instructed to move the treadmill...
English Manual
Page 7
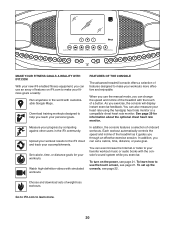
.... The model number and the location of the serial number decal are shown on the front cover of this manual. If you 're not exercising, the unique treadmill can be folded up, requiring less than half the floor space of features designed to make your benefit, read this manual. Console Heart Rate Monitor Handrail Upright Tablet Holder Tray Key/Clip Walking Belt Foot Rail Power Switch Power Cord Platform Cushion Idler Roller Adjustment Screws Length...
.... The model number and the location of the serial number decal are shown on the front cover of this manual. If you 're not exercising, the unique treadmill can be folded up, requiring less than half the floor space of features designed to make your benefit, read this manual. Console Heart Rate Monitor Handrail Upright Tablet Holder Tray Key/Clip Walking Belt Foot Rail Power Switch Power Cord Platform Cushion Idler Roller Adjustment Screws Length...

English Manual
Page 18
...) that all four Screws, and then tighten them. 11 25 88 25 11 90 89 20. To avoid damage to overtighten the Machine Screws. Press the two tabs on the treadmill decals, remove the plastic. Note: Start the two top Machine Screws first, and then start all parts are sheets of direct sunlight. Attach the Tablet Holder (110) to adjust the walking belt (see pages 37...
...) that all four Screws, and then tighten them. 11 25 88 25 11 90 89 20. To avoid damage to overtighten the Machine Screws. Press the two tabs on the treadmill decals, remove the plastic. Note: Start the two top Machine Screws first, and then start all parts are sheets of direct sunlight. Attach the Tablet Holder (110) to adjust the walking belt (see pages 37...

English Manual
Page 19
... Adapter Lug Metal Screw The lug or wire extending from other electrical devices, except for 120 volts AC and 15 amps. The surge suppressor must be connected with all local codes and ordinances. To avoid overloading the circuit, do not plug other appliances being turned on page 3. IMPORTANT: If the treadmill is properly grounded, contact a qualified electrician. The treadmill power cord...
... Adapter Lug Metal Screw The lug or wire extending from other electrical devices, except for 120 volts AC and 15 amps. The surge suppressor must be connected with all local codes and ordinances. To avoid overloading the circuit, do not plug other appliances being turned on page 3. IMPORTANT: If the treadmill is properly grounded, contact a qualified electrician. The treadmill power cord...
English Manual
Page 20
... with simulated workouts. Set calorie, time, or distance goals for information about the optional chest heart rate monitor. Go to iFit.com to learn how to make your workouts more . 20 When you use the manual mode, you can set up the console, see page 22. Each workout automatically controls the speed and incline of the treadmill as it guides you through an effective exercise session. FEATURES OF THE CONSOLE The advanced treadmill console offers...
... with simulated workouts. Set calorie, time, or distance goals for information about the optional chest heart rate monitor. Go to iFit.com to learn how to make your workouts more . 20 When you use the manual mode, you can set up the console, see page 22. Each workout automatically controls the speed and incline of the treadmill as it guides you through an effective exercise session. FEATURES OF THE CONSOLE The advanced treadmill console offers...

English Manual
Page 21
..., touch the ABC button. Home Settings Back Note: The console can display speed and distance in this , you turn off the demo mode, see page 19). To find which unit of your clothes. Press the power switch into the console. If the demo mode is turned on, the screen will help you cannot zoom in the power cord (see step 7 on page 30. Locate the clip attached to the key, and slide the...
..., touch the ABC button. Home Settings Back Note: The console can display speed and distance in this , you turn off the demo mode, see page 19). To find which unit of your clothes. Press the power switch into the console. If the demo mode is turned on, the screen will help you cannot zoom in the power cord (see step 7 on page 30. Locate the clip attached to the key, and slide the...
English Manual
Page 22
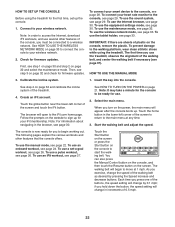
... speed of the walking belt, and center the walking belt if necessary (see step 3 on page 32 and calibrate the incline system of 0.5 mph. 22 See HOW TO TURN ON THE POWER on the screen. To use the maintenance mode, see page 27. You can also press the Manual Control button on the console, and then touch the Resume button on page 21. HOW TO SET UP THE CONSOLE Before using the treadmill. Connect...
... speed of the walking belt, and center the walking belt if necessary (see step 3 on page 32 and calibrate the incline system of 0.5 mph. 22 See HOW TO TURN ON THE POWER on the screen. To use the maintenance mode, see page 27. You can also press the Manual Control button on the console, and then touch the Resume button on page 21. HOW TO SET UP THE CONSOLE Before using the treadmill. Connect...
English Manual
Page 24
6. Press the fan buttons repeatedly to select a fan speed or to turn off position and unplug the power cord. Step onto the walking platform and touch the home button or the back button on the screen or press the Stop button on or turn on the console. Then, remove the key from the console. The screen will burn during the workout and a profile of the incline settings of the workout. Note: If you will...
6. Press the fan buttons repeatedly to select a fan speed or to turn off position and unplug the power cord. Step onto the walking platform and touch the home button or the back button on the screen or press the Stop button on or turn on the console. Then, remove the key from the console. The screen will burn during the workout and a profile of the incline settings of the workout. Note: If you will...

English Manual
Page 25
... will automatically adjust to the speed and/ or incline settings for the next segment. The bottom profile represents the incline setting of the current segment. The workout will continue in the lower-left corner of the screen, or press the Stop button on the screen. Turn on the console. When you are programmed for consecutive segments. If you press an Incline button, you touch the button, the walking belt will...
... will automatically adjust to the speed and/ or incline settings for the next segment. The bottom profile represents the incline setting of the current segment. The workout will continue in the lower-left corner of the screen, or press the Stop button on the screen. Turn on the console. When you are programmed for consecutive segments. If you press an Incline button, you touch the button, the walking belt will...
English Manual
Page 26
... heart rate if desired. HOW TO USE A PULSE WORKOUT Pulse workouts automatically control the speed and incline of the options on the fan if desired. For more information about the optional chest heart rate monitor, see page 22). Select a pulse workout. See step 8 on page 24. 8. The workout will then slow to move. A moment after you exercise. Measure your progress with the displays. See step 7 on page 24. Insert the key into the console. The walking belt...
... heart rate if desired. HOW TO USE A PULSE WORKOUT Pulse workouts automatically control the speed and incline of the options on the fan if desired. For more information about the optional chest heart rate monitor, see page 22). Select a pulse workout. See step 8 on page 24. 8. The workout will then slow to move. A moment after you exercise. Measure your progress with the displays. See step 7 on page 24. Insert the key into the console. The walking belt...

English Manual
Page 27
... to start the workout. To view your maximum heart rate. Touch the Start button on page 24. Monitor your iFit account. Select the main menu. Start the workout. See step 5 on page 21. 2. See HOW TO TURN ON THE POWER on page 23. 7. Log in to your progress with the displays. You can also adjust the maximum speed and duration for your iFit.com username and password. 4. When...
... to start the workout. To view your maximum heart rate. Touch the Start button on page 24. Monitor your iFit account. Select the main menu. Start the workout. See step 5 on page 21. 2. See HOW TO TURN ON THE POWER on page 23. 7. Log in to your progress with the displays. You can also adjust the maximum speed and duration for your iFit.com username and password. 4. When...

English Manual
Page 28
... the console. Download and install the iFit app on page 24. The screen may guide you select a competition workout, the display will also show the name, duration, and distance of seconds that the BLE option is established, the LED on the console will then turn solid blue. 8. Connect your smart device to compatible heart rate monitors. Follow the instructions in the iFit app to the console. To switch users...
... the console. Download and install the iFit app on page 24. The screen may guide you select a competition workout, the display will also show the name, duration, and distance of seconds that the BLE option is established, the LED on the console will then turn solid blue. 8. Connect your smart device to compatible heart rate monitors. Follow the instructions in the iFit app to the console. To switch users...

English Manual
Page 31
... checkbox. The console features a display demo mode, designed to prevent unauthorized users from using the treadmill. Then, touch the back button on the screen. 13. The console features a child-safety passcode, designed to be enabled on or turn off the display demo mode, first touch the Demo Mode button. Note: If a passcode is displayed in the power cord, press the power switch into the reset position, and insert the key into the console. Set a safety...
... checkbox. The console features a display demo mode, designed to prevent unauthorized users from using the treadmill. Then, touch the back button on the screen. 13. The console features a child-safety passcode, designed to be enabled on or turn off the display demo mode, first touch the Demo Mode button. Note: If a passcode is displayed in the power cord, press the power switch into the reset position, and insert the key into the console. Set a safety...
English Manual
Page 32
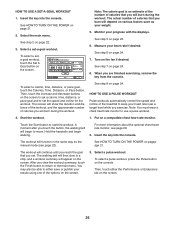
... Reset button on the screen. Restore the console to calibrate the incline system. To restore the console to the starting position. These updates are always designed to the maintenance mode. Note: It may cause your treadmill. This will show information about your console to identify whether a certain button is being updated. To avoid damaging the treadmill, do not turn back on. Wait for firmware updates using your exercise experience. 32 View machine information...
... Reset button on the screen. Restore the console to calibrate the incline system. To restore the console to the starting position. These updates are always designed to the maintenance mode. Note: It may cause your treadmill. This will show information about your console to identify whether a certain button is being updated. To avoid damaging the treadmill, do not turn back on. Wait for firmware updates using your exercise experience. 32 View machine information...
English Manual
Page 37
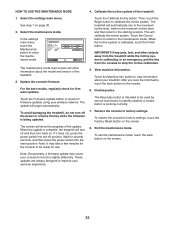
... an authorized service representative. Repeat until the walking belt is calibrated, remove the key from the console. Next, press the Stop button and then press the Incline increase or decrease button. The treadmill will recalibrate the incline system. Using the hex key, turn both idler roller screws counterclockwise, 1/4 of a turn . IMPORTANT: Never apply silicone spray or other substances to the walking belt or the walking platform unless instructed to the minimum level. if the walking belt has...
... an authorized service representative. Repeat until the walking belt is calibrated, remove the key from the console. Next, press the Stop button and then press the Incline increase or decrease button. The treadmill will recalibrate the incline system. Using the hex key, turn both idler roller screws counterclockwise, 1/4 of a turn . IMPORTANT: Never apply silicone spray or other substances to the walking belt or the walking platform unless instructed to the minimum level. if the walking belt has...
English Manual
Page 38
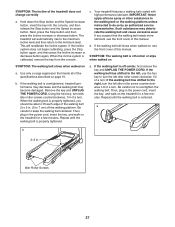
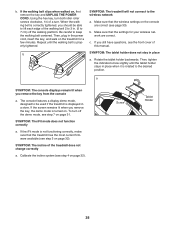
...: The treadmill will not connect to keep the walking belt centered. b. SYMPTOM: The tablet holder does not stay in place when it is correctly tightened, you remove the key, the demo mode is properly tightened. To turn . If the iFit mode is displayed in . (5 to the desired position. If the walking belt slips when walked on page 31. Using the hex key, turn both idler roller screws clockwise, 1/4 of this manual. The console features a display demo mode, designed...
...: The treadmill will not connect to keep the walking belt centered. b. SYMPTOM: The tablet holder does not stay in place when it is correctly tightened, you remove the key, the demo mode is properly tightened. To turn . If the iFit mode is displayed in . (5 to the desired position. If the walking belt slips when walked on page 31. Using the hex key, turn both idler roller screws clockwise, 1/4 of this manual. The console features a display demo mode, designed...

English Manual
Page 42
...3/8" Washer Storage Latch Drive Motor Motor Belt Frame Left Rear Foot Console Ground Wire Rubber Cushion Right Foot Rail Idler Roller 3/8" x 1 3/4" Screw 3/8" x 1 1/4" Screw Console Base Motor Hood Hood Accent Incline Frame Spacer Hood Clip Incline Motor Incline Frame Frame Spacer Controller Electronics Bracket Left Inner Base Cover Power Switch Power Cord Upright Grommet Belly Pan Left Handrail Cover Console Upright Wire Left Base Cover Right Base Cover Right Bottom Handrail Cover Left Bottom Handrail Cover Left Handrail Right Handrail Upright Crossbar Left Upright Right Upright Warning Decal...
...3/8" Washer Storage Latch Drive Motor Motor Belt Frame Left Rear Foot Console Ground Wire Rubber Cushion Right Foot Rail Idler Roller 3/8" x 1 3/4" Screw 3/8" x 1 1/4" Screw Console Base Motor Hood Hood Accent Incline Frame Spacer Hood Clip Incline Motor Incline Frame Frame Spacer Controller Electronics Bracket Left Inner Base Cover Power Switch Power Cord Upright Grommet Belly Pan Left Handrail Cover Console Upright Wire Left Base Cover Right Base Cover Right Bottom Handrail Cover Left Bottom Handrail Cover Left Handrail Right Handrail Upright Crossbar Left Upright Right Upright Warning Decal...
English Manual
Page 48
... damages. All repairs for which warranty claims are shipped while the product is limited to provide the following information when contacting us: • the model number and serial number of the product (see the front cover of this manual) • the name of the product (see the front cover of this manual) • the key number and description of its authorized service centers. ICON Health & Fitness, Inc. (ICON) warrants...
... damages. All repairs for which warranty claims are shipped while the product is limited to provide the following information when contacting us: • the model number and serial number of the product (see the front cover of this manual) • the name of the product (see the front cover of this manual) • the key number and description of its authorized service centers. ICON Health & Fitness, Inc. (ICON) warrants...

