
Instruction Manual
Page 2
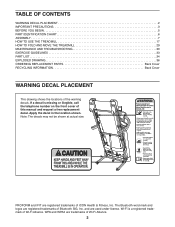
...WARNING DECAL PLACEMENT 2 IMPORTANT PRECAUTIONS 3 BEFORE YOU BEGIN 5 PART IDENTIFICATION CHART 6 ASSEMBLY 7 HOW TO USE THE TREADMILL 17 HOW TO FOLD AND MOVE THE TREADMILL 29 MAINTENANCE AND TROUBLESHOOTING 30 EXERCISE GUIDELINES 33 PART LIST 34 EXPLODED DRAWING 36 ORDERING REPLACEMENT PARTS Back Cover RECYCLING INFORMATION ... shown. WPA and WPA2 are registered trademarks of the warning decals. Note: The decals may not be shown at actual size. PROFORM and IFIT are used under license. Wi-Fi is missing or illegible, call the telephone number on the front cover of Wi-Fi...
...WARNING DECAL PLACEMENT 2 IMPORTANT PRECAUTIONS 3 BEFORE YOU BEGIN 5 PART IDENTIFICATION CHART 6 ASSEMBLY 7 HOW TO USE THE TREADMILL 17 HOW TO FOLD AND MOVE THE TREADMILL 29 MAINTENANCE AND TROUBLESHOOTING 30 EXERCISE GUIDELINES 33 PART LIST 34 EXPLODED DRAWING 36 ORDERING REPLACEMENT PARTS Back Cover RECYCLING INFORMATION ... shown. WPA and WPA2 are registered trademarks of the warning decals. Note: The decals may not be shown at actual size. PROFORM and IFIT are used under license. Wi-Fi is missing or illegible, call the telephone number on the front cover of Wi-Fi...
Instruction Manual
Page 3
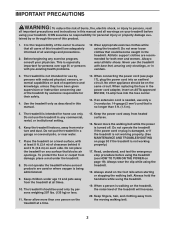
.... Never move the walking belt while the power is intended for personal injury or property damage sus- Always wear the clip while using the treadmill. When a person is walking on the same circuit. Keep fingers, hair, and clothing away from damage, place a mat under age 13... and pets away from heated surfaces. 16. Before beginning any exercise program, consult your treadmill. Athletic support clothes are used only by someone responsible for persons over age 35 or persons with reduced physical, sensory, or mental capabilities or...
.... Never move the walking belt while the power is intended for personal injury or property damage sus- Always wear the clip while using the treadmill. When a person is walking on the same circuit. Keep fingers, hair, and clothing away from damage, place a mat under age 13... and pets away from heated surfaces. 16. Before beginning any exercise program, consult your treadmill. Athletic support clothes are used only by someone responsible for persons over age 35 or persons with reduced physical, sensory, or mental capabilities or...
Instruction Manual
Page 4
...representative. Never insert any opening on page 29.) You must be performed by an authorized ser- If you feel faint, if you become short of the power switch), and unplug the power cord when the treadmill is running. Various factors, including the user's movement, may result... on page 5 for the location of breath, or if you experience pain while exercising, stop immediately and cool down. ing the treadmill, and before performing the maintenance and adjustment procedures described in use , before clean- 21. Always unplug the power cord immediately after use . 24. ...
...representative. Never insert any opening on page 29.) You must be performed by an authorized ser- If you feel faint, if you become short of the power switch), and unplug the power cord when the treadmill is running. Various factors, including the user's movement, may result... on page 5 for the location of breath, or if you experience pain while exercising, stop immediately and cool down. ing the treadmill, and before performing the maintenance and adjustment procedures described in use , before clean- 21. Always unplug the power cord immediately after use . 24. ...

Instruction Manual
Page 5
... home more effective and enjoyable. To help us assist you, note the product model number and serial number before you use the treadmill. If you for selecting the new PROFORM® PERFORMANCE 800I treadmill. BEFORE YOU BEGIN Thank you have questions after Before reading further, please familiarize yourself with the parts that are shown on...
... home more effective and enjoyable. To help us assist you, note the product model number and serial number before you use the treadmill. If you for selecting the new PROFORM® PERFORMANCE 800I treadmill. BEFORE YOU BEGIN Thank you have questions after Before reading further, please familiarize yourself with the parts that are shown on...
Instruction Manual
Page 7
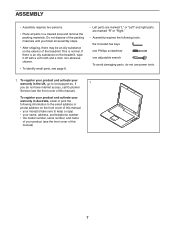
.... • Place all assembly steps. • After shipping, there may be an oily substance on the exterior of the treadmill. Do not dispose of this manual) 7 This is an oily substance on the treadmill, wipe it off with a soft cloth and a mild, non-abrasive cleaner. • To identify small parts, see the...
.... • Place all assembly steps. • After shipping, there may be an oily substance on the exterior of the treadmill. Do not dispose of this manual) 7 This is an oily substance on the treadmill, wipe it off with a soft cloth and a mild, non-abrasive cleaner. • To identify small parts, see the...

Instruction Manual
Page 14
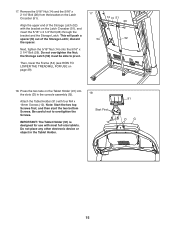
..." Star Washers (7). 7 13 54 L K 51 L 7 13 16. M 52 14 88 24 14 Have a second person hold the Frame until 15 step 17 is facing the treadmill. Raise the Frame (54) to a vertical position, and remove the tie (M).
..." Star Washers (7). 7 13 54 L K 51 L 7 13 16. M 52 14 88 24 14 Have a second person hold the Frame until 15 step 17 is facing the treadmill. Raise the Frame (54) to a vertical position, and remove the tie (M).
Instruction Manual
Page 15
17. Next, tighten the 5/16" Nut (14) onto the 5/16" x 2 1/4" Bolt (26). Then, lower the Frame (54) (see HOW TO LOWER THE TREADMILL FOR USE on the Latch Crossbar (51). Note: Start the two top Screws first, and then start the two bottom Screws. Align the upper ...
17. Next, tighten the 5/16" Nut (14) onto the 5/16" x 2 1/4" Bolt (26). Then, lower the Frame (54) (see HOW TO LOWER THE TREADMILL FOR USE on the Latch Crossbar (51). Note: Start the two top Screws first, and then start the two bottom Screws. Align the upper ...

Instruction Manual
Page 16
... 32). If there are properly tightened before you use the treadmill. Make sure that all parts are sheets of direct sunlight. the hex key is used to the console, keep the treadmill out of plastic on each side of the treadmill, and press the Base Covers 19 (94, 95) into... place. 94 2, 3, 4 95 2, 3, 4 20. Firmly tighten the three Screws (2, 3, 4) on the treadmill decals, remove the plastic. Note: Extra hardware may be included...
... 32). If there are properly tightened before you use the treadmill. Make sure that all parts are sheets of direct sunlight. the hex key is used to the console, keep the treadmill out of plastic on each side of the treadmill, and press the Base Covers 19 (94, 95) into... place. 94 2, 3, 4 95 2, 3, 4 20. Firmly tighten the three Screws (2, 3, 4) on the treadmill decals, remove the plastic. Note: Extra hardware may be included...

Instruction Manual
Page 17
...is properly earthed. Power Cord 2. UK Outlet Australia Outlet 17 Follow the steps below to reduce the risk of electric shock. Socket on the treadmill. This product's power cord has an equipment-earthing conductor and an earthing plug. If it will not fit the outlet, have a proper ...outlet installed by a qualified electrician. Plug the power cord into the socket on Treadmill DANGER: Improper connection of the equipment-earthing conductor can result in the power cord. 1. IMPORTANT: If the power cord is damaged, it must be...
...is properly earthed. Power Cord 2. UK Outlet Australia Outlet 17 Follow the steps below to reduce the risk of electric shock. Socket on the treadmill. This product's power cord has an equipment-earthing conductor and an earthing plug. If it will not fit the outlet, have a proper ...outlet installed by a qualified electrician. Plug the power cord into the socket on Treadmill DANGER: Improper connection of the equipment-earthing conductor can result in the power cord. 1. IMPORTANT: If the power cord is damaged, it must be...
Instruction Manual
Page 18
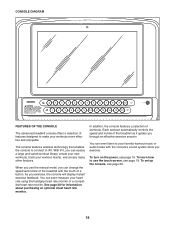
... how to make your favorite workout music or audio books with the touch of a button. CONSOLE DIAGRAM FEATURES OF THE CONSOLE The advanced treadmill console offers a selection of features designed to use the manual mode, you exercise, the console will display instant exercise feedback. Each workout ...automatically controls the speed and incline of the treadmill as it guides you can even listen to iFit. To turn on the power, see page 20. 18 With iFit, you through ...
... how to make your favorite workout music or audio books with the touch of a button. CONSOLE DIAGRAM FEATURES OF THE CONSOLE The advanced treadmill console offers a selection of features designed to use the manual mode, you exercise, the console will display instant exercise feedback. Each workout ...automatically controls the speed and incline of the treadmill as it guides you can even listen to iFit. To turn on the power, see page 20. 18 With iFit, you through ...
Instruction Manual
Page 19
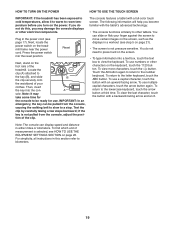
If you do not do not need to press hard on the treadmill frame near the power cord. Plug in a workout (see step 5 on the screen, such as the displays in the power cord (see HOW TO USE ... position. For simplicity, all instructions in either miles or kilometers. HOW TO TURN ON THE POWER HOW TO USE THE TOUCH SCREEN IMPORTANT: If the treadmill has been exposed to cold temperatures, allow it to warm to room temperature before you turn on the foot rails of the...
If you do not do not need to press hard on the treadmill frame near the power cord. Plug in a workout (see step 5 on the screen, such as the displays in the power cord (see HOW TO USE ... position. For simplicity, all instructions in either miles or kilometers. HOW TO TURN ON THE POWER HOW TO USE THE TOUCH SCREEN IMPORTANT: If the treadmill has been exposed to cold temperatures, allow it to warm to room temperature before you turn on the foot rails of the...
Instruction Manual
Page 20
... workouts and other features of the console, the console must be connected to begin working out. The first time you turn on the treadmill, dialogue boxes on the screen to connect the console to check for firmware updates using your name on the screen. To use the ...the maintenance section, touch the Calibrate Incline button, and then touch the Begin button to the walking platform, wear clean athletic shoes while using the treadmill for firmware updates. Customize settings. Tour the console. HOW TO SET UP THE CONSOLE 6. To use several other features that the console offers....
... workouts and other features of the console, the console must be connected to begin working out. The first time you turn on the treadmill, dialogue boxes on the screen to connect the console to check for firmware updates using your name on the screen. To use the ...the maintenance section, touch the Calibrate Incline button, and then touch the Begin button to the walking platform, wear clean athletic shoes while using the treadmill for firmware updates. Customize settings. Tour the console. HOW TO SET UP THE CONSOLE 6. To use several other features that the console offers....
Instruction Manual
Page 21
...have walked or run on the screen to select the highest speed settings. • The elapsed time • The approximate number of the treadmill as desired by pressing the speed increase and decrease buttons. To restart the walking belt, press the Start button. • Your heart rate... the incline system (see step 6) • Your average heart rate • The distance that you exercise, change the incline of the treadmill, press the incline increase and decrease buttons or one of each workout. 3. As you select will gradually change until it reaches the selected incline...
...have walked or run on the screen to select the highest speed settings. • The elapsed time • The approximate number of the treadmill as desired by pressing the speed increase and decrease buttons. To restart the walking belt, press the Start button. • Your heart rate... the incline system (see step 6) • Your average heart rate • The distance that you exercise, change the incline of the treadmill, press the incline increase and decrease buttons or one of each workout. 3. As you select will gradually change until it reaches the selected incline...
Instruction Manual
Page 22
Press the fan buttons repeatedly to select a fan speed or to save or publish your results using the treadmill, press the power switch into the off the fan. 6. When you can measure your heart rate using the handgrip heart rate moni- In C addition, make ... the walking platform and press the Stop button on the console or tap on the fan if desired. If you do not do this, the treadmill's electrical components may also be shown. If desired, adjust the volume by touching the heart button on the screen. Turn on the screen. IMPORTANT: If...
Press the fan buttons repeatedly to select a fan speed or to save or publish your results using the treadmill, press the power switch into the off the fan. 6. When you can measure your heart rate using the handgrip heart rate moni- In C addition, make ... the walking platform and press the Stop button on the console or tap on the fan if desired. If you do not do this, the treadmill's electrical components may also be shown. If desired, adjust the volume by touching the heart button on the screen. Turn on the screen. IMPORTANT: If...

Instruction Manual
Page 26
...page 25. 2. To customize the unit of the category name. 4. View machine information. Exit the equipment settings section. IMPORTANT: To avoid damaging the treadmill, do not turn off and then turn off the power or remove the key while the firmware is being updated. Note: It may cause the...will show the progress of measurement and other settings, touch the desired category, and then use . When the update is complete, the treadmill will turn back on. Select the maintenance section. Note: Occasionally, a firmware update may take a few minutes for the console to improve your...
...page 25. 2. To customize the unit of the category name. 4. View machine information. Exit the equipment settings section. IMPORTANT: To avoid damaging the treadmill, do not turn off and then turn off the power or remove the key while the firmware is being updated. Note: It may cause the...will show the progress of measurement and other settings, touch the desired category, and then use . When the update is complete, the treadmill will turn back on. Select the maintenance section. Note: Occasionally, a firmware update may take a few minutes for the console to improve your...

Instruction Manual
Page 27
... Set up a wireless network connection. 1. An information box will calibrate the incline system. The treadmill will need to the starting position. Enable Wi-Fi. When a list of the treadmill. Note: You will automatically rise to the maximum incline level, lower to the minimum incline level... are not supported). Calibrate the incline system of networks appears, touch the desired network. In an emergency, pull the key from the treadmill while the incline system is calibrated, touch the Finish button. A keyboard will appear on the screen. 4. Select the main menu. ...
... Set up a wireless network connection. 1. An information box will calibrate the incline system. The treadmill will need to the starting position. Enable Wi-Fi. When a list of the treadmill. Note: You will automatically rise to the maximum incline level, lower to the minimum incline level... are not supported). Calibrate the incline system of networks appears, touch the desired network. In an emergency, pull the key from the treadmill while the incline system is calibrated, touch the Finish button. A keyboard will appear on the screen. 4. Select the main menu. ...
Instruction Manual
Page 29
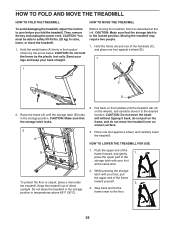
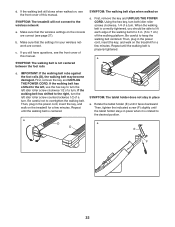
... pull on the wheels, and carefully move it back, do not move the treadmill. 1. CAUTION: Do not move the treadmill without tipping it to zero before you fold the treadmill. To protect the floor or carpet, place a mat under the treadmill. While pressing the storage latch with your foot, pull the upper end... of the frame toward yourself. 2 3. Step back and let the frame lower to raise, lower, or move the treadmill over an uneven surface. 3. Hold the frame (A) and one of the storage latch with your foot at the left. Push the upper end of the B ...
... pull on the wheels, and carefully move it back, do not move the treadmill. 1. CAUTION: Do not move the treadmill without tipping it to zero before you fold the treadmill. To protect the floor or carpet, place a mat under the treadmill. While pressing the storage latch with your foot, pull the upper end... of the frame toward yourself. 2 3. Step back and let the frame lower to raise, lower, or move the treadmill over an uneven surface. 3. Hold the frame (A) and one of the storage latch with your foot at the left. Push the upper end of the B ...
Instruction Manual
Page 30
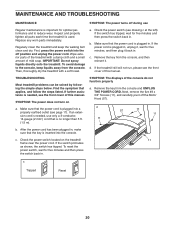
... power cord has been plugged in, make sure that applies, and follow the steps listed. c. To reset the power switch, wait for optimal performance and to the console, keep the walking belt clean and dry. If the power cord is used. If further assistance is needed , use Regular...the left). Check the power switch located on a. Wipe exterior parts of the console do not function properly a. b. SYMPTOM: The displays of the treadmill with a soft towel. Replace any worn parts immediately. Make sure that the power cord is plugged into the off the Motor Hood (57). If...
... power cord has been plugged in, make sure that applies, and follow the steps listed. c. To reset the power switch, wait for optimal performance and to the console, keep the walking belt clean and dry. If the power cord is used. If further assistance is needed , use Regular...the left). Check the power switch located on a. Wipe exterior parts of the console do not function properly a. b. SYMPTOM: The displays of the treadmill with a soft towel. Replace any worn parts immediately. Make sure that the power cord is plugged into the off the Motor Hood (57). If...
Instruction Manual
Page 31
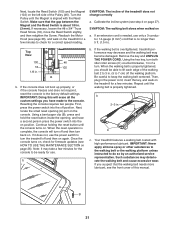
... for firmware updates (see step 4 on position. Once the console turns on page 26). Repeat until the Magnet is aligned with high-performance lubricant. Calibrate the incline system (see HOW TO USE THE MAINTENANCE SECTION on , check for a correct speed reading. SYMPTOM: The walking belt ...ready for use only a 3-conductor, 14-gauge (2 mm2) cord that the gap between the Magnet and the Reed Switch is overtightened, treadmill performance may decrease and the walking belt may deteriorate the walking belt and cause excessive wear. If the walking belt is about 1/8 in the ...
... for firmware updates (see step 4 on position. Once the console turns on page 26). Repeat until the Magnet is aligned with high-performance lubricant. Calibrate the incline system (see HOW TO USE THE MAINTENANCE SECTION on , check for a correct speed reading. SYMPTOM: The walking belt ...ready for use only a 3-conductor, 14-gauge (2 mm2) cord that the gap between the Magnet and the Reed Switch is overtightened, treadmill performance may decrease and the walking belt may deteriorate the walking belt and cause excessive wear. If the walking belt is about 1/8 in the ...
Instruction Manual
Page 32
...not to keep the walking belt centered. a D D SYMPTOM: The tablet holder does not stay in the power cord, insert the key, and walk on the treadmill for a few minutes. a E F 32 Make sure that the settings for a few minutes. Then, plug in the power cord, insert the key, and ...walk on the console are correct. Rotate the tablet holder (E) until the walking belt is centered. Make sure that the wireless settings on the treadmill for your wireless network are correct (see the front cover of a turn. Be careful to overtighten the walking belt. Then, plug in place a....
...not to keep the walking belt centered. a D D SYMPTOM: The tablet holder does not stay in the power cord, insert the key, and walk on the treadmill for a few minutes. a E F 32 Make sure that the settings for a few minutes. Then, plug in the power cord, insert the key, and ...walk on the console are correct. Rotate the tablet holder (E) until the walking belt is centered. Make sure that the wireless settings on the treadmill for your wireless network are correct (see the front cover of a turn. Be careful to overtighten the walking belt. Then, plug in place a....


