
English Manual
Page 3
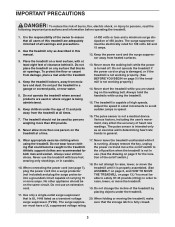
...that all users of this manual. 3. Do not attempt to raise, lower, or move the walking belt while the power is UL 1449 listed as a transient voltage surge suppressor (TVSS). Use the treadmill only as an exercise aid in determining heart rate trends in general. 9. To protect the ...of burns, fire, electric shock, or injury to avoid sudden jumps in speed. 16. It is being administered. 6. Place the treadmill on the walking belt. Do not operate the treadmill where aerosol products are standing on a level surface, with bare feet, wearing only stockings, or in sandals. 10. Keep children...
...that all users of this manual. 3. Do not attempt to raise, lower, or move the walking belt while the power is UL 1449 listed as a transient voltage surge suppressor (TVSS). Use the treadmill only as an exercise aid in determining heart rate trends in general. 9. To protect the ...of burns, fire, electric shock, or injury to avoid sudden jumps in speed. 16. It is being administered. 6. Place the treadmill on the walking belt. Do not operate the treadmill where aerosol products are standing on a level surface, with bare feet, wearing only stockings, or in sandals. 10. Keep children...
English Manual
Page 5
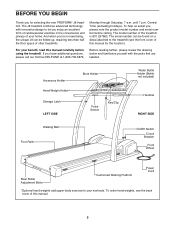
..., see the front cover of this manual for selecting the new PROFORM¨ J8 treadmill. Monday through Saturday, 7 a.m. Accessory Holder Hand Weight Holder* Storage Latch LEFT SIDE Book Holder Pulse Sensor Key/Clip Water Bottle Holder (Bottle not included) Handrail RIGHT SIDE Walking Belt Foot Rails On/Off Switch Circuit Breaker Front Wheel Rear Roller...
..., see the front cover of this manual for selecting the new PROFORM¨ J8 treadmill. Monday through Saturday, 7 a.m. Accessory Holder Hand Weight Holder* Storage Latch LEFT SIDE Book Holder Pulse Sensor Key/Clip Water Bottle Holder (Bottle not included) Handrail RIGHT SIDE Walking Belt Foot Rails On/Off Switch Circuit Breaker Front Wheel Rear Roller...
English Manual
Page 6
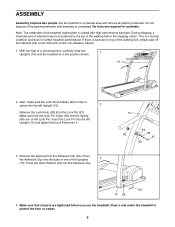
... packing materials. Press the Adhesive Clip onto the base of one of the treadmill walking belt is in a cleared area and remove all parts are required for assembly....(15) and tighten the Lock Knob onto it. 3. No tools are tightened before you use the treadmill. Do not dispose of lubricant may be transferred to protect the floor or carpet. 6 During shipping, a... the Lock Knob (92) from the Adhesive Clip (29). Set the treadmill in the position shown. 1 15 2. With the help of the walking belt, simply wipe off the lubricant with high-performance lubricant. serted into the ...
... packing materials. Press the Adhesive Clip onto the base of one of the treadmill walking belt is in a cleared area and remove all parts are required for assembly....(15) and tighten the Lock Knob onto it. 3. No tools are tightened before you use the treadmill. Do not dispose of lubricant may be transferred to protect the floor or carpet. 6 During shipping, a... the Lock Knob (92) from the Adhesive Clip (29). Set the treadmill in the position shown. 1 15 2. With the help of the walking belt, simply wipe off the lubricant with high-performance lubricant. serted into the ...
English Manual
Page 7
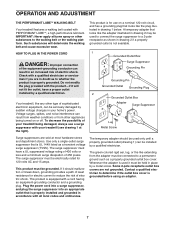
OPERATION AND ADJUSTMENT THE PERFORMANT LUBETM WALKING BELT Your treadmill features a walking belt coated with a cord having an equipment-grounding conductor and a grounding plug. IMPORTANT: Never apply silicone spray or other substances to whether the product is for ... Metal Screw Surge suppressors are not grounded. If it should be used to connect the surge suppressor to a permanent ground such as to the walking belt or the walking platform. Whenever the adapter is grounded before using an adapter. 7 HOW TO PLUG IN THE POWER CORD DANGER: Improper connection of the equipment-...
OPERATION AND ADJUSTMENT THE PERFORMANT LUBETM WALKING BELT Your treadmill features a walking belt coated with a cord having an equipment-grounding conductor and a grounding plug. IMPORTANT: Never apply silicone spray or other substances to whether the product is for ... Metal Screw Surge suppressors are not grounded. If it should be used to connect the surge suppressor to a permanent ground such as to the walking belt or the walking platform. Whenever the adapter is grounded before using an adapter. 7 HOW TO PLUG IN THE POWER CORD DANGER: Improper connection of the equipment-...
English Manual
Page 8
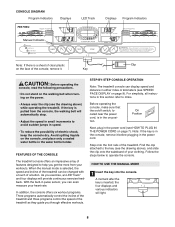
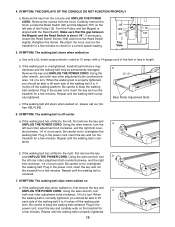
... can even measure your heart rate. STEP-BY-STEP CONSOLE OPERATION Note: The treadmill console can be changed with a touch of the treadmill as they guide you get the most from the console, the walking belt will light. 8 Find the clip attached to the key (see the drawing ...the power cord, is a sheet of clear plastic Clip on the face of the treadmill. Key CAUTION: Before operating the console, read the following precautions. ¥ Do not stand on the walking belt when turning on page 7). CONSOLE DIAGRAM Program Indicators Displays LED Track Displays Program Indicators...
... can even measure your heart rate. STEP-BY-STEP CONSOLE OPERATION Note: The treadmill console can be changed with a touch of the treadmill as they guide you get the most from the console, the walking belt will light. 8 Find the clip attached to the key (see the drawing ...the power cord, is a sheet of clear plastic Clip on the face of the treadmill. Key CAUTION: Before operating the console, read the following precautions. ¥ Do not stand on the walking belt when turning on page 7). CONSOLE DIAGRAM Program Indicators Displays LED Track Displays Program Indicators...
English Manual
Page 9
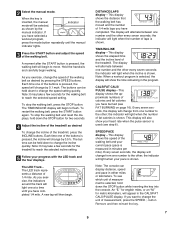
... your progress with the LED track and the four displays. To stop the walking belt and reset the displays, hold down to reach the selected speed setting. Note: It may take a few seconds for the treadmill to reach the selected incline setting. 5 Follow your heart rate when the ...; SPEED/PACE displayÑThis display shows the speed of the treadmill as desired To change by 0.1 mph. Every seven seconds, the display will change from one number to the other ; To see step 6). To restart the walking belt, press the START button again. Note: It may take a ...
... your progress with the LED track and the four displays. To stop the walking belt and reset the displays, hold down to reach the selected speed setting. Note: It may take a few seconds for the treadmill to reach the selected incline setting. 5 Follow your heart rate when the ...; SPEED/PACE displayÑThis display shows the speed of the treadmill as desired To change by 0.1 mph. Every seven seconds, the display will change from one number to the other ; To see step 6). To restart the walking belt, press the START button again. Note: It may take a ...
English Manual
Page 10
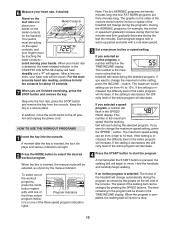
... the key into the console. the four FAT BURN programs are twenty minutes long; If the setting is the maximum speed that the treadmill will reach during the selected program. This number is increased, the difficulty level of the entire program will decrease. A moment after the...is inserted, the four displays and various indicators will light. 2 Press the MODE button to 10%. If the setting is pressed, the walking belt will begin walking. If you selected an incline program, a number will flash in the CALS/FAT CALS/PULSE display will flash steadily and a ÒPÓ...
... the key into the console. the four FAT BURN programs are twenty minutes long; If the setting is the maximum speed that the treadmill will reach during the selected program. This number is increased, the difficulty level of the entire program will decrease. A moment after the...is inserted, the four displays and various indicators will light. 2 Press the MODE button to 10%. If the setting is pressed, the walking belt will begin walking. If you selected an incline program, a number will flash in the CALS/FAT CALS/PULSE display will flash steadily and a ÒPÓ...
English Manual
Page 11
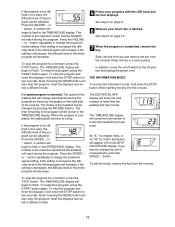
This number is the maximum incline that the walking belt has moved. Press the INCLINE v or w button repeatedly to change...the TIME/INCLINE display. When the program is completed, the walking belt will change the maximum speed setting. The DISTANCE/LAPS display will show the total number of hours the treadmill has been used. An ÒE,Ó for english miles...too easy, the difficulty level of the entire program will begin to flash. The incline of miles that the treadmill will reach during the program. Press the SPEED v or w button. The TIME/INCLINE display will decrease. ...
This number is the maximum incline that the walking belt has moved. Press the INCLINE v or w button repeatedly to change...the TIME/INCLINE display. When the program is completed, the walking belt will change the maximum speed setting. The DISTANCE/LAPS display will show the total number of hours the treadmill has been used. An ÒE,Ó for english miles...too easy, the difficulty level of the entire program will begin to flash. The incline of miles that the treadmill will reach during the program. Press the SPEED v or w button. The TIME/INCLINE display will decrease. ...
English Manual
Page 15
... between the Magnet and the Reed Switch is properly tightened, you should be able to check for a few minutes. Plug in length. SYMPTOM: The walking belt slows when walked on the treadmill for a correct speed reading. Be careful not to the right, first remove the key and UNPLUG THE POWER CORD. Retighten the Screw.
... between the Magnet and the Reed Switch is properly tightened, you should be able to check for a few minutes. Plug in length. SYMPTOM: The walking belt slows when walked on the treadmill for a correct speed reading. Be careful not to the right, first remove the key and UNPLUG THE POWER CORD. Retighten the Screw.
English Manual
Page 18
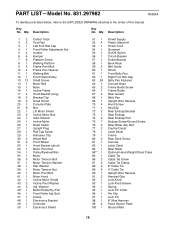
...1 96 1 97 1 98 1 99 4 100 1 Power Supply Plastic Stand-off Power Cord Grommet On/Off Switch Circuit Breaker Outlet Bracket Book Rack Belt Guide Shock Front Belly Pan Right Foot Rail Cap Belly Pan Fastener Console Base Frame Guide Screw Frame Guide Rear Isolator Belly Pan Upright Wire... 1 Center Track Foot Rail Left Foot Rail Cap Front Roller Adjustment Nut Isolator Bumper Platform Screw Walking Platform Frame Pivot Bolt Frame Pivot Spacer Walking Belt Front Roller/Pulley Small Screw Motor Belt Base Incline Frame Hood Bracket (long) Bracket Clip Small Screw Console Plate Nut Lift Motor Shield ...
...1 96 1 97 1 98 1 99 4 100 1 Power Supply Plastic Stand-off Power Cord Grommet On/Off Switch Circuit Breaker Outlet Bracket Book Rack Belt Guide Shock Front Belly Pan Right Foot Rail Cap Belly Pan Fastener Console Base Frame Guide Screw Frame Guide Rear Isolator Belly Pan Upright Wire... 1 Center Track Foot Rail Left Foot Rail Cap Front Roller Adjustment Nut Isolator Bumper Platform Screw Walking Platform Frame Pivot Bolt Frame Pivot Spacer Walking Belt Front Roller/Pulley Small Screw Motor Belt Base Incline Frame Hood Bracket (long) Bracket Clip Small Screw Console Plate Nut Lift Motor Shield ...


