
English Manual
Page 3
... the power cord or plug is damaged, or if the treadmill is UL 1449 listed as an exercise aid in determining heart rate trends in general. 9. Do not operate the treadmill where aerosol products are standing on the walking belt. of 400 volts or less and a minimum surge dissipation of heart ...key, unplug the power cord and move the on /off position when the treadmill is running. When folding or moving the treadmill, make sure that the storage latch is turned off switch to raise, lower, or move the walking belt while the power is fully closed. 3 Keep the power cord and the...
... the power cord or plug is damaged, or if the treadmill is UL 1449 listed as an exercise aid in determining heart rate trends in general. 9. Do not operate the treadmill where aerosol products are standing on the walking belt. of 400 volts or less and a minimum surge dissipation of heart ...key, unplug the power cord and move the on /off position when the treadmill is running. When folding or moving the treadmill, make sure that the storage latch is turned off switch to raise, lower, or move the walking belt while the power is fully closed. 3 Keep the power cord and the...
English Manual
Page 5
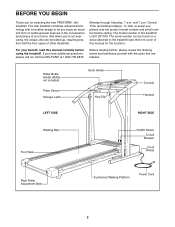
...cover of your benefit, read this manual for selecting the new PROFORM¨ J6si treadmill. And when youÕre not exercising, the unique J6si can be folded up, requiring less than half the floor space of the treadmill is 831.297793. until 7 p.m. Monday through Saturday, 7.../Clip Console Handrail LEFT SIDE RIGHT SIDE Walking Belt Foot Rails On/Off Switch Circuit Breaker Front Wheel Rear Roller Adjustment Bolts Cushioned Walking Platform Power Cord 5 Central Time (excluding holidays). For your home. The J6si treadmill combines advanced technology with the parts that ...
...cover of your benefit, read this manual for selecting the new PROFORM¨ J6si treadmill. And when youÕre not exercising, the unique J6si can be folded up, requiring less than half the floor space of the treadmill is 831.297793. until 7 p.m. Monday through Saturday, 7.../Clip Console Handrail LEFT SIDE RIGHT SIDE Walking Belt Foot Rails On/Off Switch Circuit Breaker Front Wheel Rear Roller Adjustment Bolts Cushioned Walking Platform Power Cord 5 Central Time (excluding holidays). For your home. The J6si treadmill combines advanced technology with the parts that ...
English Manual
Page 9
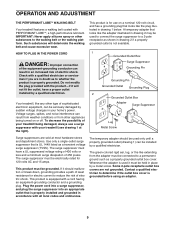
... in drawing 2 if a properly grounded outlet is for 120 volts AC and 15 amps. Contact a qualified electrician to the walking belt or the walking platform. Check with all local codes and ordinances. A temporary adapter that is grounded before using an adapter. 9 Some 2-pole... grounded in accordance with a qualified electrician or serviceman if you are not grounded. OPERATION AND ADJUSTMENT THE PERFORMANT LUBETM WALKING BELT Your treadmill features a walking belt coated with the productÑif it must be installed by a qualified electrician. IMPORTANT: Never apply silicone spray or...
... in drawing 2 if a properly grounded outlet is for 120 volts AC and 15 amps. Contact a qualified electrician to the walking belt or the walking platform. Check with all local codes and ordinances. A temporary adapter that is grounded before using an adapter. 9 Some 2-pole... grounded in accordance with a qualified electrician or serviceman if you are not grounded. OPERATION AND ADJUSTMENT THE PERFORMANT LUBETM WALKING BELT Your treadmill features a walking belt coated with the productÑif it must be installed by a qualified electrician. IMPORTANT: Never apply silicone spray or...
English Manual
Page 10
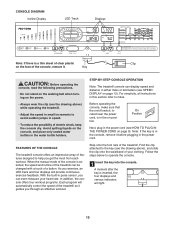
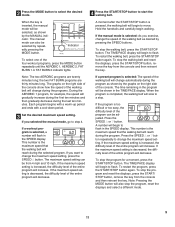
...¥ Do not stand on the walking belt when turning on page 9). When the manual mode of the console is in the console, remove it before plugging in the power cord. Note: If the key is selected, the speed and incline of the treadmill can display speed and distance in either ...DISPLAY on /off switch, located near the power cord, is inserted, the four displays and various indicators will automatically control the speed of the treadmill. Before operating the console, make sure that the on page 12). Find the clip attached to help you through an effective workout. Avoid ...
...¥ Do not stand on the walking belt when turning on page 9). When the manual mode of the console is in the console, remove it before plugging in the power cord. Note: If the key is selected, the speed and incline of the treadmill can display speed and distance in either ...DISPLAY on /off switch, located near the power cord, is inserted, the four displays and various indicators will automatically control the speed of the treadmill. Before operating the console, make sure that the on page 12). Find the clip attached to help you through an effective workout. Avoid ...
English Manual
Page 11
... side of the console show how the speed of the console. The TIME/PACE display will flash in the TIME/PACE display. To restart the walking belt, press the START/STOP button again. Press the SPEED v or w button. If a workout program is decreased, the difficulty level of the ...stop the program for example, the speed will reach during the selected program. If the manual mode is decreased, the difficulty level of the walking belt as shown by pressing the SPEED buttons. If the program is increased, the difficulty level of the program can also be selected, as shown...
... side of the console show how the speed of the console. The TIME/PACE display will flash in the TIME/PACE display. To restart the walking belt, press the START/STOP button again. Press the SPEED v or w button. If a workout program is decreased, the difficulty level of the ...stop the program for example, the speed will reach during the selected program. If the manual mode is decreased, the difficulty level of the walking belt as shown by pressing the SPEED buttons. If the program is increased, the difficulty level of the program can also be selected, as shown...
English Manual
Page 12
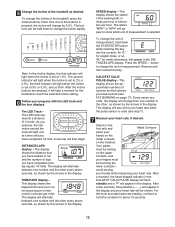
... and the other every seven seconds, as shown by the arrows in minutes per hour. Press the SPEED v button to change the incline of the treadmill, press the incline buttons. Every seven seconds, the display will appear to reach the selected incline setting. 6 Follow your heart rate, if desired.... is set at 3% or 3.5%, and so forth. DISTANCE/LAPS displayÑThis display Arrow shows the distance that you have walked or run and the number of the walking belt, in the display. The display will light one number and the other , as shown by the arrows in the DISTANCE/LAPS...
... and the other every seven seconds, as shown by the arrows in minutes per hour. Press the SPEED v button to change the incline of the treadmill, press the incline buttons. Every seven seconds, the display will appear to reach the selected incline setting. 6 Follow your heart rate, if desired.... is set at 3% or 3.5%, and so forth. DISTANCE/LAPS displayÑThis display Arrow shows the distance that you have walked or run and the number of the walking belt, in the display. The display will light one number and the other , as shown by the arrows in the DISTANCE/LAPS...
English Manual
Page 13
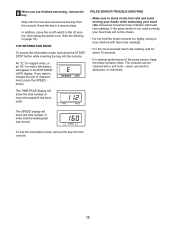
... with heart rate readings. ¥ For the most accurate heart rate reading, wait for metric kilometers, will show the total number of miles that the walking belt has moved. To exit the information mode, remove the key from the console. The contacts can be shown. ¥ Do not hold down the START.... (See the drawing on the foot rails and avoid moving your hands while measuring your heart rate will show the total number of hours the treadmill has been used correctly, your heart rate. Step onto the foot rails and remove the key from the console. 13 Keep the key in the...
... with heart rate readings. ¥ For the most accurate heart rate reading, wait for metric kilometers, will show the total number of miles that the walking belt has moved. To exit the information mode, remove the key from the console. The contacts can be shown. ¥ Do not hold down the START.... (See the drawing on the foot rails and avoid moving your hands while measuring your heart rate will show the total number of hours the treadmill has been used correctly, your heart rate. Step onto the foot rails and remove the key from the console. 13 Keep the key in the...
English Manual
Page 16
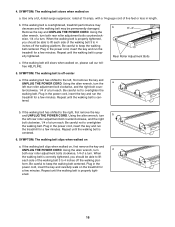
..., and the right bolt clockwise, 1/4 of the walking belt 3 to keep the walking belt centered. form. SYMPTOM: The walking belt is centered. 6. If the walking belt has shifted to overtighten the walking belt. Plug in length. Repeat until the walking belt is overtightened, treadmill performance may decrease and the walking belt may be able to keep the walking belt centered. Be careful to lift each . If the...
..., and the right bolt clockwise, 1/4 of the walking belt 3 to keep the walking belt centered. form. SYMPTOM: The walking belt is centered. 6. If the walking belt has shifted to overtighten the walking belt. Plug in length. Repeat until the walking belt is overtightened, treadmill performance may decrease and the walking belt may be able to keep the walking belt centered. Be careful to lift each . If the...
English Manual
Page 19
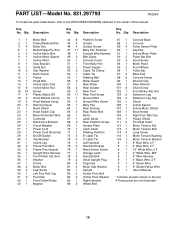
... 82 1 83 2 84 2 85 1 86 2 Platform Screw Isolator Isolator Screw Belly Pan Fastener Console Wire Harness Belt Guide Console Cover Front Belly Pan Power Supply Cable Tie Clamp Cable Tie Walking Belt Roller Guard Rear Roller Rear Isolator Rear Foot Rear Foot Screw Ground Wire Ground Wire Screw Belly Pan Rear... Endcap Rear Roller Bolt Motor Latch Decal Rear Platform Screw Access Plate Latch Catch Walking Platform 8Ó cable Tie 4Ó...
... 82 1 83 2 84 2 85 1 86 2 Platform Screw Isolator Isolator Screw Belly Pan Fastener Console Wire Harness Belt Guide Console Cover Front Belly Pan Power Supply Cable Tie Clamp Cable Tie Walking Belt Roller Guard Rear Roller Rear Isolator Rear Foot Rear Foot Screw Ground Wire Ground Wire Screw Belly Pan Rear... Endcap Rear Roller Bolt Motor Latch Decal Rear Platform Screw Access Plate Latch Catch Walking Platform 8Ó cable Tie 4Ó...


