
English Manual
Page 1
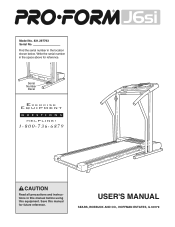
Serial Number Decal CAUTION Read all precautions and instructions in the location shown below. Save this equipment. USER'S MANUAL SEARS, ROEBUCK AND CO., HOFFMAN ESTATES, IL 60179 ¨ Model No. 831.297793 Serial No. Write the serial number in the space above for future reference. Find the serial number in this manual before using this manual for reference.
Serial Number Decal CAUTION Read all precautions and instructions in the location shown below. Save this equipment. USER'S MANUAL SEARS, ROEBUCK AND CO., HOFFMAN ESTATES, IL 60179 ¨ Model No. 831.297793 Serial No. Write the serial number in the space above for future reference. Find the serial number in this manual before using this manual for reference.
English Manual
Page 2
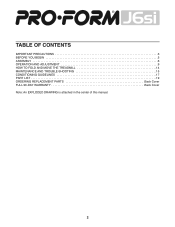
¨ TABLE OF CONTENTS IMPORTANT PRECAUTIONS 3 BEFORE YOU BEGIN 5 ASSEMBLY 6 OPERATION AND ADJUSTMENT 9 HOW TO FOLD AND MOVE THE TREADMILL 14 MAINTENANCE AND TROUBLE-SHOOTING 15 CONDITIONING GUIDELINES 17 PART LIST 19 ORDERING REPLACEMENT PARTS Back Cover FULL 90-DAY WARRANTY Back Cover Note: An EXPLODED DRAWING is attached in the center of this manual. 2
¨ TABLE OF CONTENTS IMPORTANT PRECAUTIONS 3 BEFORE YOU BEGIN 5 ASSEMBLY 6 OPERATION AND ADJUSTMENT 9 HOW TO FOLD AND MOVE THE TREADMILL 14 MAINTENANCE AND TROUBLE-SHOOTING 15 CONDITIONING GUIDELINES 17 PART LIST 19 ORDERING REPLACEMENT PARTS Back Cover FULL 90-DAY WARRANTY Back Cover Note: An EXPLODED DRAWING is attached in the center of this manual. 2
English Manual
Page 3
... remove the key, unplug the power cord and move the treadmill. 19. Do not place the treadmill on the walking belt. Do not put the treadmill in this treadmill are used by placing objects under the treadmill. 4. The pulse sensor is running. The surge suppressor must be electrically rated for both men and women. Never allow more than one person on page 5 if the treadmill is turned off switch...
... remove the key, unplug the power cord and move the treadmill. 19. Do not place the treadmill on the walking belt. Do not put the treadmill in this treadmill are used by placing objects under the treadmill. 4. The pulse sensor is running. The surge suppressor must be electrically rated for both men and women. Never allow more than one person on page 5 if the treadmill is turned off switch...
English Manual
Page 4
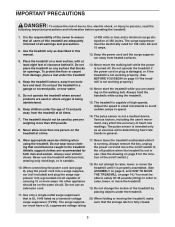
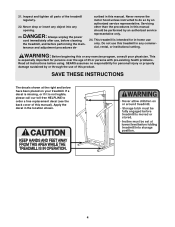
Never drop or insert any object into any commercial, rental, or institutional setting. Always unplug the power cord immediately after use this or any exercise program, consult your treadmill. tenance and adjustment procedures de- scribed in this manual). Never remove the motor hood unless instructed to order a free replacement decal (see the back cover of this manual. If a decal is missing, or if it is not legible, please...
Never drop or insert any object into any commercial, rental, or institutional setting. Always unplug the power cord immediately after use this or any exercise program, consult your treadmill. tenance and adjustment procedures de- scribed in this manual). Never remove the motor hood unless instructed to order a free replacement decal (see the back cover of this manual. If a decal is missing, or if it is not legible, please...
English Manual
Page 5
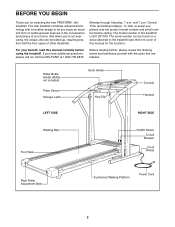
... design to the treadmill (see the front cover of your benefit, read this manual for selecting the new PROFORM¨ J6si treadmill. Water Bottle Holder (Bottle not included) Pulse Sensor Storage Latch Book Holder Key/Clip Console Handrail LEFT SIDE RIGHT SIDE Walking Belt Foot Rails On/Off Switch Circuit Breaker Front Wheel Rear Roller Adjustment Bolts Cushioned Walking Platform Power Cord 5 If you , please note the product model number and serial number before using the treadmill. until 7 p.m.
... design to the treadmill (see the front cover of your benefit, read this manual for selecting the new PROFORM¨ J6si treadmill. Water Bottle Holder (Bottle not included) Pulse Sensor Storage Latch Book Holder Key/Clip Console Handrail LEFT SIDE RIGHT SIDE Walking Belt Foot Rails On/Off Switch Circuit Breaker Front Wheel Rear Roller Adjustment Bolts Cushioned Walking Platform Power Cord 5 If you , please note the product model number and serial number before using the treadmill. until 7 p.m.
English Manual
Page 6
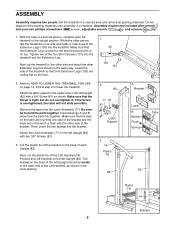
... of the lower end of the latch is overtightened, the latch will not slide smoothly. Tighten two of each Upright (82). Next, tip the treadmill to lower the treadmill. Follow step 2 to the other side and attach the other Extension Leg (not shown) in the same way. Attach the latch support to HOW TO LOWER THE TREADMILL FOR USE on the base of the four Short Screws (101...
... of the lower end of the latch is overtightened, the latch will not slide smoothly. Tighten two of each Upright (82). Next, tip the treadmill to lower the treadmill. Follow step 2 to the other side and attach the other Extension Leg (not shown) in the same way. Attach the latch support to HOW TO LOWER THE TREADMILL FOR USE on the base of the four Short Screws (101...
English Manual
Page 7
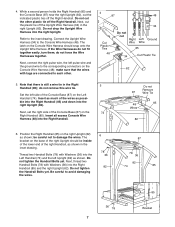
... The latch on the Console Wire Harness should be careful not to the corresponding connectors on the Console Wire Harness (48); do not fit together easily, turn them; Next, connect the right pulse wire, the left side of the Console Base ...(87) on the base of the right Handrail, as shown in the inset drawing. Insert all excess Console Wire Harness (48) into the right Upright. The bracket on the Left Handrail (74). Do not tighten the Handrail Bolts yet. 4. Set the left pulse wire...
... The latch on the Console Wire Harness should be careful not to the corresponding connectors on the Console Wire Harness (48); do not fit together easily, turn them; Next, connect the right pulse wire, the left side of the Console Base ...(87) on the base of the right Handrail, as shown in the inset drawing. Insert all excess Console Wire Harness (48) into the right Upright. The bracket on the Left Handrail (74). Do not tighten the Handrail Bolts yet. 4. Set the left pulse wire...
English Manual
Page 8
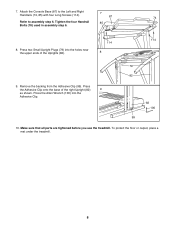
... under the treadmill. 8 Attach the Console Base (87) to the Left and Right Handrails (74, 85) with four Long Screws (114). 7 87 74 Refer to assembly step 6. Make sure that all parts are tightened before you use the treadmill. Press two Small Upright Plugs (79) into the Adhesive Clip. 82 100 99 10. Tighten the four Handrail 85 Bolts (78) used in assembly step 6. 114 114 8. 7. Press the Allen...
... under the treadmill. 8 Attach the Console Base (87) to the Left and Right Handrails (74, 85) with four Long Screws (114). 7 87 74 Refer to assembly step 6. Make sure that all parts are tightened before you use the treadmill. Press two Small Upright Plugs (79) into the Adhesive Clip. 82 100 99 10. Tighten the four Handrail 85 Bolts (78) used in assembly step 6. 114 114 8. 7. Press the Allen...
English Manual
Page 9
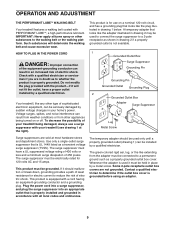
... Metal Screw Surge suppressors are not grounded. HOW TO PLUG IN THE POWER CORD DANGER: Improper connection of the equipment-grounding conductor can be connected to a permanent ground such as to determine if the outlet box cover is equipped with PERFORMANT LUBETM, a high-performance lubricant. The surge suppressor must be electrically rated for electric current to the walking belt or the walking...
... Metal Screw Surge suppressors are not grounded. HOW TO PLUG IN THE POWER CORD DANGER: Improper connection of the equipment-grounding conductor can be connected to a permanent ground such as to determine if the outlet box cover is equipped with PERFORMANT LUBETM, a high-performance lubricant. The surge suppressor must be electrically rated for electric current to the walking belt or the walking...
English Manual
Page 10
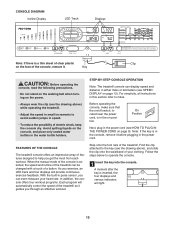
... switch, located near the power cord, is selected, the speed and incline of the treadmill can display speed and distance in the power cord. When the manual mode of the console is in speed. ¥ To reduce the possibility of electric shock, keep the console dry. A moment after the key is in the console, remove it before plugging in either miles or kilometers (see HOW TO PLUG IN THE POWER CORD on page 9). Follow the steps...
... switch, located near the power cord, is selected, the speed and incline of the treadmill can display speed and distance in the power cord. When the manual mode of the console is in speed. ¥ To reduce the possibility of electric shock, keep the console dry. A moment after the key is in the console, remove it before plugging in either miles or kilometers (see HOW TO PLUG IN THE POWER CORD on page 9). Follow the steps...
English Manual
Page 11
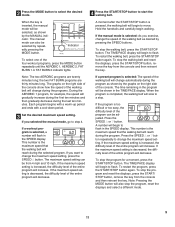
The manual mode can be adjusted. If a workout program is selected: As you exercise, change the speed of the walking belt as desired by the graphs on the right side of the console show how the speed of the walking belt will change during the programs. During the AEROBIC 1 program, for a moment, press the START/STOP button. To stop the walking belt and reset the displays, press the START/STOP button, remove the key from the console and then reinsert the key. If a preset program is...
The manual mode can be adjusted. If a workout program is selected: As you exercise, change the speed of the walking belt as desired by the graphs on the right side of the console show how the speed of the walking belt will change during the programs. During the AEROBIC 1 program, for a moment, press the START/STOP button. To stop the walking belt and reset the displays, press the START/STOP button, remove the key from the console and then reinsert the key. If a preset program is...
English Manual
Page 12
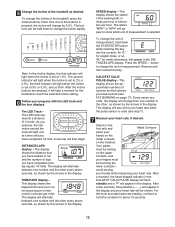
... unit of the treadmill, press the incline buttons. To change from one number and the other every seven seconds, as desired. To change the incline rapidly. This display will appear to change the incline of measurement is set at 1.5%. The buttons can be touching the lower contactsÑ avoid moving your hands while measuring your heart rate when the pulse sensor is measured in the DISTANCE/LAPS display. After a few seconds...
... unit of the treadmill, press the incline buttons. To change from one number and the other every seven seconds, as desired. To change the incline rapidly. This display will appear to change the incline of measurement is set at 1.5%. The buttons can be touching the lower contactsÑ avoid moving your hands while measuring your heart rate when the pulse sensor is measured in the DISTANCE/LAPS display. After a few seconds...
English Manual
Page 13
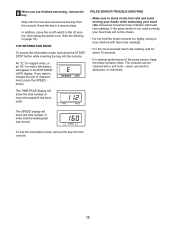
... the total number of miles that the walking belt has moved. 8 When you want to the off switch to change the unit of the pulse sensor, keep the metal contacts clean. The TIME/PACE display will show the total number of hours the treadmill has been used correctly, your heart rate. PULSE SENSOR TROUBLE-SHOOTING ¥ Make sure to stand on page 10.) THE INFORMATION MODE To access the information mode, hold...
... the total number of miles that the walking belt has moved. 8 When you want to the off switch to change the unit of the pulse sensor, keep the metal contacts clean. The TIME/PACE display will show the total number of hours the treadmill has been used correctly, your heart rate. PULSE SENSOR TROUBLE-SHOOTING ¥ Make sure to stand on page 10.) THE INFORMATION MODE To access the information mode, hold...
English Manual
Page 14
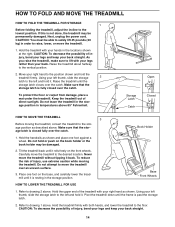
... power cord. Move your back straight. Raise the treadmill until the frame is not done, the treadmill may be able to drawing 2 above . Do not hold the treadmill firmly. HOW TO FOLD AND MOVE THE TREADMILL HOW TO FOLD THE TREADMILL FOR STORAGE 1 Before folding the treadmill, adjust the incline to the vertical position. 2. If this is past the storage latch. 2. CAUTION: To decrease the possibility of direct sunlight. Using...
... power cord. Move your back straight. Raise the treadmill until the frame is not done, the treadmill may be able to drawing 2 above . Do not hold the treadmill firmly. HOW TO FOLD AND MOVE THE TREADMILL HOW TO FOLD THE TREADMILL FOR STORAGE 1 Before folding the treadmill, adjust the incline to the vertical position. 2. If this is past the storage latch. 2. CAUTION: To decrease the possibility of direct sunlight. Using...
English Manual
Page 15
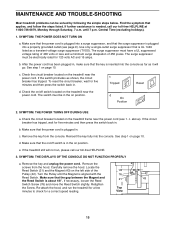
... CONSOLE DO NOT FUNCTION PROPERLY a. Locate the Reed Switch (21) and the Magnet (43) on the left side of 450 joules. Retighten the Screw. MAINTENANCE AND TROUBLE-SHOOTING Most treadmill problems can be in the on position. Central Time (excluding holidays). 1. After the power cord has been plugged in, make sure that the surge suppressor is needed, call our toll-free HELPLINE. 3. Reinsert the key...
... CONSOLE DO NOT FUNCTION PROPERLY a. Locate the Reed Switch (21) and the Magnet (43) on the left side of 450 joules. Retighten the Screw. MAINTENANCE AND TROUBLE-SHOOTING Most treadmill problems can be in the on position. Central Time (excluding holidays). 1. After the power cord has been plugged in, make sure that the surge suppressor is needed, call our toll-free HELPLINE. 3. Reinsert the key...
English Manual
Page 16
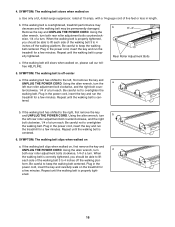
...-listed surge suppressor, rated at 15 amps, with a 14-gauge cord of a turn each . Remove the key and UNPLUG THE POWER CORD. Repeat until the walking belt is properly tightened. Using the allen wrench, turn the a left rear roller adjustment bolt counterclockwise, and the right bolt clockwise, 1/4 of a turn each . Repeat until the walking belt is cen- b 3ÓÐ4Ó Rear Roller Adjustment Bolts c. SYMPTOM: The walking belt is properly tight- b. Repeat until the walking belt is overtightened, treadmill performance...
...-listed surge suppressor, rated at 15 amps, with a 14-gauge cord of a turn each . Remove the key and UNPLUG THE POWER CORD. Repeat until the walking belt is properly tightened. Using the allen wrench, turn the a left rear roller adjustment bolt counterclockwise, and the right bolt clockwise, 1/4 of a turn each . Repeat until the walking belt is cen- b 3ÓÐ4Ó Rear Roller Adjustment Bolts c. SYMPTOM: The walking belt is properly tight- b. Repeat until the walking belt is overtightened, treadmill performance...
English Manual
Page 17
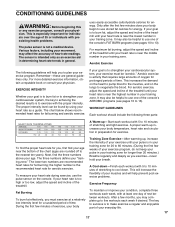
... heart rate is not a medical device. Training Zone ExerciseÑAfter warming up ÑStart each workout with at a relatively low intensity level for a sustained period of the treadmill until your heart rate during exercise, use the pulse sensor on the lungs to use stored fat calories for 20 to 60 minutes. (During the first few minutes does your body begin to exercise with preexisting health problems. The pulse sensor...
... heart rate is not a medical device. Training Zone ExerciseÑAfter warming up ÑStart each workout with at a relatively low intensity level for a sustained period of the treadmill until your heart rate during exercise, use the pulse sensor on the lungs to use stored fat calories for 20 to 60 minutes. (During the first few minutes does your body begin to exercise with preexisting health problems. The pulse sensor...

English Manual
Page 18
.... 1. Bring the sole of your feet together and your buttocks as possible. Stretches: Hamstrings, lower back and groin. 3. Calf/Achilles Stretch With one leg extended. Keep your back leg straight and your hips toward your back and shoulders to your knees outward. Allow your toes as...stretches is shown at the right. SUGGESTED STRETCHES The correct form for each leg. Hold for balance, reach back and grasp one hand against a wall for 15 counts, then relax. To cause further stretching of your hips. Move slowly as well. Repeat 3 times. Quadriceps Stretch With one...
.... 1. Bring the sole of your feet together and your buttocks as possible. Stretches: Hamstrings, lower back and groin. 3. Calf/Achilles Stretch With one leg extended. Keep your back leg straight and your hips toward your back and shoulders to your knees outward. Allow your toes as...stretches is shown at the right. SUGGESTED STRETCHES The correct form for each leg. Hold for balance, reach back and grasp one hand against a wall for 15 counts, then relax. To cause further stretching of your hips. Move slowly as well. Repeat 3 times. Quadriceps Stretch With one...
English Manual
Page 19
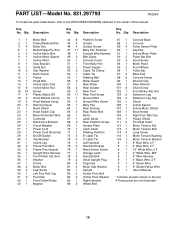
... 1 86 2 Platform Screw Isolator Isolator Screw Belly Pan Fastener Console Wire Harness Belt Guide Console Cover Front Belly Pan Power Supply Cable Tie Clamp Cable Tie Walking Belt Roller Guard Rear Roller Rear Isolator Rear Foot Rear Foot Screw Ground Wire Ground Wire Screw Belly Pan Rear Endcap Rear Roller Bolt Motor Latch Decal Rear Platform Screw Access Plate Latch Catch Walking Platform 8Ó cable Tie 4Ó cable Tie Left Handrail Handrail Endcap Reed Switch Screw Storage Latch Handrail Bolt Small Upright Plug Cage Nut Motor Star Washer Upright Incline Pivot Bolt Incline Pivot Washer...
... 1 86 2 Platform Screw Isolator Isolator Screw Belly Pan Fastener Console Wire Harness Belt Guide Console Cover Front Belly Pan Power Supply Cable Tie Clamp Cable Tie Walking Belt Roller Guard Rear Roller Rear Isolator Rear Foot Rear Foot Screw Ground Wire Ground Wire Screw Belly Pan Rear Endcap Rear Roller Bolt Motor Latch Decal Rear Platform Screw Access Plate Latch Catch Walking Platform 8Ó cable Tie 4Ó cable Tie Left Handrail Handrail Endcap Reed Switch Screw Storage Latch Handrail Bolt Small Upright Plug Cage Nut Motor Star Washer Upright Incline Pivot Bolt Incline Pivot Washer...

English Manual
Page 22
... PRODUCT (PROFORM¨ J6si treadmill) ¥ The MODEL NUMBER OF THE PRODUCT (831.297793) ¥ The KEY NUMBER AND DESCRIPTION OF THE PART (see the EXPLODED DRAWING and PART LIST included in this SEARS TREADMILL EXERCISER, contact the nearest SEARS Service Center throughout the United States and SEARS will repair or replace the TREADMILL EXERCISER, free of the decal. To request service or to state. This warranty does not apply when the TREADMILL EXERCISER is...
... PRODUCT (PROFORM¨ J6si treadmill) ¥ The MODEL NUMBER OF THE PRODUCT (831.297793) ¥ The KEY NUMBER AND DESCRIPTION OF THE PART (see the EXPLODED DRAWING and PART LIST included in this SEARS TREADMILL EXERCISER, contact the nearest SEARS Service Center throughout the United States and SEARS will repair or replace the TREADMILL EXERCISER, free of the decal. To request service or to state. This warranty does not apply when the TREADMILL EXERCISER is...


