
Uk Manual
Page 2
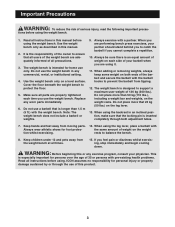
...placed on or around machine. • Replace label if damaged, illegible, or removed. Remove the Part List/Exploded Drawing before beginning assembly. PROFORM is missing or illegible, please call our Customer Service Department at 08457 089 009 to use. • Do not allow children on the weight... bench. WARNING • Misuse of this product may result in serious injury. • Read user's manual and follow all warnings and operating instructions ...
...placed on or around machine. • Replace label if damaged, illegible, or removed. Remove the Part List/Exploded Drawing before beginning assembly. PROFORM is missing or illegible, please call our Customer Service Department at 08457 089 009 to use. • Do not allow children on the weight... bench. WARNING • Misuse of this product may result in serious injury. • Read user's manual and follow all warnings and operating instructions ...
Uk Manual
Page 3
...rental, or institutional setting. 4. When you are adequately informed of all times. 15. Cover the floor beneath the weight bench to balance the bench. 8. The weight bench is inserted completely through the use only. rests to protect the floor. 5. This is the responsibility of this manual ...- Important Precautions WARNING: To reduce the risk of weight on the weight rests. Make sure all users of the weight bench are performing bench press exercises, your barbell when you use a barbell that the locking pin is designed to support a maximum user weight...
...rental, or institutional setting. 4. When you are adequately informed of all times. 15. Cover the floor beneath the weight bench to balance the bench. 8. The weight bench is inserted completely through the use only. rests to protect the floor. 5. This is the responsibility of this manual ...- Important Precautions WARNING: To reduce the risk of weight on the weight rests. Make sure all users of the weight bench are performing bench press exercises, your barbell when you use a barbell that the locking pin is designed to support a maximum user weight...
Uk Manual
Page 4
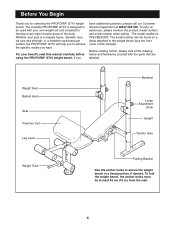
...the front cover of the body. To fold the weight bench, the anchor holes must be found on a decal attached to develop every major muscle group of this manual carefully before using the PROFORM® G710 weight bench. For your goal is a shapely figure, dramatic muscle ...size and strength, or a healthier cardiovascular system, the PROFORM® G710 will help us assist you have additional questions, please call our...
...the front cover of the body. To fold the weight bench, the anchor holes must be found on a decal attached to develop every major muscle group of this manual carefully before using the PROFORM® G710 weight bench. For your goal is a shapely figure, dramatic muscle ...size and strength, or a healthier cardiovascular system, the PROFORM® G710 will help us assist you have additional questions, please call our...
Uk Manual
Page 6
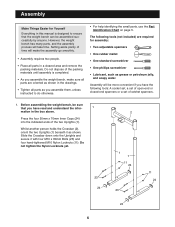
...small parts, use the Part Identification Chart on page 5. Do not dispose of time will take time. Before assembling the weight bench, be sure that the weight bench can be more convenient if you have read and understand the infor- 1 mation in the box above. However, the weight...and the assembly process will make sure all parts are required for Yourself Everything in this manual is completed. • As you assemble the weight bench, make the assembly go smoothly. • Assembly requires two people. • Place all parts in a cleared area and remove the packing ...
...small parts, use the Part Identification Chart on page 5. Do not dispose of time will take time. Before assembling the weight bench, be sure that the weight bench can be more convenient if you have read and understand the infor- 1 mation in the box above. However, the weight...and the assembly process will make sure all parts are required for Yourself Everything in this manual is completed. • As you assemble the weight bench, make the assembly go smoothly. • Assembly requires two people. • Place all parts in a cleared area and remove the packing ...
Uk Manual
Page 7
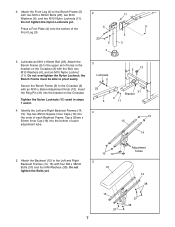
... Leg (3) to the upper set of each adjustment tube. 3 Lubricate 6 13 2 23 5 6 11 31 Bracket 4 10 15 14 5. Attach the Bench Frame (5) to the Bench Frame (5) 2 with the Bolt, two M10 Washers (6), and an M10 Nylon Locknut (11). Attach the Backrest (12) to pivot easily. Tighten the Nylon... x 65mm Adjustment Knob (13). Do not tighten the Nylon Locknuts yet. 6 11 Press a Foot Plate (4) onto the bottom of each Backrest Frame. Secure the Bench Frame (5) to the Crossbar (2) with four M6 x 38mm Bolts (37) and four M6 Washers (38). Lubricate an M10 x 80mm Bolt (23). Tap a...
... Leg (3) to the upper set of each adjustment tube. 3 Lubricate 6 13 2 23 5 6 11 31 Bracket 4 10 15 14 5. Attach the Bench Frame (5) to the Bench Frame (5) 2 with the Bolt, two M10 Washers (6), and an M10 Nylon Locknut (11). Attach the Backrest (12) to pivot easily. Tighten the Nylon... x 65mm Adjustment Knob (13). Do not tighten the Nylon Locknuts yet. 6 11 Press a Foot Plate (4) onto the bottom of each Backrest Frame. Secure the Bench Frame (5) to the Crossbar (2) with four M6 x 38mm Bolts (37) and four M6 Washers (38). Lubricate an M10 x 80mm Bolt (23). Tap a...
Uk Manual
Page 8
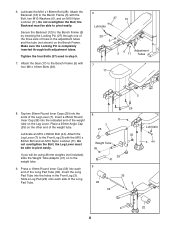
... (33) into the indicated end of the Long Pad Tube (32). Attach the Backrest (12) to the Bench Frame (5) with the M10 x 82mm Bolt and an M10 Nylon Locknut (11). Insert a 25mm Round Inner Cap... (36) into each side of the weight tube. If you will be able to the Bench Frame (5) by inserting the Locking Pin (27) through both adjustment tubes. Secure the Backrest (12) to ... must be using 28 mm weights (not included), slide the Weight Tube Adaptor (41) on the Bench Frame. Do not overtighten the Bolt; Do not overtighten the Bolt; Make sure the Locking Pin is...
... (33) into the indicated end of the Long Pad Tube (32). Attach the Backrest (12) to the Bench Frame (5) with the M10 x 82mm Bolt and an M10 Nylon Locknut (11). Insert a 25mm Round Inner Cap... (36) into each side of the weight tube. If you will be able to the Bench Frame (5) by inserting the Locking Pin (27) through both adjustment tubes. Secure the Backrest (12) to ... must be using 28 mm weights (not included), slide the Weight Tube Adaptor (41) on the Bench Frame. Do not overtighten the Bolt; Do not overtighten the Bolt; Make sure the Locking Pin is...
Uk Manual
Page 9
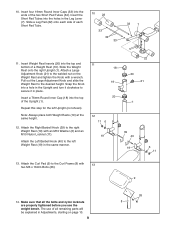
... 6 11 13. Insert the Short Pad Tubes into the top of all the bolts and nylon locknuts are properly tightened before you use the weight bench. 10. Insert four 19mm Round Inner Caps (33) into the ends of each Short Pad Tube. 10 22 33 34 33 33 7 11...
... 6 11 13. Insert the Short Pad Tubes into the top of all the bolts and nylon locknuts are properly tightened before you use the weight bench. 10. Insert four 19mm Round Inner Caps (33) into the ends of each Short Pad Tube. 10 22 33 34 33 33 7 11...
Uk Manual
Page 10
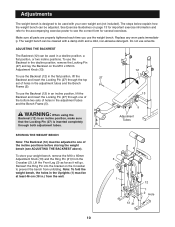
...important exercise information and refer to the accompanying exercise poster to see ADJUSTING THE BACKREST above). See Exercise Guidelines on the Crossbar to prevent the bench from unfolding. Lift the Front Leg (3) as far as it will go. Reinsert the Ring Pin into the bracket on page 13 for ... a damp cloth and a mild, non-abrasive detergent. To use the Backrest in .) from the Crossbar (2). The steps below explain how the weight bench can be cleaned with your weight bench, remove the M10 x 65mm Adjustment Knob (13) and the Ring Pin (31) from the wall. 3 1 12 1 2 Hole 13 31 ...
...important exercise information and refer to the accompanying exercise poster to see ADJUSTING THE BACKREST above). See Exercise Guidelines on the Crossbar to prevent the bench from unfolding. Lift the Front Leg (3) as far as it will go. Reinsert the Ring Pin into the bracket on page 13 for ... a damp cloth and a mild, non-abrasive detergent. To use the Backrest in .) from the Crossbar (2). The steps below explain how the weight bench can be cleaned with your weight bench, remove the M10 x 65mm Adjustment Knob (13) and the Ring Pin (31) from the wall. 3 1 12 1 2 Hole 13 31 ...

Uk Manual
Page 11
... Adjustment Knob (21) counterclockwise, pull it out of the Weight Rest, and slide the Weight Rest up or down the Upright (1) to the weight bench. Reinsert the Large Adjustment Knob so that it locks into the Front Leg and the Curl Frame. This will not interfere with other exercises. 1 19...AND REMOVING THE CURL PAD For some exercises, the Curl Pad (9) must be attached to the desired position. To remove the Curl Frame (8) from the bench so that the Large Adjustment Knobs (21) are changing weights. USING THE BARBELL HOOKS To change weights whilst your barbell (not included) is tight. ...
... Adjustment Knob (21) counterclockwise, pull it out of the Weight Rest, and slide the Weight Rest up or down the Upright (1) to the weight bench. Reinsert the Large Adjustment Knob so that it locks into the Front Leg and the Curl Frame. This will not interfere with other exercises. 1 19...AND REMOVING THE CURL PAD For some exercises, the Curl Pad (9) must be attached to the desired position. To remove the Curl Frame (8) from the bench so that the Large Adjustment Knobs (21) are changing weights. USING THE BARBELL HOOKS To change weights whilst your barbell (not included) is tight. ...

Uk Manual
Page 12
WARNING: When using the Leg Lever (7), place a barbell with the Weight Clip (42). Do not place more than 23 kg (50 lbs.) on the weight rests to balance the bench. 7 42 12 ATTACHING WEIGHTS TO THE LEG LEVER To use the Leg Lever (7), slide the desired weights (not included) onto the weight tube on the Leg Lever and secure it with the same amount of weight on the Leg Lever.
WARNING: When using the Leg Lever (7), place a barbell with the Weight Clip (42). Do not place more than 23 kg (50 lbs.) on the weight rests to balance the bench. 7 42 12 ATTACHING WEIGHTS TO THE LEG LEVER To use the Leg Lever (7), slide the desired weights (not included) onto the weight tube on the Leg Lever and secure it with the same amount of weight on the Leg Lever.
Uk Manual
Page 16
... product, or if you need to give the following information: • The MODEL NUMBER OF THE PRODUCT (PFEVBE33330) • The NAME OF THE PRODUCT (PROFORM® G710 weight bench) • The SERIAL NUMBER OF THE PRODUCT (see the front cover of this manual) • The KEY NUMBER AND DESCRIPTION OF THE PART(S) (see...
... product, or if you need to give the following information: • The MODEL NUMBER OF THE PRODUCT (PFEVBE33330) • The NAME OF THE PRODUCT (PROFORM® G710 weight bench) • The SERIAL NUMBER OF THE PRODUCT (see the front cover of this manual) • The KEY NUMBER AND DESCRIPTION OF THE PART(S) (see...
Uk Manual
Page 18
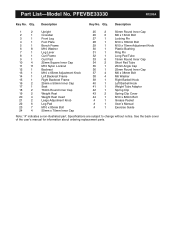
... the back cover of the user's manual for information about ordering replacement parts. Description Key No. Qty. Qty. Description 1 2 Upright 2 1 Crossbar 3 1 Front Leg 4 1 Foot Plate 5 1 Bench Frame 6 8 M10 Washer 7 1 Leg Lever 8 1 Curl Frame 9 1 Curl Pad 10 4 25mm Square Inner Cap 11 11 M10 Nylon Locknut 12 1 Backrest 13 1 M10 x 65mm Adjustment...
... the back cover of the user's manual for information about ordering replacement parts. Description Key No. Qty. Qty. Description 1 2 Upright 2 1 Crossbar 3 1 Front Leg 4 1 Foot Plate 5 1 Bench Frame 6 8 M10 Washer 7 1 Leg Lever 8 1 Curl Frame 9 1 Curl Pad 10 4 25mm Square Inner Cap 11 11 M10 Nylon Locknut 12 1 Backrest 13 1 M10 x 65mm Adjustment...
