
Uk Manual
Page 1
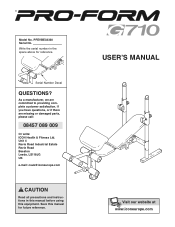
PFEVBE33330 Serial No. Write the serial number in this manual before using this manual for reference. Serial Number Decal QUESTIONS? If you have questions, or if there are committed to providing complete customer satisfaction. ® Model No. As a manufacturer, we are missing or damaged parts, please call: 08457 089 009 Or write: ICON Health & Fitness Ltd. Unit 4 Revie Road Industrial Estate Revie Road Beeston...
PFEVBE33330 Serial No. Write the serial number in this manual before using this manual for reference. Serial Number Decal QUESTIONS? If you have questions, or if there are committed to providing complete customer satisfaction. ® Model No. As a manufacturer, we are missing or damaged parts, please call: 08457 089 009 Or write: ICON Health & Fitness Ltd. Unit 4 Revie Road Industrial Estate Revie Road Beeston...
Uk Manual
Page 2
... You Begin 4 Part Identification Chart 5 Assembly 6 Adjustments 10 Exercise Guidelines 13 Ordering Replacement Parts Back Cover Note: A Part List/Exploded Drawing is attached in the centre of ICON Health & Fitness, Inc. 2 If a decal is a registered trademark of this product may result in the indicated locations. ! Apply the decals in serious injury. • Read user's manual and follow all warnings and operating instructions prior to order a free replacement decal. PROFORM is missing...
... You Begin 4 Part Identification Chart 5 Assembly 6 Adjustments 10 Exercise Guidelines 13 Ordering Replacement Parts Back Cover Note: A Part List/Exploded Drawing is attached in the centre of ICON Health & Fitness, Inc. 2 If a decal is a registered trademark of this product may result in the indicated locations. ! Apply the decals in serious injury. • Read user's manual and follow all warnings and operating instructions prior to order a free replacement decal. PROFORM is missing...
Uk Manual
Page 3
... weight bench only on the weight rests. Cover the floor beneath the weight bench to balance the bench. 8. Note: The weight bench does not include a barbell or weights. 9. Do not place more that all users of the weight bench are properly tightened each side of the owner to support a maximum user weight of weight on each time you are performing bench press exercises, your barbell when you use the weight bench in this or any exercise program...
... weight bench only on the weight rests. Cover the floor beneath the weight bench to balance the bench. 8. Note: The weight bench does not include a barbell or weights. 9. Do not place more that all users of the weight bench are properly tightened each side of the owner to support a maximum user weight of weight on each time you are performing bench press exercises, your barbell when you use the weight bench in this or any exercise program...
Uk Manual
Page 4
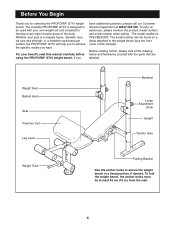
... fold the weight bench, the anchor holes must be found on a decal attached to secure the weight bench in .) from the wall. 4 The serial number can be at least 46 cm (18 in a fixed position, if desired. Weight Rest Barbell Hook Seat Preacher Curl Leg Lever Backrest Large Adjustment Knob Upright *Anchor Hole Weight Tube Folding Bracket *Use the anchor holes to the weight bench (see the front cover of the body...
... fold the weight bench, the anchor holes must be found on a decal attached to secure the weight bench in .) from the wall. 4 The serial number can be at least 46 cm (18 in a fixed position, if desired. Weight Rest Barbell Hook Seat Preacher Curl Leg Lever Backrest Large Adjustment Knob Upright *Anchor Hole Weight Tube Folding Bracket *Use the anchor holes to the weight bench (see the front cover of the body...

Uk Manual
Page 5
The number in parenthesis below each part refers to help you cannot find a part in the parts bags, check to see if it has been pre-assembled. Part Identification Chart This chart is provided to the key number of the part from the Part List in the centre of this manual. If you identify the small parts used in assembly. Important: Some parts may have been pre-assembled for shipping purposes. M10 x 82mm Bolt (44) M10 x 80mm Bolt (23) M6 x 38mm Bolt (37) M6 x 16mm Bolt (26) M6 Washer (38) M10 x 180mm Bolt (28) M10 Nylon Locknut (11) M10 Washer (6) 5
The number in parenthesis below each part refers to help you cannot find a part in the parts bags, check to see if it has been pre-assembled. Part Identification Chart This chart is provided to the key number of the part from the Part List in the centre of this manual. If you identify the small parts used in assembly. Important: Some parts may have been pre-assembled for shipping purposes. M10 x 82mm Bolt (44) M10 x 80mm Bolt (23) M6 x 38mm Bolt (37) M6 x 16mm Bolt (26) M6 Washer (38) M10 x 180mm Bolt (28) M10 Nylon Locknut (11) M10 Washer (6) 5
Uk Manual
Page 6
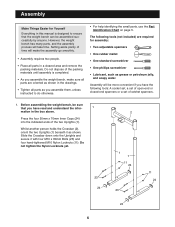
... four M10 x 80mm Bolts (23) and four hand-tightened M10 Nylon Locknuts (11). Do not dispose of the two Uprights (1). Assembly Make Things Easier for Yourself Everything in this manual is completed. • As you assemble the weight bench, make the assembly go smoothly. • Assembly requires two people. • Place all parts as you assemble them, unless instructed to ensure that you...
... four M10 x 80mm Bolts (23) and four hand-tightened M10 Nylon Locknuts (11). Do not dispose of the two Uprights (1). Assembly Make Things Easier for Yourself Everything in this manual is completed. • As you assemble the weight bench, make the assembly go smoothly. • Assembly requires two people. • Place all parts as you assemble them, unless instructed to ensure that you...
Uk Manual
Page 7
... holes in steps 1 and 2. 4. Attach the Backrest (12) to the Bench Frame (5) 2 with an M10 x 65mm Adjustment Knob (13). Do not tighten the Bolts yet. 10 16 5 12 15 37 7 Adjustment Tubes 14 38 37 38 Identify the Left and Right Backrest Frames (14, 15). Tighten the Nylon Locknuts (11) used in the bracket on the Crossbar. Attach the Front Leg (3) to...
... holes in steps 1 and 2. 4. Attach the Backrest (12) to the Bench Frame (5) 2 with an M10 x 65mm Adjustment Knob (13). Do not tighten the Bolts yet. 10 16 5 12 15 37 7 Adjustment Tubes 14 38 37 38 Identify the Left and Right Backrest Frames (14, 15). Tighten the Nylon Locknuts (11) used in the bracket on the Crossbar. Attach the Front Leg (3) to...
Uk Manual
Page 8
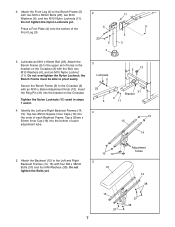
... in step 5. 7. Slide a Leg Pad (22) onto each end of the weight tube. Lubricate the M10 x 180mm Bolt (28). If you will be using 28 mm weights (not included), slide the Weight Tube Adaptor (41) on the other end of the Long Pad Tube (32). Tighten the four Bolts (37) used in the Front Leg (3). the Backrest must be able to the Bench...
... in step 5. 7. Slide a Leg Pad (22) onto each end of the weight tube. Lubricate the M10 x 180mm Bolt (28). If you will be using 28 mm weights (not included), slide the Weight Tube Adaptor (41) on the other end of the Long Pad Tube (32). Tighten the four Bolts (37) used in the Front Leg (3). the Backrest must be able to the Bench...
Uk Manual
Page 9
... properly tightened before you use the weight bench. Repeat this step for the left Weight Rest (19) in the Leg Lever (7). Attach the Curl Pad (9) to the desired height. Pull out the Large Adjustment Knob and slide the Weight Rest to the Curl Frame (8) with a wrench. Insert Weight Rest Inserts (20) into a hole in the Upright and turn it clockwise to the left Upright (not...
... properly tightened before you use the weight bench. Repeat this step for the left Weight Rest (19) in the Leg Lever (7). Attach the Curl Pad (9) to the desired height. Pull out the Large Adjustment Knob and slide the Weight Rest to the Curl Frame (8) with a wrench. Insert Weight Rest Inserts (20) into a hole in the Upright and turn it clockwise to the left Upright (not...
Uk Manual
Page 10
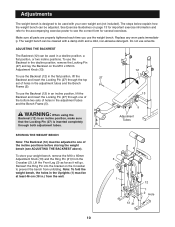
... Backrest (12) in a decline position, a flat position, or two incline positions. Lift the Front Leg (3) as far as it will go. Note: To fold the weight bench, the holes in the Uprights (1) must be used in an incline position, lift the Backrest and insert the Locking Pin (27) through the top set (not included). Replace any worn parts immediately. The weight bench can be adjusted.
... Backrest (12) in a decline position, a flat position, or two incline positions. Lift the Front Leg (3) as far as it will go. Note: To fold the weight bench, the holes in the Uprights (1) must be used in an incline position, lift the Backrest and insert the Locking Pin (27) through the top set (not included). Replace any worn parts immediately. The weight bench can be adjusted.

Uk Manual
Page 11
... Frame (8) into the Front Leg (3), and tighten the M10 x 70mm Adjustment Knob (29) into a hole in use, store it away from the Front Leg (3), remove the M10 x 70mm Adjustment Knob (29) and lift the Curl Frame out of the Front Leg. To remove the Curl Frame (8) from the bench so that the Large Adjustment Knobs (21) are changing weights. WARNING: Always set both Weight Rests (19) at the...
... Frame (8) into the Front Leg (3), and tighten the M10 x 70mm Adjustment Knob (29) into a hole in use, store it away from the Front Leg (3), remove the M10 x 70mm Adjustment Knob (29) and lift the Curl Frame out of the Front Leg. To remove the Curl Frame (8) from the bench so that the Large Adjustment Knobs (21) are changing weights. WARNING: Always set both Weight Rests (19) at the...

Uk Manual
Page 12
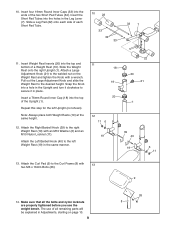
ATTACHING WEIGHTS TO THE LEG LEVER To use the Leg Lever (7), slide the desired weights (not included) onto the weight tube on the Leg Lever. Do not place more than 23 kg (50 lbs.) on the Leg Lever and secure it with the same amount of weight on the weight rests to balance the bench. 7 42 12 WARNING: When using the Leg Lever (7), place a barbell with the Weight Clip (42).
ATTACHING WEIGHTS TO THE LEG LEVER To use the Leg Lever (7), slide the desired weights (not included) onto the weight tube on the Leg Lever. Do not place more than 23 kg (50 lbs.) on the Leg Lever and secure it with the same amount of weight on the weight rests to balance the bench. 7 42 12 WARNING: When using the Leg Lever (7), place a barbell with the Weight Clip (42).
Uk Manual
Page 13
... for 3 minutes after each set . Cross Training Cross training is an essential part of an effective exercise program. Warming up prepares your body for each workout with 5 to 10 minutes of stretching and light exercise to their capacity. To give your heart and lungs. The repetitions in two ways: • by changing the amount of weight used • by using high amounts of weight. Never hold your muscles...
... for 3 minutes after each set . Cross Training Cross training is an essential part of an effective exercise program. Warming up prepares your body for each workout with 5 to 10 minutes of stretching and light exercise to their capacity. To give your heart and lungs. The repetitions in two ways: • by changing the amount of weight used • by using high amounts of weight. Never hold your muscles...
Uk Manual
Page 14
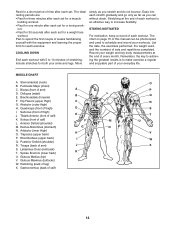
... end of your workouts. Anterior Deltoid (shoulder) M. Record your arms and legs. Hip Flexors (upper thigh) CC G. Quadriceps (front of leg) X. Posterior Deltoid (shoulder) R. Gluteus Maximus (buttocks) W. Hamstring (back of thigh) DD I. Triceps (back of calf) K. Abductor (outer thigh) H. MUSCLE CHART A. Tibialis Anterior (front of arm) JJ S. Sternomastoid (neck) B. List the date, the exercises performed, the weight used to schedule...
... end of your workouts. Anterior Deltoid (shoulder) M. Record your arms and legs. Hip Flexors (upper thigh) CC G. Quadriceps (front of leg) X. Posterior Deltoid (shoulder) R. Gluteus Maximus (buttocks) W. Hamstring (back of thigh) DD I. Triceps (back of calf) K. Abductor (outer thigh) H. MUSCLE CHART A. Tibialis Anterior (front of arm) JJ S. Sternomastoid (neck) B. List the date, the exercises performed, the weight used to schedule...

Uk Manual
Page 15
MONDAY Date: / / EXERCISE WEIGHT SETS REPS TUESDAY Date: / / AEROBIC EXERCISE WEDNESDAY Date: / / EXERCISE WEIGHT SETS REPS THURSDAY Date: / / AEROBIC EXERCISE FRIDAY Date: / / EXERCISE WEIGHT SETS REPS Make photocopies of this page for scheduling and recording your workouts. 15
MONDAY Date: / / EXERCISE WEIGHT SETS REPS TUESDAY Date: / / AEROBIC EXERCISE WEDNESDAY Date: / / EXERCISE WEIGHT SETS REPS THURSDAY Date: / / AEROBIC EXERCISE FRIDAY Date: / / EXERCISE WEIGHT SETS REPS Make photocopies of this page for scheduling and recording your workouts. 15
Uk Manual
Page 16
... of this product, or if you need to give the following information: • The MODEL NUMBER OF THE PRODUCT (PFEVBE33330) • The NAME OF THE PRODUCT (PROFORM® G710 weight bench) • The SERIAL NUMBER OF THE PRODUCT (see the front cover of this manual) • The KEY NUMBER AND DESCRIPTION OF THE PART(S) (see the Part List and the Exploded Drawing in China © 2003 ICON Health & Fitness, Inc.
... of this product, or if you need to give the following information: • The MODEL NUMBER OF THE PRODUCT (PFEVBE33330) • The NAME OF THE PRODUCT (PROFORM® G710 weight bench) • The SERIAL NUMBER OF THE PRODUCT (see the front cover of this manual) • The KEY NUMBER AND DESCRIPTION OF THE PART(S) (see the Part List and the Exploded Drawing in China © 2003 ICON Health & Fitness, Inc.

Uk Manual
Page 17
REMOVE THIS PART LIST/EXPLODED DRAWING FROM THE MANUAL SAVE THIS PART LIST/EXPLODED DRAWING AND THE USER'S MANUAL FOR FUTURE REFERENCE 81
REMOVE THIS PART LIST/EXPLODED DRAWING FROM THE MANUAL SAVE THIS PART LIST/EXPLODED DRAWING AND THE USER'S MANUAL FOR FUTURE REFERENCE 81
Uk Manual
Page 18
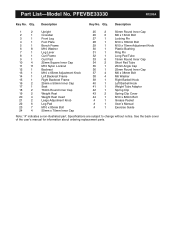
... Cap 34 2 Short Pad Tube 35 1 25mm Angle Cap 36 1 25mm Round Inner Cap 37 4 M6 x 38mm Bolt 38 4 M6 Washer 39 1 Right Barbell Hook 40 1 Left Barbell Hook 41 1 Weight Tube Adaptor 42 1 Spring Clip 43 2 Spring Clip Cover 44 1 M10 x 82mm Bolt # 1 Grease Packet # 1 User's Manual # 1 Exercise Guide Note: "#" indicates a non-illustrated part. PFEVBE33330 R1203A Key No. Qty. Part List-Model No.
... Cap 34 2 Short Pad Tube 35 1 25mm Angle Cap 36 1 25mm Round Inner Cap 37 4 M6 x 38mm Bolt 38 4 M6 Washer 39 1 Right Barbell Hook 40 1 Left Barbell Hook 41 1 Weight Tube Adaptor 42 1 Spring Clip 43 2 Spring Clip Cover 44 1 M10 x 82mm Bolt # 1 Grease Packet # 1 User's Manual # 1 Exercise Guide Note: "#" indicates a non-illustrated part. PFEVBE33330 R1203A Key No. Qty. Part List-Model No.
Uk Manual
Page 19
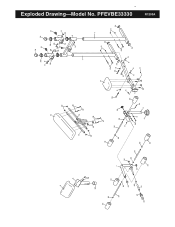
PFEVBE33330 20 11 6 18 21 18 12 19 39 20 21 40 9 20 13 6 10 11 19 20 8 26 30 15 10 16 38 14 37 38 2 31 1 1 17 11 22 37 22 24 33 22 23 11 28 34 7 32 33 29 33 6 23 6 24 24 23 33 35 11 27 11 25 6 22 6 11 33 24 36 34 23 6 11 5 37 42 25 6 41 43 33 44 11 26 3 26 4 22 22 R1203A Exploded Drawing-Model No.
PFEVBE33330 20 11 6 18 21 18 12 19 39 20 21 40 9 20 13 6 10 11 19 20 8 26 30 15 10 16 38 14 37 38 2 31 1 1 17 11 22 37 22 24 33 22 23 11 28 34 7 32 33 29 33 6 23 6 24 24 23 33 35 11 27 11 25 6 22 6 11 33 24 36 34 23 6 11 5 37 42 25 6 41 43 33 44 11 26 3 26 4 22 22 R1203A Exploded Drawing-Model No.

