
Uk Manual
Page 2
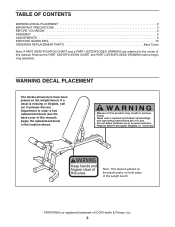
If a decal is a registered trademark of ICON Health & Fitness, Inc. 2 PROFORM is missing or illegible, call our Customer Service Department to order a free replacement decal (see the back cover of this area. Remove the PART ... The decals shown here have been placed on both sides of this manual. Note: This decal is placed on the plastic plate, on the weight bench. TABLE OF CONTENTS WARNING DECAL PLACEMENT 2 IMPORTANT PRECAUTIONS 3 BEFORE YOU BEGIN 4 ASSEMBLY 5 ADJUSTMENTS 9 EXERCISE GUIDELINES 10 ORDERING REPLACEMENT PARTS Back Cover Note: A PART IDENTIFICATION ...
If a decal is a registered trademark of ICON Health & Fitness, Inc. 2 PROFORM is missing or illegible, call our Customer Service Department to order a free replacement decal (see the back cover of this area. Remove the PART ... The decals shown here have been placed on both sides of this manual. Note: This decal is placed on the plastic plate, on the weight bench. TABLE OF CONTENTS WARNING DECAL PLACEMENT 2 IMPORTANT PRECAUTIONS 3 BEFORE YOU BEGIN 4 ASSEMBLY 5 ADJUSTMENTS 9 EXERCISE GUIDELINES 10 ORDERING REPLACEMENT PARTS Back Cover Note: A PART IDENTIFICATION ...
Uk Manual
Page 3
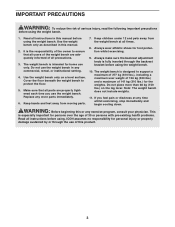
...assumes no responsibility for persons over the age of 35 or persons with pre-existing health problems. Read all precautions. 3. The weight bench is especially important for personal injury or property damage sustained by or through the backrest bracket before using. IMPORTANT PRECAUTIONS WARNING: To reduce... of serious injury, read the following important precautions before using the weight bench. It is fully inserted through the use the weight bench in this product. 3 Do not use of the weight bench are properly tightened each time you feel pain or dizziness at all users...
...assumes no responsibility for persons over the age of 35 or persons with pre-existing health problems. Read all precautions. 3. The weight bench is especially important for personal injury or property damage sustained by or through the backrest bracket before using. IMPORTANT PRECAUTIONS WARNING: To reduce... of serious injury, read the following important precautions before using the weight bench. It is fully inserted through the use the weight bench in this product. 3 Do not use of the weight bench are properly tightened each time you feel pain or dizziness at all users...
Uk Manual
Page 4
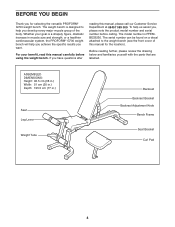
... in.) Width: 51 cm (20 in.) Depth: 195.5 cm (77 in muscle size and strength, or a healthier cardiovascular system, the PROFORM® G700 weight bench will help you achieve the specific results you want. Whether your benefit, read this manual carefully before calling. The serial number can be found... on a decal attached to help us assist you develop every major muscle group of this manual for selecting the versatile PROFORM® G700 weight bench. If you for the location). To help you , please note the product model number and serial number before using the weight...
... in.) Width: 51 cm (20 in.) Depth: 195.5 cm (77 in muscle size and strength, or a healthier cardiovascular system, the PROFORM® G700 weight bench will help you achieve the specific results you want. Whether your benefit, read this manual carefully before calling. The serial number can be found... on a decal attached to help us assist you develop every major muscle group of this manual for selecting the versatile PROFORM® G700 weight bench. If you for the location). To help you , please note the product model number and serial number before using the weight...
Uk Manual
Page 5
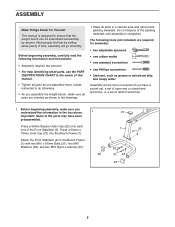
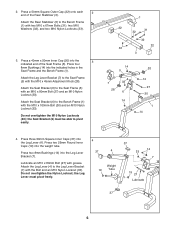
... persons. • For help identifying small parts, use the PART IDENTIFICATION CHART in the center of the packing materials until assembly is designed to the Bench Frame (1) with two M10 x 67mm Bolts (31), two M10 Washers (32), and two M10 Nylon Locknuts (33). 1 33 2 32 22 31 32 ... carefully read the following tools (not included) are oriented as you assemble them, unless instructed to do otherwise. • As you assemble the weight bench, make sure you have been preassembled. Do not dispose of this manual. • Tighten all parts as shown in the drawings. • Place ...
... persons. • For help identifying small parts, use the PART IDENTIFICATION CHART in the center of the packing materials until assembly is designed to the Bench Frame (1) with two M10 x 67mm Bolts (31), two M10 Washers (32), and two M10 Nylon Locknuts (33). 1 33 2 32 22 31 32 ... carefully read the following tools (not included) are oriented as you assemble them, unless instructed to do otherwise. • As you assemble the weight bench, make sure you have been preassembled. Do not dispose of this manual. • Tighten all parts as shown in the drawings. • Place ...
Uk Manual
Page 6
... the M10 Nylon Locknuts (33); Press two 25mm Round Inner Caps (19) into the indicated holes in the Seat Frame and the Bench Frame (1). Attach the Leg Lever (4) to the Bench Frame (1) with an M10 x 80mm Bolt (27) and an M10 Nylon Locknut (33). the Leg Lever must be able to the... Stabiliser (3). Attach the Seat Bracket (6) to the Seat Frame (5) with the Bolt and an M10 Nylon Locknut (33). Attach the Leg Lever Bracket (7) to the Bench Frame (1) with grease. Attach the Seat Bracket (6) to pivot easily. 1 22 31 32 32 22 33 3 14 5 7 33 28 6 14 20 14 27 30 1 14...
... the M10 Nylon Locknuts (33); Press two 25mm Round Inner Caps (19) into the indicated holes in the Seat Frame and the Bench Frame (1). Attach the Leg Lever (4) to the Bench Frame (1) with an M10 x 80mm Bolt (27) and an M10 Nylon Locknut (33). the Leg Lever must be able to the... Stabiliser (3). Attach the Seat Bracket (6) to the Seat Frame (5) with the Bolt and an M10 Nylon Locknut (33). Attach the Leg Lever Bracket (7) to the Bench Frame (1) with grease. Attach the Seat Bracket (6) to pivot easily. 1 22 31 32 32 22 33 3 14 5 7 33 28 6 14 20 14 27 30 1 14...
Uk Manual
Page 7
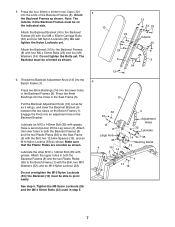
...Seat Frame (5) with grease. the Backrest (10) must be able to the Backrest Frames (8) with grease. See step 5. Attach the Backrest Bracket (9) to the Bench Frame (1) with four M8 x 55mm Carriage Bolts (24) and four M8 Nylon Locknuts (25). Lubricate the other M10 x 140mm Bolt (35) with the Bolt,... as shown. 6. Tighten the M8 Nylon Locknuts (25) and the M6 x 50mm Bolts (23) used in the Backrest Frames must be on the Bench Frame (1). The Backrest must be oriented as it will go, and lower the Backrest Bracket (9) between the two tubes on the indicated side. 5. Make...
...Seat Frame (5) with grease. the Backrest (10) must be able to the Backrest Frames (8) with grease. See step 5. Attach the Backrest Bracket (9) to the Bench Frame (1) with four M8 x 55mm Carriage Bolts (24) and four M8 Nylon Locknuts (25). Lubricate the other M10 x 140mm Bolt (35) with the Bolt,... as shown. 6. Tighten the M8 Nylon Locknuts (25) and the M6 x 50mm Bolts (23) used in the Backrest Frames must be on the Bench Frame (1). The Backrest must be oriented as it will go, and lower the Backrest Bracket (9) between the two tubes on the indicated side. 5. Make...
Uk Manual
Page 8
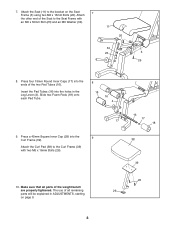
... 23 5 26 8. The use of all parts of the two Pad Tubes (16). Press a 45mm Square Inner Cap (29) into the ends of the weight bench are properly tightened. Insert the Pad Tubes (16) into the holes in ADJUSTMENTS, starting on the Seat 7 Frame (5) using two M6 x 16mm Bolts (26).
... 23 5 26 8. The use of all parts of the two Pad Tubes (16). Press a 45mm Square Inner Cap (29) into the ends of the weight bench are properly tightened. Insert the Pad Tubes (16) into the holes in ADJUSTMENTS, starting on the Seat 7 Frame (5) using two M6 x 16mm Bolts (26).
Uk Manual
Page 9
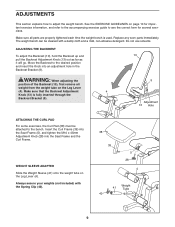
... tighten the M10 x 45mm Adjustment Knob (28) into an adjustment hole in the Backrest Bracket (9). ADJUSTMENTS This section explains how to the bench. Replace any worn parts immediately. WARNING: When adjusting the position of the Backrest (10), first remove all parts are properly tightened each time... the weight bench is fully inserted through the Backrest Bracket (9). 9 Adjustment 13 Hole ATTACHING THE CURL PAD For some exercises, the Curl Pad (38)...
... tighten the M10 x 45mm Adjustment Knob (28) into an adjustment hole in the Backrest Bracket (9). ADJUSTMENTS This section explains how to the bench. Replace any worn parts immediately. WARNING: When adjusting the position of the Backrest (10), first remove all parts are properly tightened each time... the weight bench is fully inserted through the Backrest Bracket (9). 9 Adjustment 13 Hole ATTACHING THE CURL PAD For some exercises, the Curl Pad (38)...
Uk Manual
Page 12
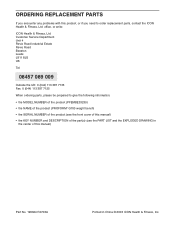
..., or if you need to give the following information: • the MODEL NUMBER of the product (PFEMBE33230) • the NAME of the product (PROFORM® G700 weight bench) • the SERIAL NUMBER of the product (see the front cover of this manual) • the KEY NUMBER and DESCRIPTION of the part(s) (see...
..., or if you need to give the following information: • the MODEL NUMBER of the product (PFEMBE33230) • the NAME of the product (PROFORM® G700 weight bench) • the SERIAL NUMBER of the product (see the front cover of this manual) • the KEY NUMBER and DESCRIPTION of the part(s) (see...
Uk Manual
Page 15
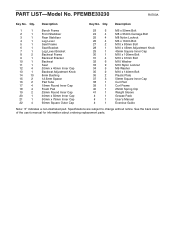
Qty. Description 1 1 Bench Frame 2 1 Front Stabiliser 3 1 Rear Stabiliser 4 1 Leg Lever 5 1 Seat Frame 6 1 Seat Bracket 7 1 Leg Lever Bracket 8 2 Backrest Frame 9 1 Backrest Bracket 10 1 Backrest 11 1 Seat 12 4 20mm x 40mm ...
Qty. Description 1 1 Bench Frame 2 1 Front Stabiliser 3 1 Rear Stabiliser 4 1 Leg Lever 5 1 Seat Frame 6 1 Seat Bracket 7 1 Leg Lever Bracket 8 2 Backrest Frame 9 1 Backrest Bracket 10 1 Backrest 11 1 Seat 12 4 20mm x 40mm ...
