
Uk Manual
Page 1
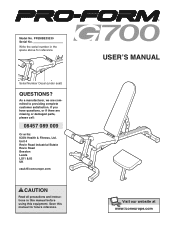
Model No. As a manufacturer, we are missing or damaged parts, please call: 08457 089 009 Or write: ICON Health & Fitness, Ltd. PFEMBE33230 Serial No. Unit 4 Revie Road Industrial Estate Revie Road Beeston Leeds LS11 8JG UK [email protected] CAUTION Read all precautions and instructions in the space above for future reference. If you have questions, or if there...
Model No. As a manufacturer, we are missing or damaged parts, please call: 08457 089 009 Or write: ICON Health & Fitness, Ltd. PFEMBE33230 Serial No. Unit 4 Revie Road Industrial Estate Revie Road Beeston Leeds LS11 8JG UK [email protected] CAUTION Read all precautions and instructions in the space above for future reference. If you have questions, or if there...
Uk Manual
Page 2
... PRECAUTIONS 3 BEFORE YOU BEGIN 4 ASSEMBLY 5 ADJUSTMENTS 9 EXERCISE GUIDELINES 10 ORDERING REPLACEMENT PARTS Back Cover Note: A PART IDENTIFICATION CHART and a PART LIST/EXPLODED DRAWING are attached in the location shown. If a decal is missing or illegible, call our Customer Service Department to order a free replacement decal (see the back cover of ICON Health & Fitness, Inc. 2 PROFORM is placed on the plastic plate, on the weight bench. Apply the replacement decal in the center of...
... PRECAUTIONS 3 BEFORE YOU BEGIN 4 ASSEMBLY 5 ADJUSTMENTS 9 EXERCISE GUIDELINES 10 ORDERING REPLACEMENT PARTS Back Cover Note: A PART IDENTIFICATION CHART and a PART LIST/EXPLODED DRAWING are attached in the location shown. If a decal is missing or illegible, call our Customer Service Department to order a free replacement decal (see the back cover of ICON Health & Fitness, Inc. 2 PROFORM is placed on the plastic plate, on the weight bench. Apply the replacement decal in the center of...
Uk Manual
Page 3
... leg lever. Replace any commercial, rental, or institutional setting. 4. The weight bench is the responsibility of the owner to ensure that all parts are adequately informed of all times. 8. If you use of this or any time whilst exercising, stop immediately and begin cooling down. It is designed to protect the floor. 5. The weight bench is especially important for home use the weight bench in this manual before using...
... leg lever. Replace any commercial, rental, or institutional setting. 4. The weight bench is the responsibility of the owner to ensure that all parts are adequately informed of all times. 8. If you use of this or any time whilst exercising, stop immediately and begin cooling down. It is designed to protect the floor. 5. The weight bench is especially important for home use the weight bench in this manual before using...
Uk Manual
Page 4
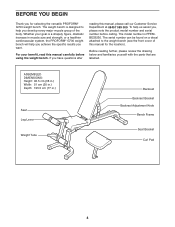
... product model number and serial number before using the weight bench. Before reading further, please review the drawing below and familiarise yourself with the parts that are labelled. For your goal is a shapely figure, dramatic increase in .) Seat Leg Lever Weight Tube Backrest Backrest Bracket Backrest Adjustment Knob Bench Frame Seat Bracket Curl Pad 4 BEFORE YOU BEGIN Thank you for the location). The model number is designed to the weight bench...
... product model number and serial number before using the weight bench. Before reading further, please review the drawing below and familiarise yourself with the parts that are labelled. For your goal is a shapely figure, dramatic increase in .) Seat Leg Lever Weight Tube Backrest Backrest Bracket Backrest Adjustment Knob Bench Frame Seat Bracket Curl Pad 4 BEFORE YOU BEGIN Thank you for the location). The model number is designed to the weight bench...
Uk Manual
Page 5
... information and instructions: • Assembly requires two persons. • For help identifying small parts, use the PART IDENTIFICATION CHART in the box above. 1 21 Important: Some of ratchet wrenches. 1. Most people find that the weight bench can be assembled successfully by setting aside plenty of time, assembly will be more convenient if you understand the information in the center of this manual. • Tighten all parts...
... information and instructions: • Assembly requires two persons. • For help identifying small parts, use the PART IDENTIFICATION CHART in the box above. 1 21 Important: Some of ratchet wrenches. 1. Most people find that the weight bench can be assembled successfully by setting aside plenty of time, assembly will be more convenient if you understand the information in the center of this manual. • Tighten all parts...
Uk Manual
Page 6
... holes in the Seat Frame and the Bench Frame (1). Attach the Leg Lever (4) to the Seat Frame (5) with grease. Press four 8mm Bushings (14) into the Leg Lever (4). the Seat Bracket (6) must pivot freely. 4 37 4 Weight 19 Tube 37 14 33 7 19 27 Lubricate 37 6 Press a 50mm Square Outer Cap (22) onto each 2 end of the Seat Frame (5). Lubricate an M10 x 80mm Bolt (27) with...
... holes in the Seat Frame and the Bench Frame (1). Attach the Leg Lever (4) to the Seat Frame (5) with grease. Press four 8mm Bushings (14) into the Leg Lever (4). the Seat Bracket (6) must pivot freely. 4 37 4 Weight 19 Tube 37 14 33 7 19 27 Lubricate 37 6 Press a 50mm Square Outer Cap (22) onto each 2 end of the Seat Frame (5). Lubricate an M10 x 80mm Bolt (27) with...
Uk Manual
Page 7
...on the Bench Frame (1). Press two 8mm Bushings into the lower holes in the Seat Frame (5). Have a second person lift the Leg Lever (4). See step 5. Attach the Backrest Bracket (9) to the Bench Frame (1) with grease. Do not tighten the Nylon Locknuts yet. Do not tighten the Bolts yet. Press two 8mm ...Bolts (23) used in the Backrest Bracket. Attach the Backrest (10) to the Seat Frame (5) with grease. Make sure that the Plastic Plates are oriented as shown. Lubricate the other M10 x 140mm Bolt (35) with the Bolt, two M10 Washers (32), and an M10 Nylon Locknut (33). Attach...
...on the Bench Frame (1). Press two 8mm Bushings into the lower holes in the Seat Frame (5). Have a second person lift the Leg Lever (4). See step 5. Attach the Backrest Bracket (9) to the Bench Frame (1) with grease. Do not tighten the Nylon Locknuts yet. Do not tighten the Bolts yet. Press two 8mm ...Bolts (23) used in the Backrest Bracket. Attach the Backrest (10) to the Seat Frame (5) with grease. Make sure that the Plastic Plates are oriented as shown. Lubricate the other M10 x 140mm Bolt (35) with the Bolt, two M10 Washers (32), and an M10 Nylon Locknut (33). Attach...
Uk Manual
Page 8
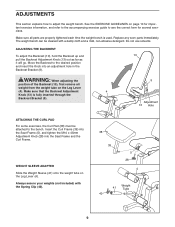
... the ends of the weight bench are properly tightened. Press a 45mm Square Inner Cap (29) into the holes in ADJUSTMENTS, starting on the Seat 7 Frame (5) using two M6 x 16mm Bolts (26). Attach the Curl Pad (38) to the bracket on page 9. 26 29 8 Make sure that all remaining parts will be explained in the Leg Lever (4). The use of all parts of the two...
... the ends of the weight bench are properly tightened. Press a 45mm Square Inner Cap (29) into the holes in ADJUSTMENTS, starting on the Seat 7 Frame (5) using two M6 x 16mm Bolts (26). Attach the Curl Pad (38) to the bracket on page 9. 26 29 8 Make sure that all remaining parts will be explained in the Leg Lever (4). The use of all parts of the two...
Uk Manual
Page 9
... form for important exercise information, and refer to the accompanying exercise guide to the desired position and insert the Knob into the Seat Frame and the Curl Frame. The weight bench can be attached to adjust the weight bench. Always secure your weights (not included) with a damp cloth and a mild, non-abrasive detergent. Make sure that the Backrest Adjustment 4 Knob (13) is used. Do not use solvents. WEIGHT SLEEVE ADAPTER...
... form for important exercise information, and refer to the accompanying exercise guide to the desired position and insert the Knob into the Seat Frame and the Curl Frame. The weight bench can be attached to adjust the weight bench. Always secure your weights (not included) with a damp cloth and a mild, non-abrasive detergent. Make sure that the Backrest Adjustment 4 Knob (13) is used. Do not use solvents. WEIGHT SLEEVE ADAPTER...
Uk Manual
Page 10
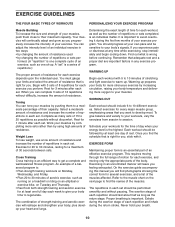
... 6 to get a complete and well-balanced fitness program. WORKING OUT Each workout should progress at least one full day each set . EXERCISE GUIDELINES THE FOUR BASIC TYPES OF WORKOUTS PERSONALIZING YOUR EXERCISE PROGRAM Muscle Building To increase the size and strength of an effective exercise program. On the exercise guide accompanying this manual you find the names of the body. Rest for at your breath. 10
... 6 to get a complete and well-balanced fitness program. WORKING OUT Each workout should progress at least one full day each set . EXERCISE GUIDELINES THE FOUR BASIC TYPES OF WORKOUTS PERSONALIZING YOUR EXERCISE PROGRAM Muscle Building To increase the size and strength of an effective exercise program. On the exercise guide accompanying this manual you find the names of the body. Rest for at your breath. 10
Uk Manual
Page 11
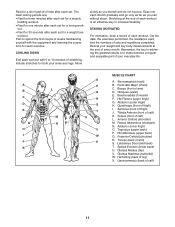
... stretch gradually and go only as far as you can without strain. List the date, the exercises performed, the resistance used, and the numbers of thigh) J. Sartorius (front of sets and repetitions completed. Rectus Abdominus (stomach) N. Record your weight and key body measurements at the end of each workout is to 10 minutes of stretching. Biceps (front of calf) L. Brachioradials...
... stretch gradually and go only as far as you can without strain. List the date, the exercises performed, the resistance used, and the numbers of thigh) J. Sartorius (front of sets and repetitions completed. Rectus Abdominus (stomach) N. Record your weight and key body measurements at the end of each workout is to 10 minutes of stretching. Biceps (front of calf) L. Brachioradials...
Uk Manual
Page 12
... write: ICON Health & Fitness, Ltd. ORDERING REPLACEMENT PARTS If you encounter any problems with this product, or if you need to give the following information: • the MODEL NUMBER of the product (PFEMBE33230) • the NAME of the product (PROFORM® G700 weight bench) • the SERIAL NUMBER of the product (see the front cover of this manual) • the KEY NUMBER and DESCRIPTION of the part(s) (see the PART LIST and...
... write: ICON Health & Fitness, Ltd. ORDERING REPLACEMENT PARTS If you encounter any problems with this product, or if you need to give the following information: • the MODEL NUMBER of the product (PFEMBE33230) • the NAME of the product (PROFORM® G700 weight bench) • the SERIAL NUMBER of the product (see the front cover of this manual) • the KEY NUMBER and DESCRIPTION of the part(s) (see the PART LIST and...

Uk Manual
Page 13
REMOVE THIS PART IDENTIFICATION CHART PART LIST/EXPLODED DRAWING SAVE THIS PART IDENTIFICATION CHART PART LIST/EXPLODED DRAWING FOR FUTURE REFERENCE 81
REMOVE THIS PART IDENTIFICATION CHART PART LIST/EXPLODED DRAWING SAVE THIS PART IDENTIFICATION CHART PART LIST/EXPLODED DRAWING FOR FUTURE REFERENCE 81
Uk Manual
Page 14
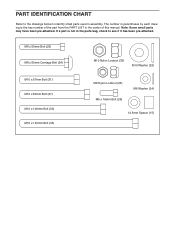
... Spacer (15) PART IDENTIFICATION CHART Refer to the drawings below to identify small parts used in the parts bag, check to see if it has been pre-attached. If a part is the key number of the part from the PART LIST in the center of this manual. Note: Some small parts may have been pre-attached. The number in parentheses by each drawing is not in assembly.
... Spacer (15) PART IDENTIFICATION CHART Refer to the drawings below to identify small parts used in the parts bag, check to see if it has been pre-attached. If a part is the key number of the part from the PART LIST in the center of this manual. Note: Some small parts may have been pre-attached. The number in parentheses by each drawing is not in assembly.
Uk Manual
Page 15
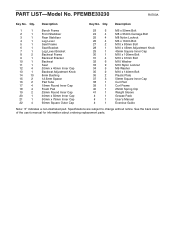
Qty. PFEMBE33230 R0703A Key No. Qty. Specifications are subject to change without notice. PART LIST-Model No. Description 1 1 Bench Frame 2 1 Front Stabiliser 3 1 Rear Stabiliser 4 1 Leg Lever 5 1 Seat Frame 6 1 Seat Bracket 7 1 Leg Lever Bracket 8 2 Backrest Frame 9 1 Backrest Bracket 10 1 Backrest 11 1 Seat 12 4 20mm x 40mm Inner Cap 13 1 Backrest Adjustment Knob 14 10 8mm Bushing 15 2 12.5mm Spacer 16 2 Pad Tube 17 4 19mm Round Inner Cap...
Qty. PFEMBE33230 R0703A Key No. Qty. Specifications are subject to change without notice. PART LIST-Model No. Description 1 1 Bench Frame 2 1 Front Stabiliser 3 1 Rear Stabiliser 4 1 Leg Lever 5 1 Seat Frame 6 1 Seat Bracket 7 1 Leg Lever Bracket 8 2 Backrest Frame 9 1 Backrest Bracket 10 1 Backrest 11 1 Seat 12 4 20mm x 40mm Inner Cap 13 1 Backrest Adjustment Knob 14 10 8mm Bushing 15 2 12.5mm Spacer 16 2 Pad Tube 17 4 19mm Round Inner Cap...
Uk Manual
Page 16
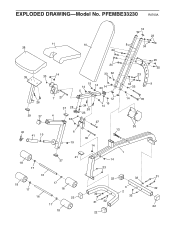
PFEMBE33230 R0703A 11 38 12 23 10 8 34 24 24 39 33 14 33 32 15 14 14 20 14 5 23 34 32 26 29 37 40 41 19 18 17 7 27 37 28 4 33 6 34 26 23 12 15 14 14 35 27 36 13 30 19 14 21 37 1 14 33 16 18 17 16 17 18 22 17 18 22 32 31 32 32 3 2 33 22 25 25 9 31 32 22 EXPLODED DRAWING-Model No.
PFEMBE33230 R0703A 11 38 12 23 10 8 34 24 24 39 33 14 33 32 15 14 14 20 14 5 23 34 32 26 29 37 40 41 19 18 17 7 27 37 28 4 33 6 34 26 23 12 15 14 14 35 27 36 13 30 19 14 21 37 1 14 33 16 18 17 16 17 18 22 17 18 22 32 31 32 32 3 2 33 22 25 25 9 31 32 22 EXPLODED DRAWING-Model No.

