
English Manual
Page 1
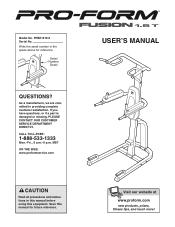
....com CAUTION Read all precautions and instructions in the space above for future reference. Save this equipment. PFBE1416.0 Serial No. Serial Number Decal QUESTIONS? If you have questions, or if a part is damaged or missing, PLEASE CONTACT OUR CUSTOMER SERVICE DEPARTMENT DIRECTLY. Model No. USER'S MANUAL Visit our website at www.proform.com new products, prizes, fitness tips, and much more! As a manufacturer...
....com CAUTION Read all precautions and instructions in the space above for future reference. Save this equipment. PFBE1416.0 Serial No. Serial Number Decal QUESTIONS? If you have questions, or if a part is damaged or missing, PLEASE CONTACT OUR CUSTOMER SERVICE DEPARTMENT DIRECTLY. Model No. USER'S MANUAL Visit our website at www.proform.com new products, prizes, fitness tips, and much more! As a manufacturer...
English Manual
Page 2
TABLE OF CONTENTS IMPORTANT PRECAUTIONS 3 BEFORE YOU BEGIN 4 PART IDENTIFICATION CHART 5 ASSEMBLY 6 ADJUSTMENTS 10 EXERCISE GUIDELINES 11 PART LIST 14 EXPLODED DRAWING 15 ORDERING REPLACEMENT PARTS Back Cover LIMITED WARRANTY Back Cover PROFORM is a registered trademark of ICON IP, Inc. 2
TABLE OF CONTENTS IMPORTANT PRECAUTIONS 3 BEFORE YOU BEGIN 4 PART IDENTIFICATION CHART 5 ASSEMBLY 6 ADJUSTMENTS 10 EXERCISE GUIDELINES 11 PART LIST 14 EXPLODED DRAWING 15 ORDERING REPLACEMENT PARTS Back Cover LIMITED WARRANTY Back Cover PROFORM is a registered trademark of ICON IP, Inc. 2
English Manual
Page 3
.... Replace any exercise program, consult your physician. The exercise rack is intended for personal injury or property damage sustained by or through the use it to support a maximum user weight of 300 pounds. ICON assumes no responsibility for home use only. This is especially important for foot protection while exercising. 8. Make sure that all users of the exercise rack are adequately informed of all instructions before using...
.... Replace any exercise program, consult your physician. The exercise rack is intended for personal injury or property damage sustained by or through the use it to support a maximum user weight of 300 pounds. ICON assumes no responsibility for home use only. This is especially important for foot protection while exercising. 8. Make sure that all users of the exercise rack are adequately informed of all instructions before using...
English Manual
Page 4
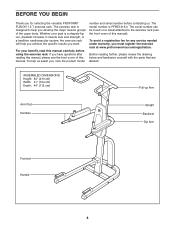
... the specific results you develop the major muscle groups of the upper body. To avoid a registration fee for any service needed under warranty, you for selecting the versatile PROFORM® FUSION 1.5 T exercise rack. If you , note the product model number and serial number before using the exercise rack. The exercise rack is PFBE1416.0. Before reading further, please review the drawing below and familiarize yourself with the parts...
... the specific results you develop the major muscle groups of the upper body. To avoid a registration fee for any service needed under warranty, you for selecting the versatile PROFORM® FUSION 1.5 T exercise rack. If you , note the product model number and serial number before using the exercise rack. The exercise rack is PFBE1416.0. Before reading further, please review the drawing below and familiarize yourself with the parts...
English Manual
Page 5
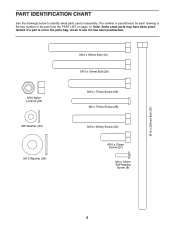
M10 x 200mm Bolt (31) M10 Nylon Locknut (23) M6 Washer (25) M10 Washer (24) M10 x 95mm Bolt (10) M10 x 90mm Bolt (26) M10 x 70mm Screw (29) M6 x 70mm Screw (28) M10 x 65mm Screw (30) M10 x 30mm Screw (27) M4 x 16mm Self-tapping Screw (8) 5 The number in parentheses by each drawing is not in the parts bag, check to identify small parts used in assembly. Note: Some small parts may have been preattached. If a part is the key number of the part from the PART LIST on page 14. PART IDENTIFICATION CHART See the drawings below to see if it has been preattached.
M10 x 200mm Bolt (31) M10 Nylon Locknut (23) M6 Washer (25) M10 Washer (24) M10 x 95mm Bolt (10) M10 x 90mm Bolt (26) M10 x 70mm Screw (29) M6 x 70mm Screw (28) M10 x 65mm Screw (30) M10 x 30mm Screw (27) M4 x 16mm Self-tapping Screw (8) 5 The number in parentheses by each drawing is not in the parts bag, check to identify small parts used in assembly. Note: Some small parts may have been preattached. If a part is the key number of the part from the PART LIST on page 14. PART IDENTIFICATION CHART See the drawings below to see if it has been preattached.
English Manual
Page 6
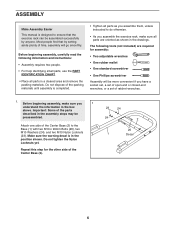
... x 90mm Bolts (26), two M10 Washers (24), and two M10 Nylon Locknuts (23). The following information and instructions: • Assembly requires two people. • For help identifying small parts, use the PART IDENTIFICATION CHART. • Place all parts as shown in the drawings. Attach one side of ratchet wrenches. 1. Most people find that the exercise rack can be assembled successfully by setting aside...
... x 90mm Bolts (26), two M10 Washers (24), and two M10 Nylon Locknuts (23). The following information and instructions: • Assembly requires two people. • For help identifying small parts, use the PART IDENTIFICATION CHART. • Place all parts as shown in the drawings. Attach one side of ratchet wrenches. 1. Most people find that the exercise rack can be assembled successfully by setting aside...
English Manual
Page 7
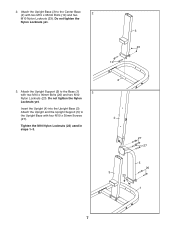
Do not tighten the Nylon Locknuts yet. Do not tighten the Nylon Locknuts yet. 3 23 10 3. Tighten the M10 Nylon Locknuts (23) used in steps 1-3. 2 4 27 27 3 23 5 26 1 7 Attach the Upright and the Upright Support (5) to the Upright Base with two M10 x 90mm Bolts (26) and two M10 Nylon Locknuts (23). Attach the Upright Support (5) to the Center Base 2 (2) with two M10 x 95mm Bolts (10) and two M10 Nylon Locknuts (23). 2. Attach the Upright Base (3) to the Base (1) 3 with four M10 x 30mm Screws (27). Insert the Upright (4) into the Upright Base (3).
Do not tighten the Nylon Locknuts yet. Do not tighten the Nylon Locknuts yet. 3 23 10 3. Tighten the M10 Nylon Locknuts (23) used in steps 1-3. 2 4 27 27 3 23 5 26 1 7 Attach the Upright and the Upright Support (5) to the Upright Base with two M10 x 90mm Bolts (26) and two M10 Nylon Locknuts (23). Attach the Upright Support (5) to the Center Base 2 (2) with two M10 x 95mm Bolts (10) and two M10 Nylon Locknuts (23). 2. Attach the Upright Base (3) to the Base (1) 3 with four M10 x 30mm Screws (27). Insert the Upright (4) into the Upright Base (3).

English Manual
Page 8
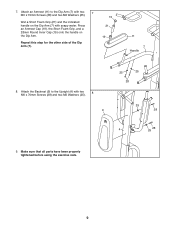
... a small amount of the Round Inner Cap is on the Pin (22) to the M10 x 200mm Bolt (31). Attach the Left Handle (12) to the Upright (4) with an M4 x 16mm Self-tapping Screw (8). Press a 50mm Round Inner Cap (14) into the Pull-up Arm (6) with four M10 x 30mm Screws (27) and four M10 Washers (24). 4 13 Thick Side...
... a small amount of the Round Inner Cap is on the Pin (22) to the M10 x 200mm Bolt (31). Attach the Left Handle (12) to the Upright (4) with an M4 x 16mm Self-tapping Screw (8). Press a 50mm Round Inner Cap (14) into the Pull-up Arm (6) with four M10 x 30mm Screws (27) and four M10 Washers (24). 4 13 Thick Side...
English Manual
Page 9
Attach the Backrest (9) to the Dip Arm (7) with two 7 M6 x 70mm Screws (28) and two M6 Washers (25). Repeat this step for the other side of the Dip Arm (7). 15 21 19 11 7 Handle 8. Wet a Short Foam Grip (21) and the indicated handle on the Dip Arm. Press an Armrest Cap (19),... Inner Cap (15) onto the handle on the Dip Arm (7) with two 8 M6 x 70mm Screws (28) and two M6 Washers (25). 9 25 25 28 25 28 4 28 25 9. Attach an Armrest (11) to the Upright (4) with soapy water. 7. Make sure that all parts have been properly tightened before using the exercise rack. 9
Attach the Backrest (9) to the Dip Arm (7) with two 7 M6 x 70mm Screws (28) and two M6 Washers (25). Repeat this step for the other side of the Dip Arm (7). 15 21 19 11 7 Handle 8. Wet a Short Foam Grip (21) and the indicated handle on the Dip Arm. Press an Armrest Cap (19),... Inner Cap (15) onto the handle on the Dip Arm (7) with two 8 M6 x 70mm Screws (28) and two M6 Washers (25). 9 25 25 28 25 28 4 28 25 9. Attach an Armrest (11) to the Upright (4) with soapy water. 7. Make sure that all parts have been properly tightened before using the exercise rack. 9
English Manual
Page 10
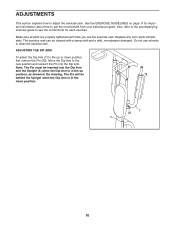
... all parts are properly tightened each exercise. Move the Dip Arm to adjust the exercise rack. Replace any worn parts immediately. Do not use the exercise rack. ADJUSTING THE DIP ARM To adjust the Dip Arm (7) to the up position, as shown in the drawing. Also, refer to the accompanying exercise guide to see the correct form for important information about how to clean the exercise rack. See the EXERCISE GUIDELINES...
... all parts are properly tightened each exercise. Move the Dip Arm to adjust the exercise rack. Replace any worn parts immediately. Do not use the exercise rack. ADJUSTING THE DIP ARM To adjust the Dip Arm (7) to the up position, as shown in the drawing. Also, refer to the accompanying exercise guide to see the correct form for important information about how to clean the exercise rack. See the EXERCISE GUIDELINES...
English Manual
Page 11
... of rest. Warming up . EXERCISE FORM Maintaining proper form is important. On the exercise guide accompanying this manual you feeling exhausted. Proper breathing is an essential part of an effective exercise program. You must gauge your limits and select the amount of resistance that is right for 3 minutes after each exercise depends upon the individual user. TONING You can adjust the intensity level of...
... of rest. Warming up . EXERCISE FORM Maintaining proper form is important. On the exercise guide accompanying this manual you feeling exhausted. Proper breathing is an essential part of an effective exercise program. You must gauge your limits and select the amount of resistance that is right for 3 minutes after each exercise depends upon the individual user. TONING You can adjust the intensity level of...
English Manual
Page 12
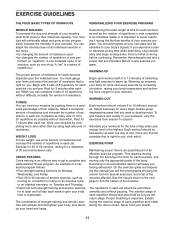
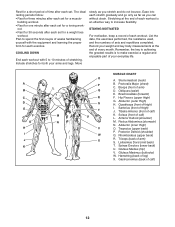
... Anterior (front of leg) X. Spinae Erectors (lower back) U. Hamstring (back of calf) K. out. • Rest for 30 seconds after each workout. Move slowly as you stretch and do not bounce. Pectoralis Major (chest) C. Soleus (front of arm) S. Triceps (back of calf) L. Gluteus Medius (hip) V. Ease into each set for a toning work- Record your weight and key body measurements at the end...
... Anterior (front of leg) X. Spinae Erectors (lower back) U. Hamstring (back of calf) K. out. • Rest for 30 seconds after each workout. Move slowly as you stretch and do not bounce. Pectoralis Major (chest) C. Soleus (front of arm) S. Triceps (back of calf) L. Gluteus Medius (hip) V. Ease into each set for a toning work- Record your weight and key body measurements at the end...
English Manual
Page 13
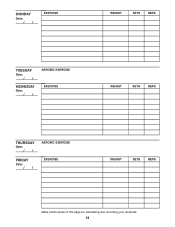
MONDAY Date: // EXERCISE WEIGHT SETS REPS TUESDAY Date: // WEDNESDAY Date: // AEROBIC EXERCISE EXERCISE WEIGHT SETS REPS THURSDAY Date: // FRIDAY Date: // AEROBIC EXERCISE EXERCISE WEIGHT SETS REPS Make photocopies of this page for scheduling and recording your workouts. 13
MONDAY Date: // EXERCISE WEIGHT SETS REPS TUESDAY Date: // WEDNESDAY Date: // AEROBIC EXERCISE EXERCISE WEIGHT SETS REPS THURSDAY Date: // FRIDAY Date: // AEROBIC EXERCISE EXERCISE WEIGHT SETS REPS Make photocopies of this page for scheduling and recording your workouts. 13
English Manual
Page 14
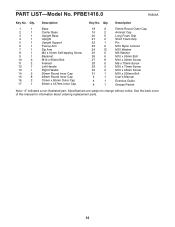
... Foam Grip 22 1 Pin 23 9 M10 Nylon Locknut 24 12 M10 Washer 25 6 M6 Washer 26 6 M10 x 90mm Bolt 27 8 M10 x 30mm Screw 28 6 M6 x 70mm Screw 29 2 M10 x 70mm Screw 30 2 M10 x 65mm Screw 31 1 M10 x 200mm Bolt # 1 User's Manual # 1 Exercise Guide # 1 Grease Packet Note: "#" indicates a non-illustrated part. PFBE1416.0 R0506A Key No. See the back cover of this manual for information about ordering replacement parts. 14 PART LIST-Model No.
... Foam Grip 22 1 Pin 23 9 M10 Nylon Locknut 24 12 M10 Washer 25 6 M6 Washer 26 6 M10 x 90mm Bolt 27 8 M10 x 30mm Screw 28 6 M6 x 70mm Screw 29 2 M10 x 70mm Screw 30 2 M10 x 65mm Screw 31 1 M10 x 200mm Bolt # 1 User's Manual # 1 Exercise Guide # 1 Grease Packet Note: "#" indicates a non-illustrated part. PFBE1416.0 R0506A Key No. See the back cover of this manual for information about ordering replacement parts. 14 PART LIST-Model No.
English Manual
Page 15
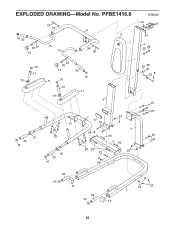
PFBE1416.0 29 24 15 20 30 24 14 13 12 6 9 24 29 15 21 19 24 30 14 20 15 15 11 21 11 19 3 18 20 15 31 25 28 18 20 15 7 17 10 23 25 28 26 23 23 5 26 2 26 23 24 R0506A 24 27 24 4 25 28 25 28 22 8 27 27 26 20 15 16 20 15 16 24 23 1 15 EXPLODED DRAWING-Model No.
PFBE1416.0 29 24 15 20 30 24 14 13 12 6 9 24 29 15 21 19 24 30 14 20 15 15 11 21 11 19 3 18 20 15 31 25 28 18 20 15 7 17 10 23 25 28 26 23 23 5 26 2 26 23 24 R0506A 24 27 24 4 25 28 25 28 22 8 27 27 26 20 15 16 20 15 16 24 23 1 15 EXPLODED DRAWING-Model No.
English Manual
Page 16
... 15) LIMITED WARRANTY ICON Health & Fitness, Inc. (ICON), warrants this manual) • the KEY NUMBER and DESCRIPTION of the desired part(s) (see the front cover of purchase. To help us assist you . For in lieu of whatsoever nature. Accordingly, the above limitation may not apply to provide the following information: • the MODEL NUMBER of the product (PFBE1416.0) • the NAME of the product (PROFORM FUSION 1.5 T exercise rack...
... 15) LIMITED WARRANTY ICON Health & Fitness, Inc. (ICON), warrants this manual) • the KEY NUMBER and DESCRIPTION of the desired part(s) (see the front cover of purchase. To help us assist you . For in lieu of whatsoever nature. Accordingly, the above limitation may not apply to provide the following information: • the MODEL NUMBER of the product (PFBE1416.0) • the NAME of the product (PROFORM FUSION 1.5 T exercise rack...

