
English Manual
Page 1
... SERVICE DEPARTMENT DIRECTLY. USER'S MANUAL Visit our website at www.proform.com new products, prizes, fitness tips, and much more! Write the serial number in this manual before using this manual for future reference. CALL TOLL-FREE: 1-888-533-1333 Mon.-Fri., 6 a.m.-6 p.m. Save this equipment. PFBE1216.0 Serial No. Serial Number Decal (Under Seat) QUESTIONS? MST ON THE WEB: www.proformservice.com CAUTION Read all precautions and instructions...
... SERVICE DEPARTMENT DIRECTLY. USER'S MANUAL Visit our website at www.proform.com new products, prizes, fitness tips, and much more! Write the serial number in this manual before using this manual for future reference. CALL TOLL-FREE: 1-888-533-1333 Mon.-Fri., 6 a.m.-6 p.m. Save this equipment. PFBE1216.0 Serial No. Serial Number Decal (Under Seat) QUESTIONS? MST ON THE WEB: www.proformservice.com CAUTION Read all precautions and instructions...
English Manual
Page 2
TABLE OF CONTENTS IMPORTANT PRECAUTIONS 3 BEFORE YOU BEGIN 4 PART IDENTIFICATION CHART 5 ASSEMBLY 5 ADJUSTMENTS 8 EXERCISE GUIDELINES 9 PART LIST 10 EXPLODED DRAWING 11 ORDERING REPLACEMENT PARTS Back Cover LIMITED WARRANTY Back Cover PROFORM is a registered trademark of ICON IP, Inc. 2
TABLE OF CONTENTS IMPORTANT PRECAUTIONS 3 BEFORE YOU BEGIN 4 PART IDENTIFICATION CHART 5 ASSEMBLY 5 ADJUSTMENTS 8 EXERCISE GUIDELINES 9 PART LIST 10 EXPLODED DRAWING 11 ORDERING REPLACEMENT PARTS Back Cover LIMITED WARRANTY Back Cover PROFORM is a registered trademark of ICON IP, Inc. 2
English Manual
Page 3
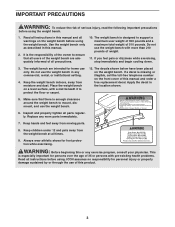
... exercising. Use the weight bench only as described in the location shown. 5. The weight bench are adequately informed of this manual and order a free replacement decal. WARNING: Before beginning this manual. 2. The weight bench is missing or illegible, call the toll-free telephone number on the weight bench. If a decal is designed to protect the floor or carpet. 12. Always wear athletic shoes for home use the weight bench with pre-existing health problems...
... exercising. Use the weight bench only as described in the location shown. 5. The weight bench are adequately informed of this manual and order a free replacement decal. WARNING: Before beginning this manual. 2. The weight bench is missing or illegible, call the toll-free telephone number on the weight bench. If a decal is designed to protect the floor or carpet. 12. Always wear athletic shoes for home use the weight bench with pre-existing health problems...
English Manual
Page 4
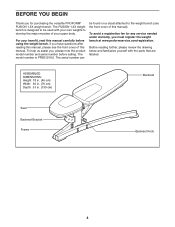
... weight bench. The serial number can be used with the parts that are labeled. To help us assist you have questions after reading this manual, please see the front cover of this manual carefully before calling. ASSEMBLED DIMENSIONS: Height: 18 in. (46 cm) Width: 30 in. (76 cm) Depth: 51 in. (130 cm) Backrest Seat Backrest Bracket Frame Backrest Knob 4 For your upper body...
... weight bench. The serial number can be used with the parts that are labeled. To help us assist you have questions after reading this manual, please see the front cover of this manual carefully before calling. ASSEMBLED DIMENSIONS: Height: 18 in. (46 cm) Width: 30 in. (76 cm) Depth: 51 in. (130 cm) Backrest Seat Backrest Bracket Frame Backrest Knob 4 For your upper body...
English Manual
Page 5
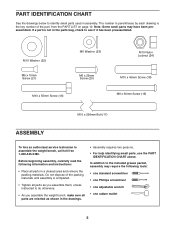
... parentheses by each drawing is the key number of the part, from the PART LIST on page 10. Before beginning assembly, carefully read the following tools: • one standard screwdriver • one Phillips screwdriver • one adjustable wrench • one rubber mallet 5 PART IDENTIFICATION CHART See the drawings below to assemble the weight bench, call toll-free 1-800-445-2480. In addition to...
... parentheses by each drawing is the key number of the part, from the PART LIST on page 10. Before beginning assembly, carefully read the following tools: • one standard screwdriver • one Phillips screwdriver • one adjustable wrench • one rubber mallet 5 PART IDENTIFICATION CHART See the drawings below to assemble the weight bench, call toll-free 1-800-445-2480. In addition to...
English Manual
Page 6
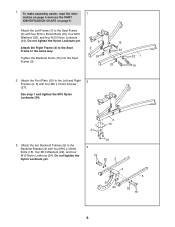
...5 22 18 6 Attach the Left Frame (1) to the Seat Frame in the same way. Attach the Right Frame (2) to the Seat Frame (3) with four M10 x 55mm Bolts (16), four M10 Washers (22), and four M10 Nylon Locknuts (24). Tighten the Backrest Knob (15) into the Seat Frame (3). 3 2 ...Screws (21). 1. Attach the two Backrest Frames (5) to the Left and Right 2 Frames (2, 3) with four M10 x 45mm Bolts (18), four M10 Washers (22), and four M10 Nylon Locknuts (24). To make assembly easier, read the infor- 1 mation on page 5 and use the PART IDENTIFICATION CHART on page 5. See step 1 and tighten...
...5 22 18 6 Attach the Left Frame (1) to the Seat Frame in the same way. Attach the Right Frame (2) to the Seat Frame (3) with four M10 x 55mm Bolts (16), four M10 Washers (22), and four M10 Nylon Locknuts (24). Tighten the Backrest Knob (15) into the Seat Frame (3). 3 2 ...Screws (21). 1. Attach the two Backrest Frames (5) to the Left and Right 2 Frames (2, 3) with four M10 x 45mm Bolts (18), four M10 Washers (22), and four M10 Nylon Locknuts (24). To make assembly easier, read the infor- 1 mation on page 5 and use the PART IDENTIFICATION CHART on page 5. See step 1 and tighten...

English Manual
Page 7
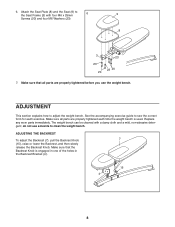
... the holes in one of the included grease to the Seat Frame (3) with four M6 x 4 60mm Screws (19) and four M6 Washers (23). 7 See step 3 and tighten the M10 Nylon Locknuts (24). 6 23 5 23 19 5. Attach the Backrest Frames (5) to an M10 x 256mm Bolt (17). Do not overtighten the Nylon Locknuts; Attach the Backrest Plate (6) and the Backrest...
... the holes in one of the included grease to the Seat Frame (3) with four M6 x 4 60mm Screws (19) and four M6 Washers (23). 7 See step 3 and tighten the M10 Nylon Locknuts (24). 6 23 5 23 19 5. Attach the Backrest Frames (5) to an M10 x 256mm Bolt (17). Do not overtighten the Nylon Locknuts; Attach the Backrest Plate (6) and the Backrest...
English Manual
Page 8
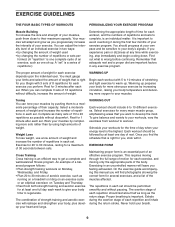
... all parts are properly tightened before you use solvents to 6 the Seat Frame (3) with a damp cloth and a mild, non-abrasive detergent; See the accompanying exercise guide to adjust the weight bench. ADJUSTING THE BACKREST To adjust the Backrest (7), pull the Backrest Knob 7 (15), raise or lower the Backrest, and then slowly release the Backrest Knob. ADJUSTMENT This section explains how to see the correct form for...
... all parts are properly tightened before you use solvents to 6 the Seat Frame (3) with a damp cloth and a mild, non-abrasive detergent; See the accompanying exercise guide to adjust the weight bench. ADJUSTING THE BACKREST To adjust the Backrest (7), pull the Backrest Knob 7 (15), raise or lower the Backrest, and then slowly release the Backrest Knob. ADJUSTMENT This section explains how to see the correct form for...
English Manual
Page 9
... exercise program. This requires moving only the appropriate parts of the body. The repetitions in each workout, and the numbers of repetitions and sets to complete, is right for each set . You must gauge your limits and select the amount of weight that adequate rest and a proper diet are important factors in two ways: • by changing the amount of weight used • by using...
... exercise program. This requires moving only the appropriate parts of the body. The repetitions in each workout, and the numbers of repetitions and sets to complete, is right for each set . You must gauge your limits and select the amount of weight that adequate rest and a proper diet are important factors in two ways: • by changing the amount of weight used • by using...

English Manual
Page 10
... 23 8 24 14 # - # - # - See the back cover of this manual for each exercise. Rest for a short period of time after each set for a toning work- COOLING DOWN End each workout with the equipment and learning the proper form for information about ordering replacement parts. 10 PART LIST-Model No. List the date, the exercises performed, the weight used, and the numbers of each stretch gradually and go only...
... 23 8 24 14 # - # - # - See the back cover of this manual for each exercise. Rest for a short period of time after each set for a toning work- COOLING DOWN End each workout with the equipment and learning the proper form for information about ordering replacement parts. 10 PART LIST-Model No. List the date, the exercises performed, the weight used, and the numbers of each stretch gradually and go only...
English Manual
Page 11
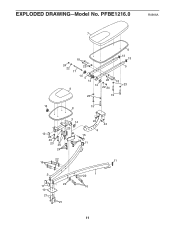
PFBE1216.0 R0906A 7 6 13 18 13 24 22 22 17 14 5 14 14 9 22 22 24 5 18 23 23 19 14 19 8 3 14 24 24 23 4 12 23 20 23 20 15 24 11 24 22 11 16 2 11 10 21 22 21 1 22 16 11 EXPLODED DRAWING-Model No.
PFBE1216.0 R0906A 7 6 13 18 13 24 22 22 17 14 5 14 14 9 22 22 24 5 18 23 23 19 14 19 8 3 14 24 24 23 4 12 23 20 23 20 15 24 11 24 22 11 16 2 11 10 21 22 21 1 22 16 11 EXPLODED DRAWING-Model No.
English Manual
Page 12
...) LIMITED WARRANTY ICON Health & Fitness, Inc. (ICON) warrants this manual. No other warranty beyond that specifically set forth herein. This warranty gives you , be prepared to provide the following information: • the MODEL NUMBER of the product (PFBE1216.0) • the NAME of the product (PROFORM FUSION 1.3X weight bench) • the SERIAL NUMBER of the product (see the front cover of this manual) • the KEY NUMBER and DESCRIPTION of the part(s) (see the front cover of removal...
...) LIMITED WARRANTY ICON Health & Fitness, Inc. (ICON) warrants this manual. No other warranty beyond that specifically set forth herein. This warranty gives you , be prepared to provide the following information: • the MODEL NUMBER of the product (PFBE1216.0) • the NAME of the product (PROFORM FUSION 1.3X weight bench) • the SERIAL NUMBER of the product (see the front cover of this manual) • the KEY NUMBER and DESCRIPTION of the part(s) (see the front cover of removal...

