
English Manual
Page 1
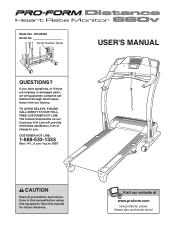
... trained technicians on our Customer Hot Line will provide immediate assistance, free of charge to you have questions, or if there are missing or damaged parts, we will guarantee complete satisfaction through direct assistance from our factory. MST CAUTION Read all precautions and instructions in this manual before using this manual..., PLEASE CALL DIRECT TO OUR TOLLFREE CUSTOMER HOT LINE. Save this equipment. CUSTOMER HOT LINE: 1-888-533-1333 Mon.-Fri., 6 a.m.-6 p.m. Visit our website at www.proform.com new products, prizes, fitness tips, and much more!
... trained technicians on our Customer Hot Line will provide immediate assistance, free of charge to you have questions, or if there are missing or damaged parts, we will guarantee complete satisfaction through direct assistance from our factory. MST CAUTION Read all precautions and instructions in this manual before using this manual..., PLEASE CALL DIRECT TO OUR TOLLFREE CUSTOMER HOT LINE. Save this equipment. CUSTOMER HOT LINE: 1-888-533-1333 Mon.-Fri., 6 a.m.-6 p.m. Visit our website at www.proform.com new products, prizes, fitness tips, and much more!
English Manual
Page 2
... is attached in the center of this manual. Do not put the treadmill in a garage or covered patio, or near water. 5. Always wear athletic shoes. When connecting the power cord (see your local PROFORM dealer or call 1-888-5331333 and order part number 146148, or see page 8), plug the power cord into a surge...
... is attached in the center of this manual. Do not put the treadmill in a garage or covered patio, or near water. 5. Always wear athletic shoes. When connecting the power cord (see your local PROFORM dealer or call 1-888-5331333 and order part number 146148, or see page 8), plug the power cord into a surge...

English Manual
Page 3
... unplug the power cord immediately after use only. However, when the next "chirp" is turned off position when the treadmill is especially important for the location of the treadmill is not legible, please call toll-free 1-888-5331333 and order a free replacement decal. SAVE THESE INSTRUCTIONS WARNING: ...use . (See the drawing on page 4 for persons over the age of 35 or persons with pre-existing health problems. Read all parts of this treadmill in this manual. Do not use this product. 3 Remove iFIT.com CDs and videos from heated surfaces. Never move the reset/off...
... unplug the power cord immediately after use only. However, when the next "chirp" is turned off position when the treadmill is especially important for the location of the treadmill is not legible, please call toll-free 1-888-5331333 and order a free replacement decal. SAVE THESE INSTRUCTIONS WARNING: ...use . (See the drawing on page 4 for persons over the age of 35 or persons with pre-existing health problems. Read all parts of this treadmill in this manual. Do not use this product. 3 Remove iFIT.com CDs and videos from heated surfaces. Never move the reset/off...
English Manual
Page 4
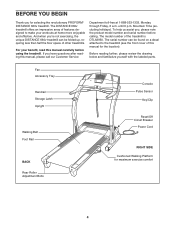
... model number and serial number before using the treadmill. Before reading further, please review the drawing below and familiarize yourself with the labeled parts. The DISTANCE 660v treadmill offers an impressive array of features designed to the treadmill (see the front cover of this manual, ... Console Pulse Sensor Key/Clip Reset/Off Circuit Breaker Power Cord RIGHT SIDE Cushioned Walking Platform for selecting the revolutionary PROFORM® DISTANCE 660v treadmill. Mountain Time (excluding holidays). The serial number can be found on a decal attached to make your benefit, read...
... model number and serial number before using the treadmill. Before reading further, please review the drawing below and familiarize yourself with the labeled parts. The DISTANCE 660v treadmill offers an impressive array of features designed to the treadmill (see the front cover of this manual, ... Console Pulse Sensor Key/Clip Reset/Off Circuit Breaker Power Cord RIGHT SIDE Cushioned Walking Platform for selecting the revolutionary PROFORM® DISTANCE 660v treadmill. Mountain Time (excluding holidays). The serial number can be found on a decal attached to make your benefit, read...
English Manual
Page 5
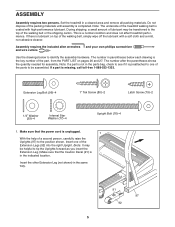
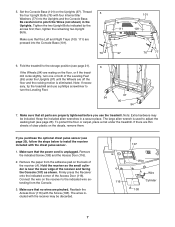
... the lubricant with high-performance lubricant. If there is missing, call toll-free 1-888-533-1333. Set the treadmill in the same way. 91 97 92 5 If a part is lubricant on pages 26 and 27. Assembly requires the included allen wrenches and your own phillips screwdriver and wire... the packing materials until assembly is unplugged. 1 With the help of the part, from the PART LIST on top of the treadmill walking belt is a normal condition and does not affect treadmill performance. Insert one of the parts to see if it is the key number of a second person, carefully ...
... the lubricant with high-performance lubricant. If there is missing, call toll-free 1-888-533-1333. Set the treadmill in the same way. 91 97 92 5 If a part is lubricant on pages 26 and 27. Assembly requires the included allen wrenches and your own phillips screwdriver and wire... the packing materials until assembly is unplugged. 1 With the help of the part, from the PART LIST on top of the treadmill walking belt is a normal condition and does not affect treadmill performance. Insert one of the parts to see if it is the key number of a second person, carefully ...
English Manual
Page 7
...Star Washers (77) into the Console Base (101). 76 111 77 97 101 109 77 76 77 6. Note: If necessary, tip the treadmill and use the treadmill. Remove the paper from the Console. 3. The large allen wrench is eliminated. Thread 5 the four Upright Bolts (76) with the chest pulse... sensor. 1. Make sure that all parts are off the floor and the rocking motion is used to turn one or both of the ...
...Star Washers (77) into the Console Base (101). 76 111 77 97 101 109 77 76 77 6. Note: If necessary, tip the treadmill and use the treadmill. Remove the paper from the Console. 3. The large allen wrench is eliminated. Thread 5 the four Upright Bolts (76) with the chest pulse... sensor. 1. Make sure that all parts are off the floor and the rocking motion is used to turn one or both of the ...
English Manual
Page 8
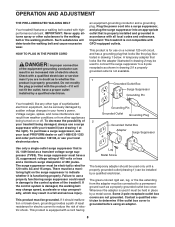
...plug the surge suppressor into an appropriate outlet that looks like any other type of the treadmill. A temporary adapter that is not available. 1 Grounded Outlet Box Surge Suppressor Grounding Pin Your treadmill, like the adapter illustrated in drawing 2 may result in your home's power. Voltage...is properly installed and grounded in drawing 1 below. To purchase a surge suppressor, see your local PROFORM dealer or call 1-888-533-1333 and order part number 146148, or see your treadmill (see drawing 1 at the right). Some 2-pole receptacle outlet box covers are in an increased...
...plug the surge suppressor into an appropriate outlet that looks like any other type of the treadmill. A temporary adapter that is not available. 1 Grounded Outlet Box Surge Suppressor Grounding Pin Your treadmill, like the adapter illustrated in drawing 2 may result in your home's power. Voltage...is properly installed and grounded in drawing 1 below. To purchase a surge suppressor, see your local PROFORM dealer or call 1-888-533-1333 and order part number 146148, or see your treadmill (see drawing 1 at the right). Some 2-pole receptacle outlet box covers are in an increased...
English Manual
Page 10
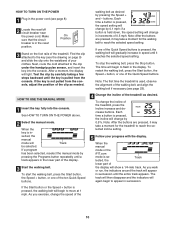
...clip by carefully taking a few steps backward until a track appears in the lower part of the treadmill. serted, the manual mode will light. The time will begin to move at 1 mph. To change the speed of the treadmill, press the Incline increase and decrease buttons. When the manual mode or the iFIT....com mode is pulled from the console, adjust the position of the treadmill as needed. HOW TO USE THE MANUAL MODE 1 Insert the key fully into the console. If the Start button or the Speed + ...
...clip by carefully taking a few steps backward until a track appears in the lower part of the treadmill. serted, the manual mode will light. The time will begin to move at 1 mph. To change the speed of the treadmill, press the Incline increase and decrease buttons. When the manual mode or the iFIT....com mode is pulled from the console, adjust the position of the treadmill as needed. HOW TO USE THE MANUAL MODE 1 Insert the key fully into the console. If the Start button or the Speed + ...
English Manual
Page 12
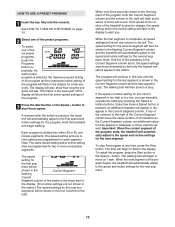
...be shown in the Current Segment flashing Current Segment column of the matrix in the lower part of the display. (The incline settings are not shown in the flashing Current Segment column and the treadmill will sound. ment will be shown in the four columns to the right. The speed... few seconds. The time will flash in the display for the second segment. As each segment. A moment after the button is pressed, the treadmill will continue in the Current Segment column and the last segment ends. The program will automatically adjust to the speed and incline settings for the...
...be shown in the Current Segment flashing Current Segment column of the matrix in the lower part of the display. (The incline settings are not shown in the flashing Current Segment column and the treadmill will sound. ment will be shown in the four columns to the right. The speed... few seconds. The time will flash in the display for the second segment. As each segment. A moment after the button is pressed, the treadmill will continue in the Current Segment column and the last segment ends. The program will automatically adjust to the speed and incline settings for the...

English Manual
Page 13
...- See page 20 and turn off position and unplug the power cord. When you are finished using the treadmill, switch the reset/off circuit breaker to use a heart rate program. 2 Insert the key into the... display will reach approximately 85% of your heart rate will show the first seven target heart rate settings of the treadmill is 190 beats per minute (220 - 30 = 190). 13 See step 7 on page 10. 3 Select ...Note: If the display remains lit after the key is removed, the console is in the lower part of your age from the console. Follow the steps below to the off the demo mode. You...
...- See page 20 and turn off position and unplug the power cord. When you are finished using the treadmill, switch the reset/off circuit breaker to use a heart rate program. 2 Insert the key into the... display will reach approximately 85% of your heart rate will show the first seven target heart rate settings of the treadmill is 190 beats per minute (220 - 30 = 190). 13 See step 7 on page 10. 3 Select ...Note: If the display remains lit after the key is removed, the console is in the lower part of your age from the console. Follow the steps below to the off the demo mode. You...
English Manual
Page 24
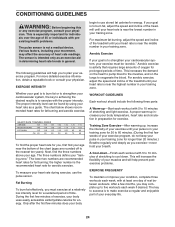
...-never hold your exercise must exercise at least one day of rest between workouts. For aerobic exercise, adjust the speed and incline of the treadmill until your heart rate is to 60 minutes. (During the first few months, you to strengthen your cardiovascular system, your breath. A proper... This increases the demand on the heart to pump blood to the muscles, and on the lungs to make exercise a regular and enjoyable part of your body uses easily accessible carbohydrate calories for energy. The three numbers define your training zone. The key to success is in preparation...
...-never hold your exercise must exercise at least one day of rest between workouts. For aerobic exercise, adjust the speed and incline of the treadmill until your heart rate is to 60 minutes. (During the first few months, you to strengthen your cardiovascular system, your breath. A proper... This increases the demand on the heart to pump blood to the muscles, and on the lungs to make exercise a regular and enjoyable part of your body uses easily accessible carbohydrate calories for energy. The three numbers define your training zone. The key to success is in preparation...
English Manual
Page 26
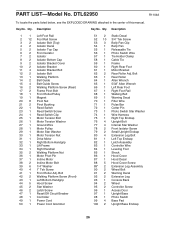
PART LIST-Model No. Qty. Bolt 42 2 Walking Platform Screw (Front) 43 1 Left Bottom Handgrip 44 5 Hood Screw 45 2 Star Washer 46 2 Latch Screw 47 1 Reset/... 97 1 Upright Base 98 1 Photo Switch 99 4 Base Pad 100 2 Upright Base Endcap 26 Qty. Key No. Description Key No. DTL62950 R1104A To locate the parts listed below, see the EXPLODED DRAWING attached in the center of this manual. Description 1 1 Left Foot Rail 2 12 Foot Rail Screw 3 2 Isolator Bolt (Top) 4 2 Isolator...
PART LIST-Model No. Qty. Bolt 42 2 Walking Platform Screw (Front) 43 1 Left Bottom Handgrip 44 5 Hood Screw 45 2 Star Washer 46 2 Latch Screw 47 1 Reset/... 97 1 Upright Base 98 1 Photo Switch 99 4 Base Pad 100 2 Upright Base Endcap 26 Qty. Key No. Description Key No. DTL62950 R1104A To locate the parts listed below, see the EXPLODED DRAWING attached in the center of this manual. Description 1 1 Left Foot Rail 2 12 Foot Rail Screw 3 2 Isolator Bolt (Top) 4 2 Isolator...

English Manual
Page 27
..." Blue Wire, 2F # 1 10" Blue Wire, M/F # 1 4" Blue Wire, 2F # 1 4" Green Wire, M/Ring # 1 14" Red Wire, M/F # 1 12" Black Wire, M/F # 1 User's Manual *Includes all parts shown in the box #These parts are not illustrated Specifications are subject to change without notice. 27 Key No. Qty. Description 101 1 Console Base 102 1 Optic Disk 103 8 Ground...
..." Blue Wire, 2F # 1 10" Blue Wire, M/F # 1 4" Blue Wire, 2F # 1 4" Green Wire, M/Ring # 1 14" Red Wire, M/F # 1 12" Black Wire, M/F # 1 User's Manual *Includes all parts shown in the box #These parts are not illustrated Specifications are subject to change without notice. 27 Key No. Qty. Description 101 1 Console Base 102 1 Optic Disk 103 8 Ground...

English Manual
Page 30
...product (DTL62950) • The NAME of the product (PROFORM® DISTANCE 660v treadmill) • The SERIAL NUMBER of the product (see the front cover of this manual) • The KEY NUMBER and DESCRIPTION of the part(s) (see the PART LIST and the EXPLODED DRAWING on how long an implied ... Fitness, Inc. (ICON), warrants this warranty is authorized by ICON. ICON HEALTH & FITNESS, INC., 1500 S. 1000 W., LOGAN, UT 84321-9813 Part No. 218126 R1104A Printed in its authorized service centers. This warranty gives you . until 6 p.m. This warranty does not extend to any product or damage...
...product (DTL62950) • The NAME of the product (PROFORM® DISTANCE 660v treadmill) • The SERIAL NUMBER of the product (see the front cover of this manual) • The KEY NUMBER and DESCRIPTION of the part(s) (see the PART LIST and the EXPLODED DRAWING on how long an implied ... Fitness, Inc. (ICON), warrants this warranty is authorized by ICON. ICON HEALTH & FITNESS, INC., 1500 S. 1000 W., LOGAN, UT 84321-9813 Part No. 218126 R1104A Printed in its authorized service centers. This warranty gives you . until 6 p.m. This warranty does not extend to any product or damage...


