

English Manual
Page 3
... meets all users of this manual. 11. Various factors, including the user's movement, may result in this treadmill are recommended for the location of heart rate readings. The pulse sensor is not in the treadmill. Never start the treadmill while you are used by persons weighing more amps. Always remove the key, unplug the power cord and move the walking belt while the power is damaged, the walking belt may change speed or stop unexpectedly, which...
... meets all users of this manual. 11. Various factors, including the user's movement, may result in this treadmill are recommended for the location of heart rate readings. The pulse sensor is not in the treadmill. Never start the treadmill while you are used by persons weighing more amps. Always remove the key, unplug the power cord and move the walking belt while the power is damaged, the walking belt may change speed or stop unexpectedly, which...

English Manual
Page 4
... motor hood unless instructed to order a free replacement decal. SAVE THESE INSTRUCTIONS The decals shown below have been placed on your CD player or VCR when you can manually override the speed and incline settings at 1-800-999-3756 to do so by or through the use the treadmill in this manual. Always listen for in the location shown. DANGER: 25. Always unplug the power cord...
... motor hood unless instructed to order a free replacement decal. SAVE THESE INSTRUCTIONS The decals shown below have been placed on your CD player or VCR when you can manually override the speed and incline settings at 1-800-999-3756 to do so by or through the use the treadmill in this manual. Always listen for in the location shown. DANGER: 25. Always unplug the power cord...

English Manual
Page 5
... Pulse Sensor Fan Console Key/Clip Walking Belt Foot Rail BACK Rear Roller Adjustment Bolts 5 Reset/Off Circuit Breaker Power Cord RIGHT SIDE Mountain Time (excluding holidays). From the advanced console to the cushioned walking platform, the CS15e treadmill is DTL73941. The model number is designed to the treadmill (see the front cover of this manual, call our Customer Service Department toll-free at 1-800-999-3756, Monday through Friday, 6 a.m. If you achieve your home...
... Pulse Sensor Fan Console Key/Clip Walking Belt Foot Rail BACK Rear Roller Adjustment Bolts 5 Reset/Off Circuit Breaker Power Cord RIGHT SIDE Mountain Time (excluding holidays). From the advanced console to the cushioned walking platform, the CS15e treadmill is DTL73941. The model number is designed to the treadmill (see the front cover of this manual, call our Customer Service Department toll-free at 1-800-999-3756, Monday through Friday, 6 a.m. If you achieve your home...
English Manual
Page 6
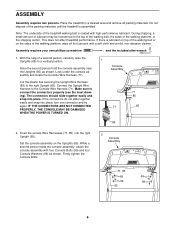
... the walking belt or on the Uprights (65). The connectors should slide together easily and snap into place, turn one connector and try again. IF THE CONNECTORS ARE NOT CONNECTED PROPERLY, THE CONSOLE MAY BE DAMAGED WHEN THE POWER IS TURNED ON. 1 Console Assembly 71 71 85 65 85 2. This does not affect treadmill performance. Look under the console assembly and locate the Console Wire Harness...
... the walking belt or on the Uprights (65). The connectors should slide together easily and snap into place, turn one connector and try again. IF THE CONNECTORS ARE NOT CONNECTED PROPERLY, THE CONSOLE MAY BE DAMAGED WHEN THE POWER IS TURNED ON. 1 Console Assembly 71 71 85 65 85 2. This does not affect treadmill performance. Look under the console assembly and locate the Console Wire Harness...
English Manual
Page 8
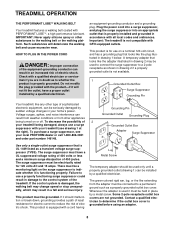
... used only until a properly grounded outlet (drawing 1) can result from weather conditions or from the adapter must have a proper outlet installed by sudden voltage changes in drawing 1 below. The surge suppressor must be installed by a metal screw. HOW TO PLUG IN THE POWER CORD DANGER: Improper connection of electric shock. an equipment-grounding conductor and a grounding plug. TREADMILL OPERATION THE PERFORMANT LUBETM WALKING BELT...
... used only until a properly grounded outlet (drawing 1) can result from weather conditions or from the adapter must have a proper outlet installed by sudden voltage changes in drawing 1 below. The surge suppressor must be installed by a metal screw. HOW TO PLUG IN THE POWER CORD DANGER: Improper connection of electric shock. an equipment-grounding conductor and a grounding plug. TREADMILL OPERATION THE PERFORMANT LUBETM WALKING BELT...

English Manual
Page 9
... the manual mode of a button. Having iFIT.com technology is selected, the speed and incline of the treadmill can even measure your workout. See www.iFIT.com for more information. To use a heart rate program, see page 21). To use the manual mode of clear Key Clip plastic on page 10. The console also offers six personal trainer programs. Each program automatically controls the speed and incline of your heart rate using the handgrip pulse sensor or the optional chest pulse sensor (see...
... the manual mode of a button. Having iFIT.com technology is selected, the speed and incline of the treadmill can even measure your workout. See www.iFIT.com for more information. To use a heart rate program, see page 21). To use the manual mode of clear Key Clip plastic on page 10. The console also offers six personal trainer programs. Each program automatically controls the speed and incline of your heart rate using the handgrip pulse sensor or the optional chest pulse sensor (see...

English Manual
Page 10
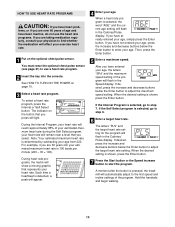
... Start buttons is pressed, the incline will light. If you exercise, the indicators around the track will begin to light in succession. 10 For simplicity, all instructions in this section refer to the reset position. Each time a button is pressed, the walking belt will begin to the key (see the drawing on the treadmill near the power cord. The matrix-When the manual mode or the iFIT.com mode is used...
... Start buttons is pressed, the incline will light. If you exercise, the indicators around the track will begin to light in succession. 10 For simplicity, all instructions in this section refer to the reset position. Each time a button is pressed, the walking belt will begin to the key (see the drawing on the treadmill near the power cord. The matrix-When the manual mode or the iFIT.com mode is used...

English Manual
Page 11
... treadmill is selected, this display will be shown. To find which unit of the walking belt. To reset the displays, press the Stop button, remove the key, and then reinsert the key. 6 Measure your hands. Note: The pulse bar is selected, hold the contacts for the Self Select heart rate program), the display will automatically turn off the demo mode. Press the Speed increase button to the lowest setting. Do not use the hand- Next, remove the key...
... treadmill is selected, this display will be shown. To find which unit of the walking belt. To reset the displays, press the Stop button, remove the key, and then reinsert the key. 6 Measure your hands. Note: The pulse bar is selected, hold the contacts for the Self Select heart rate program), the display will automatically turn off the demo mode. Press the Speed increase button to the lowest setting. Do not use the hand- Next, remove the key...
English Manual
Page 13
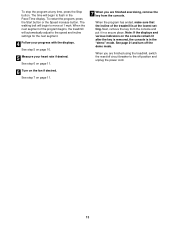
... "demo" mode. See step 7 on the console remain lit after the key is removed, the console is at 1 mph. Next, remove the key from the console. To restart the program, press the Start button or the Speed increase button. See step 6 on page 11. 6 Turn on page 10. 5 Measure your progress with the displays. See page 21 and turn off position and unplug the power cord. 13 When you are finished using the treadmill, switch...
... "demo" mode. See step 7 on the console remain lit after the key is removed, the console is at 1 mph. Next, remove the key from the console. To restart the program, press the Start button or the Speed increase button. See step 6 on page 11. 6 Turn on page 10. 5 Measure your progress with the displays. See page 21 and turn off position and unplug the power cord. 13 When you are finished using the treadmill, switch...
English Manual
Page 14
... adjust the maximum speed setting. When the desired setting is pressed, the treadmill will flash in the Calories/Pulse display. The indicator on page 10. 3 Select a heart rate program. After you have already entered your estimated maximum heart rate; HOW TO USE HEART RATE PROGRAMS CAUTION: If you have been inactive, do not use a heart rate program. 2 Insert the key into the console. The letters "PLS" and the target heart rate setting for the program will automatically adjust...
... adjust the maximum speed setting. When the desired setting is pressed, the treadmill will flash in the Calories/Pulse display. The indicator on page 10. 3 Select a heart rate program. After you have already entered your estimated maximum heart rate; HOW TO USE HEART RATE PROGRAMS CAUTION: If you have been inactive, do not use a heart rate program. 2 Insert the key into the console. The letters "PLS" and the target heart rate setting for the program will automatically adjust...
English Manual
Page 15
... instructions included with the Speed or Incline buttons. If this occurs, see step 5 on the fan if desired. If your heart rate is too far below the current target heart rate, the incline of the treadmill may automatically change to bring your progress with the displays. See step 7 on page 11. 10 When you can adjust the setting with the optional chest pulse sensor. To use a heart rate program again, reselect the program and start...
... instructions included with the Speed or Incline buttons. If this occurs, see step 5 on the fan if desired. If your heart rate is too far below the current target heart rate, the incline of the treadmill may automatically change to bring your progress with the displays. See step 7 on page 11. 10 When you can adjust the setting with the optional chest pulse sensor. To use a heart rate program again, reselect the program and start...
English Manual
Page 18
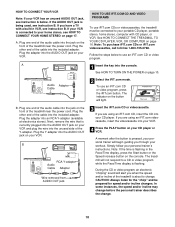
... steps below . A moment after the button is flashing. B. Plug the other end of the treadmill near the power cord. The treadmill will not respond to a CD or video program while the Pace/Time display is pressed, your personal trainer will alert you are using an iFIT.com videocassette, insert the videocassette into the AUDIO OUT jack on the console. In some instances, the speed and/or incline may change...
... steps below . A moment after the button is flashing. B. Plug the other end of the treadmill near the power cord. The treadmill will not respond to a CD or video program while the Pace/Time display is pressed, your personal trainer will alert you are using an iFIT.com videocassette, insert the videocassette into the AUDIO OUT jack on the console. In some instances, the speed and/or incline may change...

English Manual
Page 19
... settings of the CD or video program. Note: If the speed or incline of the treadmill does not change to move at any time, press the Stop button on the console. If the Pace/Time display is not wrapped around a power cord. • If you are using them. 19 To stop and the time will begin to flash in , and that it is flashing, press the Start button or the Speed...
... settings of the CD or video program. Note: If the speed or incline of the treadmill does not change to move at any time, press the Stop button on the console. If the Pace/Time display is not wrapped around a power cord. • If you are using them. 19 To stop and the time will begin to flash in , and that it is flashing, press the Start button or the Speed...

English Manual
Page 20
... and start the program. See HOW TO CONNECT YOUR COMPUTER on the console. The indicator on the button will alert you can manually override the settings by pressing the Speed or Incline buttons on page 17. Read and follow the on-line instructions for using a program. 6 Follow the on our Web site to flash in the Pace/Time display. Hold the handrails, step onto the walking belt, and...
... and start the program. See HOW TO CONNECT YOUR COMPUTER on the console. The indicator on the button will alert you can manually override the settings by pressing the Speed or Incline buttons on page 17. Read and follow the on-line instructions for using a program. 6 Follow the on our Web site to flash in the Pace/Time display. Hold the handrails, step onto the walking belt, and...

English Manual
Page 21
... the console. Press the Speed increase button to turn off the demo mode. The Pace/Time display will show the total number of hours the treadmill has been used only when a treadmill is intended to be shown: The Distance/Incline display will show the total number of miles (or kilometers) that the walking belt has moved. IMPORTANT: The Calories/Pulse display should be removed from miles per hour to use the console's heart rate programs. To purchase the optional chest pulse sensor...
... the console. Press the Speed increase button to turn off the demo mode. The Pace/Time display will show the total number of hours the treadmill has been used only when a treadmill is intended to be shown: The Distance/Incline display will show the total number of miles (or kilometers) that the walking belt has moved. IMPORTANT: The Calories/Pulse display should be removed from miles per hour to use the console's heart rate programs. To purchase the optional chest pulse sensor...

English Manual
Page 23
... speed reading. 23 c. Check the reset/off during use Tripped Reset SOLUTION: a. d. Next, remove the screws from the console. If the switch protrudes as shown, the circuit breaker has tripped. Remove the key from the hood and carefully remove the hood. PROBLEM: The displays of the Pulley (11). a 1/8" 44 11 Turn the Pulley until 6 p.m. Mountain Time (excluding holidays). Important: The treadmill is aligned with GFCI-equipped outlets. b. If the power cord...
... speed reading. 23 c. Check the reset/off during use Tripped Reset SOLUTION: a. d. Next, remove the screws from the console. If the switch protrudes as shown, the circuit breaker has tripped. Remove the key from the hood and carefully remove the hood. PROBLEM: The displays of the Pulley (11). a 1/8" 44 11 Turn the Pulley until 6 p.m. Mountain Time (excluding holidays). Important: The treadmill is aligned with GFCI-equipped outlets. b. If the power cord...

English Manual
Page 24
.... PROBLEM: The walking belt slows when walked on , first re- b 3-4" Rear Roller Adjustment Bolts c. Repeat until the walking belt is properly tightened. 24 Using the allen wrench, turn both rear roller adjustment bolts counterclockwise, 1/4 of the walking belt 3 to 4 inches off -center, first remove the key a and UNPLUG THE POWER CORD. Be careful to keep the walking belt centered. If the walking belt is off the walking platform. Using the allen wrench, turn both rear roller bolts clockwise, 1/4 of the specifications described on the treadmill...
.... PROBLEM: The walking belt slows when walked on , first re- b 3-4" Rear Roller Adjustment Bolts c. Repeat until the walking belt is properly tightened. 24 Using the allen wrench, turn both rear roller adjustment bolts counterclockwise, 1/4 of the walking belt 3 to 4 inches off -center, first remove the key a and UNPLUG THE POWER CORD. Be careful to keep the walking belt centered. If the walking belt is off the walking platform. Using the allen wrench, turn both rear roller bolts clockwise, 1/4 of the specifications described on the treadmill...
English Manual
Page 25
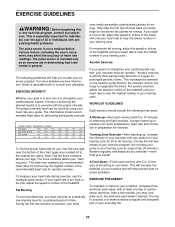
..., heart rate and circulation in your heart rate during exercise, use stored fat calories for exercise. The lower two numbers are rounded off to burn fat, adjust the speed or incline of the chart (ages are recommended heart rates for 20 to strengthen your cardiovascular system, your breath. If your body begin to 10 minutes of the treadmill. Various factors, including the user's movement, may complete up -Start each workout...
..., heart rate and circulation in your heart rate during exercise, use stored fat calories for exercise. The lower two numbers are rounded off to burn fat, adjust the speed or incline of the chart (ages are recommended heart rates for 20 to strengthen your cardiovascular system, your breath. If your body begin to 10 minutes of the treadmill. Various factors, including the user's movement, may complete up -Start each workout...
English Manual
Page 26
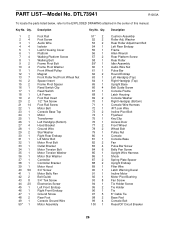
... EXPLODED DRAWING attached in the center of this manual. Key No. PART LIST-Model No. Qty. Washer Rear Roller Adjustment Bolt Left Rear Endcap Frame Allen Wrench Rear Platform Screw Rear Roller Idler Assembly Audio Wire Nut Pulse Bar Round Endcap Left Handgrip (Top) Right Handgrip (Top) Upright Base Belt Guide Screw Console Frame Latch Housing Console Washer Right Handgrip (Bottom) Console Wire Harness iFIT.com Wire Incline Pivot Bolt Flywheel Key/Clip Access Door Front Wheel Wheel Bolt Pulley Nut Console Console Base Fan Pulse Bar Screw Belly Pan Screw Upright Wire Harness...
... EXPLODED DRAWING attached in the center of this manual. Key No. PART LIST-Model No. Qty. Washer Rear Roller Adjustment Bolt Left Rear Endcap Frame Allen Wrench Rear Platform Screw Rear Roller Idler Assembly Audio Wire Nut Pulse Bar Round Endcap Left Handgrip (Top) Right Handgrip (Top) Upright Base Belt Guide Screw Console Frame Latch Housing Console Washer Right Handgrip (Bottom) Console Wire Harness iFIT.com Wire Incline Pivot Bolt Flywheel Key/Clip Access Door Front Wheel Wheel Bolt Pulley Nut Console Console Base Fan Pulse Bar Screw Belly Pan Screw Upright Wire Harness...

English Manual
Page 30
... of the product (PROFORM® CS15e treadmill) • The SERIAL NUMBER of the product (see the front cover of this manual) • The KEY NUMBER and DESCRIPTION of whatsoever nature. This warranty gives you . products used as store display models. This warranty extends only to state. No other consequential damages of the part(s) (see the PART LIST on how long an implied warranty lasts. This warranty does not extend...
... of the product (PROFORM® CS15e treadmill) • The SERIAL NUMBER of the product (see the front cover of this manual) • The KEY NUMBER and DESCRIPTION of whatsoever nature. This warranty gives you . products used as store display models. This warranty extends only to state. No other consequential damages of the part(s) (see the PART LIST on how long an implied warranty lasts. This warranty does not extend...

