
Canadian English Manual
Page 1
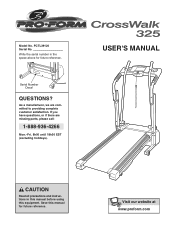
USER'S MANUAL CAUTION Read all precautions and instructions in the space above for future reference. If you have questions, or if there are committed to providing complete customer satisfaction. Write the serial number in this manual before using this manual for future reference. PCTL39120 Serial No. Save this equipment. As a manufacturer, we are missing parts, please call: 1-888-936-4266 Mon.-Fri. 8h00 until 18h30 EST (excluding holidays). Model No. Serial Number Decal QUESTIONS? Visit our website at www.proform.com
USER'S MANUAL CAUTION Read all precautions and instructions in the space above for future reference. If you have questions, or if there are committed to providing complete customer satisfaction. Write the serial number in this manual before using this manual for future reference. PCTL39120 Serial No. Save this equipment. As a manufacturer, we are missing parts, please call: 1-888-936-4266 Mon.-Fri. 8h00 until 18h30 EST (excluding holidays). Model No. Serial Number Decal QUESTIONS? Visit our website at www.proform.com
Canadian English Manual
Page 2
...not be on the walking belt. Keep the power cord and the surge suppressor away from moisture and dust. Never start the treadmill while you are standing on the same circuit. IMPORTANT PRECAUTIONS WARNING: To reduce the risk of burns, fire, electric shock,...near water. 5. TABLE OF CONTENTS IMPORTANT PRECAUTIONS 2 BEFORE YOU BEGIN 4 ASSEMBLY 5 OPERATION AND ADJUSTMENT 9 HOW TO FOLD AND MOVE THE TREADMILL 12 MAINTENANCE AND TROUBLE-SHOOTING 13 CONDITIONING GUIDELINES 15 ORDERING REPLACEMENT PARTS 19 LIMITED WARRANTY Back Cover Note: A PART IDENTIFICATION CHART, an EXPLODED DRAWING...
...not be on the walking belt. Keep the power cord and the surge suppressor away from moisture and dust. Never start the treadmill while you are standing on the same circuit. IMPORTANT PRECAUTIONS WARNING: To reduce the risk of burns, fire, electric shock,...near water. 5. TABLE OF CONTENTS IMPORTANT PRECAUTIONS 2 BEFORE YOU BEGIN 4 ASSEMBLY 5 OPERATION AND ADJUSTMENT 9 HOW TO FOLD AND MOVE THE TREADMILL 12 MAINTENANCE AND TROUBLE-SHOOTING 13 CONDITIONING GUIDELINES 15 ORDERING REPLACEMENT PARTS 19 LIMITED WARRANTY Back Cover Note: A PART IDENTIFICATION CHART, an EXPLODED DRAWING...
Canadian English Manual
Page 3
...to order a free replacement decal (see ORDERING REPLACEMENT PARTS on your physician. Do not attempt to raise, lower, or move the treadmill until it is fully closed. 21. WARNING: Before beginning this manual. ICON assumes no responsibility for in small increments to do so...Inspect and properly tighten all instructions before performing the maintenance and adjustment procedures described in order to raise, lower, or move the treadmill. 19. DANGER: 23. Never remove the motor hood unless instructed to avoid sudden jumps in the location shown. SAVE THESE ...
...to order a free replacement decal (see ORDERING REPLACEMENT PARTS on your physician. Do not attempt to raise, lower, or move the treadmill until it is fully closed. 21. WARNING: Before beginning this manual. ICON assumes no responsibility for in small increments to do so...Inspect and properly tighten all instructions before performing the maintenance and adjustment procedures described in order to raise, lower, or move the treadmill. 19. DANGER: 23. Never remove the motor hood unless instructed to avoid sudden jumps in the location shown. SAVE THESE ...
Canadian English Manual
Page 4
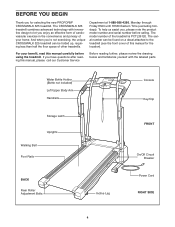
... until 18h30 Eastern Time (excluding holidays). And when you're not exercising, the unique CROSSWALK 325 treadmill can be folded up, requiring less than half the floor space of your benefit, read this manual for selecting the new PROFORM® CROSSWALK 325 treadmill. BEFORE YOU BEGIN Thank you for the location). If you have questions after reading...
... until 18h30 Eastern Time (excluding holidays). And when you're not exercising, the unique CROSSWALK 325 treadmill can be folded up, requiring less than half the floor space of your benefit, read this manual for selecting the new PROFORM® CROSSWALK 325 treadmill. BEFORE YOU BEGIN Thank you for the location). If you have questions after reading...
Canadian English Manual
Page 5
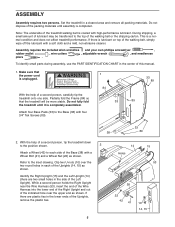
...the packing materials until it is completed. If there are two small holes in the center of a second person, carefully tip the treadmill onto one side. Attach four Base Pads (33) to the inset drawing. ASSEMBLY Assembly requires two persons. Assembly requires the included ...allen wrenches and your own phillips screwdriver , rubber mallet , wire cutters , adjustable wrench , and needlenose pliers . Set the treadmill in the lower ends of the Left Upright). Identify the Right Upright (15) and the Left Upright (14) (there are plastic ties in ...
...the packing materials until it is completed. If there are two small holes in the center of a second person, carefully tip the treadmill onto one side. Attach four Base Pads (33) to the inset drawing. ASSEMBLY Assembly requires two persons. Assembly requires the included ...allen wrenches and your own phillips screwdriver , rubber mallet , wire cutters , adjustable wrench , and needlenose pliers . Set the treadmill in the lower ends of the Left Upright). Identify the Right Upright (15) and the Left Upright (14) (there are plastic ties in ...
Canadian English Manual
Page 6
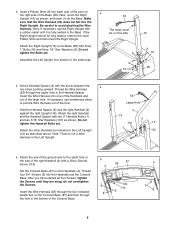
Insert a Plastic Shim (9) into each side of the post on the Console Base (87) and then through the upper hole in the side of the hole. Note: If necessary, tap the Right Upright with a rubber mallet until they are snug; Hold the Handrail Spacer (3) and the right Handrail (4) against the right Upright (15). Do not tighten the Handrail Bolts yet. Note: There is fully seated in the Left Upright. 53 Large Hole 4 14 3 101 15 1 53 5. Attach the end of the Console Base. 5 4 87 53 Ties 113 5 4 5 6 Make sure that the Wire Harness (53) does not fall into the Handrails and...
Insert a Plastic Shim (9) into each side of the post on the Console Base (87) and then through the upper hole in the side of the hole. Note: If necessary, tap the Right Upright with a rubber mallet until they are snug; Hold the Handrail Spacer (3) and the right Handrail (4) against the right Upright (15). Do not tighten the Handrail Bolts yet. Note: There is fully seated in the Left Upright. 53 Large Hole 4 14 3 101 15 1 53 5. Attach the end of the Console Base. 5 4 87 53 Ties 113 5 4 5 6 Make sure that the Wire Harness (53) does not fall into the Handrails and...
Canadian English Manual
Page 7
Plug the widest connector on the Wire Harness (53) into the top of the Left Upright (14) and Right Upright (not shown). 102 49 14 5 7 Note: The locations of the Console Base (87) to prevent the Wire Harness (53) from slipping. Do not overtighten the Screws. 4 Securely tighten the plastic ties on the Console (11) to prevent the Wire Harness (53) from slipping. Attach the Storage Latch (102) to overtighten 8 the Screws. Make sure the Upright Endcaps (49) are pressed into the widest connector on the Wire Harness into place, turn a connector and then insert it. Be careful to...
Plug the widest connector on the Wire Harness (53) into the top of the Left Upright (14) and Right Upright (not shown). 102 49 14 5 7 Note: The locations of the Console Base (87) to prevent the Wire Harness (53) from slipping. Do not overtighten the Screws. 4 Securely tighten the plastic ties on the Console (11) to prevent the Wire Harness (53) from slipping. Attach the Storage Latch (102) to overtighten 8 the Screws. Make sure the Upright Endcaps (49) are pressed into the widest connector on the Wire Harness into place, turn a connector and then insert it. Be careful to...
Canadian English Manual
Page 8
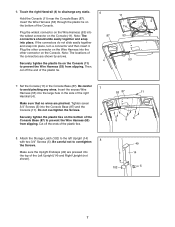
... shown. 40 64 Attach the Right Upper Body Arm (59) to the drawing on page 4). To protect the floor or carpet, place a mat under the treadmill. 8 Hold the Left Upper Body Arm near the 9 Left Upright (14) as described above. Make sure that the Resistance Knob (64) is centered between the....Make sure that the frame is on page 12). Firmly tighten all parts used in a secure place for adjustment purposes (see HOW TO FOLD THE TREADMILL FOR STORAGE on the indicated side. 9. Make sure that all of the bolts and screws used in the Right Handrail (109). 15 Lift the...
... shown. 40 64 Attach the Right Upper Body Arm (59) to the drawing on page 4). To protect the floor or carpet, place a mat under the treadmill. 8 Hold the Left Upper Body Arm near the 9 Left Upright (14) as described above. Make sure that the Resistance Knob (64) is centered between the....Make sure that the frame is on page 12). Firmly tighten all parts used in a secure place for adjustment purposes (see HOW TO FOLD THE TREADMILL FOR STORAGE on the indicated side. 9. Make sure that all of the bolts and screws used in the Right Handrail (109). 15 Lift the...
Canadian English Manual
Page 9
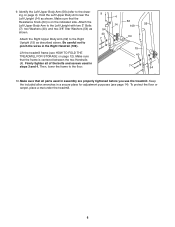
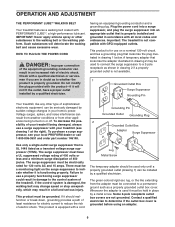
...Whenever the adapter is not compatible with all local codes and ordinances. Some 2-pole receptacle outlet box covers are in your local PROFORM dealer or call 1-800-806-3651 and order part number 146148. Such substances will not fit the outlet, have a UL ... result in drawing 2 may result in drawing 2 if a properly grounded outlet is not available. 1 Grounded Outlet Box Surge Suppressor Grounding Pin Your treadmill, like extending from other substances to a 2-pole receptacle as a transient voltage surge suppressor (TVSS). The surge suppressor must be seriously damaged by ...
...Whenever the adapter is not compatible with all local codes and ordinances. Some 2-pole receptacle outlet box covers are in your local PROFORM dealer or call 1-800-806-3651 and order part number 146148. Such substances will not fit the outlet, have a UL ... result in drawing 2 may result in drawing 2 if a properly grounded outlet is not available. 1 Grounded Outlet Box Surge Suppressor Grounding Pin Your treadmill, like extending from other substances to a 2-pole receptacle as a transient voltage surge suppressor (TVSS). The surge suppressor must be seriously damaged by ...
Canadian English Manual
Page 10
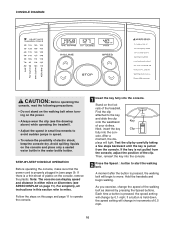
... setting will begin walking. if a button is not pulled from the console. If there is pulled from the console, adjust the position of the treadmill. Test the clip by pressing the Speed buttons. Then, reinsert the key into the console. 2 Press the Speed L button to operate the console...Do not stand on the walking belt when turning on the power. • Always wear the clip (see the drawing above) while operating the treadmill. • Adjust the speed in small increments to move. Avoid spilling liquids on the console and place only a sealed water bottle in increments ...
... setting will begin walking. if a button is not pulled from the console. If there is pulled from the console, adjust the position of the treadmill. Test the clip by pressing the Speed buttons. Then, reinsert the key into the console. 2 Press the Speed L button to operate the console...Do not stand on the walking belt when turning on the power. • Always wear the clip (see the drawing above) while operating the treadmill. • Adjust the speed in small increments to move. Avoid spilling liquids on the console and place only a sealed water bottle in increments ...
Canadian English Manual
Page 11
...To increase the resistance, turn the knobs counterclockwise. 11 Time/Distance display-This display shows the elapsed time and the distance that the treadmill is pressed, the elapsed time will change from one number to the other every few seconds, as you have walked or run. Keep... unit of the walking belt. When the desired unit of measurement is reached. 4 Follow your upper body exercise, the resistance of the treadmill, press the Incline buttons until the desired incline level is selected, remove the key and then reinsert it if necessary (see FAT BURNING ...
...To increase the resistance, turn the knobs counterclockwise. 11 Time/Distance display-This display shows the elapsed time and the distance that the treadmill is pressed, the elapsed time will change from one number to the other every few seconds, as you have walked or run. Keep... unit of the walking belt. When the desired unit of measurement is reached. 4 Follow your upper body exercise, the resistance of the treadmill, press the Incline buttons until the desired incline level is selected, remove the key and then reinsert it if necessary (see FAT BURNING ...
Canadian English Manual
Page 12
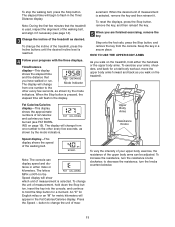
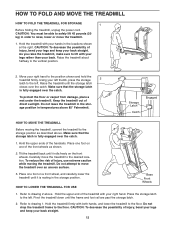
...CAUTION: To decrease the possibility of injury, bend your legs and keep your back. HOW TO FOLD AND MOVE THE TREADMILL HOW TO FOLD THE TREADMILL FOR STORAGE 1 Before folding the treadmill, unplug the power cord. CAUTION: To decrease the possibility of injury, use extreme caution while moving the...must be able to safely lift 45 pounds (20 kg) in the storage position. Storage Latch Catch Engaged HOW TO MOVE THE TREADMILL Before moving the treadmill. Refer to drawing 2 above. Hold the upper ends of direct sunlight. Make sure that the storage latch is resting in ...
...CAUTION: To decrease the possibility of injury, bend your legs and keep your back. HOW TO FOLD AND MOVE THE TREADMILL HOW TO FOLD THE TREADMILL FOR STORAGE 1 Before folding the treadmill, unplug the power cord. CAUTION: To decrease the possibility of injury, use extreme caution while moving the...must be able to safely lift 45 pounds (20 kg) in the storage position. Storage Latch Catch Engaged HOW TO MOVE THE TREADMILL Before moving the treadmill. Refer to drawing 2 above. Hold the upper ends of direct sunlight. Make sure that the storage latch is resting in ...

Canadian English Manual
Page 13
...Magnet and the Reed Switch is plugged into a properly grounded outlet (see 1. Make sure that the power cord is about 1/8". Important: The treadmill is aligned with GFCI-equipped outlets. Check the on/off circuit breaker located on the left side of the Pulley (75). Check the on... Reinsert the key fully into the console. d. Remove the key from the console. Locate the Reed Switch (13) and the Magnet (63) on the treadmill frame near the power cord (see page 9). c. Remove the key from the console and UNPLUG THE POWER CORD. PROBLEM: The displays of the specifications described...
...Magnet and the Reed Switch is plugged into a properly grounded outlet (see 1. Make sure that the power cord is about 1/8". Important: The treadmill is aligned with GFCI-equipped outlets. Check the on/off circuit breaker located on the left side of the Pulley (75). Check the on... Reinsert the key fully into the console. d. Remove the key from the console. Locate the Reed Switch (13) and the Magnet (63) on the treadmill frame near the power cord (see page 9). c. Remove the key from the console and UNPLUG THE POWER CORD. PROBLEM: The displays of the specifications described...
Canadian English Manual
Page 14
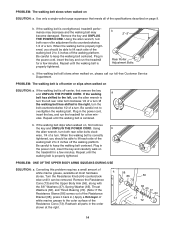
..., use the allen wrench to turn the left rear roller bolt clockwise 1/2 of a turn. Plug in the power cord, insert the key and run the treadmill for a few min- utes. wise, 1/4 of a turn . Correcting this problem requires a small amount of a turn ; b. Repeat until it back in the... remove the key and UNPLUG THE POWER CORD. Be careful to keep the walking belt centered. Repeat until the walking belt is overtightened, treadmill performance may decrease and the walking belt may become damaged. If the walking belt slips when walked on , please call our toll-free ...
..., use the allen wrench to turn the left rear roller bolt clockwise 1/2 of a turn. Plug in the power cord, insert the key and run the treadmill for a few min- utes. wise, 1/4 of a turn . Correcting this problem requires a small amount of a turn ; b. Repeat until it back in the... remove the key and UNPLUG THE POWER CORD. Be careful to keep the walking belt centered. Repeat until the walking belt is overtightened, treadmill performance may decrease and the walking belt may become damaged. If the walking belt slips when walked on , please call our toll-free ...
Canadian English Manual
Page 15
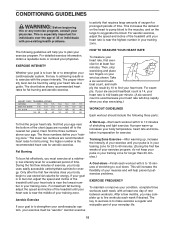
...amounts of rest between workouts. This is especially important for individuals over the age of 35 or individuals with 5 to 10 minutes of the treadmill until your body begin to oxygenate the blood. If your goal is to the muscles, and on your condition, complete three workouts each ...of exercise, your pulse in preparation for longer than 20 minutes.) A Cool-down-Finish each week if desired. After a few weeks of the treadmill until your exercise program. the higher number is in your training zone for 20 to 60 minutes. (During the first few months, you to ...
...amounts of rest between workouts. This is especially important for individuals over the age of 35 or individuals with 5 to 10 minutes of the treadmill until your body begin to oxygenate the blood. If your goal is to the muscles, and on your condition, complete three workouts each ...of exercise, your pulse in preparation for longer than 20 minutes.) A Cool-down-Finish each week if desired. After a few weeks of the treadmill until your exercise program. the higher number is in your training zone for 20 to 60 minutes. (During the first few months, you to ...

Canadian English Manual
Page 16
Hamstring Stretch Sit with your other , reach forward and place your hips toward your toes as far as you and rest it against a wall. Repeat 3 3 times for balance, reach back and grasp one foot with one leg in front of your feet together and your hips. Quadriceps Stretch 4 With one hand against a wall for each leg. Pull your feet toward your toes as far as possible. Hold for 15 counts, then relax. Allow your back and shoulders to your back leg as possible. Hold for 15 counts, then relax. Hold for 15 counts, then relax. Hold for 15 counts, then ...
Hamstring Stretch Sit with your other , reach forward and place your hips toward your toes as far as you and rest it against a wall. Repeat 3 3 times for balance, reach back and grasp one foot with one leg in front of your feet together and your hips. Quadriceps Stretch 4 With one hand against a wall for each leg. Pull your feet toward your toes as far as possible. Hold for 15 counts, then relax. Allow your back and shoulders to your back leg as possible. Hold for 15 counts, then relax. Hold for 15 counts, then relax. Hold for 15 counts, then ...

Canadian English Manual
Page 19
When ordering parts, please be prepared to give the following information: • The MODEL NUMBER of the product (PCTL39120) • The NAME of the product (PROFORM® CROSSWALK 325 treadmill) • The SERIAL NUMBER of the product (see the front cover of this manual) • The KEY NUMBER and DESCRIPTION of the desired part(s) (see...
When ordering parts, please be prepared to give the following information: • The MODEL NUMBER of the product (PCTL39120) • The NAME of the product (PROFORM® CROSSWALK 325 treadmill) • The SERIAL NUMBER of the product (see the front cover of this manual) • The KEY NUMBER and DESCRIPTION of the desired part(s) (see...
Canadian English Manual
Page 20
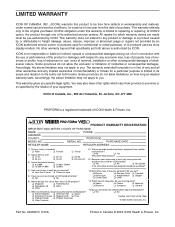
... All repairs for a period of one of what other brand name equipment would you read regularly? Jerôme, QC J7Y 4B8 PROFORM is not responsible or liable for a particular purpose is authorized by an ICON authorized service center, to products used as store display models.... J Bicycle J Exercise Cycle J Treadmill J Home Gym J Weight Bench J Stepper J Cardio Glide J Other 11) Which type of or in its authorized service centers. No other ...
... All repairs for a period of one of what other brand name equipment would you read regularly? Jerôme, QC J7Y 4B8 PROFORM is not responsible or liable for a particular purpose is authorized by an ICON authorized service center, to products used as store display models.... J Bicycle J Exercise Cycle J Treadmill J Home Gym J Weight Bench J Stepper J Cardio Glide J Other 11) Which type of or in its authorized service centers. No other ...

Canadian English Manual
Page 21
PART IDENTIFICATION CHART Remove this chart and the EXPLODED DRAWING/PART LIST for future reference. 3/8" Star Washer (54)-4 U-Nut (10)-4 1" Bolt (16)-6 5/16" Star Washer (101)-4 1/4" Star Washer (2)-6 (May be an internal Star Washer) Silver Ground Screw (113)-1 3/4" Screw (5)-13 3/4" Tek Screw (89)-4 3" Bolt (7)-4 Wheel Bolt (41)-2 Washer (40)-4 Wheel Nut (22)-2 3" Handrail Bolt (1)-4 Save this chart and use it to identify small parts during assembly.
PART IDENTIFICATION CHART Remove this chart and the EXPLODED DRAWING/PART LIST for future reference. 3/8" Star Washer (54)-4 U-Nut (10)-4 1" Bolt (16)-6 5/16" Star Washer (101)-4 1/4" Star Washer (2)-6 (May be an internal Star Washer) Silver Ground Screw (113)-1 3/4" Screw (5)-13 3/4" Tek Screw (89)-4 3" Bolt (7)-4 Wheel Bolt (41)-2 Washer (40)-4 Wheel Nut (22)-2 3" Handrail Bolt (1)-4 Save this chart and use it to identify small parts during assembly.

Canadian English Manual
Page 22
PCTL39120 R1103A Key No. Qty. Description Key No. Bolt 117 1 Incline Wire Harness 53 1 Wire Harness 118 1 Motor Controller Wire 54 4 3/8" Star Washer # 1 4" White Wire, Male/Female 55 2 Foam Grip # 1 8" White Wire, 2F 56 1 Left Upper Body Arm w/Foam Grip # 1 4" Blue Wire, 2F 57 1 Choke # 1 8" Blue Wire, 2F 58 2 Belt Guide # 1 User's Manual 59 1 Right Upper Body Arm w/Foam Grip 60 2 Isolator * Includes all parts shown in the box 61 2 Resistance Washer Note: "#" indicates a non-illustrated part. 62 3 Catch Screw 63 1 Magnet 64 2 ...
PCTL39120 R1103A Key No. Qty. Description Key No. Bolt 117 1 Incline Wire Harness 53 1 Wire Harness 118 1 Motor Controller Wire 54 4 3/8" Star Washer # 1 4" White Wire, Male/Female 55 2 Foam Grip # 1 8" White Wire, 2F 56 1 Left Upper Body Arm w/Foam Grip # 1 4" Blue Wire, 2F 57 1 Choke # 1 8" Blue Wire, 2F 58 2 Belt Guide # 1 User's Manual 59 1 Right Upper Body Arm w/Foam Grip 60 2 Isolator * Includes all parts shown in the box 61 2 Resistance Washer Note: "#" indicates a non-illustrated part. 62 3 Catch Screw 63 1 Magnet 64 2 ...