
Canadian English Manual
Page 3
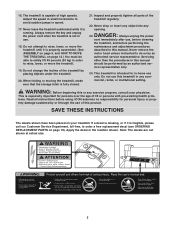
... in speed. 17. Never leave the treadmill unattended while it is illegible, please call our Customer Service Department, toll-free, to do so by placing objects under the treadmill. 20. Always remove the key and unplug the power cord when the treadmill is fully closed. 21. Never drop ...or insert any object into any exercise program, consult your treadmill. Do not attempt to raise, lower, or move the treadmill until it is running....
... in speed. 17. Never leave the treadmill unattended while it is illegible, please call our Customer Service Department, toll-free, to do so by placing objects under the treadmill. 20. Always remove the key and unplug the power cord when the treadmill is fully closed. 21. Never drop ...or insert any object into any exercise program, consult your treadmill. Do not attempt to raise, lower, or move the treadmill until it is running....
Canadian English Manual
Page 4
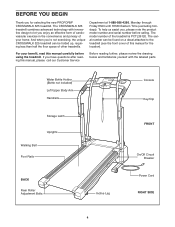
... floor space of your benefit, read this manual for selecting the new PROFORM® CROSSWALK 325 treadmill. For your home. The model number of this manual carefully before calling. The CROSSWALK 325 treadmill combines advanced technology with the labeled parts. Water Bottle Holder (Bottle not... included) Left Upper Body Arm Handrails Storage Latch Uprights Walking Belt Foot Rails BACK Rear Roller Adjustment Bolts Incline Leg Console Key/Clip FRONT ...
... floor space of your benefit, read this manual for selecting the new PROFORM® CROSSWALK 325 treadmill. For your home. The model number of this manual carefully before calling. The CROSSWALK 325 treadmill combines advanced technology with the labeled parts. Water Bottle Holder (Bottle not... included) Left Upper Body Arm Handrails Storage Latch Uprights Walking Belt Foot Rails BACK Rear Roller Adjustment Bolts Incline Leg Console Key/Clip FRONT ...
Canadian English Manual
Page 10
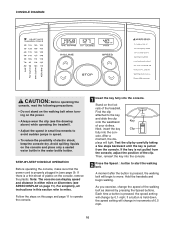
...STEP CONSOLE OPERATION Before operating the console, make sure that the power cord is properly plugged in (see the drawing above) while operating the treadmill. • Adjust the speed in either miles or kilometers (see SPEED DISPLAY on the console, remove the plastic. Find the clip attached to...Note: The console can display speed and distance in small increments to move. Test the clip by carefully taking a few steps backward until the key is pressed, the walking belt will change in the water bottle holder. A moment after the button is pulled from the console, adjust the ...
...STEP CONSOLE OPERATION Before operating the console, make sure that the power cord is properly plugged in (see the drawing above) while operating the treadmill. • Adjust the speed in either miles or kilometers (see SPEED DISPLAY on the console, remove the plastic. Find the clip attached to...Note: The console can display speed and distance in small increments to move. Test the clip by carefully taking a few steps backward until the key is pressed, the walking belt will change in the water bottle holder. A moment after the button is pulled from the console, adjust the ...
Canadian English Manual
Page 11
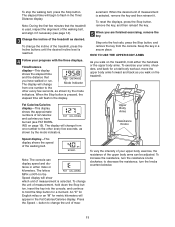
...Time/Distance display-This display shows the elapsed time and the distance that the treadmill is used, inspect the alignment of the treadmill, press the Incline buttons until the desired incline level is selected, remove the key and then reinsert it if necessary (see FAT BURNING on page 15). HOW ...unit of measurement is reached. 4 Follow your upper body exercise, the resistance of the treadmill as shown by the mode indicators. Step onto the foot rails, press the Stop button, and remove the key from one number to the other every few minutes that you have walked or run....
...Time/Distance display-This display shows the elapsed time and the distance that the treadmill is used, inspect the alignment of the treadmill, press the Incline buttons until the desired incline level is selected, remove the key and then reinsert it if necessary (see FAT BURNING on page 15). HOW ...unit of measurement is reached. 4 Follow your upper body exercise, the resistance of the treadmill as shown by the mode indicators. Step onto the foot rails, press the Stop button, and remove the key from one number to the other every few minutes that you have walked or run....

Canadian English Manual
Page 13
... Remove the key from the console and UNPLUG THE POWER CORD. Carefully remove the hood. Make sure that meets all of the Pulley (75). If necessary, loosen the Screw (89) and move the Reed Switch slightly. PROBLEM: The power does not turn on the treadmill frame near ...and then plug it , wait for five minutes and then press the switch back in . If the on page 9. MAINTENANCE AND TROUBLESHOOTING Most treadmill problems can be solved by following the steps below. Retighten the Screw. Find the symptom that the power cord is about 1/8". PROBLEM: The...
... Remove the key from the console and UNPLUG THE POWER CORD. Carefully remove the hood. Make sure that meets all of the Pulley (75). If necessary, loosen the Screw (89) and move the Reed Switch slightly. PROBLEM: The power does not turn on the treadmill frame near ...and then plug it , wait for five minutes and then press the switch back in . If the on page 9. MAINTENANCE AND TROUBLESHOOTING Most treadmill problems can be solved by following the steps below. Retighten the Screw. Find the symptom that the power cord is about 1/8". PROBLEM: The...
Canadian English Manual
Page 14
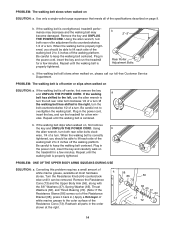
Plug in the power cord, insert the key and run the treadmill for a few min- if the walking belt has shifted to 3 inches off -center or slips when walked on , first remove the key and UNPLUG THE POWER CORD. wise, 1/4 of a turn . b. b 2"-3" Rear Roller Adjustment Bolts c. If the ...the walking belt is off the walking platform. utes. Using b the allen wrench, turn . Plug in the power cord, insert the key, and run the treadmill for a few minutes. PROBLEM: ONE OF THE UPPER BODY ARMS SQUEAKS DU2R7IN1G12USE 111 SOLUTION: a. Using the allen wrench, turn both rear...
Plug in the power cord, insert the key and run the treadmill for a few min- if the walking belt has shifted to 3 inches off -center or slips when walked on , first remove the key and UNPLUG THE POWER CORD. wise, 1/4 of a turn . b. b 2"-3" Rear Roller Adjustment Bolts c. If the ...the walking belt is off the walking platform. utes. Using b the allen wrench, turn . Plug in the power cord, insert the key, and run the treadmill for a few minutes. PROBLEM: ONE OF THE UPPER BODY ARMS SQUEAKS DU2R7IN1G12USE 111 SOLUTION: a. Using the allen wrench, turn both rear...
Canadian English Manual
Page 15
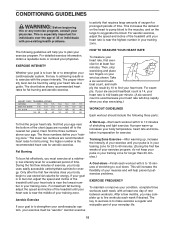
...The proper intensity level can be "aerobic." For maximum fat burning, adjust the speed and incline of stretching to 10 minutes of the treadmill until your pulse is to strengthen your cardiovascular system, your everyday life. 15 Next, find the three numbers above your condition, complete ... two fingers on the lungs to strengthen your age near the bottom of the treadmill until your heart rate is the recommended heart rate for a sustained period of exercise, your physician. The key to success is in your exercise program. Aerobic Exercise If your goal is to...
...The proper intensity level can be "aerobic." For maximum fat burning, adjust the speed and incline of stretching to 10 minutes of the treadmill until your pulse is to strengthen your cardiovascular system, your everyday life. 15 Next, find the three numbers above your condition, complete ... two fingers on the lungs to strengthen your age near the bottom of the treadmill until your heart rate is the recommended heart rate for a sustained period of exercise, your physician. The key to success is in your exercise program. Aerobic Exercise If your goal is to...
Canadian English Manual
Page 19
... following information: • The MODEL NUMBER of the product (PCTL39120) • The NAME of the product (PROFORM® CROSSWALK 325 treadmill) • The SERIAL NUMBER of the product (see the front cover of this manual) • The KEY NUMBER and DESCRIPTION of the desired part(s) (see the PART LIST and the EXPLODED DRAWING in the...
... following information: • The MODEL NUMBER of the product (PCTL39120) • The NAME of the product (PROFORM® CROSSWALK 325 treadmill) • The SERIAL NUMBER of the product (see the front cover of this manual) • The KEY NUMBER and DESCRIPTION of the desired part(s) (see the PART LIST and the EXPLODED DRAWING in the...
Canadian English Manual
Page 22
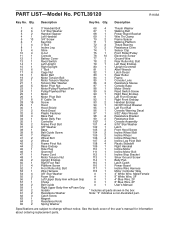
... part. 62 3 Catch Screw 63 1 Magnet 64 2 Resistance Knob 65 2 Spring Washer Specifications are subject to change without notice. Description Key No. Description 1 4 3" Handrail Bolt 66 4 Thrush Washer 2 6 1/4" Star Washer 67 1 Walking Belt 3 2 Handrail Spacer 68... 1 Power Board Bracket 4 1 Left Handrail 69 1 Wire Tie Clamp 5 13 3/4" Screw 70 2 Frame Spacer 6 1 Key/Clip 71 1 Walking Platform 7 4 3" Bolt 72 2 Thrust Bearing 8 1 Incline Leg 73 2 Resistance Cone 9 4 Shim 74 1 Sensor Clip 10 ...
... part. 62 3 Catch Screw 63 1 Magnet 64 2 Resistance Knob 65 2 Spring Washer Specifications are subject to change without notice. Description Key No. Description 1 4 3" Handrail Bolt 66 4 Thrush Washer 2 6 1/4" Star Washer 67 1 Walking Belt 3 2 Handrail Spacer 68... 1 Power Board Bracket 4 1 Left Handrail 69 1 Wire Tie Clamp 5 13 3/4" Screw 70 2 Frame Spacer 6 1 Key/Clip 71 1 Walking Platform 7 4 3" Bolt 72 2 Thrust Bearing 8 1 Incline Leg 73 2 Resistance Cone 9 4 Shim 74 1 Sensor Clip 10 ...


