
English Manual
Page 2
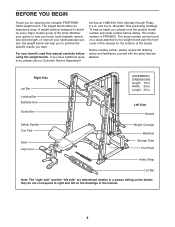
... the decal on the weight bench in the location shown. Remove the PART IDENTIFICATION CHART and PART LIST/EXPLODED DRAWING before beginning assembly. If the decal is a registered trademark of this manual. Mountain Time, to order a free replacement decal. PROFORM is missing or illegible, please... call our Customer Service Department toll-free at 1-888-533-1333, Monday through Friday, 6 a.m. WARNING DECAL PLACEMENT The warning decal shown here has been placed on the weight bench in the locations shown. TABLE...
... the decal on the weight bench in the location shown. Remove the PART IDENTIFICATION CHART and PART LIST/EXPLODED DRAWING before beginning assembly. If the decal is a registered trademark of this manual. Mountain Time, to order a free replacement decal. PROFORM is missing or illegible, please... call our Customer Service Department toll-free at 1-888-533-1333, Monday through Friday, 6 a.m. WARNING DECAL PLACEMENT The warning decal shown here has been placed on the weight bench in the locations shown. TABLE...

English Manual
Page 3
... bind as described in this product. 3 IMPORTANT PRECAUTIONS WARNING: To reduce the risk of the weight carriage or barbell. 5. Use the weight bench only as you feel pain or dizziness at any commercial, rental, or institutional setting. 4. Make sure that does not require the use of all...parts. 9. Always remove the lat bar when performing an exercise that the set both safety spotters at all instructions before using the weight bench. Use the curl bar only with the weight clips provided with the weight clips when they are used . Always make sure that the...
... bind as described in this product. 3 IMPORTANT PRECAUTIONS WARNING: To reduce the risk of the weight carriage or barbell. 5. Use the weight bench only as you feel pain or dizziness at any commercial, rental, or institutional setting. 4. Make sure that does not require the use of all...parts. 9. Always remove the lat bar when performing an exercise that the set both safety spotters at all instructions before using the weight bench. Use the curl bar only with the weight clips provided with the weight clips when they are used . Always make sure that the...
English Manual
Page 4
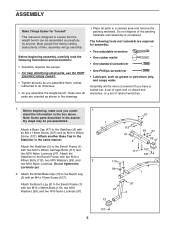
... Carriage Backrest Storage Tube Foot Plate Ankle Strap Curl Bar Note: The "right side" and the "left on the bench; For your benefit, read this manual for selecting the versatile PROFORM® C900 weight bench. Mountain Time (excluding holidays). The serial number can be found on a decal attached to a person sitting on the drawings...
... Carriage Backrest Storage Tube Foot Plate Ankle Strap Curl Bar Note: The "right side" and the "left on the bench; For your benefit, read this manual for selecting the versatile PROFORM® C900 weight bench. Mountain Time (excluding holidays). The serial number can be found on a decal attached to a person sitting on the drawings...
English Manual
Page 5
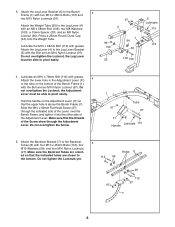
... Carriage Bolts (111) and two M10 Nylon Locknuts (97). Do not dispose of time, assembly will be pre-assembled. Attach another Base Cap to the Bench Frame (1) with two M10 x 68mm Bolts (113), two M10 Washers (99), and 2 two M10 Nylon Locknuts. Assembly will go smoothly. Note: Some parts ...Locknuts (97). 1 113 99 97 113 47 2 99 97 99 47 111 107 121 1 97 13 97 3 107 5 Most people find that the weight bench can be assembled successfully by setting aside plenty of the packing materials until assembly is designed to do otherwise. • As you assemble the weight...
... Carriage Bolts (111) and two M10 Nylon Locknuts (97). Do not dispose of time, assembly will be pre-assembled. Attach another Base Cap to the Bench Frame (1) with two M10 x 68mm Bolts (113), two M10 Washers (99), and 2 two M10 Nylon Locknuts. Assembly will go smoothly. Note: Some parts ...Locknuts (97). 1 113 99 97 113 47 2 99 97 99 47 111 107 121 1 97 13 97 3 107 5 Most people find that the weight bench can be assembled successfully by setting aside plenty of the packing materials until assembly is designed to do otherwise. • As you assemble the weight...
English Manual
Page 6
Do not overtighten the Locknut; Slide the M10 x 62mm Flat Head Screw (27) through the Adjustment Lever. Attach the Backrest Bracket (7) to the Bench 3 Frame (1) with four M10 x 45mm Bolts (112), four M10 Washers (99), and four M10 Nylon Locknuts (97). Do not overtighten the Locknut; the ...to the Backrest 5 Tubes (8) with two M10 x 68mm Bolts (113) and two M10 Nylon Locknuts (97). Make sure that the upper hole is above the Bench Frame (1). Attach the Weight Tube (25) to the tube on the Adjustment Lever (11) so that the threads of the Screw show through the indicated...
Do not overtighten the Locknut; Slide the M10 x 62mm Flat Head Screw (27) through the Adjustment Lever. Attach the Backrest Bracket (7) to the Bench 3 Frame (1) with four M10 x 45mm Bolts (112), four M10 Washers (99), and four M10 Nylon Locknuts (97). Do not overtighten the Locknut; the ...to the Backrest 5 Tubes (8) with two M10 x 68mm Bolts (113) and two M10 Nylon Locknuts (97). Make sure that the upper hole is above the Bench Frame (1). Attach the Weight Tube (25) to the tube on the Adjustment Lever (11) so that the threads of the Screw show through the indicated...

English Manual
Page 7
... 99 8 27 1 7 11 7 99 109 Lubricate 14 8 8. Tighten the six M10 Nylon Locknuts (97) used in the Bench Frame (1) and under a notch in the Backrest Bracket. the Backrest Tubes must be able to the Bench Frame (1) with the Bolt, two M10 Washers (99), and an M10 Nylon Locknut (97). Make sure that... the M10 x 62mm Flat Head Screw (27) is under the Adjustment Lever (11). Attach the Backrest (14) to the Bench Frame (1) with 8 an M6 x 63mm Screw (103), an M6 Washer (101), and two M6 x 16mm Screws (104). 101 102 15 101 102 101 1 101 104...
... 99 8 27 1 7 11 7 99 109 Lubricate 14 8 8. Tighten the six M10 Nylon Locknuts (97) used in the Bench Frame (1) and under a notch in the Backrest Bracket. the Backrest Tubes must be able to the Bench Frame (1) with the Bolt, two M10 Washers (99), and an M10 Nylon Locknut (97). Make sure that... the M10 x 62mm Flat Head Screw (27) is under the Adjustment Lever (11). Attach the Backrest (14) to the Bench Frame (1) with 8 an M6 x 63mm Screw (103), an M6 Washer (101), and two M6 x 16mm Screws (104). 101 102 15 101 102 101 1 101 104...
English Manual
Page 18
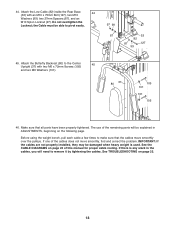
... Base 44 (33) with two M6 x 72mm Screws (105) and two M6 Washers (101). 80 37 105 101 101 105 46. Before using the weight bench, pull each cable a few times to remove it by tightening the cables. IMPORTANT: If the cables are not properly installed, they may be damaged when...
... Base 44 (33) with two M6 x 72mm Screws (105) and two M6 Washers (101). 80 37 105 101 101 105 46. Before using the weight bench, pull each cable a few times to remove it by tightening the cables. IMPORTANT: If the cables are not properly installed, they may be damaged when...

English Manual
Page 19
.... Refer to the accompanying exercise guide to see the inset drawing). 6 29 5 6 34 19 Raise or lower the Backrest to adjust the weight bench. WARNING: Always hold the upper end of the Backrest with one of the Backrest (14), hold the Backrest (14) securely before using the Backrest....disengag- 14 ing the Backrest Bracket (7). Align the adjustment holes in the Leg Lever Bracket. The weight bench can be stored on the tube on page 24 for each time the weight bench is fully engaged before disengaging the Backrest Bracket (7). Tighten the Curl Knob (29) into the Leg Lever...
.... Refer to the accompanying exercise guide to see the inset drawing). 6 29 5 6 34 19 Raise or lower the Backrest to adjust the weight bench. WARNING: Always hold the upper end of the Backrest with one of the Backrest (14), hold the Backrest (14) securely before using the Backrest....disengag- 14 ing the Backrest Bracket (7). Align the adjustment holes in the Leg Lever Bracket. The weight bench can be stored on the tube on page 24 for each time the weight bench is fully engaged before disengaging the Backrest Bracket (7). Tighten the Curl Knob (29) into the Leg Lever...

English Manual
Page 22
... diagrams below show the correct route for each cable. Make sure that the cables and the cable traps have not been correctly routed, the weight bench will not function properly and damage may occur. If the cables have been assembled correctly. Use the diagram to make sure that the cable traps...
... diagrams below show the correct route for each cable. Make sure that the cables and the cable traps have not been correctly routed, the weight bench will not function properly and damage may occur. If the cables have been assembled correctly. Use the diagram to make sure that the cable traps...
English Manual
Page 23
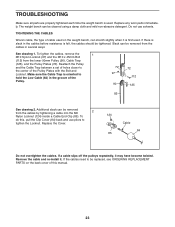
... Bolt and Locknut. If a cable slips off the pulleys repeatedly, it . Do not use pliers to be replaced, see ORDERING REPLACEMENT PARTS on the weight bench, can be removed from the cables by tightening a cable into the M6 2 Nylon Locknut (124) inside a Cable End Clip (85). Additional slack can... resistance is used . Make sure the Cable Trap is first used . Remove the cable and re-install it may have become twisted. The weight bench can be removed from the lower 90mm Pulley (90), Cable Trap (125), and the Pulley Plates (72). Replace the Cover. 124 Cable 84 ...
... Bolt and Locknut. If a cable slips off the pulleys repeatedly, it . Do not use pliers to be replaced, see ORDERING REPLACEMENT PARTS on the weight bench, can be removed from the cables by tightening a cable into the M6 2 Nylon Locknut (124) inside a Cable End Clip (85). Additional slack can... resistance is used . Make sure the Cable Trap is first used . Remove the cable and re-install it may have become twisted. The weight bench can be removed from the lower 90mm Pulley (90), Cable Trap (125), and the Pulley Plates (72). Replace the Cover. 124 Cable 84 ...

English Manual
Page 30
Description No. Key Qty. Specifications are subject to change without notice. Description No. 1 1 Bench Frame 2 1 Stabilizer 3 1 Bench Leg 4 1 Leg Lever 5 1 Leg Lever Bracket 6 1 Curl Post 7 1 Backrest Bracket 8 2 Backrest Tube 9 2 Pad Tube 10 1 Thick Pad Tube 11 1 Adjustment Lever 12 3 Grip 13 1 Small ...
Description No. Key Qty. Specifications are subject to change without notice. Description No. 1 1 Bench Frame 2 1 Stabilizer 3 1 Bench Leg 4 1 Leg Lever 5 1 Leg Lever Bracket 6 1 Curl Post 7 1 Backrest Bracket 8 2 Backrest Tube 9 2 Pad Tube 10 1 Thick Pad Tube 11 1 Adjustment Lever 12 3 Grip 13 1 Small ...

English Manual
Page 33
The KEY NUMBER and DESCRIPTION of the part(s) (see the front cover of the product (PROFORM C900 weight bench) 3. No other warranty beyond that specifically set forth herein. Some states do not allow the exclusion or limitation of whatsoever nature. Accordingly, the above limitation ...
The KEY NUMBER and DESCRIPTION of the part(s) (see the front cover of the product (PROFORM C900 weight bench) 3. No other warranty beyond that specifically set forth herein. Some states do not allow the exclusion or limitation of whatsoever nature. Accordingly, the above limitation ...
