
English Manual
Page 1
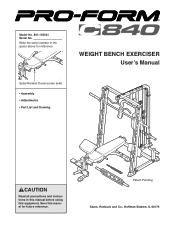
Model No. 831.153321 Serial No. Save this equipment. WEIGHT BENCH EXERCISER User's Manual Serial Number Decal (under seat) • Assembly • Adjustments • Part List and Drawing CAUTION Read all precautions and instructions in the space above for future reference. Write the serial number in this manual before using this manual for reference. Patent Pending Sears, Roebuck and Co., Hoffman Estates, IL 60179
Model No. 831.153321 Serial No. Save this equipment. WEIGHT BENCH EXERCISER User's Manual Serial Number Decal (under seat) • Assembly • Adjustments • Part List and Drawing CAUTION Read all precautions and instructions in the space above for future reference. Write the serial number in this manual before using this manual for reference. Patent Pending Sears, Roebuck and Co., Hoffman Estates, IL 60179
English Manual
Page 2
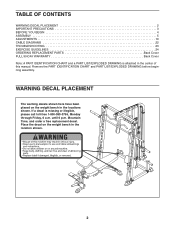
... in the locations shown. WARNING DECAL PLACEMENT The warning decals shown here have been placed on the weight bench in the location shown. 2 Mountain Time, and order a free replacement decal. until 6 p.m. Place the decal on the weight bench in the center of this manual. TABLE OF CONTENTS WARNING DECAL PLACEMENT 2 IMPORTANT PRECAUTIONS 3 BEFORE YOU...
... in the locations shown. WARNING DECAL PLACEMENT The warning decals shown here have been placed on the weight bench in the location shown. 2 Mountain Time, and order a free replacement decal. until 6 p.m. Place the decal on the weight bench in the center of this manual. TABLE OF CONTENTS WARNING DECAL PLACEMENT 2 IMPORTANT PRECAUTIONS 3 BEFORE YOU...
English Manual
Page 3
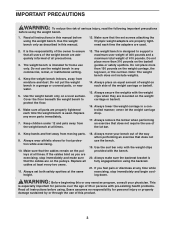
...the way when performing an exercise that the cables are used . Read all times. Use the weight bench only as you feel pain or dizziness at the same height. 18. The weight bench is the responsibility of the owner to protect the floor. 6. Always wear athletic shoes for home... intended for foot protection while exercising. 10. Always make sure that does not use of the weight carriage or barbell. 15. The weight bench is used . 2. Do not put the weight bench in a controlled manner; Replace any time while exercising, stop immediately and make sure the backrest bracket is ...
...the way when performing an exercise that the cables are used . Read all times. Use the weight bench only as you feel pain or dizziness at the same height. 18. The weight bench is the responsibility of the owner to protect the floor. 6. Always wear athletic shoes for home... intended for foot protection while exercising. 10. Always make sure that does not use of the weight carriage or barbell. 15. The weight bench is used . 2. Do not put the weight bench in a controlled manner; Replace any time while exercising, stop immediately and make sure the backrest bracket is ...
English Manual
Page 4
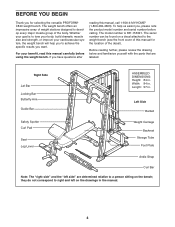
... 4 BEFORE YOU BEGIN Thank you for the location of the decal). The weight bench offers an impressive array of weight stations designed to the weight bench (see the front cover of the body. Before reading further, please review ...the drawing below and familiarize yourself with the parts that are determined relative to a person sitting on a decal attached to develop every major muscle group of this manual for selecting the versatile PROFORM® C840 weight bench...
... 4 BEFORE YOU BEGIN Thank you for the location of the decal). The weight bench offers an impressive array of weight stations designed to the weight bench (see the front cover of the body. Before reading further, please review ...the drawing below and familiarize yourself with the parts that are determined relative to a person sitting on a decal attached to develop every major muscle group of this manual for selecting the versatile PROFORM® C840 weight bench...

English Manual
Page 5
... (1) with two M10 x 92mm Carriage Bolts (111) and two M10 Nylon Locknuts (97). Most people find that the weight bench can be assembled successfully by setting aside plenty of time, assembly will be pre-assembled. 1 1 Attach a Base Cap (47) to the Stabilizer (2) with...8226; One standard screwdriver • One Phillips screwdriver • Lubricant, such as shown in the drawings. • Place all parts as you assemble the weight bench, make sure you have a socket set, a set of open-end or closed-end wrenches, or a set of the packing materials until assembly is designed...
... (1) with two M10 x 92mm Carriage Bolts (111) and two M10 Nylon Locknuts (97). Most people find that the weight bench can be assembled successfully by setting aside plenty of time, assembly will be pre-assembled. 1 1 Attach a Base Cap (47) to the Stabilizer (2) with...8226; One standard screwdriver • One Phillips screwdriver • Lubricant, such as shown in the drawings. • Place all parts as you assemble the weight bench, make sure you have a socket set, a set of open-end or closed-end wrenches, or a set of the packing materials until assembly is designed...
English Manual
Page 6
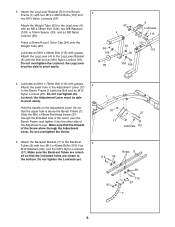
... the threads of the Screw show through the indicated side of the Lever, over the Bench Frame, and tighten it into the other side of the Adjustment Lever. Press a 25mm Round Outer Cap (94) onto the Weight Tube (25). Hold the handle on the Adjustment Lever (11) so that the indicated ...holes are orient- Make sure the Backrest Tubes are closer to the Bench Frame (1) with grease. Do not overtighten the Screw. 1 97 11 27 Lubricate...
... the threads of the Screw show through the indicated side of the Lever, over the Bench Frame, and tighten it into the other side of the Adjustment Lever. Press a 25mm Round Outer Cap (94) onto the Weight Tube (25). Hold the handle on the Adjustment Lever (11) so that the indicated ...holes are orient- Make sure the Backrest Tubes are closer to the Bench Frame (1) with grease. Do not overtighten the Screw. 1 97 11 27 Lubricate...
English Manual
Page 18
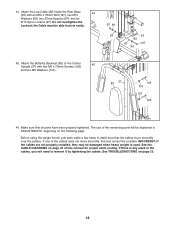
... manual for proper cable routing. IMPORTANT: If the cables are not properly installed, they may be damaged when heavy weight is any slack in ADJUSTMENTS, beginning on page 23. 18 Before using the weight bench, pull each cable a few times to remove it by tightening the cables. See TROUBLESHOOTING on the following page...
... manual for proper cable routing. IMPORTANT: If the cables are not properly installed, they may be damaged when heavy weight is any slack in ADJUSTMENTS, beginning on page 23. 18 Before using the weight bench, pull each cable a few times to remove it by tightening the cables. See TROUBLESHOOTING on the following page...
English Manual
Page 19
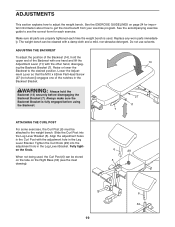
...Bracket (7). Fully tighten the Knob. See the EXERCISE GUIDELINES on the Right Base (34) (see the correct form for important information about how to the weight bench. See the accompanying exercise guide to see the inset drawing). 6 29 5 6 34 19 When not being used . Make sure all parts are ... damp cloth and a mild, non-abrasive detergent. Align the adjustment holes in the Leg Lever Bracket. Raise or lower the Backrest to adjust the weight bench. ment Lever so that the M10 x 62mm Flat Head Screw (27 [not shown]) engages one hand and lift the Adjustment Lever (11) with ...
...Bracket (7). Fully tighten the Knob. See the EXERCISE GUIDELINES on the Right Base (34) (see the correct form for important information about how to the weight bench. See the accompanying exercise guide to see the inset drawing). 6 29 5 6 34 19 When not being used . Make sure all parts are ... damp cloth and a mild, non-abrasive detergent. Align the adjustment holes in the Leg Lever Bracket. Raise or lower the Backrest to adjust the weight bench. ment Lever so that the M10 x 62mm Flat Head Screw (27 [not shown]) engages one hand and lift the Adjustment Lever (11) with ...
English Manual
Page 22
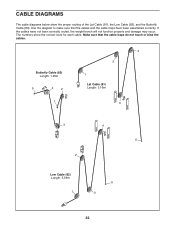
... Cable (81) Length: 3.16m 1 3 3 4 5 2 Low Cable (82) Length: 5.59m 1 5 3 22 Make sure that the cables and the cable traps have not been correctly routed, the weight bench will not function properly and damage may occur. CABLE DIAGRAMS The cable diagrams below show the correct route for each cable.
... Cable (81) Length: 3.16m 1 3 3 4 5 2 Low Cable (82) Length: 5.59m 1 5 3 22 Make sure that the cables and the cable traps have not been correctly routed, the weight bench will not function properly and damage may occur. CABLE DIAGRAMS The cable diagrams below show the correct route for each cable.
English Manual
Page 23
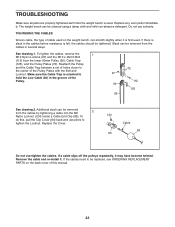
... the groove of the Pulley. 72 97 112 90 125 82 See drawing 2. TIGHTENING THE CABLES Woven cable, the type of cable used on the weight bench, can be replaced, see ORDERING REPLACEMENT PARTS on the back cover of the Pulley Plates with the Bolt and Locknut. If the cables need to... to the center of this , pull the Clip Cover (84) back and use solvents. TROUBLESHOOTING Make sure all parts are properly tightened each time the weight bench is used . To do this manual. 23 If there is slack in several ways: See drawing 1. The...
... the groove of the Pulley. 72 97 112 90 125 82 See drawing 2. TIGHTENING THE CABLES Woven cable, the type of cable used on the weight bench, can be replaced, see ORDERING REPLACEMENT PARTS on the back cover of the Pulley Plates with the Bolt and Locknut. If the cables need to... to the center of this , pull the Clip Cover (84) back and use solvents. TROUBLESHOOTING Make sure all parts are properly tightened each time the weight bench is used . To do this manual. 23 If there is slack in several ways: See drawing 1. The...
English Manual
Page 30
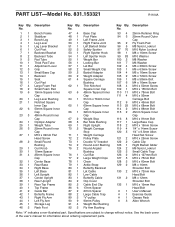
Description No. Key Qty. Description No. 1 1 Bench Frame 2 1 Stabilizer 3 1 Bench Leg 4 1 Leg Lever 5 1 Leg Lever Bracket 6 1 Curl Post 7 1 Backrest Bracket 8 2 Backrest Tube 9... Notched Square Inner Cap 22 6 50mm Square Inner Cap 23 3 48mm Round Inner Cap 24 1 Olympic Adapter 25 1 Weight Tube 26 3 25mm Round Inner Cap 27 1 M10 x 62mm Flat Head Screw 28 2 Small Round Bushing 29 1 ... 85 2 Cable End Clip 86 6 17mm Spacer 87 2 27mm Spacer 88 2 Large Cable Trap 89 2 "V"-pulley 90 9 90mm Pulley 91 4 Weight Bar Bushing 92 2 Fly Arm Bushing 93 4 94 3 95 2 96 5 97 70 98 1 99 83 100 2 101 7 102 4 103...
Description No. Key Qty. Description No. 1 1 Bench Frame 2 1 Stabilizer 3 1 Bench Leg 4 1 Leg Lever 5 1 Leg Lever Bracket 6 1 Curl Post 7 1 Backrest Bracket 8 2 Backrest Tube 9... Notched Square Inner Cap 22 6 50mm Square Inner Cap 23 3 48mm Round Inner Cap 24 1 Olympic Adapter 25 1 Weight Tube 26 3 25mm Round Inner Cap 27 1 M10 x 62mm Flat Head Screw 28 2 Small Round Bushing 29 1 ... 85 2 Cable End Clip 86 6 17mm Spacer 87 2 27mm Spacer 88 2 Large Cable Trap 89 2 "V"-pulley 90 9 90mm Pulley 91 4 Weight Bar Bushing 92 2 Fly Arm Bushing 93 4 94 3 95 2 96 5 97 70 98 1 99 83 100 2 101 7 102 4 103...
English Manual
Page 33
...., Dept 817WA, Hoffman Estates, IL 60179 Part No. 221117 R1104A Printed in this WEIGHT BENCH EXERCISER, contact the nearest Sears Service Center throughout the United States and Sears will repair or replace the WEIGHT BENCH EXERCISER, free of charge. FULL 90-DAY WARRANTY For 90 days from state to defect... in material or workmanship in China © 2004 Sears, Roebuck and Co. This warranty does not apply when the WEIGHT BENCH EXERCISER is used commercially or ...
...., Dept 817WA, Hoffman Estates, IL 60179 Part No. 221117 R1104A Printed in this WEIGHT BENCH EXERCISER, contact the nearest Sears Service Center throughout the United States and Sears will repair or replace the WEIGHT BENCH EXERCISER, free of charge. FULL 90-DAY WARRANTY For 90 days from state to defect... in material or workmanship in China © 2004 Sears, Roebuck and Co. This warranty does not apply when the WEIGHT BENCH EXERCISER is used commercially or ...


