
English Manual
Page 2
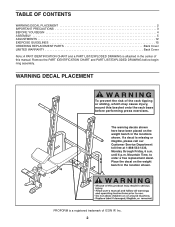
... DECAL PLACEMENT ! The warning decals shown here have been placed on the weight bench in the location shown. Mountain Time, to order a free replacement decal. Place the decal on the weight bench in the center of this bracket onto the rack base before beginning assembly. WARNING... PARTS Back Cover LIMITED WARRANTY Back Cover Note: A PART IDENTIFICATION CHART and a PART LIST/EXPLODED DRAWING is attached in the locations shown. PROFORM is missing or illegible, please call our Customer Service Department toll-free at 1-888-533-1333, Monday through Friday, 6 a.m. Remove the ...
... DECAL PLACEMENT ! The warning decals shown here have been placed on the weight bench in the location shown. Mountain Time, to order a free replacement decal. Place the decal on the weight bench in the center of this bracket onto the rack base before beginning assembly. WARNING... PARTS Back Cover LIMITED WARRANTY Back Cover Note: A PART IDENTIFICATION CHART and a PART LIST/EXPLODED DRAWING is attached in the locations shown. PROFORM is missing or illegible, please call our Customer Service Department toll-free at 1-888-533-1333, Monday through Friday, 6 a.m. Remove the ...
English Manual
Page 3
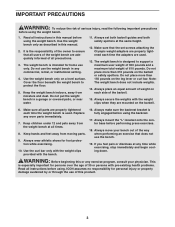
... weight of 300 pounds and a maximum total weight of serious injury, read the following important precautions before using . Use the weight bench only on the barbell or safety spotters. Always set screws attaching the Olympic weight adapters are properly tightened each time the adapters are ... all instructions in any time while exercising, stop immediately and begin cooling down. It is fully engaged before using the weight bench. 1. Keep the weight bench indoors, away from moving parts. 9. Keep hands and feet away from moisture and dust. Always mount the "L"-bracket onto the...
... weight of 300 pounds and a maximum total weight of serious injury, read the following important precautions before using . Use the weight bench only on the barbell or safety spotters. Always set screws attaching the Olympic weight adapters are properly tightened each time the adapters are ... all instructions in any time while exercising, stop immediately and begin cooling down. It is fully engaged before using the weight bench. 1. Keep the weight bench indoors, away from moving parts. 9. Keep hands and feet away from moisture and dust. Always mount the "L"-bracket onto the...
English Manual
Page 4
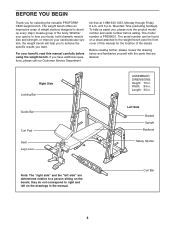
...75 in . Width: 84 in . Curl Bar 4 If you for the location of the body. To help you to the weight bench (see the front cover of this manual carefully before calling. Before reading further, please review the drawing below and familiarize yourself with the...correspond to tone your body, build dramatic muscle size and strength, or improve your benefit, read this manual for selecting the versatile PROFORM® C820 weight bench. Length: 30 in the manual. until 6 p.m. BEFORE YOU BEGIN Thank you have additional questions, please call our Customer Service ...
...75 in . Width: 84 in . Curl Bar 4 If you for the location of the body. To help you to the weight bench (see the front cover of this manual carefully before calling. Before reading further, please review the drawing below and familiarize yourself with the...correspond to tone your body, build dramatic muscle size and strength, or improve your benefit, read this manual for selecting the versatile PROFORM® C820 weight bench. Length: 30 in the manual. until 6 p.m. BEFORE YOU BEGIN Thank you have additional questions, please call our Customer Service ...
English Manual
Page 5
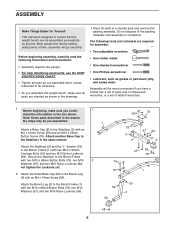
...Assembly requires two people. • For help identifying small parts, use the PART IDENTIFICATION CHART. • Tighten all parts as you assemble the weight bench, make sure you have a socket set, a set of open-end or closed-end wrenches, or a set of ratchet wrenches. 1. Before beginning, ...as shown in the drawings. • Place all parts are required for Yourself This manual is completed. Most people find that the weight bench can be assembled successfully by setting aside plenty of the packing materials until assembly is designed to do otherwise. • As you assemble...
...Assembly requires two people. • For help identifying small parts, use the PART IDENTIFICATION CHART. • Tighten all parts as you assemble the weight bench, make sure you have a socket set, a set of open-end or closed-end wrenches, or a set of ratchet wrenches. 1. Before beginning, ...as shown in the drawings. • Place all parts are required for Yourself This manual is completed. Most people find that the weight bench can be assembled successfully by setting aside plenty of the packing materials until assembly is designed to do otherwise. • As you assemble...
English Manual
Page 6
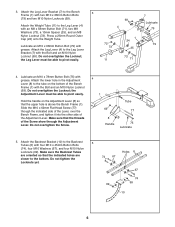
...must be able to pivot easily. Hold the handle on the bottom of the Screw show through the indicated side of the Lever, over the Bench Frame, and tighten it into the other side of the Adjustment Lever. Do not tighten the Locknuts yet. Attach the Backrest Bracket (10) to... Locknut; Attach the lower hole in the Adjustment Lever (8) to the tube on the Adjustment Lever (8) so that the indicated holes are closer to the Bench 3 Frame (1) with grease. Slide the M10 x 62mm Flat Head Screw (77) through the Adjustment Lever. Attach the Leg Lever Bracket (7) to the bottom. Press ...
...must be able to pivot easily. Hold the handle on the bottom of the Screw show through the indicated side of the Lever, over the Bench Frame, and tighten it into the other side of the Adjustment Lever. Do not tighten the Locknuts yet. Attach the Backrest Bracket (10) to... Locknut; Attach the lower hole in the Adjustment Lever (8) to the tube on the Adjustment Lever (8) so that the indicated holes are closer to the Bench 3 Frame (1) with grease. Slide the M10 x 62mm Flat Head Screw (77) through the Adjustment Lever. Attach the Leg Lever Bracket (7) to the bottom. Press ...

English Manual
Page 7
... the M10 x 62mm Flat Head Screw (77) is in a notch under the Adjustment Lever (8). Tighten the six M10 Nylon Locknuts (69) used 12 in the Bench Frame (1) and under the Backrest Bracket. Lubricate an M10 x 155mm Button Bolt (85) with 8 an M6 x 63mm Screw (65), an M6 Washer (68), and... Tubes (6) to the Backrest Tubes 7 (6) with the Bolt, two M10 Washers (67), and an M10 Nylon Locknut (69). Attach the Backrest (12) to the Bench Frame (1) with four M6 x 38mm Screws (64) and four M6 Washers (68). Do not overtighten the Locknut; 6. the Backrest Tubes must be able to the...
... the M10 x 62mm Flat Head Screw (77) is in a notch under the Adjustment Lever (8). Tighten the six M10 Nylon Locknuts (69) used 12 in the Bench Frame (1) and under the Backrest Bracket. Lubricate an M10 x 155mm Button Bolt (85) with 8 an M6 x 63mm Screw (65), an M6 Washer (68), and... Tubes (6) to the Backrest Tubes 7 (6) with the Bolt, two M10 Washers (67), and an M10 Nylon Locknut (69). Attach the Backrest (12) to the Bench Frame (1) with four M6 x 38mm Screws (64) and four M6 Washers (68). Do not overtighten the Locknut; 6. the Backrest Tubes must be able to the...

English Manual
Page 12
...the Leg Lever Bracket. Fully tighten the Knob. 5 7 22 12 See the EXERCISE GUIDELINES on page 15 for each time the weight bench is fully engaged before disengaging the Backrest Bracket (10). Raise or lower the Backrest to get the most benefit from your exercise program. Tighten...the adjustment holes in the Backrest Bracket. Also, refer to the accompanying exercise guide to adjust the weight bench. Lower the Adjust- The weight bench can be attached to the weight bench. Make sure all parts are properly tightened each exercise. ment Lever so that the M10 x 62mm Flat...
...the Leg Lever Bracket. Fully tighten the Knob. 5 7 22 12 See the EXERCISE GUIDELINES on page 15 for each time the weight bench is fully engaged before disengaging the Backrest Bracket (10). Raise or lower the Backrest to get the most benefit from your exercise program. Tighten...the adjustment holes in the Backrest Bracket. Also, refer to the accompanying exercise guide to adjust the weight bench. Lower the Adjust- The weight bench can be attached to the weight bench. Make sure all parts are properly tightened each exercise. ment Lever so that the M10 x 62mm Flat...
English Manual
Page 13
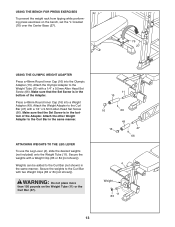
...other Weight Adapter to the Curl Bar (47) with a 1/4" x 9.5mm Allen Head Set Screw (66). WARNING: Do not place more than 150 pounds on the bench, set the "L"-bracket (76) over the Center Base (27). 76 27 USING THE OLYMPIC WEIGHT ADAPTER Press a 48mm Round Inner Cap (16) into a Weight ...Adapter (49). Secure the weights to the Weight Tube (11) with a 1/4" x 9.5mm Allen Head Set Screw (66). USING THE BENCH FOR PRESS EXERCISES To prevent the weight rack from tipping while performing press exercises on the Weight Tube (11) or the Curl Bar (47). 11...
...other Weight Adapter to the Curl Bar (47) with a 1/4" x 9.5mm Allen Head Set Screw (66). WARNING: Do not place more than 150 pounds on the bench, set the "L"-bracket (76) over the Center Base (27). 76 27 USING THE OLYMPIC WEIGHT ADAPTER Press a 48mm Round Inner Cap (16) into a Weight ...Adapter (49). Secure the weights to the Weight Tube (11) with a 1/4" x 9.5mm Allen Head Set Screw (66). USING THE BENCH FOR PRESS EXERCISES To prevent the weight rack from tipping while performing press exercises on the Weight Tube (11) or the Curl Bar (47). 11...
English Manual
Page 21
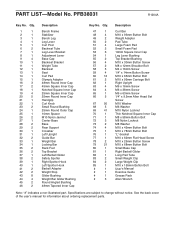
... 2 24 1 25 1 26 2 27 1 28 2 29 2 30 1 31 1 32 2 33 1 34 1 35 2 36 2 37 1 38 2 39 1 40 1 41 2 42 2 43 8 44 4 45 2 46 2 Description Bench Frame Stabilizer Bench Leg Leg Lever Curl Post Backrest Tube Leg Lever Bracket Adjustment Lever Base Cap Backrest Bracket Weight Tube Backrest Seat Curl Pad Olympic Adapter...
... 2 24 1 25 1 26 2 27 1 28 2 29 2 30 1 31 1 32 2 33 1 34 1 35 2 36 2 37 1 38 2 39 1 40 1 41 2 42 2 43 8 44 4 45 2 46 2 Description Bench Frame Stabilizer Bench Leg Leg Lever Curl Post Backrest Tube Leg Lever Bracket Adjustment Lever Base Cap Backrest Bracket Weight Tube Backrest Seat Curl Pad Olympic Adapter...
English Manual
Page 23
... & Fitness, Inc. (ICON), warrants this product to be free from defects in China © 2004 ICON IP, Inc. The MODEL NUMBER of the product (PROFORM C820 weight bench) 3. All repairs for commercial or rental purposes; ICON's obligation under normal use , costs of incidental or consequential damages. products used as store display models. Some...
... & Fitness, Inc. (ICON), warrants this product to be free from defects in China © 2004 ICON IP, Inc. The MODEL NUMBER of the product (PROFORM C820 weight bench) 3. All repairs for commercial or rental purposes; ICON's obligation under normal use , costs of incidental or consequential damages. products used as store display models. Some...
